James Smith would like to see only the records for the Radio, TV, & Film Club, a club that he personally sponsors. To display the records he wants to see, use the Filter By Selection command, which retrieves only the records that contain the value in the selected field. The records in the table that do not contain the value in the selected field are removed from view.
| |
1. | In the Club Affiliation field, click in any record that contains Radio, TV, & Film Club. On the Table Datasheet toolbar, click the Filter by Selection button  , and then compare your screen with Figure 2.4. , and then compare your screen with Figure 2.4.
Figure 2.4.
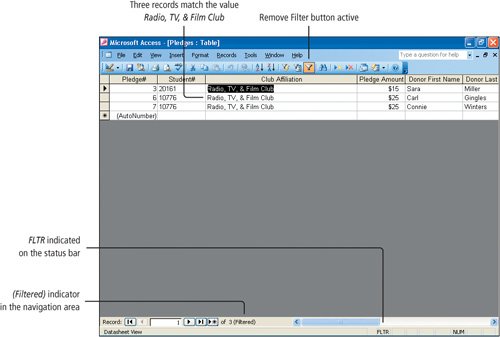
Three records display that match the value Radio, TV, & Film Club. At the bottom of the window, in the navigation area, (Filtered) displays next to the number of records, and on the status bar, FLTR displays to indicate that a filter has been applied. On the Table Datasheet toolbar, the Remove Filter button is active, indicated by an orange background.
[Page 974]NoteApply/Remove Filter Button
On the Table Datasheet toolbar, the Apply/Remove Filter button is used to apply or remove a filter. If no filter has been created for the table the button is not activeit is dimmed. After a filter is created, this button becomes active. Because it is a toggle button used to apply or remove filters, the ScreenTip that displays for this button will alternate between Apply Filter, when a filter has been created but is not currently applied, and Remove Filter, when a filter has been applied to the table.
|
2. | On the Table Datasheet toolbar, click the Remove Filter button  to display all of the records, and notice that the Apply/Remove filter button is still active. to display all of the records, and notice that the Apply/Remove filter button is still active.
|
3. | Click the Apply Filter button to reapply the filter and display the three records that match Radio, TV, & Film Club.
|
4. | Click the Remove Filter button to redisplay all of the records. In the Pledge Amount field, locate any record with $25 and click in the field. Then on the Table Datasheet toolbar, click the Filter by Selection button .
A new filter is applied that retrieves only the records with $25 as the Pledge Amount. Nine records match this condition.
|
5. | On the Table Datasheet toolbar, click the Remove Filter button to redisplay all of the records.
|
| |
1. | On the Table Datasheet toolbar, click the Filter By Form button  and compare your screen with Figure 2.5. and compare your screen with Figure 2.5.
Figure 2.5.
(This item is displayed on page 975 in the print version)

The Filter by Form window displays in the form of your tableall the field names are includedbut without any data. In the empty row under each column heading, you can type a value or select from a list of available values. The previous filter value25still displays under Pledge Amount. Although the filter is not currently applied to the table, it is still available.
|
|
[Page 975] |
2. | On the Filter/Sort toolbar, click the Clear Grid button  to remove 25 from the Pledge Amount field. to remove 25 from the Pledge Amount field.
|
3. | Under Student#, click in the empty field box to display its list arrow, and then click the arrow. From the displayed list, click 20201. Alternatively, you can type the value if you know it, but selecting from the list is often faster. On the Filter/Sort toolbar, click the Apply Filter button .
Five records display for Student# 20201. You can see that this student collected five pledges, on behalf of two different clubs. This would be a quick way to check if all the pledges for one student had been properly recorded.
|
4. | On the Table Datasheet toolbar, click the Filter By Form button to return to the Filter by Form window.
|
5. | Click in the Club Affiliation field box to display its list arrow, click the arrow, and then from the displayed list, click Entrepreneurs of LMCC.
With two fields displaying a specific value in this window, you have created an And condition. That is, only records where both values20201 and Entrepreneurs of LMCCare present in the selected fields will display.
|
6. | On the Filter/Sort toolbar, click the Apply Filter button .
Two records match the And condition that you created. Pledge numbers 19 and 20 were both made to student #20201 for the Entrepreneurs of LMCC club.
|
7. | On the Table Datasheet toolbar, click the Filter By Form button to display the Filter by Form window, and then click the Clear Grid button .
|
|
[Page 976] |
8. | Click in the Club Affiliation field box, click the arrow, and then click Entrepreneurs of LMCC. In the lower left corner of the Filter by Form window, click the Or tab to display a new filter form. Under Club Affiliation, click the arrow, and then click International Business Student Association.
With one field (Club Affiliation) displaying two specific values in this windowon two separate tabsyou have created an Or condition.
Only records where Entrepreneurs of LMCC or International Business Student Association are present in the selected field will display.
|
9. | Click the Apply Filter button , and then compare your screen with Figure 2.6.
Figure 2.6.
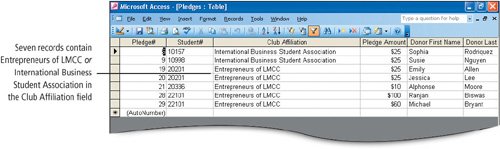
In the Club Affiliation field, a total of seven records contain either the value Entrepreneurs of LMCC or the value International Business Student Association.
|
10. | Click the Filter By Form button , and then click Clear Grid to remove all of the values from the filter form.
To permanently remove a filter, clear all of the filter values, and then apply an empty filter. All of the records will be displayed and the Apply Filter button will become inactive because there is no longer an active filter than can be applied.
|
11. | Click the Apply Filter button .
Notice that all 30 records are displayed and the Apply Filter button is no longer active.
|
12. | Close  the table window, and when prompted to save changes, click No. the table window, and when prompted to save changes, click No.
|
Access recognizes that you made changes to the table, even though you cleared the grid and re-sorted the data on its primary key. Therefore, Access prompts you to save the changes. Click No to return the data to its original conditionsorted by the primary key, and no filters.
After a filter is created, it becomes part of the table until it is replaced with another filter. If the Apply Filter button is active, it is a visual indication that a filter has been created and is still an active part of the table. To ensure that the filter does not become a permanent part of the table, do not save the table when you close it. If a filter is saved with a table, it might be applied without the individual who is using the database being aware that the data displayed is a subset of the entire table. For this reason, use filters to answer quick questions. If a filter is useful and needs to be used again, create it as a query so that it can be saved and applied to the data when necessary.
