Objective 6. Modify the Table Design

When you create a new table, you decide on the number and content of the fields in the tablerecall that this is referred to as the tables design. After you have created a table, you may find that you need to make changes to the design of the table by adding or deleting fields, or changing the order of the fields within a table. You can easily modify a table using the Table Design view.

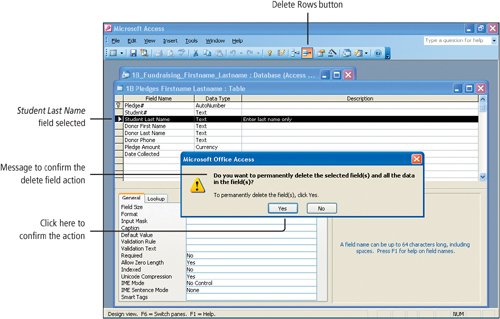
Activity 1.15. Deleting a Field

Now that you have the 1B Club Members table, you can see that the students last name does not need to be in the 1B Pledges tablethe students name is related to the student, not to the pledge. In the 1B Pledges table, having the Student# is sufficient for identifying which student is responsible for any single pledge.

1.

In the Database window, click your 1B Pledges table to select it, and then in the Database Window toolbar, click Design to open the table in Design view.

2.

In the Table Design view, next to the Student Last Name field, click in the row selector box to selecthighlight in blackthe row. Then, on the Table Design toolbar, click the Delete Rows button and compare your screen with Figure 1.35.

Figure 1.35.
(This item is displayed on page 905 in the print version)


If the field is deleted, both the field and its data will be deleted; you cannot undo this action. If you change your mind after deleting the field, you will have to add the field back into the table and then reenter the data for that field in each record.


[Page 905]

3.

Click Yes to confirm the delete action, and then, on your 1B Pledges table title bar, click the Close button . When prompted, click Yes to save the changes you have made to the tables design.

4.

In the Database window, point to your 1B Club Members table and right-click. From the displayed shortcut menu, click Design View, which is another way to open a table in Design view.

5.

In the Design view, use the technique you just practiced to delete the Club Affiliation field. Close your 1B Club Members table and click Yes when prompted to save the changes.

Because the fundraising event includes a competition among the participating clubs at the college to see which club can raise the most money, for the purpose of this database, the Club Affiliation must be associated with the pledge data. Students can belong to more than one club and may accept pledges for multiple club affiliations. Therefore, the Club Affiliation was removed from the 1B Club Members table. In the next activity, you will add the Club Affiliation to the 1B Pledges table.

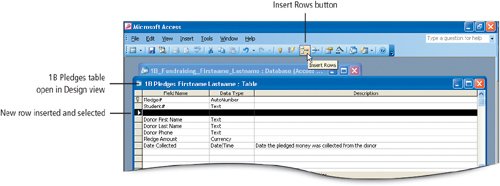
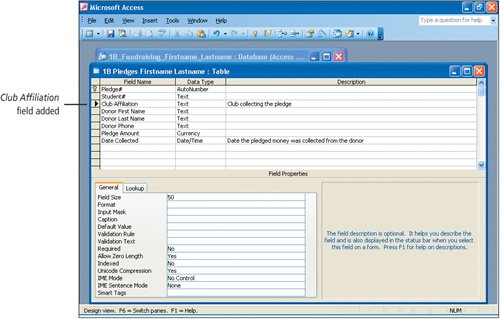
Activity 1.16. Adding a Field

The club affiliation must be added to the 1B Pledges table so that a donation made can be recorded for a specific club. In the previous activity, you removed the Club Affiliation field from the 1B Club Members table. In this activity, you will add the Club Affiliation field to the 1B Pledges table. In this database, the Club Affiliation is related to the pledge that is made.


[Page 906]

1.

Open your 1B Pledges table in Design view. Select the row containing the Donor First Name field, and then on the Table Design toolbar, click the Insert Rows button to add an empty row before the Donor First Name field. Compare your screen with Figure 1.36.

Figure 1.36.


2.

Click in the Field Name box of the newly inserted row, type Club Affiliation and then press twice. In the Description column, type Club collecting the pledge Compare your screen with Figure 1.37.

Figure 1.37.


[Page 907]

3.

On the Table Design toolbar, click the View button to switch to Datasheet view.

A message box displays advising you that you must first save the table. When you make design changes to your table, you must first save the table before you can view the datasheet. If you forget to save your changes, Access will remind you.

4.

Click Yes to save the changes you made to the design of the table and display the table in Datasheet view.

5.

Click in the first empty Club Affiliation fieldfor Student# 10157and type Accounting Student Association

6.

Press to move to the next open field, and for Student# 22055 type Student Vocational Nursing Association

7.

Continue in this manner to enter the club affiliation for the next three records:

Entrepreneurs of LMCC for Student# 22101

Culinary Arts Club for Student# 11432

Entrepreneurs of LMCC for Student# 22101

8.

On your 1B Pledges table title bar, click the Close button .

Recall that changes to a record are saved as soon as another record is selected or when the table is closed.


[Page 907 (continued)]

Windows XP

Outlook 2003

Internet Explorer

Computer Concepts

Word 2003

Chapter One. Creating Documents with Microsoft Word 2003

Chapter Two. Formatting and Organizing Text

Chapter Three. Using Graphics and Tables

Chapter Four. Using Special Document Formats, Columns, and Mail Merge

Excel 2003

Chapter One. Creating a Worksheet and Charting Data

Chapter Two. Designing Effective Worksheets

Chapter Three. Using Functions and Data Tables

Access 2003

Chapter One. Getting Started with Access Databases and Tables

Chapter Two. Sort, Filter, and Query a Database

Chapter Three. Forms and Reports

Powerpoint 2003

Chapter One. Getting Started with PowerPoint 2003

Chapter Two. Creating a Presentation

Chapter Three. Formatting a Presentation

Integrated Projects

Chapter One. Using Access Data with Other Office Applications

Chapter Two. Using Tables in Word and Excel

Chapter Three. Using Excel as a Data Source in a Mail Merge

Chapter Four. Linking Data in Office Documents

Chapter Five. Creating Presentation Content from Office Documents


Go! With Microsoft Office 2003 Brief
GO! with Microsoft Office 2003 Brief (2nd Edition)
ISBN: 0131878646
EAN: 2147483647
Year: 2004
Pages: 448

Flylib.com © 2008-2020.
If you may any questions please contact us: flylib@qtcs.net