Objective 1. Create a Presentation
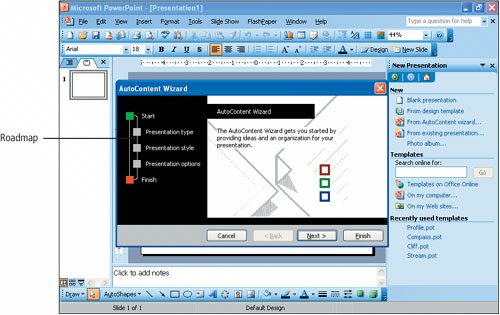
In the following activities, you will create a new presentation using the AutoContent Wizard. The AutoContent Wizard is a feature that leads you step by step through the creation of a presentation by asking you questions about the presentation that you want to create. You will also create new slides and insert slides from an existing presentation.
Activity 2.1. Creating a Presentation Using the AutoContent Wizard
In this activity, you will create a presentation using the AutoContent Wizard. You will edit the content of several slides and delete several that are unnecessary to the presentation.
Activity 2.2. Modifying AutoContent Presentation Text
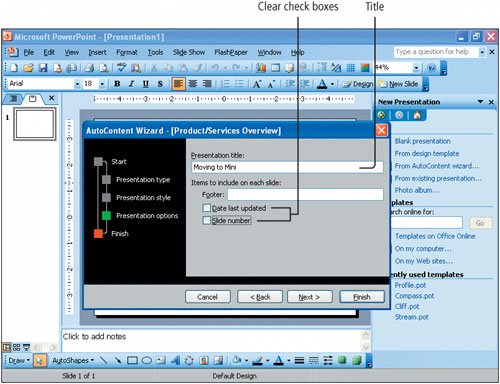
In this activity, you will modify the text in your presentation according to the suggestions in your AutoContent presentation.
1. | If necessary, display the presentation Outline by moving to the View |
2. | Look at the status bar and notice that this presentation contains seven slides. In the vertical scroll bar, use the Next Slide button |
3. | The text Your Logo Here displays in the upper left corner of Slide 1 in the Slide pane. Click anywhere in the text Your Logo Here to activate the placeholder. |
4. | Point to the text Your Logo Here, press and hold down |
5. | Type El Cuero Specialty Wares and notice that Your Logo Here is deleted as you type the text. Do not be concerned if the text extends outside the boundaries of the placeholder. |
6. | If necessary, select and delete the text in the subtitle placeholder and type Marketing and the Teenage Customer to create a subtitle for the slide. Compare your slide with Figure 2.5. Figure 2.5.
|
7. | Display Slide 2. |
8. | Move your pointer into the Outline pane and point to the title of Slide 2Overview. Double-click to select the word Overview or drag to select the word. Type New Teen Line to create a new title for Slide 2. |
9. | In the Outline pane on Slide 2, point to the first bullet so that the four-headed arrow displays, and then click the left mouse button to select the entire first bullet point. |
10. | With the first bullet point selected, press and hold down |
11. | On your keyboard, press |
12. | Type the text in the outline in Figure 2.6, demoting and promoting text as necessary. Recall that on the Formatting toolbar, the Increase Indent Figure 2.6.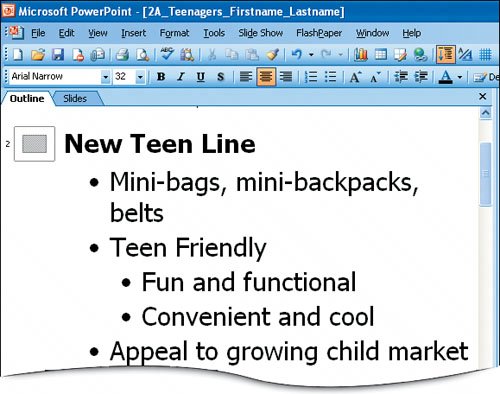
|
13. | Display Slide 5. Delete the bulleted text on this slide and type the text in Figure 2.7. Save Figure 2.7.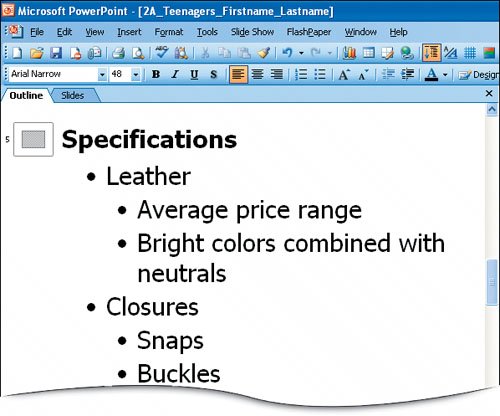
|
14. | Several of the slides generated by the AutoContent Wizard are not necessary in this presentation. Recall that you can delete slides using Slide Sorter View. Click Slide Sorter View |
15. | Click Slide 4 so that a border surrounds it, indicating that it is selected. Press and hold down |
16. | With Slides 4, 6, and 7 selected, press |
17. | Double-click Slide 1 to display the slide in Normal view. Alternatively, click Normal View and then display Slide 1. |
18. | On the Standard toolbar, click Save |
Activity 2.3. Inserting Slides from an Existing Presentation
Teamwork is an important aspect of all organizations, and presentations are often shared among employees. Another employee may create several slides for a presentation that you are developing. Rather than recreating the slides, you can insert slides from an existing presentation into the current presentation.
In this activity, you will delete a slide from your presentation and insert two slides from an existing presentation into your 2A_Teenagers presentation. The slides you insert will become the third and fourth slides in the presentation.
1. | Display Slide 3. |
2. | On the menu bar, click Insert, and then click Slides from Files. In the Slide Finder dialog box, click the Find Presentation tab, and then click the Browse button. Navigate to your student files, and then double-click the file name p02A_Content. Alternatively, you can click the file name p02A_Content and then click Open. Figure 2.8.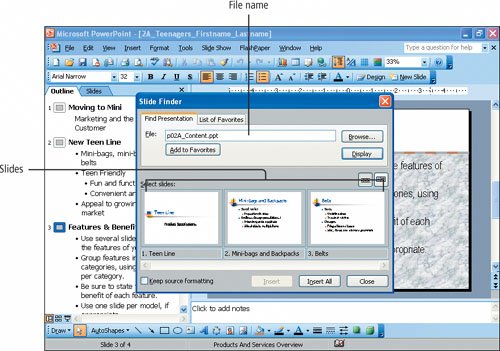
|
3. | Under Select slides, click Slides 1, 2, and 3. Notice that each slide is selected, indicated by the border surrounding each slide. |
4. | If necessary, clear the Keep source formatting check box at the lower left corner. |
5. | Click Slide 1 again and notice that the slide is no longer selected. In the lower center of the dialog box, click the Insert button. |
6. | In the displayed Slide Finder dialog box, click the Close button. |
7. | Display Slide 3. On the Edit menu, click Delete Slide to delete Slide 3. |
8. | Save |
NoteInserting All Slides
To insert all of the slides from a presentation displayed in the Slide Finder dialog box, click the Insert All button.
Activity 2.4. Inserting a New Slide
You can insert a new slide into a presentation using one of four techniques. You can click the New Slide button on the Formatting toolbar, you can click New Slide on the Insert menu, you can press ![]() and press
and press ![]() , or you can position the insertion point in the last placeholder on a slide and press
, or you can position the insertion point in the last placeholder on a slide and press ![]() and press
and press ![]() . In this activity, you will use the New Slide button to insert a new, sixth slide.
. In this activity, you will use the New Slide button to insert a new, sixth slide.
1. | Display Slide 5 so that you can create a new Slide 6. On the Formatting toolbar, click the New Slide button |
2. | Under Text Layouts, in the second row, click Title and 2-Column |
3. | Click in the title placeholder and type Product Distribution Timelines |
4. | Click in the text placeholder on the left side of the slide. Type Test market in February and then press |
5. | Click in the text placeholder on the right side of the slide. Type Orders shipped out of San Diego and then press Figure 2.9.
|
6. | Save |

|
Windows XP
Outlook 2003
Internet Explorer
Computer Concepts
Word 2003 Chapter One. Creating Documents with Microsoft Word 2003
Chapter Two. Formatting and Organizing Text
Chapter Three. Using Graphics and Tables
Chapter Four. Using Special Document Formats, Columns, and Mail Merge
Excel 2003 Chapter One. Creating a Worksheet and Charting Data
Chapter Two. Designing Effective Worksheets
Chapter Three. Using Functions and Data Tables
Access 2003 Chapter One. Getting Started with Access Databases and Tables
Chapter Two. Sort, Filter, and Query a Database
Chapter Three. Forms and Reports
Powerpoint 2003 Chapter One. Getting Started with PowerPoint 2003
Chapter Two. Creating a Presentation
Chapter Three. Formatting a Presentation
Integrated Projects Chapter One. Using Access Data with Other Office Applications
Chapter Two. Using Tables in Word and Excel
Chapter Three. Using Excel as a Data Source in a Mail Merge
Chapter Four. Linking Data in Office Documents
Chapter Five. Creating Presentation Content from Office Documents GO! with Microsoft Office 2003 Brief (2nd Edition) ISBN: 0131878646
EAN: 2147483647 Year: 2004
Pages: 448
Flylib.com © 2008-2020. If you may any questions please contact us: flylib@qtcs.net 
|