Objective 11. Use the Access Help System
Mastery Assessments
Project 1I. Computer Inventory
Objectives: 3. Create a New Database; 4. Create a New Table; 5. Add Records to a Table; 7. Create Table Relationships; 9. Print a Table; 10. Close and Save a Database.
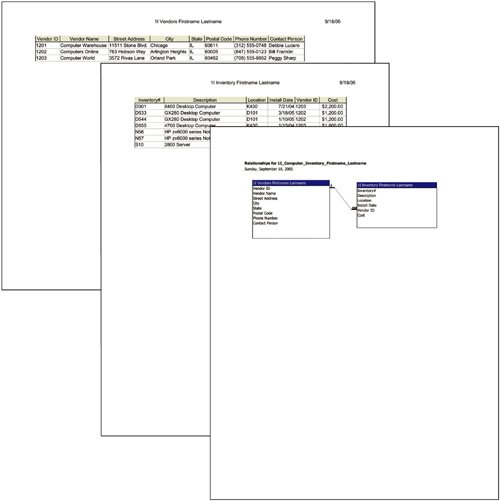
In the following Mastery Assessment, you will create a new database to track data related to computer inventory for Lake Michigan City College. The Vendors table will keep track of information about the vendors the college uses for computer purchases. The Inventory table will record the computers, their locations, when they were put into service, and the vendor number for the company from which the computer was purchased. Your completed tables will look like the ones shown in Figure 1.61.
Figure 1.61.
For Project 1I, you will need the following file: |
New Access database |
You will save your database as
1I_Computer_Inventory_Firstname_Lastname
1. | Start Access. Create a new database and store it in your chapter folder as 1I_Computer_Inventory_Firstname_Lastname | ||||||||||||||||||||||||||||||||||||||||||||||||
2. | Use the following information to create a new table to store data about the vendors used by the college for computer purchases, and use 50 as the text field size unless otherwise specified.
| ||||||||||||||||||||||||||||||||||||||||||||||||
3. | Set the Vendor ID as the primary key for this table. Save the table as 1I Vendors Firstname Lastname Switch to Datasheet view and add the following records to the table.
| ||||||||||||||||||||||||||||||||||||||||||||||||
4. | Resize all of the columns to accommodate their data and column headings. If you are submitting printed pages, display the Page Setup dialog box, change the page orientation to Landscape, and then print the table. Close the table, saving the changes to the layout. | ||||||||||||||||||||||||||||||||||||||||||||||||
5. | Create a second table with the following fields to record the information about the computers that have been purchased by the college.
| ||||||||||||||||||||||||||||||||||||||||||||||||
6. | Set Inventory# as the primary key. Save the table as 1I Inventory Firstname Lastname | ||||||||||||||||||||||||||||||||||||||||||||||||
7. | Populate the table with the following records:
| ||||||||||||||||||||||||||||||||||||||||||||||||
8. | Resize all of the column widths to accommodate their data and column headings. Switch to Design view, and then redisplay the Datasheet viewthis will sort the records by primary key. If you are submitting printed pages, preview and print the table. Close the table, saving the changes to the layout. | ||||||||||||||||||||||||||||||||||||||||||||||||
9. | Create a relationship between the two tables based on the Vendor ID field and enforce referential integrity. Place the field list with the one side of the relationship on the left, and then expand and arrange both field lists to display all the fields and the entire table name. Create the Relationships report. If you are submitting printed pages, print the Relationships report. Save the report with the default name. Save the layout of the Relationships window. | ||||||||||||||||||||||||||||||||||||||||||||||||
10. | Close the database and close Access. |
End | You have completed Project 1I |
Project 1J. Students
Objectives: 1. Rename a Database; 2. Start Access, Open an Existing Database, and View Database Objects; 4. Create a New Table; 6. Modify the Table Design; 7. Create Table Relationships; 8. Find and Edit Records in a Table; 9. Print a Table; 10. Close and Save a Database.
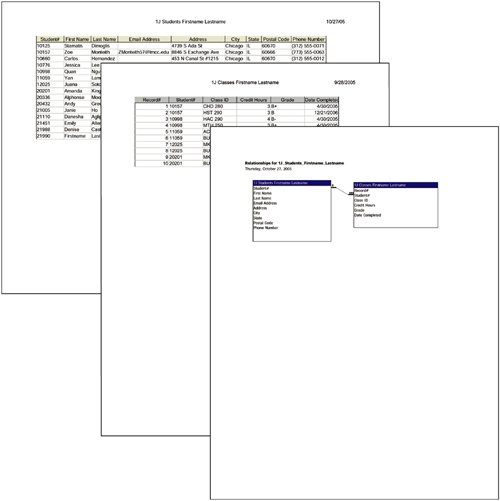
In the following Mastery Assessment, you will open and edit an existing database that stores student information at Lake Michigan City College. Then you will add another table to store records about the classes taken by specific students. The Student ID number will be used to create a relationship between the Student table and the Classes table. By using two tables, you do not have to repeat all of the student information each time a class is completed. Your completed database objects will look like the ones shown in Figure 1.62.
Figure 1.62.
For Project 1J, you will need the following file: |
a01J_Students |
You will save your database as
1J_Students_Firstname_Lastname
1. | Open My Computer, and then from the student files that accompany this textbook, locate the file a01J_Students and copy it to your chapter folder. Rename the file 1J_Students_Firstname_Lastname Start Access and open the file you just renamed. | |||||||||||||||||||||||||||||||||||||||||||||||||||||||
2. | Point to the Students table, right-click, click Rename, type 1J Students Firstname Lastname and press | |||||||||||||||||||||||||||||||||||||||||||||||||||||||
3. | In Design view, following the Last Name field, add Email Address as a new field and accept Text as the Data Type. Add the following email addresses:
| |||||||||||||||||||||||||||||||||||||||||||||||||||||||
4. | Using your own name, add a new record, and for the email address, use the same pattern as the other student email addresses:
| |||||||||||||||||||||||||||||||||||||||||||||||||||||||
5. | Adjust the column widths to accommodate the longest entry. If you are submitting printed pages, change the print orientation to Landscape and then print the table. Save the changes to the table layout and then close it. | |||||||||||||||||||||||||||||||||||||||||||||||||||||||
6. | Create a new table with the following fields that will store records for classes that students have taken.
| |||||||||||||||||||||||||||||||||||||||||||||||||||||||
7. | Set Record# as the primary key field and save the table with the name 1J Classes Firstname Lastname | |||||||||||||||||||||||||||||||||||||||||||||||||||||||
8. | Create a one-to-many relationship between the tables based on the Student# field, and enforce referential integrity. Place the field list with the one side of the relationship on the left and then expand and arrange the field lists to display all of the fields and the full table name. Create the Relationships report, saving it with the default name. If you are submitting printed pages, print the Relationships report. Save the layout of the Relationships window. | |||||||||||||||||||||||||||||||||||||||||||||||||||||||
9. | Populate your 1J Classes Firstname Lastname table with the following records.
| |||||||||||||||||||||||||||||||||||||||||||||||||||||||
10. | Adjust the column widths to accommodate the widest entry. If you are submitting printed pages, print the table. Close your 1J Classes table, close the database, and then close Access. |
End | You have completed Project 1J |
