Objective 3. Create a Chart in Excel

Activity 1.3. Creating a Chart in Excel

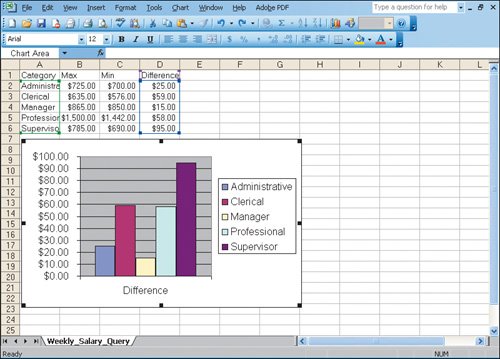
To create a chart quickly, you can use the default settings in Excel. You can also select specific cells of data from the worksheet to include in the chart. Press and hold the key when selecting multiple items.

1.

Select cells A1 through A6. Press and hold the key, and then select cells D1 through D6. You should have two nonadjacent areas of shaded selected cells.

Because you include the cells showing column headings in your selection, these labels will also appear on your chart.

2.

On the Insert menu, click Chart. In the Chart dialog box, click Finish.

This creates a chart with the default choices, a column chart on the current sheet, with a legend. The Chart Area is the background area of the chart object that has no other chart content. When you point to the Chart Area using the mouse, a ScreenTip appears that shows the name Chart Area.


[Page 1349]

3.

On the Chart Area, right-click, and then click Source Data. Click Rows, and then click OK.

This creates a data set and legend items based on each row instead of each column. When you create charts, you will select rows or columns based on how you need to present the data.

Excel displays the chart along with the other information on the worksheet. You can move and position the chart on the sheet by clicking in the Chart Area and then dragging the chart to a new position. You can also size the chart using its sizing handles.

4.

At the lower right corner of the chart object, drag the sizing handle to size the chart larger to the right and down a bit, making it larger and easier to read. Click in the Chart Area and Move the chart to the left side of the screen, under the cells.

Compare your screen with Figure 1.3.

Figure 1.3.


5.

Save your file. Leave your Excel file open for use later.


[Page 1349 (continued)]

Windows XP

Outlook 2003

Internet Explorer

Computer Concepts

Word 2003

Chapter One. Creating Documents with Microsoft Word 2003

Chapter Two. Formatting and Organizing Text

Chapter Three. Using Graphics and Tables

Chapter Four. Using Special Document Formats, Columns, and Mail Merge

Excel 2003

Chapter One. Creating a Worksheet and Charting Data

Chapter Two. Designing Effective Worksheets

Chapter Three. Using Functions and Data Tables

Access 2003

Chapter One. Getting Started with Access Databases and Tables

Chapter Two. Sort, Filter, and Query a Database

Chapter Three. Forms and Reports

Powerpoint 2003

Chapter One. Getting Started with PowerPoint 2003

Chapter Two. Creating a Presentation

Chapter Three. Formatting a Presentation

Integrated Projects

Chapter One. Using Access Data with Other Office Applications

Chapter Two. Using Tables in Word and Excel

Chapter Three. Using Excel as a Data Source in a Mail Merge

Chapter Four. Linking Data in Office Documents

Chapter Five. Creating Presentation Content from Office Documents


Go! With Microsoft Office 2003 Brief
GO! with Microsoft Office 2003 Brief (2nd Edition)
ISBN: 0131878646
EAN: 2147483647
Year: 2004
Pages: 448

Flylib.com © 2008-2020.
If you may any questions please contact us: flylib@qtcs.net