Objective 6. Specify Text Criteria in a Query

Use queries to locate information in an Access database based on criteria that you specify as part of the query. Criteria are conditions that identify the specific records you are looking for. Criteria enable you to ask a more specific question, and therefore you will get a more specific result. For example, if you want to find out which student club members live in a particular town, you could limit the results to a specific city and only records that match the specified city would display.

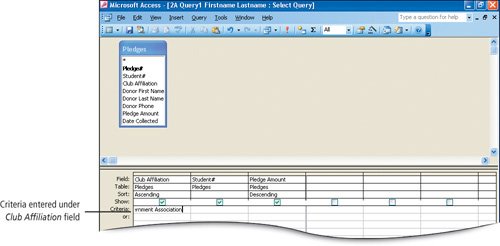
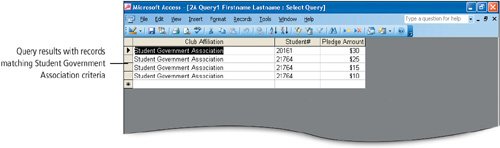
Activity 2.9. Specifying Text Criteria in a Query

In this activity, you will specify the criteria in the query so that only records in the Pledges table that have Student Government in the Club Affiliation field display. Records that indicate another club affiliation will not display. You will save the query with a new name.

1.

With your 2A Query1 open, click the View button to switch to the Design view. In the design grid, locate the Criteria row as indicated in Figure 2.17.

Figure 2.17.


The Criteria row is where you will specify the criteria that will limit the results of the query to your exact specifications.


[Page 988]

2.

In the Criteria row, under the Club Affiliation field, type Student Government Association Compare your screen with Figure 2.18.

Figure 2.18.


3.

On the Query Design toolbar, click the Run button to see the results, and then compare your screen with Figure 2.19.

Figure 2.19.


Four records display that meet the specified criteriarecords that have Student Government Association in the Club Affiliation field.

Alert!: Do Your Query Results Differ?

If you mistype the criteria, enter it under the wrong field, or make some other error, the results will not display any records. This indicates that there are no records in the table that match the criteria as you entered it. If this occurs, return to the Design view and re-examine the query design. Verify that the criteria is typed on the Criteria row, under the correct fieldClub Affiliation, and that it is spelled correctly. Then rerun the query.


[Page 989]

4.

From the File menu, click Save As.

The Save As dialog box displays. Here you can give this query a name different from the first query, and thus have both as saved queries.

5.

In the text box under Save Query 2A Query1 Firstname L. . . To: and using your own name, type 2A Student Government Pledges Firstname Lastname Click OK or press .

The query with the criteria you specified is saved and the new name displays in the title bar of the Query window.

6.

At the far right edge of the menu bar, click the Close Window button to close the query and display the name of your new query in the Database window.

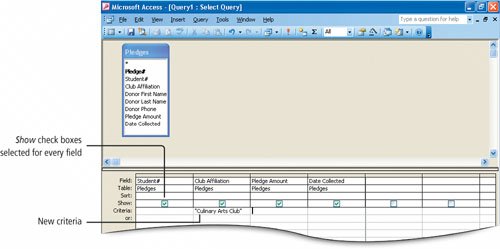
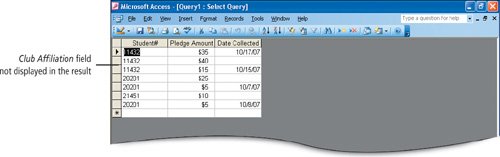
Activity 2.10. Specifying Criteria for a Field Not Displayed in the Result

So far, all of the fields that you included in the query design have also been included in the query result. It is not required to have every field in the query display in the result. In fact, there will be times when you will want to prevent some fields from displaying in the result.

For example, if you were querying your CD collection database to find out what records in the CD table were performed by a particular artist, you would need the CD Artist field in the query design, but you would not need the field to display in the query resultbecause the artist would be the same for all the records. Including the field would be redundant and not particularly useful.

1.

Be sure Queries is selected on the Objects bar, and then double-click Create query in Design view.

2.

In the displayed Show Table dialog box, double-click Pledges and then click Close. Expand the table area by dragging the border between the table area and the design grid downward. Then, expand the lower edge of the Pledges field list until all of the fields are displayed.

3.

Using any of the techniques you have practiceddouble-clicking, dragging, or displaying the list arrowadd the following fields, in the order listed, to the design grid: Student#, Club Affiliation, Pledge Amount, and Date Collected.

4.

In the Criteria row, under Club Affiliation, type Culinary Arts Club and then press . Compare your screen with Figure 2.20.

Figure 2.20.
(This item is displayed on page 990 in the print version)


When you press , the insertion point moves to the next criteria box and quote marks are added around the text you entered. The quote marks are added to text criteria to indicate to Access that this is a text stringa sequence of charactersthat must be matched.


[Page 990]

5.

On the Show row, notice that the check box is selected for every field. Then, on the Query Design toolbar, click the Run button to see the seven records that display as a result of this query. Notice that all of the records display Culinary Arts Club in the Club Affiliation column.

6.

On the Query Datasheet toolbar, click the View button to return to Design view. Under Club Affiliation, in the Show row, click to clear the check mark, and then compare your screen with Figure 2.21.

Figure 2.21.
(This item is displayed on page 991 in the print version)


[Page 991]

7.

On the Query Design toolbar, click the Run button and compare your screen with Figure 2.22.

Figure 2.22.


The query results display the same seven records but the Club Affiliation field does not display. Although the Club Affiliation field was still included in the query criteria for the purpose of identifying specific records, it is not necessary to display the field in the result.

Clear the Show check box when necessary to avoid cluttering the query results with redundant data.

8.

Leave this query open for the next activity.


[Page 992]

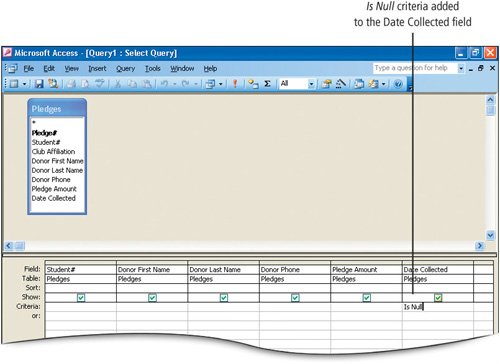
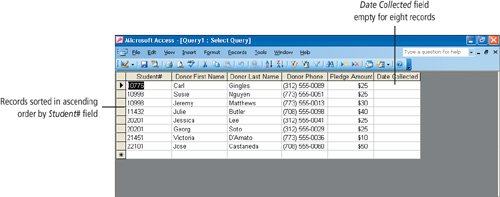
Activity 2.11. Using Is Null Criteria to Find Empty Fields

Sometimes you must locate records where specific data is missing. For example, you might want to know who has not paid their club dues for the year so you can send them a reminder notice. You can locate these records by using is nullemptyas a criteria on a Date Paid field. Additionally, you can display only the records where a value has been entered in a field by using is not null as a criteria, which will exclude records where the specified field is empty.

1.

On the Query Datasheet toolbar, click the View button to return to Design view. From the Edit menu, click Clear Grid.

The fields are cleared in the design grid. You can use this method to quickly clear the design grid to begin a new query.

NoteClearing the Design Grid

The Clear Grid button is on the Filter/Sort toolbar because filters are intended to be temporary and easily created, cleared, or replaced. Queries on the other hand are intended to be saved so that they can be applied to the data repeatedly. It would not be typical to open an existing query, clear the grid, and start over; therefore, the Clear Grid button is not included on the Query Design toolbar. If a new query is needed, it is more common to start with the blank query design window.

2.

From the Pledges field list, use one of the techniques you have practiced to add, in the order given, the following fields to the design grid: Student#, Donor First Name, Donor Last Name, Donor Phone, Pledge Amount, and Date Collected.

3.

On the Criteria row, under the Date Collected field, type Is Null and compare your screen with Figure 2.23. Alternatively, type is null and Access will change the criteria to display with capitals.

Figure 2.23.
(This item is displayed on page 993 in the print version)


The criteria Is Null examines the field and looks for records that do not have any values entered in the Date Collected field. In this manner, you can determine which pledges still need to be collected from the donors.


[Page 993]

4.

On the Sort row, click under the Student# field, click the Sort arrow, and then click Ascending. Run the query to see the results, and compare your screen with Figure 2.24.

Figure 2.24.


Eight pledges have not been collectedthe Date Collected field is empty for these pledges.


[Page 994]

5.

On the Query Datasheet toolbar, click the Save button , and then name this query 2A Uncollected Pledges Firstname Lastname and then click OK or press .


[Page 994 (continued)]

Windows XP

Outlook 2003

Internet Explorer

Computer Concepts

Word 2003

Chapter One. Creating Documents with Microsoft Word 2003

Chapter Two. Formatting and Organizing Text

Chapter Three. Using Graphics and Tables

Chapter Four. Using Special Document Formats, Columns, and Mail Merge

Excel 2003

Chapter One. Creating a Worksheet and Charting Data

Chapter Two. Designing Effective Worksheets

Chapter Three. Using Functions and Data Tables

Access 2003

Chapter One. Getting Started with Access Databases and Tables

Chapter Two. Sort, Filter, and Query a Database

Chapter Three. Forms and Reports

Powerpoint 2003

Chapter One. Getting Started with PowerPoint 2003

Chapter Two. Creating a Presentation

Chapter Three. Formatting a Presentation

Integrated Projects

Chapter One. Using Access Data with Other Office Applications

Chapter Two. Using Tables in Word and Excel

Chapter Three. Using Excel as a Data Source in a Mail Merge

Chapter Four. Linking Data in Office Documents

Chapter Five. Creating Presentation Content from Office Documents


Go! With Microsoft Office 2003 Brief
GO! with Microsoft Office 2003 Brief (2nd Edition)
ISBN: 0131878646
EAN: 2147483647
Year: 2004
Pages: 448

Flylib.com © 2008-2020.
If you may any questions please contact us: flylib@qtcs.net