For your database to be useful, you must keep its information up to date. Thus, in a database that includes records of individuals, you will need to know how to locate specific records so you can update addresses, phone numbers, and so on. To locate records quickly, Access includes the Find button on toolbars when records are displayed.
To find a record, first click in the field by which you want to search. Use the Find and Replace dialog box to locate a record, after which you can type directly in the table to change data while leaving the Find and Replace dialog box open for the next task.
1. | In the Database window, double-click your 1B Club Members table to display it in Datasheet view. Click anywhere in the Last Name field (column), and then on the Table Datasheet toolbar, click the Find button  to display the Find and Replace dialog box. to display the Find and Replace dialog box.
|
|
[Page 915] |
2. | In the Find What box, type Hill In the Match box, be sure Whole Field is indicated, click Find Next, and then compare your screen with Figure 1.44.
Figure 1.44.
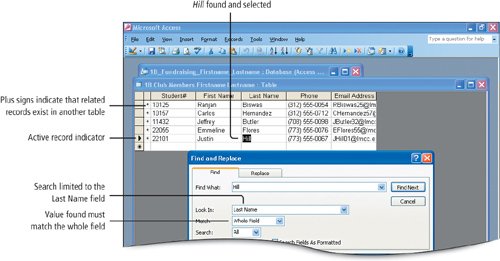
A right-pointing triangle displays in the row selector box next to the record for Justin Hill and Hill is selected in the Last Name field. The search is limited to the Last Name field because you clicked in this field before you displayed the Find and Replace dialog box.
After you create a relationship between two tables, plus signs display next to every record in the Datasheet view of the table that is the one side of the relationship, in this case the 1B Club Members table. The plus sign indicates that there may be related record(s) in another table. If you click the plus sign, the records that are related to the one you clicked will display, and the plus sign changes to a minus sign. Click the minus sign to close the related records.
|
3. | In the Phone column, point to the left edge of the phone numberfor Justin Hilluntil the  pointer displays, and then click to select the phone number. Alternatively, click to place the insertion point in the phone field for Justin Hill and select the current phone number. pointer displays, and then click to select the phone number. Alternatively, click to place the insertion point in the phone field for Justin Hill and select the current phone number.
|
4. | Type (312) 555-0023 to change the phone number for Justin Hill.
|
| |
5. | In your 1B Club Members table, in the Student# field, click in any record. In the Find and Replace dialog box, replace the value in the Find What box with 22055 and then click the Find Next button. Alternatively, press  to produce the same action. to produce the same action.
[Page 916]The Look In box changes to Student# and the value you entered is located and selected in the Student# column. This is the Student# for Emmeline Flores.
|
6. | Click in the Last Name field to the right of Flores, type -Martinez and then press  . .
When you press , the insertion point moves to the next record and the change you made to the previous record is saved. The last name for student 22055 displays as Flores-Martinez.
|
7. | On the toolbar click the Undo button  . .
The change you made is reversed and the last name for student 22055 once again displays as Flores. The Undo button is dimmedit is no longer active. In the Table Datasheet view, only the most recent action can be undone, and this toolbar does not include a Redo button.
|
8. | Click in the Last Name field to the right of Flores and type -Martinez again. Compare your screen with Figure 1.45 to verify that you correctly changed both records.
Figure 1.45.

|
9. | Press to finish changing the record and then Close  the Find and Replace dialog box. Leave the 1B Club Members table open for the next activity. the Find and Replace dialog box. Leave the 1B Club Members table open for the next activity.
|
If you delete a record, the action is permanent. You cannot use the Undo button to reverse the removal of a record. You could, of course, manually add the record back if you need to do so.
1. | With your 1B Club Members table open in Datasheet view, on the Table Datasheet toolbar, click the Find button to display the Find and Replace dialog box.
|
2. | In the Find What box, if necessary, select the value that displays, and then type Biswas as the term to find. In the Look In box, click the arrow, and then click to select your 1B Club Members Firstname Lastname : Table.
Selecting the table changes the search from a specific field to the entire table.
|
3. | Click Find Next and then Close the Find and Replace dialog box.
The Last Name Biswas is selected for Student# 10125.
|
4. | Click in the row selector box for Biswas to select the entire record, on the Table Datasheet toolbar, click the Delete Record button  , and then compare your screen with Figure 1.46. , and then compare your screen with Figure 1.46.
Figure 1.46.
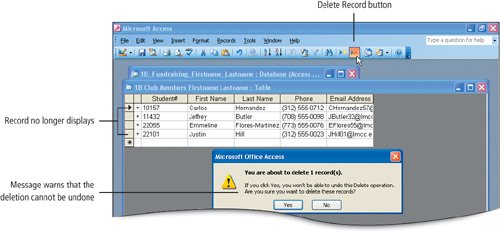
A message displays asking if you are sure you want to delete the selected record(s). Although the record has been removed from the screen, it is not permanently deleted until you confirm the deletion.
|
5. | Click Yes to confirm that you want to delete this record, and then Close the table.
|
You can add records to a table at any time. If a new record violates referential integrity, an error message will display. Recall that referential integrity prevents you from referring to records that do not exist. For example, if you try to add a pledge for a student, before the student data has been added to the 1B Club Members table, referential integrity will warn you that the Student# is not in the related tablethe 1B Club Members table. In this activity, you will enter a record in the 1B Pledges table.
1. | From the Database window, open your 1B Pledges table in Datasheet view.
|
2. | On the Table Datasheet toolbar, click the New Record button  , and then press , and then press  . Alternatively, click in the first blank cell in the Student# column. . Alternatively, click in the first blank cell in the Student# column.
|
3. | In the Student# field, type 10776 Press and continue entering the record as shown below:
Club Affiliation | Donor First Name | Donor Last Name | Donor Phone | Pledge Amount | Date Collected | Radio, TV & Film Club | Carl | Gingles | (312) 555-0089 | 25 | 11/23/07 |
|
4. | After entering the record, press , and then compare your screen with Figure 1.47.
Figure 1.47.
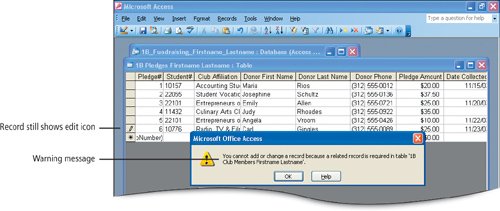
Because Student# 10776 is not listed in the 1B Club Members table, a message displays advising you that you cannot add this record. To add a record, a related record must exist in the 1B Club Members table.
|
| |
5. | In the displayed message box, click OK, and then press  to remove the record that you attempted to enter. to remove the record that you attempted to enter.
[Page 919]Before you can enter this pledge, you must first enter a record for student 10776 in the 1B Club Members table. Recall that the Student# field is the primary key field in the 1B Club Members table, and it is also the foreign key fieldthe field used to match records between tablesin the 1B Pledges table.
|
6. | Close your 1B Pledges table, and then open your 1B Club Members table in Datasheet view. In the navigation area, click the New Record button  . Alternatively, click the New Record button on the Table Datasheet toolbar. . Alternatively, click the New Record button on the Table Datasheet toolbar.
|
7. | Beginning in the Student# field type the following record:
Student# | First Name | Last Name | Phone | Email | 10776 | Jessica | Lee | (312) 555-0041 | JLee76@lmcc.edu |
|
8. | Close your 1B Club Members table. In the Database window, double-click your 1B Club Members table again to open it in Datasheet view, and then compare your screen with Figure 1.48.
Figure 1.48.
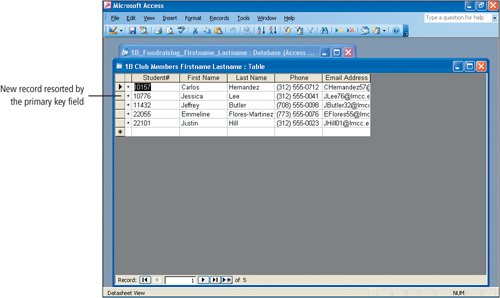
Notice that the Student# is sorted in ascending order and the record for Jessica Lee displays as the second record in the table. By default, records in a table are sorted by the field designated as the primary key field.
|
|
[Page 920] |
9. | Close your 1B Club Members table and then open your 1B Pledges table. At the bottom of the table, click the blank Student# field, enter the following record, and then press :
Student# | Club Affiliation | Donor First Name | Donor Last Name | Donor Phone | Pledge Amount | Date Collected | 10776 | Radio, TV & Film Club | Carl | Gingles | (312) 555-0089 | 25 | 11/23/07 |
Now that Student# 10776 is listed in the 1B Club Members table, you are able to enter this record in the 1B Pledges tablereferential integrity is maintained. When you scroll back to view the first column, you can see that the new record is recorded as Pledge# 7. After an AutoNumber6 in this instancehas been used to enter a record, even if it is not successful, that AutoNumber will not be used again. Leave the 1B Pledges table open for the next activities.
|
