After a report is created, you can modify its design by using the same tools and techniques you used to modify a form. For example, in the Pledges by Club report, the names of some of the clubs do not fully display, therefore the Club Affiliation label control needs to be widened. You can also change the format of controls, add controls, remove controls, or change the placement of controls in the report. Use the Toolbox toolbar to add controls to a report in the same manner as in a form.
In this activity you will add a label to the Page Footer section of your Pledges by Club report to place identifying information there.
1. | With the Pledges by Club report displayed in Print Preview, be sure the Zoom is set to 100%, and then at the bottom of the screen, click the Next Page button  to view the second page of the report. to view the second page of the report.
|
2. | Scroll to the end of the report and compare your screen with Figure 3.39. Notice the Grand Total amountthe report footerthat displays at the end of the data. Also notice that the current date and the page number information display on the bottom of the page in the page footer.
Figure 3.39.
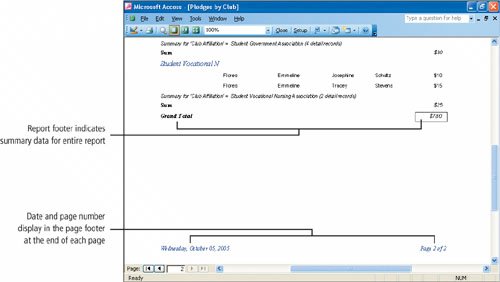
The report footer displays once at the end of the data, and displays items such as report totals. It displays only if the data has been summarized. The report footer is the last section in the report design, but in the Report Preview it displays on the last page of the printed report before the page footer.
|
| |
3. | On the Print Preview toolbar, click the View button  to switch to the Design view of the report. If the Pledges by Club field list displays, on its title bar click the Close button to switch to the Design view of the report. If the Pledges by Club field list displays, on its title bar click the Close button  . Be sure the Toolbox toolbar displays, and then compare your screen with Figure 3.40. . Be sure the Toolbox toolbar displays, and then compare your screen with Figure 3.40.
[Page 1089]
Figure 3.40.

You can see that the Design view for a report is similar to the Design view of a form. Here you can modify the layout of the report, and use the dotted grid pattern to align controls. This report contains a Report Header, a Page Header, a Group Header, a Detail section that displays the data, and a Group Footer.
The Report Header displays information at the top of the first page of a report. The Page Header displays information at the top of every page of a report. The Group Header and Group Footer displays the field label by which the data has been groupedClub Affiliation in this instance. If you do not group data in a report, the Group Header does not display. Similarly, if you do not summarize data, the Group Footer does not display.
|
4. | Locate the Page Footer section of the report and examine the two controls in this section.
The date control on the left, identified as =Now ( ), inserts the current date each time the report is opened. The page number control on the right, identified as ="Page " & [Page] & " of " & [Pages], inserts the page number, for example Page 1 of 2, in the report when the report is displayed in Print Preview or when the report is printed. Both of these are examples of programming code that is used by Access to create controls in a report.
|
| |
5. | In the Page Footer section, click to select the date control. Shorten this control by dragging the right middle sizing handle to the left to 1.75 inches on the horizontal ruler.
[Page 1090]The Page Footer displays information at the bottom of every page in the report, including the page number and the current date inserted by those controls.
|
6. | Click the page number control on the right. Shorten this control by dragging the left middle sizing handle to the right to 5 inches on the horizontal ruler.
|
7. | On the Toolbox toolbar, click the Label button  , and then in the Page Footer section, position the plus sign of the , and then in the Page Footer section, position the plus sign of the  pointer vertically in the middle of the section and horizontally at 2 inches on the horizontal ruler, click once and then type 3A Pledges by Club Firstname Lastname Press pointer vertically in the middle of the section and horizontally at 2 inches on the horizontal ruler, click once and then type 3A Pledges by Club Firstname Lastname Press  to select the control. If necessary, hold down to select the control. If necessary, hold down  and press and press  to align the top edge even with the other two controls, but do not be concerned if this control overlaps the page number control. Compare your screen with Figure 3.41. to align the top edge even with the other two controls, but do not be concerned if this control overlaps the page number control. Compare your screen with Figure 3.41.
Figure 3.41.
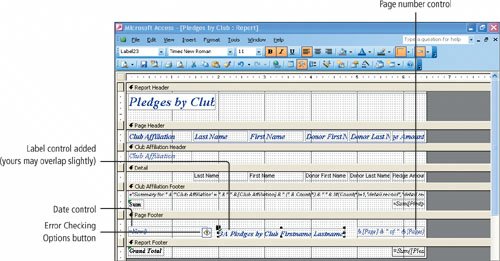
As you type, the label control expands to accommodate your typing. The Error Checking Options button may display to the left of the control. The Error Checking Options button displays when Access detects a potential problem. In this instance, the control you have added is a new unassociated label. If you clicked the Error Checking Options button, a list of options would display, one of which is to associateattachthe new label to another control so the two controls could be treated as one unit for the purpose of moving the controls. This label should not be attached to another control so you can ignore this option button. A green triangle displays in the upper left corner of the affected control.
|
| |
8. | With the label control selected, on the Formatting toolbar, click the Font Size button arrow  and click 9. On the Report Design toolbar, click Save and click 9. On the Report Design toolbar, click Save  , and then click the View button , and then click the View button  . Scroll to the bottom of the page, if necessary, and compare your screen with Figure 3.42. . Scroll to the bottom of the page, if necessary, and compare your screen with Figure 3.42.
[Page 1091]
Figure 3.42.
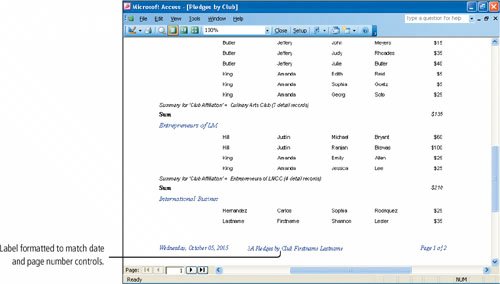
The format of the new label now matches the other controls in the footer.
|
In some instances, you will need to move controls out of the way before you can expand a control that is next to it. In this activity, you will expand the Club Affiliation text box control so that all of the club names are fully visible. You will remove the First Name label and edit the Last Name label to display Club Member. You will make similar changes to the two donor name labels. Then you will adjust the size and position of the labels so the data is clear and attractively presented. Moving and resizing controls in the Design view of a report is accomplished with the same techniques you practiced when you moved and resized controls in a form in Design view.
1. | In the Print Preview, scroll through the report and notice that several of the club names are not fully displayed. Click the View button to switch to the Design view.
|
|
[Page 1092] |
2. | In the Club Affiliation Header section, click the Club Affiliation text box control to select it.
The Club Affiliation text box control is selected and sizing handles surround the selected control. This is the control that displays the name of each club.
|
3. | Point to the right middle sizing handle, and then drag the right edge of the control to 3 inches on the horizontal ruler.
The control is expanded so that the name of each club will be fully displayed in the report.
|
4. | In the Page Header section, click to select the First Name label control, and then press  . .
Because this is a label control, it is not bound to the data from the underlying tableit can be removed without affecting the data that displays.
|
5. | In the Page Header section, click the Donor Last Name control, and then press to remove this control from the report.
The remaining label controls can now be edited to better describe the data that displays under each remaining label.
|
6. | In the Page Header section, click the Last Name control to select it, and then click a second time to place the insertion point in the control. Select Last Name, type Club Member and then press .
This clearly identifies the data that is the club member name fields.
|
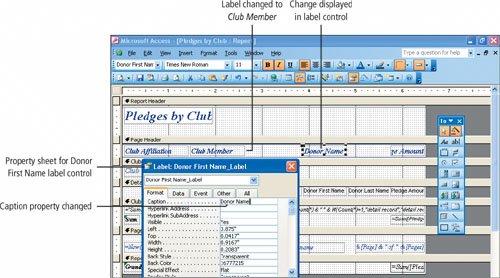
7. | In the Page Header section, double-click the Donor First Name control.
Double-clicking a control opens the related property sheet for that control. The text of the label displays on the Caption line and can be edited in the property sheet.
|
| |
8. | In the Label: Donor First Name_Label property sheet, in the Caption box, edit the label to read Donor Name and then press . Compare your screen with Figure 3.43.
[Page 1093]
Figure 3.43.
|
9. | Close the Label: Donor First Name_Label property sheet. In the Page Header section, click the Pledge Amount label control to select it. Point to the left middle sizing handle, and then drag the left edge of the control to 5.25 inches on the horizontal ruler.
The Pledge Amount control widens so its label is fully displayed.
|
10. | In the Detail section, click the Last Name text box control to select it. Point to the right middle sizing handle and drag it to the left to 2.25 inches on the horizontal ruler.
The size of this text box is reduced so the First Name text box can be moved closer to it, which will reduce the amount of space that appears between the students last and first names in the report. When you reduce the size of a text box, you need to be sure that you do not cause the data to be truncated in the report.
|
11. | In the Detail section, click the First Name text box control and drag to move it to the left until there is one column of dots between it and the Last Name text box control. Alternatively, hold down and press  as necessary to drive the control into place. as necessary to drive the control into place.
|
| |
12. | In the Detail section, click the Donor First Name text box control to select it. Point to the right middle sizing handle and drag to the left to 4.5 inches on the horizontal ruler. Click the Donor Last Name text box control and drag or use plus to move it to the left until there is one column of dots between it and the Donor First Name text box control.
[Page 1094]The Donor First Name control is made smaller and the Donor Last Name control is moved closer to the Donor First Name so the space between the data on the report is reduced.
|
13. | On the Report Design toolbar, click Save , click and the View button . Scroll up in the report if necessary and compare your screen with Figure 3.44.
Figure 3.44.

|
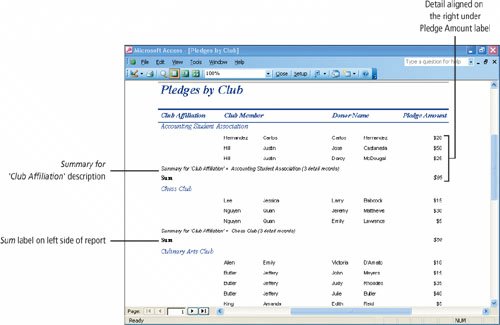
When you summarize data in a report, Access includes a summary line that details what is being summarized (summed) and how many records are included in the total. This descriptive label is not needed in this report and can be removed. The monetary values under the Pledge Amount label would look better if they were centered under the label. The Sum label is on the left side of the page, but the total to which it refers is on the far right. This label would be more useful if it was next to the summary value and clearly stated what is being summed. Making these adjustments to the report will improve its overall layout and readability.
| |
1. | In the Preview of the Pledges by Club report, notice the Summary for Club Affiliation at the end of each group, and the Sum label on the left side of the report. Also notice the monetary values aligned on the right under the Pledge Amount label as shown in Figure 3.45.
[Page 1095]
Figure 3.45.
|
| |
2. | Click the View button to switch to the Design view. In the Detail section, click the Pledge Amount text box control. Hold down  , and in the Club Affiliation Footer section, click the =Sum([Pledge Amount]) control, and in the Report Footer section, click the =Sum([Pledge Amount]) control. Compare your screen with Figure 3.46. , and in the Club Affiliation Footer section, click the =Sum([Pledge Amount]) control, and in the Report Footer section, click the =Sum([Pledge Amount]) control. Compare your screen with Figure 3.46.
Figure 3.46.
(This item is displayed on page 1096 in the print version)
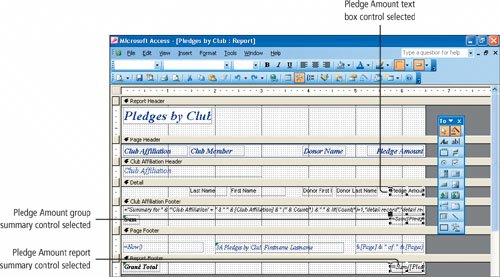
All of the controls related to summary of this data are selected. In this manner you can select controls from several sections of the report for the purpose of moving, formatting, resizing, or in this case, aligning the controls. The summary controls are examples of calculated controlscontrols that contain an expressionoften a formulathat uses one or more fields from the underlying table or query.
|
|
[Page 1096] |
3. | With the controls selected as shown in Figure 3.46, point to the edge of one of the selected controls and when the  pointer displays, drag to the left to 5.5 inches on the horizontal ruler. pointer displays, drag to the left to 5.5 inches on the horizontal ruler.
All of the selected controls move to the left. The result will cause the values to appear to be centered under the Pledge Amount label.
|
| |
4. | In the Club Affiliation Footer section, click the long Summary control, and then compare your screen with Figure 3.47.
Figure 3.47.
(This item is displayed on page 1097 in the print version)
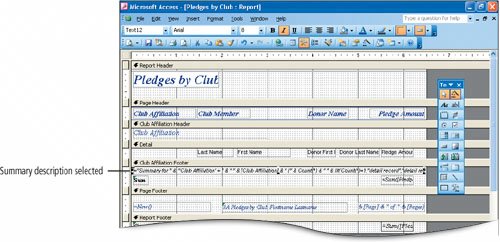
This descriptive summary control is added by Access when you choose to summarize data in a report. You can remove the description without altering the totals that display.
|
|
[Page 1097] |
5. | Press to remove the selected control from the report.
|
6. | In the Club Affiliation Footer section, select the Sum label control.
Point to the top edge of the control until the pointer displays, and then drag this control up to the top of the section and to the right, just to the left of the calculated summary control. Compare your screen with Figure 3.48.
Figure 3.48.

|
|
[Page 1098] |
7. | With the Sum label control still selected, on the Report Design toolbar, click the Properties button  . Alternatively, right-click the Sum label control, and then from the shortcut menu, click Properties. . Alternatively, right-click the Sum label control, and then from the shortcut menu, click Properties.
Just like the controls in a form, each control on a report has an associated property sheet that can be used to change the propertiescharacteristicsof the control. The Access program assigns names to controls when the report is created.
|
8. | In the displayed Label: Label13 property sheet, click the Format tab. In the Caption property box, select Sum and then type Club Total to change the caption that displays for this control.
|
9. | Click the Left property box and change the value to 4.25 Click the Width property box, change the value to 0.75, and then press . Compare your screen with Figure 3.49.
Figure 3.49.
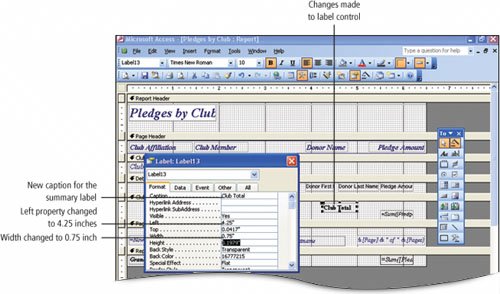
These changes provide a more descriptive label for the amounts that are summarized for each group. The left property positions the control next to the summary control that displays the amount. The width property adjusts the size of the label control so that it is just large enough to display the new caption.
|
10. | Close the displayed property sheet. With the Club Total label control selected, hold down , and then in the Club Affiliation Footer section, click the =Sum([Pledge Amount]) control. From the Format menu, point to Align, and then click Top.
The summary control is aligned at the top edge of the Club Total label control.
|
|
[Page 1099] |
11. | Point to the top edge of the Page Footer section bar. When the  pointer displays, drag upward slightly, just to the bottom edge of the controls in the Club Affiliation Footer section. Compare your screen with Figure 3.50. pointer displays, drag upward slightly, just to the bottom edge of the controls in the Club Affiliation Footer section. Compare your screen with Figure 3.50.
Figure 3.50.
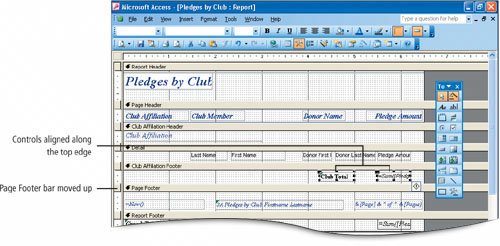
This action reduces the size of the Club Affiliation Footer section.
|
| |
12. | On the Report Design toolbar, click Save to save the changes you have made to the layout of your report, and then click the View button  . Scroll through the report to compare the effect of the changes you have made with Figure 3.51. . Scroll through the report to compare the effect of the changes you have made with Figure 3.51.
[Page 1100]
Figure 3.51.
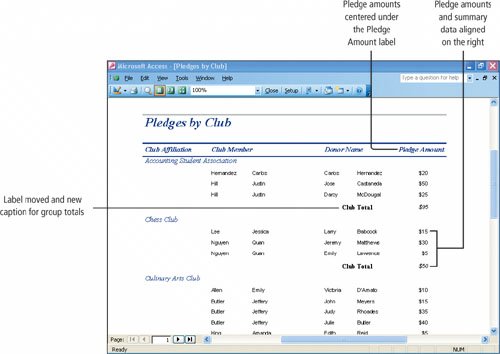
The long descriptive phrase is removed, which reduces the clutter on the report. The label for the totals has a new caption and is placed next to the summary data. The values under the Pledge Amount label are centered.
|
