After you have created a form, you can make further changes. For example, you can change the placement of the fields on the form for easier viewing or more efficient data entry. Access provides tools to modify the layout of a form. These tools are available by displaying the form in its Design view.
You can open a form in Design view or Form view, depending on what action you want to perform on the form. For example, if you want to view, add, delete, or modify records using the form, use the Form view. If you want to view, add, delete, or modify the field informationsuch as the placement of the fields on the formuse the Design view. In the following activities, you will modify your Pledges form.
As currently formatted, the form does not match the layout of the paper form that students use to record pledge information. In the following activities, you will modify the form so that it matches the paper form, which will make entering data from the paper form a more efficient process.
1. | On the Form View toolbar, click the View button  to switch to the Design view. to switch to the Design view.
A form is divided into three sectionsForm Header, Detail, and Form Footerdesignated by a bar called a section bar. Any graphical object on a form is referred to as a control. The white text box controls on the right display data from the underlying table and are bound controlstheir content comes from the table. Label controls display on the left, and contain descriptive information that appear on the form, usually the field names.
|
2. | If necessary, display the Toolbox toolbar by clicking  to open it. If the Pledges Field List displays, on the title bar of the field list, click the Close button to open it. If the Pledges Field List displays, on the title bar of the field list, click the Close button  to remove it from the window. Compare your screen to Figure 3.11. to remove it from the window. Compare your screen to Figure 3.11.
Figure 3.11.
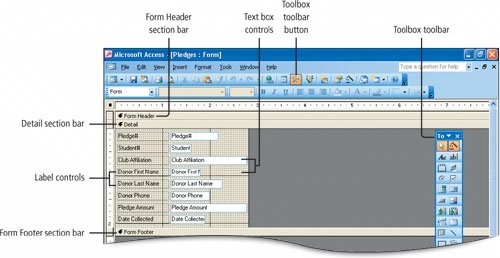
This toolbar, commonly referred to simply as the Toolbox, is used to add controls to a form. The Toolbox button is a toggle button that opens and closes the toolbar. The size, shape, and location of your Toolbox may differ from the one shown in Figure 3.11, depending on its configuration the last time Access was used. It may be anchored to one of the edges of the Access window.
|
| |
3. | Point to the dividing line between the Form Header and Detail section bars to display the  pointer. Drag downward to the 1-inch mark on the vertical ruler. Compare your screen with Figure 3.12. The Form Header section is expanded so you can add a title to your form. Do not be concerned if your expanded Form Header area does not match Figure 3.12 exactlyit will be adjusted later. The background grid is dotted and divided into 1-inch squares to help you place and align controls on the form. Use the vertical and horizontal rulers to guide the placement of a control on the form. pointer. Drag downward to the 1-inch mark on the vertical ruler. Compare your screen with Figure 3.12. The Form Header section is expanded so you can add a title to your form. Do not be concerned if your expanded Form Header area does not match Figure 3.12 exactlyit will be adjusted later. The background grid is dotted and divided into 1-inch squares to help you place and align controls on the form. Use the vertical and horizontal rulers to guide the placement of a control on the form.
[Page 1063]
Figure 3.12.

Alert!: Are the Rulers Missing?
If the horizontal and vertical rulers do not display, click the View menu, and then click Ruler.
|
4. | On the Toolbox toolbar, click the Label button  . Position the plus sign of the . Position the plus sign of the  pointer in the Form Header section at approximately 0.25 inches on the horizontal ruler and 0.25 inches on the vertical ruler. pointer in the Form Header section at approximately 0.25 inches on the horizontal ruler and 0.25 inches on the vertical ruler.
|
| |
5. | Drag to the right to 2.5 inches on the horizontal ruler and downward to 0.75 inches on the vertical ruler, and then compare your screen with Figure 3.13. If you are not satisfied with your result, click Undo  and begin again. and begin again.
Figure 3.13.
(This item is displayed on page 1064 in the print version)
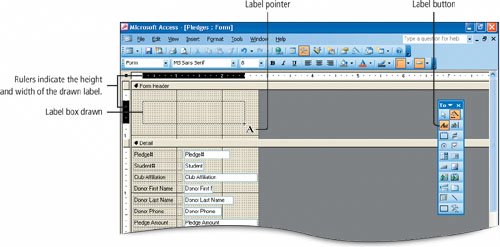
When you release the mouse pointer, the label will be positioned as shown by the dotted outline.
|
|
[Page 1064] |
6. | Type Pledges Made and then press  to create a title for the form. Compare your screen with Figure 3.14. to create a title for the form. Compare your screen with Figure 3.14.
Figure 3.14.
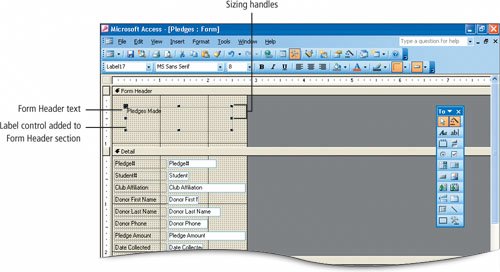
Pressing adds the text you typed to the label in the Form Header section and selects the label so it can be formatted. The small boxes around the edge of the label control are sizing handles. These are used to resize the control and to indicate when a control is selected.
|
|
[Page 1065] |
7. | With sizing handles displayed around the label, on the Formatting toolbar, click the Font Size button arrow  and then click 18. Click Bold and then click 18. Click Bold  to add bold emphasis to the text. Click the Font/Fore Color button arrow to add bold emphasis to the text. Click the Font/Fore Color button arrow  , and then in the second row, click the sixth colorblue. , and then in the second row, click the sixth colorblue.
|
8. | On the right side of the label, point to the middle sizing handle to display the  pointer, and then double-click to adjust the size of the label. Compare your screen with Figure 3.15. pointer, and then double-click to adjust the size of the label. Compare your screen with Figure 3.15.
Figure 3.15.
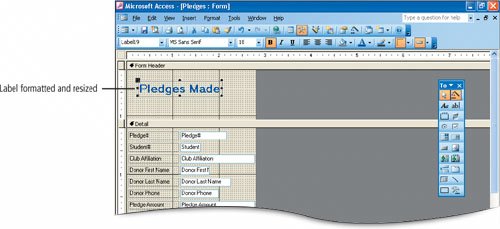
The size of the label is adjusted to fit the text as it has been reformatted.
|
9. | At the bottom of the form, point to the lower edge of the Form Footer section bar to display the pointer, and then drag downward approximately 0.50 of an inch to expand this section of the form.
|
10. | On the Toolbox toolbar, click the Label button . Position the plus sign of the pointer in the Form Footer section at approximately 0.25 inches on the horizontal ruler and even with the top edge of the section. Drag to the right to 2.75 inches on the horizontal ruler and then downward approximately 0.25 inches.
|
| |
11. | Using your own name, type 3A Pledges Made Firstname Lastname and then press . Click the View button  and compare your screen with Figure 3.16. and compare your screen with Figure 3.16.
[Page 1066]
Figure 3.16.
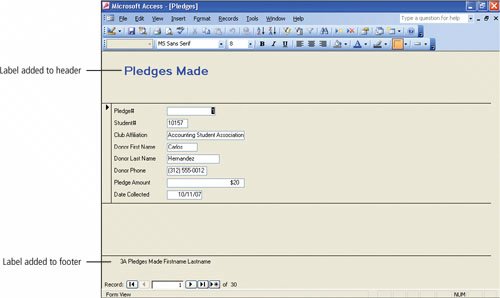
Depending on the length of your name, the text in this label may wrap to a second line. Form Footer text displays on the screen at the bottom of the form, and prints only on the last page when forms are printed.
|
12. | On the Form View toolbar, click Save  to save the changes you have made to the design of your form. to save the changes you have made to the design of your form.
|
1. | Click the View button  to return your Pledges form to Design view. Locate the horizontal and vertical rulers on your screen, and notice that the form is less than 3 inches wide. to return your Pledges form to Design view. Locate the horizontal and vertical rulers on your screen, and notice that the form is less than 3 inches wide.
|
| |
2. | Point to the right edge of the form until the  pointer displays, and then drag the right edge of the form to slightly less than 6.5 inches on the horizontal ruler. Compare your screen with Figure 3.17. pointer displays, and then drag the right edge of the form to slightly less than 6.5 inches on the horizontal ruler. Compare your screen with Figure 3.17.
[Page 1067]
Figure 3.17.

By increasing the width of the form, you have more space in which to rearrange the various form controls. Do not exceed 6.5 inches on the horizontal ruler if you plan to print in portrait orientation. Because Access uses one-inch margins for printing and standard paper is 8.5 inches wide, the print area cannot exceed 6.5 inches wide. If the right border of the design grid extends just slightly over 6.5 inches, when you print, you will get blank pages between pages of data.
|
3. | Click once in the white Donor First Name text box control.
The Donor First Name text box control is selected and sizing handles surround it. The label control on the left is also selected so that it can be moved with the text box control. Recall that in Form view, a text box control displays the data from the underlying table or query.
|
4. | The label control on the left is also selected so that it can be moved with the text box control. Point to any border of the selected text box control until the  pointer displays, which is the pointer used to move controls. pointer displays, which is the pointer used to move controls.
|
| |
5. | With the pointer displayed, drag the text box control up and to the right of the Pledge# field, positioning the left edge of the Donor First Name label control at approximately 3.50 inches on the horizontal ruler. Compare your screen with Figure 3.18.
Figure 3.18.
(This item is displayed on page 1068 in the print version)
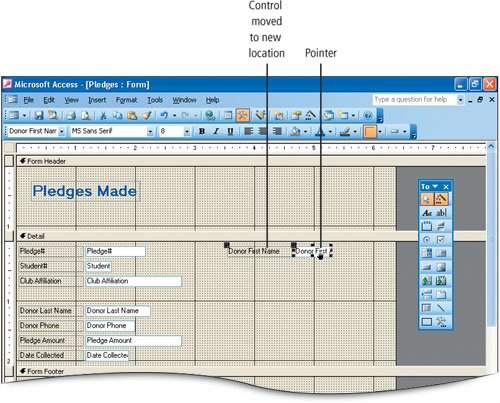
Notice that both the label controlthe box on the leftand the text box control move together to the new location. Dragging with this pointer on the border of a control allows you to reposition both the label control and the text box control as one unit.
[Page 1068]
|
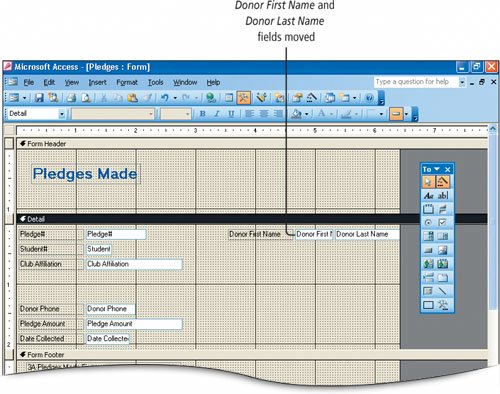
6. | On the left, click once in the gray Donor Last Name label control to select it, and then press  . .
Label controls can be removed without affecting the data that displays.
|
| |
7. | Click the white Donor Last Name text box control to select it. Point to the edge of the control, and then with the pointer, drag it to the immediate right of the Donor First Name text box control.
[Page 1069]Click in an open area to deselect the control and then compare your screen with Figure 3.19.
Figure 3.19.
|
8. | Click the gray Donor First Name label control to select it, and then to the left of First, click in the control to place the insertion point in the control.
With the insertion point placed in the control, you can select text, use  or to remove text, and edit the label. or to remove text, and edit the label.
|
9. | Select the word First and then press to edit the label so it reads Donor Name.
|
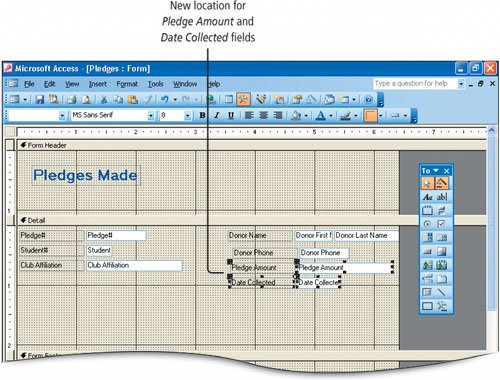
10. | Click once in the white Donor Phone text box control to select it, and then point to any border of the text box control to display the pointer. Drag to position the Donor Phone controls directly under the Donor Name controls, to the right of the Student# controls.
Do not be concerned if the controls do not align exactly; you will adjust these in the next activity.
|
11. | Click the white Pledge Amount text box control, hold down  , and then click the white Date Collected text box control. , and then click the white Date Collected text box control.
Multiple controls can be selected and moved as a group.
|
|
[Page 1070] |
12. | Using the technique you have practiced, point to the border of one of the selected controls, and then with the pointer, drag the selected controls to the positions shown in Figure 3.20.
Figure 3.20.
|
| |
13. | Click the white Club Affiliation text box control to select it. In the upper left corner of the Club Affiliation text box control, point to the large black move handle until the  pointer displays. Compare your screen with Figure 3.21. pointer displays. Compare your screen with Figure 3.21.
Figure 3.21.
(This item is displayed on page 1071 in the print version)

This pointer displays when your mouse pointer is positioned on the move handle. With this pointer shape, you can move the white text box control separately from the gray label control.
|
|
[Page 1071] |
14. | With the pointer displayed, drag the Club Affiliation text box control under the Club Affiliation label control, and then compare your screen with Figure 3.22.
Figure 3.22.

|
Controls on a form can be resized to ensure that all of the data is fully displayed, or to make the label and text box controls the same size. Controls can be aligned with each other or to a specific location on the form.
1. | With the white Club Affiliation text box control still selected, point to the right-middle sizing handle. When the pointer displays, drag to the right to 2.25 inches on the horizontal ruler.
The text box expands; this will allow space for the complete name of each club.
|
2. | Select the white Pledge# text box control, hold down and click the Student# text box control below it.
|
3. | From the Format menu, point to Size, and then click To Narrowest. Click the View button  to switch to the Form view, and then compare your screen with Figure 3.23. to switch to the Form view, and then compare your screen with Figure 3.23.
Figure 3.23.

To make controls the same size, select multiple controls and then use the Format Size command to adjust the dimension you want to match. The width of the control can be made wider or narrower, and the height can be made taller or shorter. Access adjusts the dimension of one control to match the other control according to the command you select. In this case, the Pledge# text box control is made narrower to match the Student# text box control, which was the narrower of the two controls when they were first selected.
|
|
[Page 1073] |
4. | Click the View button to return to the Design view. Click the white Pledge Amount text box control, hold down and click the Date Collected text box control. From the Format menu, point to Size, and then click To Narrowest.
The Pledge Amount text box is reduced in width to match the Date Collected text box. Because text box controls display the data, and not the field name, they need not be wide enough to display the field name in Form Design view.
|
5. | In the Form Header section, click the label you created to select it. On the Form Design toolbar, click the Properties button  . Compare your screen with Figure 3.24. . Compare your screen with Figure 3.24.
Figure 3.24.
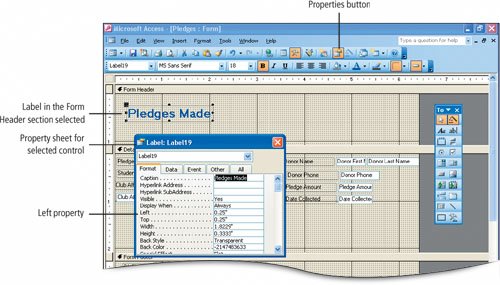
The property sheet for this label control displays. The title bar on the property sheet displays Label: Label19, or some other number. Each control has an associated property sheet which can also be used to change the propertiescharacteristicsof the control. Because this is a label that was added to the form, Access assigns it a number. The number on your property sheet may be different.
|
6. | In the displayed property sheet, be sure the Format tab is selected. In the Left property box, select the value that displays, type 1 and then press .
The left edge of the label is moved so that its left edge aligns at 1 inch on the horizontal ruler. In this manner you can place a control in a specific location on the form.
|
|
[Page 1074] |
7. | Close the property sheet. With the label control still selected, point to a border to display the pointer, and drag the control upward to align with the second dotted grid line. Compare your screen with Figure 3.25.
Figure 3.25.
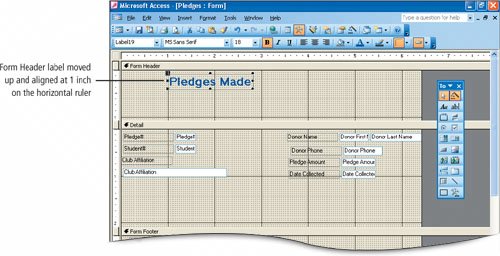
The top edge of the label is moved to the second grid line displayed in the Form Header. You can see that there are various ways to position labels on a form.
|
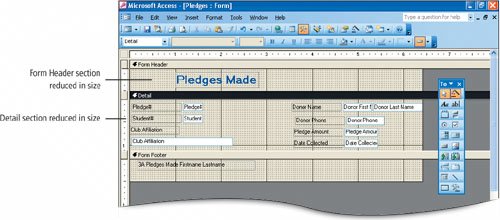
8. | Point to the top edge of the Detail section bar. When the pointer displays, drag upward until the Detail bar is one dotted gridline below the Form Header label control.
This action reduces the size of Form Header section so it is just large enough to accommodate your label.
|
| |
9. | Point to the top edge of the Form Footer section bar. When the pointer displays, drag upward until the Form Footer bar is one dotted gridline below the last row of controls. Compare your screen with Figure 3.26.
[Page 1075]
Figure 3.26.
|
10. | In the Form Footer section, right-click the label control with your name, and then from the shortcut menu, click Properties.
The shortcut menu is another way to display the property sheet for a control.
|
11. | In the displayed property sheet, click the Format tab if necessary. Change the Left property to 1 and press . In the Width property box, select the value and type 2.25 and then press . Close the property sheet and then compare your screen with Figure 3.27.
Figure 3.27.
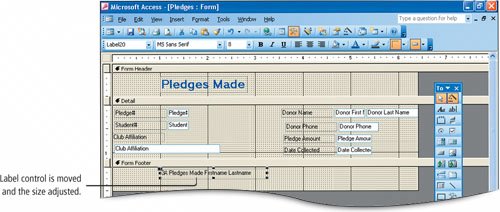
The location and size of the label control is adjusted.
|
| |
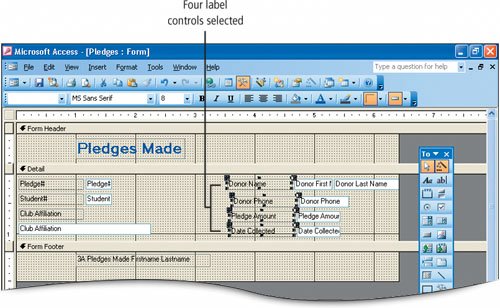
12. | In the Detail section, click the gray Club Affiliation label control, hold down and click the Club Affiliation text box control to select these two controls. From the Format menu, point to Align and then click Left.
[Page 1076]
The selected controls are aligned with each other on the left edge of the control that was furthest to the left. Controls can be aligned vertically on the left or right, and horizontally on the top or bottom.
|
13. | Click the Donor Name label control, hold down and click the label controls for Donor Phone, Pledge Amount, and Date Collected. Compare your screen with Figure 3.28.
Figure 3.28.
|
14. | On the Form Design toolbar, click the Properties button . In the displayed Multiple selection property sheet, in the Left box, type 3.5 Close the property sheet.
If a group of controls are selected, the property sheet title will display Multiple selection. Any property changes affect all of the selected controls. In this instance, the four selected controls are aligned vertically with each other at 3.5 inches on the horizontal ruler.
|
15. | Click the white Donor First Name text box control, hold down , and then click the text box controls for Donor Phone, Pledge Amount and Date Collected. From the Format menu, point to Align, and then click Left.
To align multiple controls, you can also select the controls and then use the Align command on the Format menu.
|
| |
16. | Using the techniques you have practiced, align other controls if necessary so that your form resembles the one in Figure 3.29. Be sure that only one row of dots displays horizontally between controls.
Figure 3.29.
(This item is displayed on page 1077 in the print version)
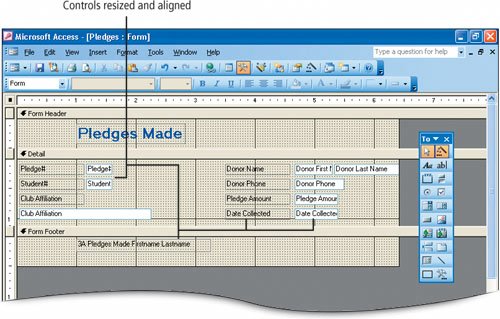
Then Save the changes you have made to the design of your form.
|
Now that you have arranged the controls on the form to match the paper form used by club members when they are gathering pledges, you will enter a record to test the form and then print a sample form so the form design can be approved by Mr. Smith.
1. | With your Pledges form displayed in Design view, click the View button . In the navigation area at the bottom of the screen, click the New Record button  . .
The fields are cleared and ready to accept a new entry. The record number advances to 31, indicating that this will be the 31st record.
|
2. | Press  to move to the Student# field and type 22202 to move to the Student# field and type 22202
Recall that you need not enter a value into an AutoNumber field; thus, you can press to begin entering data in the next field.
|
3. | Press . In the Club Affiliation field, type International Business Student Association and then press .
|
| |
4. | Continue in this manner and finish entering the data for this record as listed on the next page. Notice there are two white boxes for the first and last name of the donor. If necessary, click the Previous Record button  , and then compare your screen with Figure 3.30. , and then compare your screen with Figure 3.30.
Figure 3.30.
(This item is displayed on page 1078 in the print version)
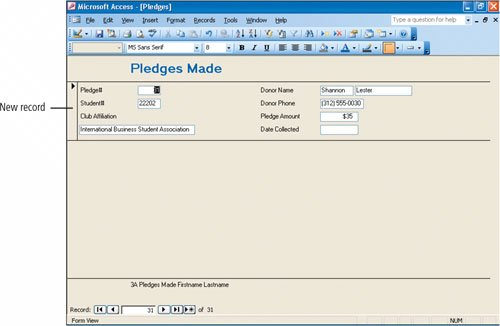
[Page 1078]Donor First Name | Donor Last Name | Donor Phone | Pledge Amount | Date Collected | Shannon | Lester | (312) 555-0030 | 35 | |
|
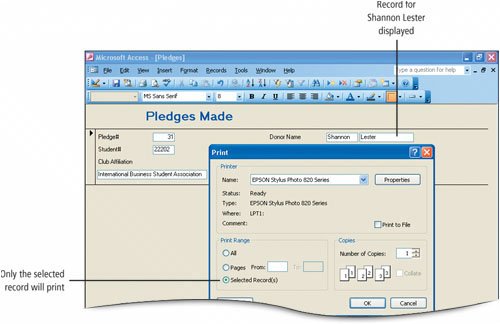
5. | With the record for Shannon Lester displayed in the form, on the Form View toolbar, click the Print Preview button  . .
The label in the Form Header section displays on the first page of the form, and the records display sequentially in the layout that you designed. Recall that the content in the Form Header displays on the screen and on the first page of the printout.
|
6. | In the navigation area, click the Next Page button  three times to navigate through the form to the last page where the label in the Form Footer section displays. Click Close three times to navigate through the form to the last page where the label in the Form Footer section displays. Click Close  to close the Print Preview window and return to the Form View. to close the Print Preview window and return to the Form View.
Recall that the content in the Form Footer displays on the screen and on the last page of the printout.
|
| |
7. | Be sure that the record you entered for Shannon Lester displays. From the File menu, click Print. In the displayed Print dialog box, under Print Range, click Selected Record(s). Compare your screen with Figure 3.31.
[Page 1079]
Figure 3.31.
|
8. | In the Print dialog box, click OK to print the record that you just entered. If you have been instructed to submit your file electronically, click Cancel to skip this step. Click the small Close Window button  to close the Pledges form window. Save any changes if prompted to do so. to close the Pledges form window. Save any changes if prompted to do so.
|
