Objective 3. Produce and Save Merged Mailing Labels

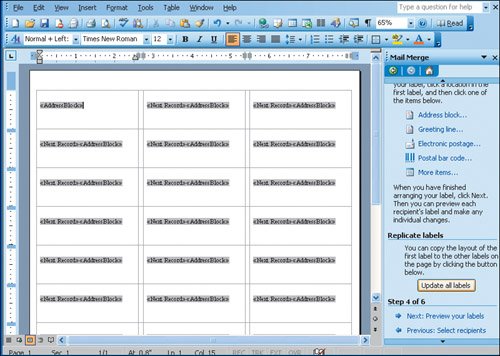
Activity 3.3. Adding Merge Fields to the Mailing Labels

In the next step of the Mail Merge Wizard, you will add merge fields as placeholders for the information that will be inserted from the data source.

1.

Under Step 3 of 6, click Next: Arrange your labels.

Mail Merge Step 4 of 6 displays. You need to create the contents for only the first label, and it will be duplicated for the other labels.

2.

The insertion point should be in the first label. Under Arrange your labels, click Address block. The Insert Address Block dialog box displays. Click OK to accept the default address layout.

The first label shows the merge field «Address Block».

If you do not see all the information displayed in the Mail Merge task pane, point to the triangle at the top or bottom to scroll it.

3.

In the Mail Merge task pane, under Replicate labels, click Update all labels. All the labels should now show the merge field for the address block in addition to the next record field.

Compare your screen with Figure 3.4.

Figure 3.4.


[Page 1371]

4.

Under Step 4 of 6, click Next: Preview your labels.

The document displays the names and addresses from the data source as the content on the labels.

5.

Save your file.

You are saving the main document, including the merge fields that you have arranged on the labels, and the inserted data.

Activity 3.4. Producing the Mailing Labels

The Mail Merge process includes the data source and the main document with which you have been working so far. Now you will produce a completed new document that contains the finished labels.

1.

Under Step 5 of 6, click Next: Complete the merge.

Step 6 of 6 displays.

2.

Under Merge, click Edit individual labels. The Merge to New Document dialog box displays. Under Merge records, click the All option button, and then click OK.

A new Word window opens with the mailing labels as the document. The title bar displays Labels1Microsoft Word. The Mail Merge task pane does not display with the document. You will save this as a completed merge document.

3.

In the first label, edit the name, and change it to your own name.

4.

Save the file as Labels1_Firstname_Lastname The saved document has only the finished labels showing names and addresses.

5.

Close the file.


[Page 1371 (continued)]

Windows XP

Outlook 2003

Internet Explorer

Computer Concepts

Word 2003

Chapter One. Creating Documents with Microsoft Word 2003

Chapter Two. Formatting and Organizing Text

Chapter Three. Using Graphics and Tables

Chapter Four. Using Special Document Formats, Columns, and Mail Merge

Excel 2003

Chapter One. Creating a Worksheet and Charting Data

Chapter Two. Designing Effective Worksheets

Chapter Three. Using Functions and Data Tables

Access 2003

Chapter One. Getting Started with Access Databases and Tables

Chapter Two. Sort, Filter, and Query a Database

Chapter Three. Forms and Reports

Powerpoint 2003

Chapter One. Getting Started with PowerPoint 2003

Chapter Two. Creating a Presentation

Chapter Three. Formatting a Presentation

Integrated Projects

Chapter One. Using Access Data with Other Office Applications

Chapter Two. Using Tables in Word and Excel

Chapter Three. Using Excel as a Data Source in a Mail Merge

Chapter Four. Linking Data in Office Documents

Chapter Five. Creating Presentation Content from Office Documents


Go! With Microsoft Office 2003 Brief
GO! with Microsoft Office 2003 Brief (2nd Edition)
ISBN: 0131878646
EAN: 2147483647
Year: 2004
Pages: 448

Flylib.com © 2008-2020.
If you may any questions please contact us: flylib@qtcs.net