Advanced .NET Framework
One of the most exciting things about Visual Basic .NET is the newfound power it gives to Visual Basic programmers. In previous versions of Visual Basic, certain types of applications were often difficult or impossible to write, or required third- party toolkits and complicated Win32 API calls. As a result, many of these advanced techniques were often the exclusive domain of C++ programmers. Visual Basic .NET changes all that. Advanced programming techniques, such as creating Windows Services and thread pooling, are now accessible to Visual Basic programmers. This chapter attempts to cover some of these advanced topics.
Application #78 Create a Windows Service
This sample application demonstrates how to create a Microsoft Windows service (formerly Windows NT Service) using Microsoft Visual Basic .NET. There are three projects in the solution. The first project, VB.NET How-To Creating a Windows Service, provides a user interface for accessing the Windows service. The second project, VB.NET How-To Windows Service Demo, is the actual Windows service. The Windows service itself is fairly simple. Whenever the service starts, pauses, resumes, or ends, a message is written to the event log. Finally, the third project, VB.NET How-To Windows Service - Time Track Install, is used to demonstrate the creation of an installation package for a Windows service.
Building Upon…
Application #2: Use DateTimes
Application #7: Object-Oriented Features
Application #8: Scoping, Overloading, Overriding
New Concepts
A Windows service is a special type of application that runs in the background and has no user interface. A Windows service can run without any user being logged on to the computer and can be started, stopped, paused, resumed, or disabled. Microsoft SQL Server and Internet Information Services (IIS) are two examples of programs that run as services.
Creating a Windows Service
The easiest way to create a Windows service using Visual Basic .NET is to use the Windows Service project template. Using this template, Visual Studio .NET will automatically create a Service1 class that contains the skeleton code needed to implement a Windows service.
The Service1 class inherits from the System.ServiceProcess.ServiceBase class. At a bare minimum, a service should override the OnStart and OnStop methods. As you can probably guess, the OnStart method is called when the service is to start and the OnStop method is called when the service is to stop. In addition, the ServiceBase class provides OnContinue, OnPause, OnShutdown, and various other methods. Depending on the specifics of what tasks the service is to perform, these methods might or might not be needed.
Create an Installer for a Windows Service
To create an installer for a Windows service, right-click on the design surface of the class that inherits from ServiceBase and select the Add Installer menu. Visual Studio .NET will add a new class to your project named ProjectInstaller. By default, this class has two components to it: ServiceProcessInstaller1 and ServiceInstaller1. Both are called by installation utilities when installing the Windows service. Among other things, ServiceProcessInstaller1 specifies the name of the account under which the service should run and ServiceInstaller1 specifies the display name of the service. These can be set in code or in the Properties window. To actually install a Windows service, you can either create a setup project or use the InstallUtil.exe utility. The sample application uses the former method. This is where the VB.NET How-To Windows Service - Time Track Install project comes into play. It creates an .msi file, which serves as the installation package for the application. To install the Windows service, simply double-click VB.NET How-To Windows Service - Time Track.msi in Windows Explorer.
Code Walkthrough
As stated previously, there are three projects in the sample application. The code walkthrough will focus on the VB.NET How-To Windows Service Demo project. This service does nothing more than keep track of the time it is running. Although it is simple, it demonstrates the fundamentals of creating Windows services in Visual Basic .NET.
Service1.vb (default)
To better understand how the code in the sample application works, first take a look at how the Service1 class appears before any code is changed or added:
ImportsSystem.ServiceProcess


PublicClassService1
InheritsSystem.ServiceProcess.ServiceBase


'ComponentDesignergeneratedcode


ProtectedOverridesSubOnStart(ByValargs()AsString)
'Addcodeheretostartyourservice.Thismethod
'shouldsetthingsinmotionsoyourservice
'candoitswork.
EndSub


ProtectedOverridesSubOnStop()
'Addcodeheretoperformanytear-downnecessary
'tostopyourservice.
EndSub
EndClass
The first line of code imports System.ServiceProcess. This namespace provides the classes that allow you to implement, install, and control Windows service applications. Next, an empty stub for OnStart has been provided. This method is overridden, and it’s where you place the code to run when the service is started. Next is an empty stub for the OnStop method. Place any code that is needed to stop the service into the OnStop routine.
VB.NET How-To TimeTracker Windows Service.vb
In the sample application, the Service1 class was renamed to VB_NET_HowTo_ TimeTrackerService:
ImportsSystem.ServiceProcess


PublicClassVB_NET_HowTo_TimeTrackerService
InheritsSystem.ServiceProcess.ServiceBase
The declarations section contains several module-level variables:
PrivatetimeStartAsDateTime
PrivatetimeEndAsDateTime
PrivatetimeElapsedAsNewTimeSpan(0)
PrivatetimeDifferenceAsTimeSpan
PrivateisPausedAsBoolean=False
The timeStart and timeEnd variables are used to keep track of the times the service starts and ends. The timeElapsed and timeDifference variables are both TimeSpan objects. The timeDifference variable is used to calculate the difference between timeStart and timeEnd. The timeElapsed variable is used to keep a running total of time elapsed. Finally, isPaused is a Boolean that indicates whether the service is currently in a paused state.
The OnStart method is called whenever the service is started:
ProtectedOverridesSubOnStart(ByValargs()AsString)


timeElapsed=NewTimeSpan(0)


timeStart=DateTime.Now()
isPaused=False


EventLog.WriteEntry("TheVB.NETHow- ToServicewasStartedat"+_
timeStart.ToString())


EndSub
Inside OnStart, timeElapsed is reset to zero. This is necessary because the service can be restarted without pausing or stopping. Then, timeStart is initialized to the current time by using DateTime.Now. Next, isPaused is set to False. Finally, a message is written to the event log indicating the time the service has been started.
The OnStop method is called whenever the service is stopped. This provides an opportunity to perform whatever clean-up code your application needs:
ProtectedOverridesSubOnStop()


timeEnd=DateTime.Now()
IfNotisPausedThen
timeDifference=timeEnd.Subtract(timeStart)
timeElapsed=timeElapsed.Add(timeDifference)
EndIf


EventLog.WriteEntry("TheVB.NETHow- ToServicewasStoppedat"+_
timeEnd.ToString())
EventLog.WriteEntry("TheVB.NETHow- Toranforatotaltimeof"+_
timeElapsed.ToString())
EndSub
For the sample application, this means calculating the elapsed time and writing it out to the event log. Note that the code checks to make sure the service isn’t paused. This needs to be done to make sure the time the service is paused isn’t counted as part of the total elapsed time.
Of course, the ServiceBase base class provides more than just the OnStart and OnStop methods. For example, the OnPause method is used when the service is to be paused. The sample application uses the OnPause method to calculate the total elapsed time so far, set isPaused to True, and write a message to the event log:
ProtectedOverridesSubOnPause()


timeEnd=DateTime.Now()
IfNotisPausedThen
timeDifference=timeEnd.Subtract(timeStart)
timeElapsed=timeElapsed.Add(timeDifference)
EndIf
isPaused=True


EventLog.WriteEntry("VB.NETHow-ToServicewasPausedat"+_
DateTime.Now().ToString())
EndSub
Finally, OnContinue occurs when a paused service is supposed to continue:
ProtectedOverridesSubOnContinue()
IfisPausedThen
timeStart=DateTime.Now
EndIf
isPaused=False


EventLog.WriteEntry("VB.NETHow-ToServiceContinuedat"+_
DateTime.Now().ToString())
EndSub
The OnContinue method begins by setting timeStart to the current time. Because the service is resuming, isPaused must be set back to False. Finally, a message is written out to the event log to indicate the service has resumed.
Conclusion
A Windows service is a special type of application that runs in the background and has no user interface. To create a Windows service in Visual Basic .NET, begin by creating a new solution using the Windows Service template in Visual Studio .NET. At a minimum, implement the OnStart and OnStop methods. Additional methods exist such as OnPause and OnContinue. To create an installer for a Windows service, right-click the design surface of the class that inherits from the System.ServiceProcess.ServiceBase class. In the popup menu, select Add Installer. Visual Studio .NET will add a new class to your project named ProjectInstaller. Use this class to set the various properties of the ServiceProcessInstaller1 and ServiceInstaller1 components so that installation utilities can install the Windows service.
Application #79 Use Thread Pooling
The ability to use threads within Visual Basic has long been a requested feature because threads allow you to create a multitasking application that runs smoothly. However, if an application requires a design where threads must be constantly created and destroyed, performance might actually suffer. Thread pooling is a technique that streamlines the performance of these types of applications. When a thread is no longer needed, rather than being terminated, the thread is saved to a pool where it can be reused later. Conceptually, this is similar to database connection pooling. Thread pooling improves performance because it eliminates the overhead of repeatedly creating and destroying threads.
This sample application demonstrates how to use a thread pool in Visual Basic .NET. It consists of a main form with three TabPages. The first TabPage, Queued Functions (shown in Figure 9-1), compares performance by running three processes in sequential order, in three discrete threads. It demonstrates the ThreadPool function QueueUserWorkItem to queue a task to a thread. The second TabPage, Timers, shows how to use the Threading.Timer class to set up timed events. The third TabPage, Synchronization Objects, demonstrates how to use the synchronization objects Mutex, ManualResetEvent, and AutoResetEvent to manage functions on separate threads.
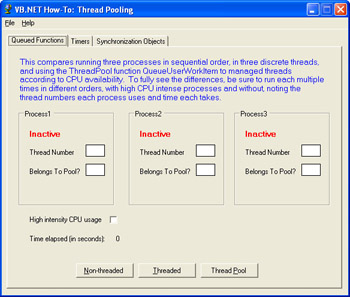
Figure 9-1: The application interface for the Thread Pooling demonstration.
Building Upon…
Application #7: Object-Oriented Features
Application #8: Scoping, Overloading, Overriding
Application #9: Use Callbacks
Application #11: Key Visual Basic .NET Benefits
New Concepts
This sample introduces three new concepts: function queuing, timers, and synchronization objects.
Function Queuing
Creating a thread pool can be a tricky task. Fortunately, Visual Basic .NET provides a built-in ThreadPool object that does much of the hard work for you. Part of the System.Thread namespace, the ThreadPool object provides a pool of threads that can be used for various application tasks. When a thread is terminated or goes into a sleep state, it’s placed into the thread pool. Visual Basic .NET manages assigning a work item to a thread automatically. You only need to queue the work item by using the QueueUserWorkItem method of the ThreadPool object. To use QueueUserWorkItem, simply pass it a delegate to the function to call when the thread is available. This is known as function queuing. By default, the ThreadPool has a maximum limit of 25 threads per processor.
Timers
The Timer class provides a way to execute a routine at specified time intervals. This is handy when you want to perform a particular task at regular intervals. For example, the Timer class could be used in a client e-mail application to check a server for incoming e-mail messages every five minutes. When using the Timer class, you set the amount of time to wait before the first time the routine is executed and the amount of time to wait between subsequent invocations. When you’re done with the Timer class, be sure to call the Dispose method to free all allocated resources. Timer is also part of the System.Thread namespace.
Synchronization Objects
When two or more threads need to access a shared resource at the same time, a synchronization object is used to guarantee that only one thread uses the resource. Thus, synchronization objects are used to gain exclusive access to a shared resource. Visual Basic .NET has three types of synchronization objects: Mutex, ManualResetEvent, and AutoResetEvent. All three derive from the WaitHandle class, which serves as the base class for synchronization objects. The Mutex synchronization object is used to gain exclusive access to a shared resource. Only one thread at a time can hold a Mutex. All other threads are suspended until the Mutex is released.
The ManualResetEvent and AutoResetEvent synchronization objects are also used for synchronization and are similar to each other. They both have two states, signaled and unsignaled. Signaled means the shared resource has been locked and no other thread can use it. Unsignaled means the shared resource is available to be used by another thread. To signal and unsignal the ManualResetEvent and AutoResetEvent objects, use the Set and Reset methods, respectively. The key difference between the ManualResetEvent and AutoResetEvent objects is that AutoResetEvent is automatically reset to unsignaled by the system after a single waiting thread has been released. The sample application demonstrates how to use all three objects on the Synchronization tab page.
Code Walkthrough
The sample application consists of one main form and two helper classes, ProcessGroup and TimerGroup. The ProcessGroup class is used to simulate a two-second process using thread pooling. The TimerGroup class is used to demonstrate the Threading.Timer class.
frmMain Declarations
The declarations section of frmMain contains several module-level variables:
PrivateautoResetEvent1AsThreading.AutoResetEvent
PrivatemanualResetEvent1AsThreading.ManualResetEvent
Privatemutex1AsThreading.Mutex


PrivateprocessGroup1AsProcessGroup
PrivateprocessGroup2AsProcessGroup
PrivateprocessGroup3AsProcessGroup
The first three variables—autoResetEvent1, manualResetEvent1, and mutex1—represent the three types of synchronization objects available in Visual Basic .NET. Then three ProcessGroup objects are declared. These objects will be used to simulate work items that will be queued to the thread pool.
frmMain_Load
When frmMain loads, the three ProcessGroup objects are instantiated. Each ProcessGroup has a Completed event, which occurs when the work item has been completed. An event handler named OnProcessesCompleted is hooked to each ProcessGroup’s Completed event. Next, the ProcessGroup’s shared PrepareToRun method is called to initialize the ProcessGroup objects:
PrivateSubfrmMain_Load(ByValsenderAsSystem.Object,_
ByValeAsSystem.EventArgs)HandlesMyBase.Load

processGroup1=NewProcessGroup(lblProcess1Active,_
lblProcess1ThreadNum,lblProcess1IsPoolThread)
processGroup2=NewProcessGroup(lblProcess2Active,_
lblProcess2ThreadNum,lblProcess2IsPoolThread)
processGroup3=NewProcessGroup(lblProcess3Active,_
lblProcess3ThreadNum,lblProcess3IsPoolThread)


AddHandlerprocessGroup1.Completed,AddressOfOnProcessesComplet ed
AddHandlerprocessGroup2.Completed,AddressOfOnProcessesComplet ed
AddHandlerprocessGroup3.Completed,AddressOfOnProcessesComplet ed


ProcessGroup.PrepareToRun()


timerGroup1=NewTimerGroup(lblTimer1Output,lblTimer1ThreadNum ,_
lblTimer1IsThreadPool)
timerGroup2=NewTimerGroup(lblTimer2Output,lblTimer2ThreadNum ,_
lblTimer2IsThreadPool)
EndSub
Thread Pool Button
When the user clicks the Thread Pool button, the process begins. First, all the buttons on the tab page are disabled. Next, the PrepareToRun method is called to reinitialize the ProcessGroup objects. Then, the StartPooledThread method is called:
PrivateSubbtnThreadPool_Click(ByValsenderAsSystem.Object,_
ByValeAsSystem.EventArgs)HandlesbtnThreadPool.Click

btnNonthreaded.Enabled=False
btnThreaded.Enabled=False
btnThreadPool.Enabled=False


ProcessGroup.PrepareToRun()


processGroup1.StartPooledThread()
processGroup2.StartPooledThread()
processGroup3.StartPooledThread()
EndSub
Queuing a Function
The StartPooledThread method itself is very short. The first line creates a callback to the subroutine RunPooledThread. The second line performs the actual function queuing. As explained previously, to queue a work item to the thread pool, use the QueueUserWorkItem method of the Threading.ThreadPool object:
SubStartPooledThread()
DimcallbackAsNewThreading.WaitCallback(AddressOfRunPooledTh read)
Threading.ThreadPool.QueueUserWorkItem(callback,Nothing)
EndSub
OnProcessesCompleted
When the task finally completes, the OnProcessesCompleted event procedure is triggered. This routine calculates the number of seconds the task took to complete and displays the result in a label on the form. Then it re-enables the buttons that were disabled in the btnThreadPool_Click routine. Finally, the PrepareToRun method is called to reinitialize the ProcessGroup objects:
PrivateSubOnProcessesCompleted()
DimsecondsElapsedAsDouble=ProcessGroup.GetTicksElapsed/ 1000
lblSecondsElapsed.Text=secondsElapsed.ToString


btnNonthreaded.Enabled=True
btnThreaded.Enabled=True
btnThreadPool.Enabled=True


ProcessGroup.PrepareToRun()
EndSub
Conclusion
Visual Basic .NET provides a built-in thread-pool object named ThreadPool as part of the System.Threading namespace. To queue a function to ThreadPool, use the QueueUserWorkItem method. To execute a routine at specific time intervals, use the System.Threading.Timer class. Finally, synchronization objects are used to make sure that no more than one thread can access a shared resource at the same time. Visual Basic .NET provides three such synchronization objects: Mutex, ManualResetEvent, and AutoResetEvent. Threading is a powerful tool in the Visual Basic .NET programmer’s toolbox, and thread pooling is useful in situations where an application constantly creates and destroys new threads.
Application #80 Use Sockets
This sample application demonstrates how to create a simple chat program by using sockets. Support for using sockets within Visual Basic .NET is provided by the System.Net and System.Net.Sockets namespaces. Broken into two different solutions, the sample application features a chat server (shown in Figure 9-2) and a chat client. It demonstrates three important aspects of sockets communication using the TcpClient and TcpListener classes:
- Server-to-client communication
- The server application allows you to enter text to broadcast to all attached clients. To run this demonstration, run the server and at least one instance of the client.
- Client-to-client communication
- This shows how to send text from a client application to all other attached clients. To run this demonstration, run the server with at least two instances of the client running.
- Client-to-server request with server response
- This demonstrates the client sending the server a request for a list of all users that are in the chat. When the client receives the response, it fills a list-box control with the users. To run this demonstration, run the server and at least one instance of the client.
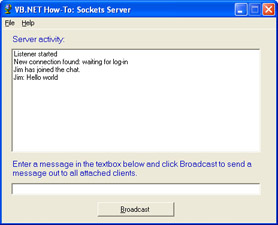
Figure 9-2: Application Interface for the Sockets Server project.
Building Upon…
Application #7: Object-Oriented Features
Application #8: Scoping, Overloading, Overriding
Application #11: Key Visual Basic .NET Benefits
New Concepts
This sample application introduces three new concepts: sockets, TCP clients, and TCP listeners.
Sockets
Simply speaking, a socket is an endpoint for communication between two computers. In Visual Basic .NET, the Socket class is part of the System.Net.Sockets namespace and serves as a wrapper around the Winsock32 API. The Socket class supports both synchronous and asynchronous modes. In synchronous mode, network calls such as Send and Receive wait until the operation completes before returning control to the calling program. In asynchronous mode, these calls return immediately and a callback is used to indicate when the operation completes. To use a socket, you must know the connected computer’s IP address and TCP port number. In the sample application, the TCP port number is defined as a constant so that both client and server use the same port. Sending data across the connection is accomplished by using the Send or SendTo method. To read data from the socket, use the Receive or ReceiveFrom method.
TcpClient Class
The TcpClient class is a type of socket that provides TCP services for client access. To send and receive data, you use a NetworkStream object, which provides an underlying stream of data for the network. The TcpClient GetStream method returns this NetworkStream object. For example, TcpClient.GetStream.Read would receive a message from a connected client. TcpClient is capable of both synchronous and asynchronous communications. The Read and Write methods are synchronous, while the BeginRead, BeginWrite, EndRead, and EndWrite methods are asynchronous. When you’re done with your TcpClient, use the Close method to release its resources.
TcpListener Class
The TcpListener class is also a type of socket and listens for connections from TCP clients. Once a TcpListener object has been instantiated, use the Start method to begin listening for network requests. There are two ways to detect a request. One way is to use the Pending method to detect incoming connection requests. You can also use the AcceptSocket or AcceptTcpClient method to block until a connection request arrives. The sample application uses the AcceptTcpClient method. When the TcpListener is done listening for network requests, the Stop method is used.
Code Walkthrough
The sample application is divided into two solutions: a server solution and a client solution. This code walkthrough will focus on the server solution.
The Server Solution—frmMain
First, examine the declarations section of frmMain, the main form of the application:
ImportsSystem.Net.Sockets


PublicClassfrmMain
InheritsSystem.Windows.Forms.Form


ConstPORT_NUMAsInteger=10000


PrivateclientsAsNewHashtable()
PrivatelistenerAsTcpListener
PrivatelistenerThreadAsThreading.Thread
First, the System.Net.Sockets namespace is imported to the file to reduce the amount of typing required. A constant, PORT_NUM, is used to specify the port number the application will use. A PORT_NUM constant is also defined in the client solution. clients is a Hashtable that is used to keep track of all clients that connect to the server. As each client connects, a new item is added to the Hashtable. When a client disconnects, it’s removed from the collection. The listener object is the TcpListener object that listens for and connects to client applications. Finally, a thread is declared that will be used later in conjunction with the listener object. Although using a thread to listen for client requests is not a requirement for programming with sockets, it can make the application more responsive.
The Server Solution—frmMain_Load
When frmMain loads, it starts the background listener thread and updates the status list box to indicate the server is now available for client requests:
PrivateSubfrmMain_Load(ByValsenderAsSystem.Object,_
ByValeAsSystem.EventArgs)HandlesMyBase.Load


listenerThread=NewThreading.Thread(AddressOfDoListen)
listenerThread.Start()
UpdateStatus("Listenerstarted")
EndSub
The Server Solution—frmMain.DoListen
The DoListen subroutine is used by the background listener thread so that clients can connect to the server without slowing down the user interface:
PrivateSubDoListen()
Try
listener=NewTcpListener(PORT_NUM)
listener.Start()
Do
DimclientAsNewUserConnection(listener.AcceptTcpClien t)
AddHandlerclient.LineReceived,_
AddressOfOnLineReceived
UpdateStatus("Newconnectionfound:waitingforlog-in")
LoopUntilFalse
Catch
EndTry
EndSub
Inside DoListen, a new TcpListener object is created to listen for client requests. Note that the port number is passed into its constructor and the Start method is used to begin the listening process. A Do/Loop is used to continuously monitor for client requests. If a request is received, the OnLineReceived method is invoked.
OnLineReceived acts as an event handler and is triggered when a client sends a command to the server. The sample application defines four types of commands: “CONNECT”, “CHAT”, “DISCONNECT”, and “REQUESTUSERS”. The command is sent over the network stream as a text message. A vertical bar (|) is used as a delimiter to separate the type of command from the content of the message. For example, consider “CHAT|Hello World”. “CHAT” is the type of command, and “Hello World” is the actual message content. To parse the message, the Split method of the String object is used:
PrivateSubOnLineReceived(ByValsenderAsUserConnection,_
ByValdataAsString)


DimdataArray()AsString


dataArray=data.Split(Chr(124))


SelectCasedataArray(0)
Case"CONNECT"
ConnectUser(dataArray(1),sender)
Case"CHAT"
SendChat(dataArray(1),sender)
Case"DISCONNECT"
DisconnectUser(sender)
Case"REQUESTUSERS"
ListUsers(sender)
CaseElse
UpdateStatus("Unknownmessage:"&data)
EndSelect

EndSub
Now that the client is connected, the chat program is operational for clients to send messages back and forth to each other.
Conclusion
This sample application shows how to use sockets within Visual Basic .NET applications. Support for sockets is provided by the System.Net and System.Net.Sockets namespaces. The sample application uses two basic types of sockets, TcpClient and TcpListener. The TcpClient class provides client connections for TCP network services. The TcpListener class listens for connections from TCP clients. When running the sample application, remember to run both the server and client solutions at the same time.
Application #81 Work with Resource Files
This sample application shows how to work with resource files to create forms that are localized to specific cultures. A resource file contains nonexecutable data such as strings and graphics that can be embedded into the portable executable (PE) file for an application. Windows Forms have Localizable and Language properties, which allow a form to share application code for all cultures while allowing the form to easily display culture-specific strings and images. The sample application contains a form, frmDataEntry, that uses these properties and resource files for four different cultures: France, Italy, Spain, and the United States. The user can select from these four cultures simply by clicking a command button, as shown in Figure 9-3. When the button is clicked, frmDataEntry displays the culture the user selected, as shown in Figure 9-4.
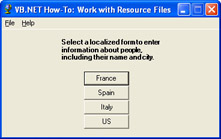
Figure 9-3: The main form lets you choose between four different cultures.
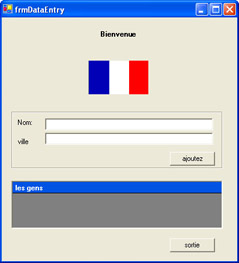
Figure 9-4: The data entry form localized to French.
Building Upon…
Application #7: Object-Oriented Features
Application #8: Scoping, Overloading, Overriding
Application #32: Use Format Codes to Format Data
New Concepts
This sample application introduces two new concepts: globalization and localization. To support these concepts in your applications, Windows Forms provides Localizable and Language properties.
Globalization and Localization
Visual Basic .NET provides built-in support for creating global, culturally aware applications. These days, many companies are expanding their markets across the world. Users in other parts of the globe have various standards for formatting numbers, dates, and currencies, and they speak various languages. To make your applications usable to these people, you must design them to take into account the concepts of globalization and localization. Globalization is the process of formatting data based on the selected culture. For example, in the United States, a period is used as a decimal place and a comma as a thousands separator. But in other countries, a comma is used as a decimal place and a period is used as a thousands separator. Localization is the process of displaying languages and graphics based on the selected culture. In the sample application, the text and graphics on frmDataEntry change according to the selected culture.
Localizable and Language Properties
Creating a localized form in Visual Basic .NET is straightforward. First, set the form’s Localizable property to True. This tells Visual Basic .NET the form will be localized to one or more cultures. Next, each Windows Form has a Language property that indicates the current localizable language. By default, this property is set to (Default). After you’ve set Localizable to True, change the Language property to whatever language you want to localize to and then make whatever culture-specific changes that need to be made to the form. Visual Studio .NET automatically handles the creation of all appropriate resource files. Then change the Language property to the next culture you want to localize to, and make the culture-specific changes to the form for that language. Repeat these steps for as many cultures as there are to be localized.
Code Walkthrough
Because the actual localization takes place at design time when you’re creating your user interface, there is very little code to walk through. The frmMain form contains four button controls: Italy, France, Spain, and US. Each of these buttons will display the frmDataEntry form localized to one of these cultures. For example, here is the click event procedure for the France button:
PrivateSubbtnFrance_Click(ByValsenderAsSystem.Object,_
ByValeAsSystem.EventArgs)HandlesbtnFrance.Click

Thread.CurrentThread.CurrentUICulture=NewCultureInfo("fr-FR")
DimfrmDataAsNewfrmDataEntry()
frmData.ShowDialog()
EndSub
Thread.CurrentThread.CurrentUICulture represents the current culture for the user interface. The culture code for the French language and the region France is “fr-FR”. By changing Thread.CurrentThread.CurrentUICulture, you are effectively telling Visual Basic .NET to render your form for this culture.
Conclusion
As the world seems to get smaller and smaller, there is a greater need to create applications that can be sold and used across the global marketplace. Globalization and localization are two related but different concepts. Globalization is the process of formatting the same data based on the current culture, whereas localization is the process of displaying different languages and images based on the current culture. To create a localized form, set the form’s Localizable property to True and customize the user interface for each culture using the form’s Language property. A resource file containing all localizable data (such as strings and graphics) is automatically embedded into the binary file of an application. Using the Localizable and Language properties, Visual Studio .NET will create these resource files for you.
Application #82 Serialize Objects
Serialization is the process of converting an object into a linear sequence of bytes. This is a powerful technique that has several practical uses, such as persisting an object’s state to disk. For example, a word-processing document might exist as an object. Using serialization, the word-processing document can be saved to a file on disk for later retrieval. When the user wants to reopen the document, it’s deserialized and the document is restored. Other uses include cloning objects and remoting.
The sample application, shown in Figure 9-5, allows the user to serialize a class by using either SOAP or binary format. The six grouped command buttons are for serializing and deserializing. The bottom two buttons allow the user to view the SOAP envelopes for the serialized objects. The text boxes on the right allow the user to specify the initial data for the instances. The read-only text boxes on the far right allow the user to see the new field values after deserialization.
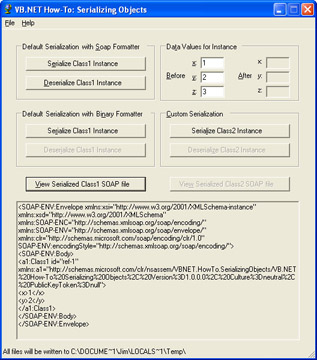
Figure 9-5: The application interface for the Serialization demonstration.
Building Upon…
Application #7: Object-Oriented Features
Application #8: Scoping, Overloading, Overriding
New Concepts
There are two ways to mark a class as being serializable: using the <Serializable> attribute, or implementing the ISerializable interface.
Using the <Serializable> Attribute
The <Serializable> attribute is the easiest way to mark a class as being serializable. Simply add this attribute to a class, and all module-level fields in a class are marked as being serializable. This includes all public and private fields.
Implementing ISerializable
A second way to mark a class as serializable is to implement the ISerializable interface. ISerializable has only one method that must be implemented: GetObjectData. GetObjectData accepts two parameters and has no return value. The first parameter, SerializationInfo, holds all the data needed to serialize or deserialize an object. The second parameter, StreamingContext, indicates the source or destination of the information. Because you implement GetObjectData yourself, you can specify exactly which fields are to be serialized.
Formatters
Regardless of how a class is marked as being serializable—either by using the <Serializable> attribute or the ISerializable interface—the data is serialized using a formatter. Visual Basic .NET provides two built-in formatters: the BinaryFormatter and the SoapFormatter. The BinaryFormatter is used to serialize and deserialize an object in binary format. The SoapFormatter uses XML format. You can also create your own formatters, which can be customized in any way you want.
Marking a Class as Serializable
The sample application contains a class named Class1, which is used as the object to be serialized:
PublicClassClass1


PublicxAsInteger
PrivateyAsInteger
PubliczAsInteger


PublicSubNew(ByValargxAsInteger,ByValargyAsInteger,_
ByValargzAsInteger)
Me.x=argx
Me.y=argy
Me.z=argz
EndSub


PublicReadOnlyPropertyGetY()AsInteger
Get
Returny
EndGet
EndProperty
EndClass
As you can see, Class1 is marked with the <Serializable> attribute. Normally, this means that all fields in the class—public and private—will be serialized. However, if there is a particular field you don’t want to be serialized, you can mark it with the <NonSerialized> attribute. In this case, the variable z is marked with the <NonSerialized> attribute.
Serialization Using the SoapFormatter
Now that you’ve seen the class that is to be serialized, here is the code that serializes an instance of Class1 to an XML file using the SoapFormatter:
PrivateSubcmdStandardSerializationSoap_Click(_
ByValsenderAsSystem.Object,_
ByValeAsSystem.EventArgs)_
HandlescmdStandardSerializationSoap.Click


DimcAsNewClass1(CInt(txtX.Text),CInt(txtY.Text),CInt(txtZ. Text))
DimfsAsNewFileStream(strFileName1,FileMode.OpenOrCreate)
DimsfAsNewSoapFormatter()


sf.Serialize(fs,c)


fs.Close()


EndSub
First, an instance of Class1 is created and populated with sample data. Then a FileStream is created. This will be used to save the XML to a file on disk. Next, an instance of the SoapFormatter is created. Now that all the variables have been set up, the Serialize method of the SoapFormatter is called to perform the actual serialization. Note that the FileStream and Class1 objects are both passed into the Serialize method. Finally, the file is closed.
Deserialization Using the SoapFormatter
The code for deserializing an object is similar to the serialization code:
PrivateSubcmdStandardDeserializationSoap_Click(_
ByValsenderAsSystem.Object,_
ByValeAsSystem.EventArgs)_
HandlescmdStandardDeserializationSoap.Click


DimcAsClass1
DimfsAsNewFileStream(strFileName1,FileMode.Open)
DimsfAsNewSoapFormatter()


c=CType(sf.Deserialize(fs),Class1)


fs.Close()


EndSub
Again, an instance of Class1 is declared, but this time it won’t be instantiated until later. Then a FileStream object is created to read the XML text file. Next, an instance of a SoapFormatter is created. To perform the actual deserialization, the Deserialize method of the SoapFormatter object is called. This is when Class1 is instantiated. Finally, the file is closed.
Conclusion
Serialization is the process of converting an object into a linear sequence of bytes. To mark a class as serializable, use either the <Serializable> attribute or implement the ISerializable interface. To perform serialization, use a formatter. Visual Basic .NET provides two built-in formatters: SoapFormatter and BinaryFormatter. You can also create your own custom formatter. The Serialize method is used to serialize an object, and the Deserialize method is used to deserialize an object.
Application #83 Use TCP Remoting
This sample is designed to show how to use .NET Remoting with Visual Basic .NET. Because .NET Remoting is an architecture for distributed applications, this sample is divided into three solutions: server, host, and client. The server solution is named RemoteCustomer, and it exposes three types of server objects: client-activated, single-call, and singleton.
Before running the demo, you need to build all three solutions. You should build them in the following order:
- RemoteCustomer
- Host
- Client
Once the binaries have been built, start the Host application first to make sure your objects are available for remoting. Then start the client, which is shown in Figure 9-6.
Building Upon…
Application #7: Object-Oriented Features
Application #72: Configuration Settings
Application #82: Serialize Objects
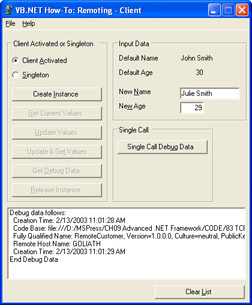
Figure 9-6: The application interface for the Client project.
New Concepts
This sample application introduces several new concepts: .NET Remoting, and single-call, singleton, and client-activated objects.
.NET Remoting
.NET Remoting is the process of communicating between different processes, usually across a network. .NET Remoting is the .NET replacement for DCOM in Visual Basic 6.0, only it’s more powerful and flexible. For example, with .NET Remoting, you have the power of actually moving an object across the network from one machine to the next using the Visual Basic .NET built-in serialization capabilities. There were no built-in facilities for serialization in DCOM, so this had to be done manually. .NET Remoting is also very flexible. You can choose between HTTP and TCP for your transfer mechanism, and SOAP and binary formats for the data encoding. What’s more, you can switch between these by simply changing a couple of lines in a configuration file. No recompilation is necessary.
Single-Call and Singleton Objects
Single-call and singleton objects both run on the server and service client requests. The key difference between them is that a single-call object serves just one request and then is destroyed upon completion, whereas a singleton object serves multiple clients and multiple requests. Thus, a single-call object is stateless and a singleton object is stateful. Further, only one singleton object exists at a time. Multiple single- call objects can be running in memory simultaneously.
Client-Activated Objects
Client-activated objects also run on the server and service client requests. Unlike single-call objects, client-activated objects are stateful. Also, client-activated objects are different from singleton objects in that multiple client-activated objects can exist at the same time, serving multiple clients. If you’re familiar with DCOM in Visual Basic 6.0, client-activated objects are the most similar of the .NET Remoting objects to DCOM.
Code Walkthrough
As mentioned previously, this application comprises three solutions. The code walkthrough will focus on two of these solutions: first, on the server solution and then the client solution.
The Server Solution—Defining the Server Classes
The server solution, RemoteCustomer, exposes three types of server objects: client- activated, single-call, and singleton. Note that all three inherit from the MarshalByRef object:
PublicClassCustomer
InheritsMarshalByRefObject
⋮


PublicClassSingleCallCustomer
InheritsMarshalByRefObject
⋮


PublicClassSingletonCustomer
InheritsMarshalByRefObject
ImplementsIDisposable
⋮
The Client Solution—Accessing a SingleCall Object
There’s a lot of code contained in these three solutions, more than can be shown here. So, the rest of the walkthrough will focus on the code to access a SingleCall object. Take a look at the event procedure for the Single Call Debug Data button:
PrivateSubcmdSingleDebug_Click(ByValsenderAsSystem.Object,_
ByValeAsSystem.EventArgs)HandlescmdSingleDebug.Click

Dimargs()AsObject
DimscCustAsSingleCallCustomer


Try
scCust=_
CType(Activator.CreateInstance_
(GetType(RemotingSample.SingleCallCustomer),_
args),RemotingSample.SingleCallCustomer)
WithMe.lstResponses.Items
.Add("Debugdatafollows:")
.Add(String.Format("CreationTime:{0}",_
scCust.DebugCreationTime.ToString))
.Add(String.Format("CodeBase:{0}",scCust.DebugCodeB ase))
.Add(String.Format("FullyQualifiedName:{0}",_
scCust.DebugFQName))
.Add(String.Format("RemoteHostName:{0}",_
scCust.DebugHostName))
.Add(String.Format("CreationTime:{0}",_
scCust.DebugCreationTime.ToString))
.Add("EndDebugData")
EndWith


CatchexpAsException
DimtxtAsString
txt="Iwasunabletoaccesstheremotecustomerobject."_
&vbCrLf&vbCrLf&_
"DetailedErrorInformationbelow:"&vbCrLf&vbCrLf& _
"Message:"&exp.Message&vbCrLf&_
"Source:"&exp.Source&vbCrLf&vbCrLf&_
"StackTrace:"&vbCrLf&_
exp.StackTrace


MessageBox.Show(txt,"GenericException",MessageBoxButtons. OK,_
MessageBoxIcon.Stop)


EndTry


EndSub
Again, single-call objects live only for the life of one method call. Each time the button is clicked, a new instance of the object is created. Note that to create a single-call object, the code uses Activator.CreateInstance. The Activator object is used to create types of objects locally or remotely, or to obtain references to existing remote objects. The first parameter to CreateInstance is the type of object you want to create. The second parameter is the arguments to be passed into the object’s constructor. Although SingleCallCustomer is expecting no arguments, it is a required parameter, so you must pass something. In this case, args is defined as an array of objects. There is no need to initialize the array. Simply pass it in as is. Once the object has been instantiated, a series of diagnostic messages are written to the list box on screen. The code is enclosed within a Try/Catch/Finally block to trap for errors. If an exception is thrown, it is caught, and an appropriate error message displays on screen.
Conclusion
.NET Remoting is a powerful technology for enabling the distributing of .NET applications. Objects can live solely on a single machine or be transferred across the network. Out of the box, .NET Remoting provides two methods of data transfer—HTTP and TCP—and two methods of encoding—SOAP and binary. You can also plug in your own data-transfer and encoding objects. There are three types of server objects: singleton, single-call, and client-activated. The most similar of these to classic DCOM is the client-activated object. .NET Remoting is such an advanced technology that you’d need an entire book to explain it in detail. Hopefully, this sample will give you a good start. For more information, consult the .NET documentation.
Application #84 Asynchronous Calls
This sample application demonstrates how to use threads to create a responsive application while executing a processor-intensive or lengthy task in the background. This application allows the user to fire a long-running process on various types of threads. The main form contains three command buttons. The first button runs the task on the same thread as the main application, effectively blocking the user from interacting with the main form until the task is finished. The second and third buttons run the task on a second thread, allowing the user to continue interacting with the main form. The difference is that the second button runs the task on a thread from the worker pool, whereas the third button uses a newly created Win32 thread. This example does not include synchronization because no data is being accessed by multiple threads.

Figure 9-7: The application interface of the Asynchronous Calls demonstration.
Building Upon…
Application #7: Object-Oriented Features
Application #79: Use Thread Pooling
New Concepts
This sample application introduces two new concepts: the DebuggerStepThrough attribute and delegates.
DebuggerStepThrough Attribute
The DebuggerStepThrough attribute is used several times in the sample application to tell the Visual Studio .NET debugger to skip over a routine while it’s executing. You can, however, still set a breakpoint in the routine. The DebuggerStepThrough attribute is used because attempting to step through multithreaded code can sometimes lead to inconsistent results.
Delegates
A delegate is a special kind of data type that allows you to pass a routine as a parameter to a method. In a sense, delegates are new to Visual Basic developers, but in reality, this mechanism has been prevalent all along. Behind the scenes, events are implemented as delegates. To create your own delegate, use the Delegate keyword. For example:
PublicDelegateSubMyDelegateType(ByValiAsInteger,ByValsAsSt ring)
This creates a new delegate named MyDelegateType with two parameters, an integer and a string, in that order. The signature is important because any procedure assigned to this delegate must have the same signature to keep your code type-safe. Once a delegate type has been declared, you can create instances of it by passing in the address of the routine you want to assign it to. For example:
PublicSubMyProcedure(ByValiAsInteger,ByValsAsString)
'Dosomething
EndSub


DimdtAsNewMyDelegateType(AddressOfMyProcedure)
The sample application uses a delegate in the Click event procedure for the Run On Worker Pool Thread button.
Code Walkthrough
The focal point of the code walkthrough will be on frmMain. In particular, it will examine the TheLongRunningTask subroutine and the cmdSameThread_Click, cmdWorkerPoolThread_Click, and cmdRunOnNewWin32Thread_Click event handlers.
TheLongRunningTask Subroutine
Before taking a look at the actual threading code, first look at the TheLongRunningTask subroutine. The first thing to notice is that this subroutine doesn’t do any real work. Its only purpose is to simulate a long-running process. The Sleep method of the Thread.CurrentThread object is used to simulate a long-running piece of code:
PrivateSubTheLongRunningTask()


DimfAsNewfrmTaskProgress()
f.Show()
f.Refresh()


DimiAsInteger
Fori=1To10
f.prgTaskProgress.Value+=10
Thread.CurrentThread.Sleep(500)
Next


f.Hide()
f.Dispose()
EndSub
The Sleep method inserts a half-second delay. To keep the user apprised of its progress, this subroutine displays a form with a progress bar on it. As the For/Next loop iterates, the progress bar is incremented. TheLongRunningTask takes 5 seconds to run.
The Run On Same Thread Button
When the user clicks the Run On Same Thread button, the TheLongRunningTask subroutine is executed directly. No threading is used. In other words, this is “normal” code:
_
PrivateSubcmdSameThread_Click(ByValsenderAsSystem.Object,_
ByValeAsSystem.EventArgs)_
HandlescmdSameThread.Click

TheLongRunningTask()


EndSub
Also, note that when this button is clicked, the whole application is unresponsive until the task completes.
TaskDelegate
TaskDelegate is a delegate used by the Run On Worker Pool Thread button:
DelegateSubTaskDelegate()
The Run On Worker Pool Thread Button
The Run On Worker Pool Thread button executes the TheLongRunningTask subroutine on a thread from the thread pool. This is performed asynchronously using the TaskDelegate declared previously. The AddressOf operator passes the memory address of the TheLongRunningTask subroutine into the delegate, and then the BeginInvoke method starts execution:
_
PrivateSubcmdWorkerPoolThread_Click(_
ByValsenderAsSystem.Object,_
ByValeAsSystem.EventArgs)_
HandlescmdWorkerPoolThread.Click


DimtdAsNewTaskDelegate(AddressOfTheLongRunningTask)
td.BeginInvoke(Nothing,Nothing)


EndSub
Note that when this button is clicked, the application itself remains responsive.
The Run On New Win32 Thread Button
Finally, the Run On New Win32 Thread button runs the same subroutine as the previous two buttons. But this time the task is run on a newly created operating system thread (not on a thread from the thread pool):
_
PrivateSubcmdRunOnNewWin32Thread_Click(_
ByValsenderAsSystem.Object,_
ByValeAsSystem.EventArgs)_
HandlescmdRunOnNewWin32Thread.Click


DimtAsNewThread(AddressOfTheLongRunningTask)
t.Start()
EndSub
Again, when this button is clicked, the application remains responsive.
Conclusion
Visual Basic .NET allows you to run code asynchronously using free threading. Free threading lets you write an application that performs a task on a separate thread, keeping your user interface free and responsive. You can even use multiple threads to run multiple tasks simultaneously. This technique is very useful when you’re trying to create an application that scales. As more clients connect, or as the workload increases, you can add more threads.
About the Applications
- Working with Microsoft Visual Studio .NET 2003 and Microsoft .NET Framework 1.1
- Working with the Microsoft Visual Basic .NET Language
- Data Access
- Building Windows Forms User Interfaces
- Building Web Applications
- Working with Console Applications
- Interacting with the Operating System
- Working with the .NET Framework
- Advanced .NET Framework
- GDI+
- Building Enterprise Services Applications
- COM Interop/PInvoke
- Visual Studio .NET
- Securing Applications
- Coding Conventions
- Windows Server 2003 for .NET Developers
EAN: 2147483647
Pages: 157
