Securing Applications
Security is paramount, and in this chapter, we’ll show how you can use a user’s Microsoft Windows identity and role membership to control access to protected resources. We’ll also demonstrate how you can implement your own custom authentication schemes. We’ll walk you through using hash algorithms to uniquely identify documents, messages, or both. And finally, we’ll show how you can enhance security by implementing encryption.
Application #97 Implement Windows Role Based Security
This sample application shows you how to retrieve the identity and group membership for a Windows user of your application. The sample application demonstrates how to selectively enable certain application features (such as controls) based on the user’s identity. The sample form has two tabs. The first tab shows how you can gather information about the user’s identity and the groups the user belongs to. The second tab demonstrates selective access to a protected form, based on the groups the user belongs to.
Building Upon…
Application #4: Try/Catch/Finally
Application #7: Object-Oriented Features
New Concepts
The .NET Framework provides a coordinated set of classes for managing security, making it easier than ever to control access to protected resources and to specific portions of your code.
Leveraging Windows Security
The techniques we’ll demonstrate in this sample application give you access to the Windows identity of the current user, and they show you how to apply security measures based on the user’s identity and group membership. The classes we’ll focus on are found in the System.Security.Principal and System.Security.Permissions namespaces, and they are as follows:
- WindowsIdentityA class that represents a user account.
- WindowsPrincipalA class that incorporates both the user’s identity and group membership.
- PrincipalPermissionA class that lets you stipulate that the current operation can be carried out only by one or more principals that you specify. For example, you can stipulate that only User1 can run a particular procedure, or that only members of Group1 can do so. Further, you can specify that User1 can run the procedure only if she is also a member of Group1. You can also combine requirements for multiple identities, groups, or both through methods such as Intersect and Union. See the code walkthrough for examples.
Windows Principals
Once you have identified who the user is and which groups she belongs to, you can authorize her to take further actions. But first you must be sure you know who she is. To accomplish that, you can start with the WindowsIdentity class, which represents the identity of the current user. This class gets its information from the operating system and its key properties include the following:
- AuthenticationTypeIndicates how the user was authenticated
- IsAnonymousIndicates whether the system considers the user to be anonymous
- IsAuthenticatedIndicates whether Windows has authenticated the user
- IsGuestIndicates whether the user is using a Guest account
- IsSystemIndicates whether the user is using a System account
- NameSpecifies the name with which the user logged on to Windows
- TokenSpecifies the user’s Windows account token
You can use these properties to make decisions on whether and how to grant a user access to sensitive resources. For example, you might choose to allow such access only if the user has been authenticated by Windows and is not using a Guest account. Figure 14-1 shows the result of a successful demand that the current user be part of the Administrators group.
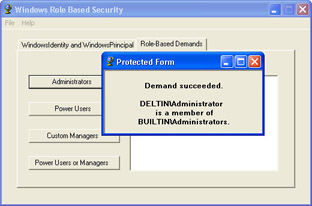
Figure 14-1: With role-based security, you can easily control user access to resources based not only on user identities but also on the groups (roles) to which they belong.
With the WindowsIdentity in hand, you can create a WindowsPrincipal object based on the identity. The WindowsPrincipal, which also gets its data from the operating system, will contain not only the user’s identity but also the groups to which the user belongs. With these elements, you’re able to authorize the user based either on her identity or on her group membership, as we’ll describe in the next section.
Code Walkthrough
First, at the class level, we use the GetCurrent method to create a WindowsIdentity object that represents the current user. Then we create a WindowsPrincipal object based on the WindowsIdentity object.
Privatem_idWindowsAsWindowsIdentity=WindowsIdentity.GetCurrent( )

Privatem_prinWindowsAsWindowsPrincipal=_
NewWindowsPrincipal(m_idWindows)

Privatem_strIdentityAsString=m_idWindows.Name
Retrieving User Information
Now that we have the WindowsPrincipal object, we can determine the user’s group memberships. In the btnRetrieveUserInfo_Click procedure, we’ll set the Checked property of each Checkbox control based on whether the user is a member of a specific group (role). To see whether the user is a member of a built-in group, we use the IsInRole method, passing it one of the members of the WindowsBuiltInRole enumeration, which has entries for such groups as Administrators, Power Users, and more.
PrivateSubbtnRetrieveUserInfo_Click(...
chkAdministrator.Checked=_
m_prinWindows.IsInRole(WindowsBuiltInRole.Administrator)
chkPowerUsers.Checked=_
m_prinWindows.IsInRole(WindowsBuiltInRole.PowerUser)
chkUsers.Checked=_
m_prinWindows.IsInRole(WindowsBuiltInRole.User)
| Note |
Members of the WindowsBuiltInRole enumeration are spelled a little differently than the Windows groups they represent: they have no spaces, and they don’t have a closing s. |
If you prefer, you can use the BUILTIN keyword with the group name, which must be spelled the same way it is in Windows. The equivalent of WindowsBuiltInRole.Administrator would be "BUILTINAdministrators"—for example: chkAdministrator.Checked = prinWindows.IsInRole("BUILTINAdministrators").
To test for membership in a custom group, we must concatenate the computer name with the name of the custom group.
chkManagers.Checked=_
m_prinWindows.IsInRole(m_machineName& "Managers")
Finally, we display the WindowsIdentity properties, whose contents help us determine how much to permit this user to do on our system.
Withm_idWindows
txtLogin.AppendText(String.Format("Name:{0}{1}",_
.Name,ControlChars.CrLf))
txtLogin.AppendText(String.Format("AuthenticationType:{0}{ 1}",_
.AuthenticationType,ControlChars.CrLf))

txtLogin.AppendText(String.Format("IsSystem:{0}{1}",_
.IsSystem,ControlChars.CrLf))
txtLogin.AppendText(String.Format("Token:{0}{1}",_
.Token,ControlChars.CrLf))
EndWith
EndSub
Implementing Authorization
Once we have access to the current principal, we can impose demands that specify what that user can do.
In this example, we have a form that we want only selected users, groups, or both to be able to display. It’s displayed by a procedure named ShowProtectedForm, which accepts the name of a group that will be allowed to see the form. In the following example, we’ll display the form if the current user is a member of the Administrators group:
PrivateSubbtnAdminRun_Click(...
ShowProtectedForm("BUILTINAdministrators")

EndSub
| Note |
You can’t use the WindowsBuiltInRole enumeration here. You must pass a string using the BUILTIN keyword and the Windows group name. |
In the ShowProtectedForm procedure, we’re using the PrincipalPermission object to run a security check against the active principal. We’re requiring that the principal be part of the group provided in strGroup, or else they cannot execute the procedure.
PrivateSubShowProtectedForm(ByValstrGroupAsString)

DimppTestAsNewPrincipalPermission(Nothing,strGroup)
Because we’re passing Nothing as the first parameter to the PrincipalPermission constructor, any member of the specified group will be allowed access. However, you can specify both an identity and a role (the identity would be the first parameter), in which case the current principal must meet both criteria.
Once the PrincipalPermission object is created, we use its Demand method to require that the user meet the stated criteria. If the criteria are not met, a security exception is thrown, and we handle it gracefully in a Try/Catch block.
Try
ppTest.Demand()


DimfrmAsNewfrmProtected()
frm.Show()
frm.txtProtected.Text=String.Format(_
 "{0}Demandsucceeded.{0}{0}{1}{0}isamemberof{0}" &_
 "{2}.",ControlChars.CrLf,m_strIdentity,strGroup)
CatchexAsSystem.Security.SecurityException
txtDisplay.Text=String.Format("SecurityException:" &_
 "{0}{3}{0}{1}isnotamemberof{0}{2}.",ControlChars.CrLf,_
m_strIdentity,strGroup,ex.Message)
EndTry
EndSub
What if you want to allow members of more than one group to have access to the protected resource? You can implement a Demand that checks for multiple groups by using the Union method. The following example requires the user to be a member of either the built-in Power Users group or the custom Managers group. If the user is not a member of either one, a security exception will be thrown.
PrivateSubbtnUnion_Click(...

DimppPowerAsNewPrincipalPermission(Nothing, "BUILTINPowerUsers")
DimppMgrAsNewPrincipalPermission(Nothing,m_machineName&_
 "Managers")
Try
ppPower.Union(ppMgr).Demand()
DimfrmAsNewfrmProtected()
frm.Show()
frm.txtProtected.Text=String.Format(_
 "Demandsucceeded.{0}{1}{0}isamemberofeither{0}Power " &_
 "UsersorManagers.",ControlChars.CrLf,_
m_strIdentity)
CatchexAsSystem.Security.SecurityException

EndTry
EndSub
Conclusion
Using the WindowsIdentity, WindowsPrincipal, and PrincipalPermission classes, you can easily control access to protected resources, based on the current user’s identity and membership in specific groups (roles).
Application #98 Create a Login Dialog Box
This sample application demonstrates how to create a login dialog box to authenticate users and restrict access to selected features of the application. The user must first log in, within three attempts, using either custom authentication or Windows authentication. After the user logs in, his role membership is checked. If the user is a member of either the custom Managers group or the built-in Administrators group, the main form displays a list of the application’s users from the Users.XML file; otherwise, the main form is left blank.
Building Upon…
Application #12: Use a DataSet and DataView
Application #92: Implement Role-Based Security
Application #97: Implement Windows Role-Based Security
New Concepts
In the “Application #97: Implement Windows Role-Based Security” section, we demonstrated the use of the WindowsIdentity and WindowsPrincipal classes, which give us access to the identity and group membership of a user. In this sample application, we’ll demonstrate the use of two sister classes: GenericIdentity and GenericPrincipal, both found in the System.Security.Principal namespace.
Principals and Roles
Whereas the WindowsIdentity and WindowsPrincipal classes represent authentication data gathered from the operating system, the GenericIdentity and GenericPrincipal classes represent user authentication data that results from custom authentication mechanisms.
For example, you can implement your own custom authentication for your application, accepting credentials from users in a custom dialog box and validating them against your own database of usernames and passwords. Once you’ve authenticated a user, you can create generic identity and principal objects for that user and implement authorization based on them.
A principal is an object that contains information about both the user’s identity and his group membership. Armed with a principal, you can restrict use of a form to only users who belong to custom groups such as Managers or Executives, or to a built- in group such as Administrators or Power Users. Figure 14-2 shows a successful login based on custom authentication.
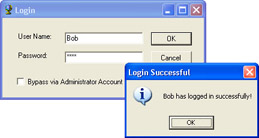
Figure 14-2: By using GenericIdentity and GenericPrincipal objects, you can “roll your own” user authentication while still having access to the Windows-authenticated user and role information.
Generic Principals
Whereas a WindowsPrincipal is instantiated based only on the user’s Windows-authenticated identity, and gathers the user’s group membership from the operating system, a GenericPrincipal is created from the user’s identity coupled with an array of one or more roles to which the user belongs. You’ll find GenericIdentity and GenericPrincipal perfectly suited to custom authentication schemes because you can create your own set of identities and create your own roles at will.
This sample application shows you how you can use both the Windows and Generic classes, implementing custom authentication via user credentials stored in an XML file, but also accessing Windows authentication data.
Code Walkthrough
First, the application presents a custom Login dialog box that asks for a username and password. The dialog box also has a check box that allows the user to bypass the custom authentication if the user is a member of the built-in Administrators group. When the user clicks the OK button, the following routine swings into action to validate him.
Step one is to instantiate an object from the CustomUser class. This class has three methods: IsAdministrator, GetPrincipal, and ValidateUser, each of which will be explained shortly. If the user claims to be an Administrator and truly is, no further authentication is needed, so we display the main form. Otherwise, we notify the user that authentication failed.
PrivateSubbtnOK_Click(...
DimobjUserAsNewCustomUser()


IfchkAdministratorAccount.CheckedThen
IfobjUser.IsAdministratorThen
ShowMainForm()
Else
LimitLoginAttempts("CurrentuserisnotanAdministrator . " &_
 "PleaseprovideaUsernameandPassword.")
EndIf
Else
If the user doesn’t claim to be an Administrator, we determine whether the user account exists, based on the submitted username and password. The ValidateUser method can return one of four results, and we take action accordingly:
DimstrNameAsString=txtUserName.Text
DimstrPasswordAsString=txtPassword.Text
SelectCaseobjUser.ValidateUser(strName,strPassword)
If the user’s credentials are valid, we get a GenericPrincipal object associated with the user’s identity, and show the main form.
CaseValidationResult.ValidUser
DimprinGenPrincipalAsGenericPrincipal


prinGenPrincipal=objUser.GetPrincipal(strName,_
strPassword)
Thread.CurrentPrincipal=prinGenPrincipal


ShowMainForm()
If the user has presented invalid credentials, we warn the user and handle multiple login attempts.
CaseValidationResult.InvalidUser
LimitLoginAttempts("Invalidcredentials.Please " &_
 "tryagain.")

EndSelect
EndIf
EndSub
Custom Authentication
The CustomUser class encapsulates the essentials for authenticating the user, based on credentials in the XML user data file, a portion of which is shown in the following code sample. Note that a user can belong to more than one role.
Bob
pass
Managers
Executives
ValidateUser Method
The ValidateUser method verifies whether the user account exists in the XML user data file, and it returns a ValidationResult (an enumeration we created for the purpose). First we read the XML into a DataSet and filter on the username and password.
FunctionValidateUser(ByValstrNameAsString,ByValstrPasswordAs String)_
AsValidationResult
DimdsUsersAsNewDataSet()
DimdrRows()AsDataRow
Try
dsUsers.ReadXml("..Users.xml")
drRows=dsUsers.Tables(0).Select("name='" &_
strName& "'andpassword='" &strPassword& "'")
| Important |
If the filtered collection contains one row, a record was found. Otherwise, the user either doesn’t exist or there’s a duplicate. If you plan to use the filtering technique shown here, you’ll need to ensure, when adding new users to the list, that there are no two users with the same credentials. SelectCasedrRows.Length Case1 ReturnValidationResult.ValidUser Case0 ReturnValidationResult.InvalidUser CaseElse ReturnValidationResult.DuplicateUser EndSelect CatchexAsFileNotFoundException ReturnValidationResult.UserDataNotFound EndTry EndFunction |
IsAdministrator Method
The IsAdministrator method verifies whether the currently logged-in Windows user is an Administrator. If you expect repeated role-based validation, set the principal policy as shown in the following code sample. The SetPrincipalPolicy method sets Windows principals as the default result whenever threads in this application domain attempt to bind to principals.
FunctionIsAdministrator()AsBoolean
AppDomain.CurrentDomain.SetPrincipalPolicy(_


PrincipalPolicy.WindowsPrincipal)
| Note |
If you expect only a single instance of role-based validation, you can use the following syntax, rather than setting the principal policy: DimprinWinPrincipalAsNew_ WindowsPrincipal(WindowsIdentity.GetCurrent()) |
We convert the current principal, of whatever type, into a WindowsPrincipal and then check whether the user account belongs to the Administrators group.
DimprinWinPrincipalAsWindowsPrincipal=_
CType(Thread.CurrentPrincipal,WindowsPrincipal)
IfprinWinPrincipal.IsInRole(WindowsBuiltInRole.Administrator)T hen
ReturnTrue
Else
ReturnFalse
EndIf
EndFunction
GetPrincipal Method
The GetPrincipal method returns a GenericPrincipal representing a user account. First we create a GenericIdentity representing the user. Then we read the XML user list into a DataSet and filter the DataSet to produce a DataRows collection (which should have only one row) containing the user’s credentials.
FunctionGetPrincipal(ByValstrNameAsString,ByValstrPasswordAs String)_
AsGenericPrincipal
DimidGenIdentityAsNewGenericIdentity(strName)


DimdsUsersAsNewDataSet()
dsUsers.ReadXml("..Users.xml")
DimdrRows()AsDataRow=dsUsers.Tables(0).Select("name='" &_
strName& "'andpassword='" &strPassword& "'")
The DataSet has two tables. Table(0) contains the user name and password, and Table(1) has the roles. The DataSet considers Table(1) to be a child table of the Table(0) because the role element is repeated in the XML file. The DataSet creates a default relationship between the two tables named user_role. Using that relationship, we retrieve child rows containing the user’s roles.
DimdrChildRows()AsDataRow=drRows(0).GetChildRows("user_role ")
We create a string array to hold the roles the user belongs to. The array will have as many elements as there are rows in drChildRows. Therefore, its upper bound will be one less than the number of rows in drChildRows.
DimstrRoles(drChildRows.Length-1)AsString


DimiAsInteger=0
DimdrAsDataRow
ForEachdrIndrChildRows
strRoles(i)=dr.Item(0).ToString()
i+=1
Next
Finally we combine the identity and the roles to create the GenericPrincipal, which we’ll use for authorization.
DimprinGenPrincipalAsNewGenericPrincipal(idGenIdentity,strR oles)
ReturnprinGenPrincipal
EndFunction
Restricting the User
Having authenticated the user, we can now determine what the user is allowed to do—that is, implement Authorization. The main form has a DataGrid that lists the application user accounts. We intend to make that list available only to members of the built-in Administrators group or to the custom Managers role.
In the Load event procedure of the form, we check the user’s role membership, accessing both Windows and generic roles. If the user is either a Manager or an Administrator, we’ll load and display the current user accounts. Otherwise, we won’t.
PrivateSubfrmMain_Load(...
IfThread.CurrentPrincipal.IsInRole("Managers")Or_
Thread.CurrentPrincipal.IsInRole("BuiltInAdministrators")T hen
DimdsUsersAsNewDataSet()
dsUsers.ReadXml("..users.xml")
WithdgUsers
.CaptionText= "UserAccounts"
.DataSource=dsUsers.Tables(0)
EndWith
Else
MessageBox.Show("YoumustbeamemberofeithertheManagers " &_
 "orAdministratorsroletoviewuseraccountinformation.",_
 "InsufficientPermissions",MessageBoxButtons.OK,_
MessageBoxIcon.Exclamation)
EndIf
EndSub
Conclusion
It’s just as easy to use the generic identity and principal objects as the Windows versions. Having them available means that you can implement your own custom authentication schemes while still taking advantage of the Framework’s extensive security features.
Application #99 Cryptographic Hash Algorithms
This sample application demonstrates how to use hash functions to ensure data integrity. It simulates the transmission of data over a network or the Internet, with the recipient being able to verify that the received data was not corrupted in transit.
When you run the application, an XML data document of all the Northwind products is created by querying the Microsoft SQL Server Northwind database and persisting the DataSet to XML. This simulates the sender’s creation of the source document. The contents of this document are then read into a StreamReader and converted to a string to be displayed in a TextBox. This simulates your receiving the transmitted document.
When the main form is loaded, an MD5 hash digest is created to be used as an original “key” by which you can validate the transmitted XML. You can click the Compare button to compare the hash digest for the products sent over the wire (displayed) with the hash digest sent from Northwind. If you alter the contents of the TextBox by even one character and click Compare, you’ll see that the hash digests no longer match. Examples of three different hash types—MD5, SHA1, and SHA384— are provided.
Building Upon…
Application #12: Use a DataSet and DataView
Application #22: Build an Offline Application
Application #73: Read From and Write To a Text File
New Concepts
Because data transmitted over a network is susceptible to interception and corruption, you need a means of verifying that the data you receive is the same as the original. Hash digests let you do that.
Hashing Algorithms
Hash values (also known as message digests) are unique and extremely compact numerical representations of a piece of data. Changing even one character in a source file can result in huge differences in the hash value. It’s considered to be computationally infeasible that any two messages can produce the same hash value, or that a message can be produced to match an existing hash value.
Because a hash value is like a fingerprint for the original message, hashes are extremely valuable for ensuring data integrity. For example, if you compare the hash value generated before a message is sent with the hash value generated from the message you receive, you can determine whether the message has been corrupted. Some of the more commonly used hashing algorithms, all found in the System.Security.Cryptography namespace, are as follows:
- MD5 hashing algorithmThe MD5 algorithm accepts an input message and produces a 128-bit hash value. MD5 is often used for digital signatures.
- SHA1 hashing algorithmLike MD5, SHA1 also produces a message digest. SHA1 output, however, is 160 bytes long, as opposed to 128 bits for MD5.
- SHA384 hashing algorithmSHA384 is a big brother to SHA1, producing a 384-bit message digest.
Figure 14-3 shows a successful comparison between the original hash digest of a message and the hash digest after it is received.
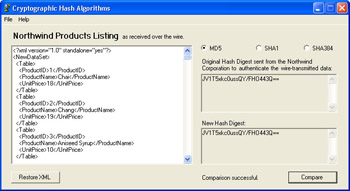
Figure 14-3: A hash value (or message digest) serves as a digital fingerprint of a file. When you send the file and the message digest to someone else, the recipient can verify whether the data arrived uncorrupted.
Code Walkthrough
When the main form is loaded, its Form Load event calls the CreateOriginalProductsList procedure to create the original XML document, reads in the XML, displays it in the large TextBox, and then calls a function to generate an MD5 hash digest to display in the upper right TextBox.
First we create the XML document, simulating the original products list sent by the Northwind Corporation. The XML document is stored in the application’s root folder. Then we open the XML document and convert it to a string. This simulates transferring the product listing over the wire to a client.
PrivateSubfrmMain_Load(...
CreateOriginalProductsList()


DimsrAsNewStreamReader("..products.xml")
strOriginalXML=sr.ReadToEnd
sr.Close()
Next we display the transmitted XML and the hash digest that is used for authenticating the transmitted XML. This digest is generated from the contents of the original document, not from the XML displayed in the TextBox.
txtXML.Text=strOriginalXML
txtHashOriginal.Text=GenerateHashDigest(strOriginalXML)


txtHashForCompare.Text=COMPARE_INSTRUCTIONS

EndSub
Generating the Digest
The GenerateHashDigest function performs the work of encryption, generating each of the three hash digest types. We begin by creating an Encoding object so that we can use its convenient GetBytes method. GetBytes creates a byte array from the source text passed as an argument. To create the hash, we simply call the ComputeHash method of the desired cryptographic provider, passing it the byte array we just generated. Finally the function returns a Base64-encoded version of the hash. Base64 is a method of encoding binary data as ASCII text.
FunctionGenerateHashDigest(ByValstrSourceAsString)AsString
DimuEncodeAsNewUnicodeEncoding()
DimbytProducts()AsByte=uEncode.GetBytes(strSource)


SelectCaseTrue
CaseoptMD5.Checked
Dimmd5AsNewMD5CryptoServiceProvider()
hash=md5.ComputeHash(bytProducts)


CaseoptSHA1.Checked
Dimsha1AsNewSHA1CryptoServiceProvider()
hash=sha1.ComputeHash(bytProducts)


CaseoptSHA384.Checked
Dimsha384AsNewSHA384Managed()
hash=sha384.ComputeHash(bytProducts)


EndSelect
ReturnConvert.ToBase64String(hash)

EndFunction
| Tip |
In addition to accepting a complete byte array, ComputeHash can do its work on a portion of a byte array, or it can accept a Stream. |
Comparing the Hashes
To verify data integrity, you need to compare the original hash value with the hash value produced from the received text. The btnCompare_Click routine does just that. It compares, byte for byte, the original hash digest with the hash digest generated from the contents of the TextBox. First we create an Encoding object so that we can use the GetBytes method to obtain byte arrays. Then we create a byte array from the original XML file sent by the Northwind Corporation.
PrivateSubbtnCompare_Click(...
DimuEncodeAsNewUnicodeEncoding()
DimbytHashOriginalAsByte()=uEncode.GetBytes(txtHashOriginal .Text)
Now we generate a hash digest from the contents of the large TextBox containing the XML. The contents simulate the XML received from the Northwind Corporation over the wire. We want to compare the new hash with the original hash to make sure the XML has not been corrupted in transit. So from the new hash digest we create a byte array for comparison with the original hash digest byte array.
DimstrHashForCompareAsString=GenerateHashDigest(txtXML.Text )
DimbytHashForCompareAsByte()=uEncode.GetBytes(strHashForCom pare)
We loop through all the bytes in the hashed values and compare them, byte for byte. If any pair fails to match, we display an appropriate message and exit the loop. Otherwise, we indicate success.
txtHashForCompare.Text=strHashForCompare
DimiAsInteger
Fori=0TobytHashOriginal.Length-1
IfbytHashOriginal(i)<>bytHashForCompare(i)Then


lblResults.Text= "Datahasbeencorrupted!"
ExitFor
Else
lblResults.Text= "Comparisonsuccessful."
EndIf
Nexti
EndSub
Conclusion
Cryptographic hash values or message digests provide a simple way for you to ensure that two versions of a data item are identical. Various hashing algorithms are available, each with varying message digest sizes. The larger the digest size, the more secure the fingerprint. Naturally, you’ll need to use the same algorithm (MD5, SHA1, SHA384, or other) that was used on the original data. You’ll probably use this technique most often to verify that transmitted data arrived without modification.
Application #100 Encrypt and Decrypt Data
This sample application shows you how to encrypt and decrypt data using symmetric encryption, in which you and your recipient use the same key both to encrypt and to decrypt the data. The application lets you load a document, create a key, encrypt the document, and decrypt the document. You can choose between two popular encryption standards: Rijndael and TripleDES.
Building Upon…
Application #73: Read From and Write To a Text File
New Concepts
When you need to transmit data securely, one useful option is to encrypt it. Encrypting ensures that the data remains confidential, protects it from being altered, and helps to assure the recipient that it truly originated from you. Private-key encryption, also known as symmetric encryption, requires you and your recipient to have the same key, which is used both to encrypt and to decrypt the data. Naturally, you’ll need to protect this key because anyone who gets it can decrypt intercepted messages.
| Note |
Another kind of encryption, public-key or asymmetric encryption, utilizes a public-private key pair. You encrypt data with your private key, and then give your public key to your recipient. The public key is used to decrypt the data, and it can decrypt only data that was encrypted with your private key, assuring your recipient that the data came from you. |
One advantage of symmetric encryption is that it’s very fast compared to the other alternative, public-key encryption, and is therefore ideal for large amounts of data.
| Tip |
You can take advantage of the strengths of both encryption technologies by sending your main document (which could be quite large) encrypted symmetrically, and sending the private key (which will be quite small) encrypted asymmetrically. |
The symmetric encryption key is generated from a secret password, which serves as the cryptographic seed for the key. It’s conceivable that someone might guess the password and generate his own copy of the key, or that an intruder might use a dictionary attack, in which multiple possible passwords are tried until the correct one is sniffed out. To prevent such security breaches, you can salt the password before generating the key. The salt is in the form of random bytes added to the password, which makes the generated key harder to duplicate.
Further, the Framework encryption classes use a technique known as cipher block chaining (CBC), in which data is encrypted a block at a time, with each block ranging from 8 to 32 bytes. Data from the previous block is mixed into the encryption of the current block to further ensure randomness, even when encrypting identical blocks. The first block is encrypted using an Initialization Vector (IV). You can generate both the salt and the IV and save them in a file that you can send to your recipient. Using the password and the salt/IV file, your recipient can generate the key to be used for decryption.
The Framework encryption classes (found in the System.Security.Cryptography namespace) are stream-based, which means that an input stream of data can be passed to an encryption stream and on to an output stream without having to be saved to disk in between.
TripleDes
TripleDES is a block cipher based on the Data Encryption Standard (DES). It applies the DES algorithm to the data three successive times and can use either two or three 56-bit keys.
Rijndael
Rijndael is a block cipher that allows block lengths up to 256 bits. Its keys can also range up to 256 bits.
Figure 14-4 shows the sample form with a loaded text file ready to be encrypted. Note the use of both a password and a key file.
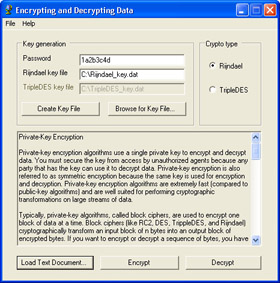
Figure 14-4: The .NET Framework classes make it easy for you to encrypt files. Using your chosen password, a salted key file and one of the available cryptographic providers, you can create an encryption that will be tough to break.
Code Walkthrough
When the main form loads, we first instantiate m_crpSample, an instance of the SampleCrypto class, passing the name of the default crypto type. SampleCrypto is a custom class within our project designed to handle encryption functions. m_crpSample was declared earlier at the class level as Private m_crpSample As SampleCrypto. Next we set paths for the files that will contain the keys used for encryption.
PrivateSubfrmMain_Load(...

m_crpSample=NewSampleCrypto("Rijndael")


DimstrCurrentDirectoryAsString=_
Microsoft.VisualBasic.Left(Environment.CurrentDirectory,_
Len(Environment.CurrentDirectory)-3)
m_strRijndaelKeyFile= "C:Rijndael_key.dat"


m_strTripleDESKeyFile= "C:TripleDES_key.dat"


txtRijndaelKeyFile.Text=m_strRijndaelKeyFile


txtTripleDESKeyFile.Text=m_strTripleDESKeyFile


EndSub
Next we need a file to encrypt. The btnLoad_Click procedure lets us locate one, and then retrieves its contents and places them into the TextBox by using the code txtCrypto.Text = ReadFileAsString(m_strSourcePath). The following ReadFileAsString procedure converts the contents of the file first to a byte array, and then to a string for display.
PrivateFunctionReadFileAsString(ByValpathAsString)AsString
DimfsAsNewFileStream(path,FileMode.Open,FileAccess.Read,_
FileShare.Read)
Dimabyt(CInt(fs.Length-1))AsByte


fs.Read(abyt,0,abyt.Length)


fs.Close()
ReturnUTF8.GetString(abyt)

EndFunction
| Note |
Even though in this sample application we’re using only text files for demonstration, the encryption mechanism works on files of any kind. |
We need to generate an encryption key, so when the user fills in a password to be used as the seed for the key and clicks the Create Key File button, btnCreateKey_Click starts the creation of a salt/IV file with the following method call: m_crpSample.CreateKeyFile(m_strCurrentKeyFile).
The CreateKeyFile procedure creates the key file as shown in the following sample code. After initializing each byte array to the proper length for the particular crypto class we’re using, we create a FileStream object to write the salt and IV to a file.
PublicFunctionCreateKeyFile(ByValstrSaveToPathAsString)AsBool ean
ReDimByteArrays()
DimfsKeyAsNewFileStream(strSaveToPath,FileMode.OpenOrCreate ,_
FileAccess.Write)
To generate a random value for salting the key, we use a random number generator. These random bytes are appended to the password before the key is derived from it, making a dictionary attack much more difficult. The PasswordDeriveBytes class lets us generate a key using the password and the salt. Once we’ve generated a new random IV, we’re ready to write the results to the key file.
DimrngAsRandomNumberGenerator=RandomNumberGenerator.Create( )
rng.GetBytes(m_abytSalt)
DimpdbAsNewPasswordDeriveBytes(m_strPassword,m_abytSalt)
m_abytKey=pdb.GetBytes(m_abytKey.Length)
m_crpSym.GenerateIV()
m_abytIV=m_crpSym.IV
Try
fsKey.Write(m_abytSalt,0,m_abytSalt.Length)


fsKey.Write(m_abytIV,0,m_abytIV.Length)


m_strSaltIVFile=strSaveToPath
ReturnTrue
CatchexpAsException
ThrowNewException(exp.Message)
Finally
fsKey.Close()
EndTry
EndFunction
With the target file loaded, its path stored in m_strSourcePath, and our key file created, we can now begin the encryption process, which is initiated by the EncryptDecrypt_Click procedure, with the method call m_crpSample.EncryptFile(). The actual encryption is done by the EncryptFile method of the SampleCrypto class, which is shown in the next section.
Encrypting Data
Step one for encrypting data is to get the salt and IV information from the key file. Then we create a FileStream object and read the source file into a byte array (abytInput). This is similar to how we earlier loaded the TextBox.
PublicSubEncryptFile()
GetSaltAndIVFromKeyFile()
DimfsInputAsNewFileStream(m_strSourceFile,FileMode.Open,_
FileAccess.Read)
DimabytInput(CInt(fsInput.Length-1))AsByte
fsInput.Read(abytInput,0,CInt(fsInput.Length))
fsInput.Close()
Next we create a second FileStream object that will write the data to a temporary file once it’s encrypted. We create a CryptoStream object that points to the file stream and will operate in Write mode. Note the use of the CreateEncryptor method of the SymmetricAlgorithm class, which creates a symmetric encryptor object that will actually perform the encryption.
DimfsCipherTextAsNewFileStream("temp.dat",FileMode.Create, _
FileAccess.Write)
fsCipherText.SetLength(0)
DimcsEncryptedAsNewCryptoStream(fsCipherText,_
m_crpSym.CreateEncryptor(),CryptoStreamMode.Write)
Finally, to perform the encryption and write the data out, we invoke the Write method of the crypto stream, passing in the unencrypted byte array from the source file. The encryption takes place, and the encrypted data is passed to the file stream and written to the temporary file. Thus, the logic flow is as follows: byte array CryptoStream FileStream.
csEncrypted.Write(abytInput,0,abytInput.Length)
csEncrypted.FlushFinalBlock()
| Important |
When you use this technique and the bytes are all written, you must call FlushFinalBlock to indicate to the crypto stream that you’ve finished using it and that it should finish processing any bytes remaining in its buffer. Typically this involves padding the last output block to a complete multiple of the crypto object’s block size (for Rijndael this is 16 bytes, or 128 bits), encrypting it, and then writing this final block to the memory stream. |
Finally we clean up by closing the crypto stream, which automatically closes the file stream. Then the SwapFiles procedure copies the temporary file to the original one and deletes the temp file.
csEncrypted.Close()
SwapFiles(False)
EndSub
Decrypting Data
If someone has sent you an encrypted file, along with a password and a key file containing the salt and the IV, you need to install that key file on your machine and begin the decryption process. The first part of the process is the same as for encryption: you load the target file and enter the password. Then you’ll load the key file, and click the Decrypt button. The EncryptDecrypt_Click procedure calls the m_crpSample.DecryptFile method, and the DecryptFile method swings into action, as shown in the following code.
To decrypt the file, we get the salt and IV information from the key file. Then we read the encrypted file into the fsCipherText FileStream, pass it to the csDecrypted CryptoStream, pass the decrypted data to the srReader StreamReader and on through the fsPlainText FileStream and the swWriter StreamWriter to the output file. Finally we close the streams and clean up.
PublicSubDecryptFile()
GetSaltAndIVFromKeyFile()
DimfsCipherTextAsNewFileStream(m_strSourceFile,FileMode.Ope n,_
FileAccess.Read)
DimcsDecryptedAsNewCryptoStream(fsCipherText,_
m_crpSym.CreateDecryptor(),CryptoStreamMode.Read)
DimsrReaderAsNewStreamReader(csDecrypted)
DimfsPlainTextAsNewFileStream("temp.dat",FileMode.Create,_
FileAccess.Write)
DimswWriterAsNewStreamWriter(fsPlainText)
Try
swWriter.Write(srReader.ReadToEnd)
CatchexpCryptoAsCryptographicException
ThrowNewCryptographicException()
Finally
csDecrypted.Close()
srReader.Close()
swWriter.Close()
EndTry
SwapFiles(True)
EndSub
Conclusion
In this sample application, we’ve shown you how the .NET Framework cryptography classes make it simple for you to encrypt data for secure transmission. You’ve also seen that TripleDES and Rijndael are only two of the Framework symmetrical encryption options, which also include RC2 and DES. Symmetric encryption (which this sample has focused on) is fast, and therefore, suited for large amounts of data. Asymmetric encryption is more secure but slower and, therefore, more suited for smaller data sizes.
About the Applications
- Working with Microsoft Visual Studio .NET 2003 and Microsoft .NET Framework 1.1
- Working with the Microsoft Visual Basic .NET Language
- Data Access
- Building Windows Forms User Interfaces
- Building Web Applications
- Working with Console Applications
- Interacting with the Operating System
- Working with the .NET Framework
- Advanced .NET Framework
- GDI+
- Building Enterprise Services Applications
- COM Interop/PInvoke
- Visual Studio .NET
- Securing Applications
- Coding Conventions
- Windows Server 2003 for .NET Developers
EAN: 2147483647
Pages: 157
- ERP Systems Impact on Organizations
- Challenging the Unpredictable: Changeable Order Management Systems
- The Effects of an Enterprise Resource Planning System (ERP) Implementation on Job Characteristics – A Study using the Hackman and Oldham Job Characteristics Model
- Data Mining for Business Process Reengineering
- Intrinsic and Contextual Data Quality: The Effect of Media and Personal Involvement
