Building Enterprise Services Applications
Enterprise Services is the Microsoft .NET Framework term for COM+ Services. More accurately, Enterprise Services is the name given to the classes in the System.EnterpriseServices namespace. These classes form a wrapper around COM+ Services, providing a much improved COM API. By combining Enterprise Services with features of the common language runtime (CLR), building COM+ applications has never been easier.
Application #91 Create an Enterprise Services Component
This topic can be considered part one of a two-part series on building a simple Enterprise Services component. We assume that you have a basic understanding of COM+, or Enterprise Services as it is referred to in the .NET Framework. Therefore, this topic focuses on the steps required to build an Enterprise Services component.
At the outset, it’s important to clarify some terminology. From the perspective of managed code, the term application takes on its traditional meaning. Also from this perspective, the term serviced component means a component that uses COM+ Services. Thus, for this topic, there is a Windows Forms application (that does not use COM+ directly), which consumes a serviced component. From the perspective of COM+, however, a serviced component is known as a COM+ application. You’ll see this term in the Component Services management console. Keep this in mind as you continue reading.
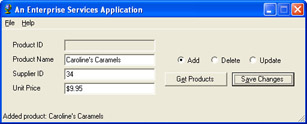
The Microsoft Windows application simulates a data entry form for Northwind products. It does little more than instantiate the serviced component and call appropriate methods. A Class Library project contains the code and the strong name key for the serviced component. Although for instructional purposes a connection string is set in the component class, Product, there is no actual connection to a database. Instead, trace statements are written to the Output window. A StatusBar on the host application is also employed to confirm user actions.
Part two of this series will extend the component to support method-level role-based security.
Building Upon…
Application #4: Try/Catch/Finally
Application #70: Reflection
New Concepts
In the past, it has been quite difficult to build COM+ applications. With the advent of the .NET Framework, however, the COM programming model has been extensively overhauled, due mainly to features inherent in the CLR. Among these features are the following:
- Greatly improved APIThe CLR can be viewed as a replacement for COM because of the wrapper classes in the System.EntepriseServices namespace. Of course, the CLR doesn’t replace COM+ itself, as this is the component runtime environment that provides numerous middle-tier services not presently found in the .NET Framework.
- Accessible assembly metadataBinaries, or assemblies as they are referred to in the .NET Framework, can be declaratively marked with a variety of attributes. This permits serviced components to run under COM+ services without you having to manually configure them by using the Component Services snap-in. This metadata is accessible at precompile time, compile time, and run time via the System.Reflection.Assembly class.
Thus, assuming you have an understanding of COM+, implementing these features in Microsoft Visual Basic .NET basically amounts to learning the associated attributes and how to use them declaratively.
In addition to writing the code you’ll see in the code walkthrough, you must also perform two other tasks when building a serviced component:
- Strong-name the assemblyAll serviced components must be signed with a public-private key pair. To generate a key pair you use the sn.exe utility from a command prompt, as follows:
sn.exe –k MyComponent.snk
The path to this key is then referenced in the AssemblyInfo.vb file for the component.
- Deploy the assemblyYou deploy an assembly by placing the assembly in the global assembly cache (recommended) or by registering the assembly with COM+. The latter option can take three forms:
- Manual registration using the regsvcs.exe utility
- Programmatic registration using the RegistrationHelper class
- Dynamic (also known as lazy) registration
The third option is typically used during development. The component is automatically registered when it is first accessed (causing a slight performance degradation). This is the type of deployment used for the two applications in this series.
You’ll now step through the code for a serviced component.
Code Walkthrough
The walkthrough is divided into two parts. You begin with the Product class, where most of the code resides. In the second half, you’ll learn about the assembly attributes that are needed to properly configure the application for COM+ Services.
The Product Class
The most basic step involved with building a serviced component is to derive from the base class provided by the .NET Framework for all classes that use COM+ Services. This base class is ServicedComponent, and it resides in the System.EnterpriseServices namespace.
ImportsSystem.EnterpriseServices


PublicClassProduct
InheritsServicedComponent
EndClass
At this point, you have the basis of a COM+ component. All that remains to be done is set the required AssemblyKeyFile attribute in the AssemblyInfo.vb file. Further code for this class does not need to be written in any particular way. Of course, in most cases you want to take advantage of various COM+ features and change the default COM+ runtime settings. This is where attributes come in.
In this application, attributes are used at the assembly, component-class, and method levels. You’ll see how the assembly attributes are set in the next section. The class is declaratively marked as follows to require transactions, to enable both Just- in-Time activation (that is, instantiation) and object pooling, and to set a construction string:
JustInTimeActivation(True),_
ObjectPooling(Enabled:=True,MinPoolSize:=2,MaxPoolSize:=10),_
ConstructionEnabled(Default:=_
 "Server=localhost;DataBase=Northwind;IntegratedSecurity=SSPI")>_
PublicClassProduct
InheritsServicedComponent
EndClass
When this component is registered with COM+ Services, these attributes will determine related settings that can be viewed in the component’s Properties dialog box. In Figure 11-1, the Properties dialog box for the Product component shows the activation settings that were set via the ObjectPooling and ConstructionEnabled attributes.
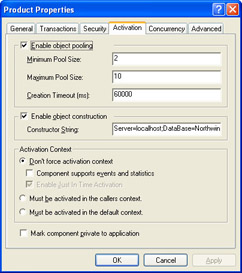
Figure 11-1: The Properties dialog box for the Product component shows the activation settings that were set via the ObjectPooling and ConstructionEnabled attributes.
The only attribute used at the method level is AutoComplete. This marks the method for auto completion, which means that if the procedure exits with no exception, SetComplete is automatically called; otherwise, SetAbort is called.
'Simulatesacalltoastoredproceduretoupdateaproduct.
_
PublicSubUpdate(_
ByValProductIDAsInteger,_
ByValProductNameAsString,_
ByValSupplierIDAsInteger,_
ByValUnitPriceAsDecimal)
⋮

Try
'cmd=NewSqlCommand("Update",cnn)
⋮

'cmd.ExecuteNonQuery()
DoTracing("Product.Updatecalledat " &_
DateTime.Now.ToLongTimeString)
CatchexpAsException
ThrowNewException(exp.Message,exp.InnerException)
EndTry
EndSub
The methods for adding, deleting, and getting products are similar to Update. When examining the class, you’ll also see various base-class methods overridden, such as Deactive and CanBePooled.
The Assembly Metadata
As mentioned earlier, the only line of code that needs to be added to the component’s AssemblyInfo.vb file is the following, which associates (“strong-names”) the assembly with the key you generate using the sn.exe utility:
If you fail to add this statement, a RegistrationException is thrown when the component is instantiated.
Although it’s not required, the ApplicationName attribute is important. If you don’t give the application a name, it will register as ServicedComponent:
You’ll also want to identify the application in a more unique way than a friendly name. For this, use the ApplicationID attribute and pass a GUID to its constructor:
This component also adds a description using the ApplicationDescription attribute. (When you read application here, think “from the perspective of COM+.” These attributes are specifying COM+ Services settings, not CLR settings.)
Finally, to indicate that the component should run in a system process (dllhost.exe), pass the ActivationOption.Server enumeration value to the ApplicationActivation attribute.
If you would rather run the component in the creator’s process, pass the Library enumeration value.
Conclusion
This topic introduced you to building a serviced component (also known as a COM+ application) by using classes in the System.EnterpriseServices namespace. These classes form a wrapper around COM+ Services, providing a greatly improved API. Add to this some special COM+ attributes, as well as to metadata via the way that .NET Framework assemblies support access to metadata via reflection, and your life as a COM+ application developer has become much easier.
The next topic will extend this application to support method-level, role- based security.
Application #92 Implement Role Based Security
This topic continues where the previous topic left off by extending its serviced component to support role-based security at the method level. If you haven’t already read the “Application #91” section, you should do so before proceeding.
Building Upon…
Application #4: Try/Catch/Finally
Application #70: Reflection
Application #91: Create an Enterprise Services Component
New Concepts
There are no new concepts for this topic. We’ve assumed that you already have a basic understanding of COM+ concepts such as marshaling and roles. As with the previous topic, the discussion will focus on the Enterprise Services attributes used to declaratively mark up the serviced component.
Code Walkthrough
The code walkthrough begins with the Product class and then proceeds to a review of the attributes used in the AssemblyInfo.vb file.
The Product Class
To support role-based security at the method level, several changes have been made to the Product class for the serviced component (class members are omitted to conserve space):
SecureMethod(),_
Transaction(TransactionOption.Required),_
JustInTimeActivation(True),_
ObjectPooling(Enabled:=True,MinPoolSize:=2,MaxPoolSize:=10),_
ConstructionEnabled(Default:=_
 "Server=localhost;DataBase=Northwind;IntegratedSecurity=SSPI")>_
PublicClassProduct
InheritsServicedComponent
ImplementsIMyInterface
EndClass
Notice the addition of two attributes. ComponentAccessControl serves as the component’s security “master switch.” In COM+ parlance, access control is the term used for authorization. Thus, marking this class with the ComponentAccessControl attribute means that authorization is enabled for the component.
The SecureMethod attribute enables authorization at the method level. When you use this attribute, you must implement an interface. In this application, IMyInterface serves this purpose:
PublicInterfaceIMyInterface
SubAdd(_
ByValProductNameAsString,_
ByValSupplierIDAsInteger,_
ByValUnitPriceAsDecimal)


SubDelete(ByValProductIDAsInteger)


SubUpdate(_
ByValProductIDAsInteger,_
ByValProductNameAsString,_
ByValSupplierIDAsInteger,_
ByValUnitPriceAsDecimal)


FunctionGetProducts()AsDataTable
EndInterface
At this point, all that remains is to apply SecurityRole attributes to the Product class methods you want to secure.
| Warning |
If you apply the SecurityRole attributes to the method declarations in the interface, they will not be set properly in COM+ Services. As the Framework documentation states, "Security roles can be specified at the component level, per interface and per method." However, "As with other method attributes, security configuration is not currently shared between interface definition and method implementation." |
In this application there are two roles, Managers and Clerks. The former basically has administrative rights. Managers can retrieve products as well as add, update, or delete a product. Clerks, on the other hand, have limited rights. They can only retrieve products or add a new product. Thus, you want to associate the Add method with both roles, as follows:
SecurityRole("Managers"),SecurityRole("Clerks")>_
PublicSubAdd(_
ByValProductNameAsString,_
ByValSupplierIDAsInteger,_
ByValUnitPriceAsDecimal)ImplementsIMyInterface.Add
⋮

Try
'cmd=NewSqlCommand("Add",cnn)
⋮

'cmd.ExecuteNonQuery()
DoTracing("Product.Addcalledat " &_
DateTime.Now.ToLongTimeString)
CatchexpAsException
ThrowNewException(exp.Message,exp.InnerException)
EndTry
EndSub
Associating the Add method with both roles will allow members of both the Managers and Clerks roles to add a product. The Delete and Update methods use only the SecurityRole("Managers") attribute, which denies access to users who are only members of the Clerks role.
Figure 11-2 illustrates the effects of using these attributes. The left pane shows the expanded tree view for the Product component. The Update Properties dialog box shows the three roles used in the application as a whole. (The special Marshaler role is covered on page 471.) Only the Managers role is permitted access to this method.
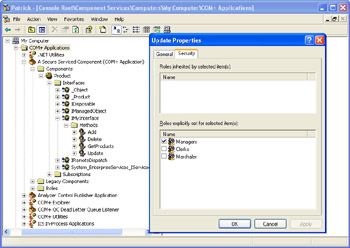
Figure 11-2: Various roles set in COM+ Services as a result of using the SecureMethod and SecurityRole attributes.
Finally, if you want only component-level access control, you can apply SecurityRole attributes to the class instead of the methods. In this case, you would not need to implement an interface.
The Assembly Metadata
To support role-based security, three attributes are added to the AssemblyInfo.vb file used in the “Application #91” section. The first attribute added is the ApplicationAccessControl attribute, which acts just like the ComponentAccessControl attribute but at the COM+ application level. This is the "master security switch" for the application as a whole. If this attribute is not set, security checks are not enabled for other members of the application.
(AccessChecksLevel:=AccessChecksLevelOption.ApplicationComponent )>
The AccessChecksLevelOption enumeration has two members, Application and ApplicationComponent. The latter is the default, so the preceding statement could simply be written as follows:
Role settings at the COM+ application level can be specified using the SecurityRole attribute, as follows:
Description:="Managershavecompleteaccess.",_
SetEveryoneAccess:=False)>
Description:="Clerkshavelimitedmethod-levelaccess.",_
SetEveryoneAccess:=False)>
The use of these attributes here is not required. If application authorization is enabled, roles used in any of the components are automatically added to role lists that appear elsewhere in the COM+ application’s settings. The benefit of using the attributes in AssemblyInfo.vb is that you can also pass arguments to set the Description and SetEveryoneAccess properties. If the latter is set to True, the Everyone user group is automatically added as a member to the role. In this application, the component is fully secured from the outset. You will have to manually add user accounts to the roles in the COM+ Services console. This is discussed in more detail in the next section.
You can see the result of using these attributes in Figure 11-3. It depicts the Properties dialog box for the serviced component, which appears in the snap-in as a “COM+ Application.” (See comments on terminology in the previous topic.)
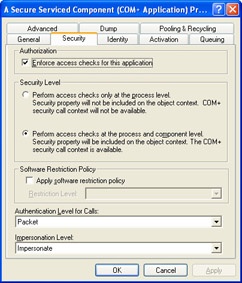
Figure 11-3: The effect of using security-related EnterpriseServices attributes in the AssemblyInfo.vb file is shown in this serviced component Properties dialog box.
In the Security tab, you see that Enforce Access Checks For This Application is checked. Also, the second Security Level option is selected. These settings correspond to the ApplicationAccessControl attribute and the AccessChecksLevelOption.ApplicationComponent enumeration value, respectively.
The Windows Application
The only change made to the Windows application that consumes the serviced component is to trap an UnauthorizedAccessException and display instructions for adding users to the roles in COM+ Services. For example:
CatchexpSecAsUnauthorizedAccessException
MsgBox("Youarenotcurrentlyauthorizedtoretrieveproducts. " &_
 "Toremedythis,takethefollowingsteps:1.Closethe " &_
 "application.2.OpentheCOM+snap-inandaddyouruser " &_
 "accounttotheClerksrole.Ifnotalreadyamember,also " &_
 "addyouraccounttotheMarshalerrole.3.Restartthe " &_
 "application.",MsgBoxStyle.OKOnly,Me.Text)
Figure 11-4 shows the Roles node expanded for the COM+ application and the author’s user account after manually adding it to the Managers role.
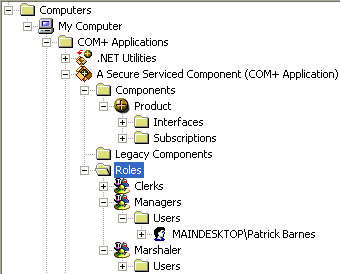
Figure 11-4: A Windows user account is made a member of the Managers role.
Notice the presence of an additional role, Marshaler. As the article “Building Secure ASP.NET Applications” explains:
The Enterprise Services infrastructure uses a number of system-level interfaces that are exposed by all serviced components. These include IManagedObject, IDisposable, and IServiceComponentInfo. If access checks are enabled at the interface or method levels, the Enterprise Services infrastructure is denied access to these interfaces. As a result, Enterprise Services creates a special role called Marshaler and associates the role with these interfaces. At deployment time, application administrators need to add all users to the Marshaler role who need to access any methods or interface of the class.
The authors then go on to write that you can automate the process of adding users by using various custom scripts.
As you experiment with the sample application and the COM+ snap-in settings, be aware that you must cycle the application for the changes to take effect. To do this, right-click the application’s node in COM+ Services and then click Shut Down. Right-click the node again, and then click Start. Closing and rerunning the Windows application will achieve the same results.
Conclusion
This concludes a brief two-part series on building Enterprise Services applications. In this second installment, you learned how to apply Enterprise Services attributes to enforce role-based security at the method level. This involved several new attributes as well as an interface. For real-world deployment, it would also involve custom scripts to automate adding users to the COM+ Services roles.
About the Applications
- Working with Microsoft Visual Studio .NET 2003 and Microsoft .NET Framework 1.1
- Working with the Microsoft Visual Basic .NET Language
- Data Access
- Building Windows Forms User Interfaces
- Building Web Applications
- Working with Console Applications
- Interacting with the Operating System
- Working with the .NET Framework
- Advanced .NET Framework
- GDI+
- Building Enterprise Services Applications
- COM Interop/PInvoke
- Visual Studio .NET
- Securing Applications
- Coding Conventions
- Windows Server 2003 for .NET Developers
EAN: 2147483647
Pages: 157
