Working with Microsoft Visual Studio .NET 2003 and Microsoft .NET Framework 1.1
This chapter discusses some of the new functionality of Microsoft .NET Framework version 1.1 and how the .NET Framework has changed from .NET Framework version 1.0. First, however, we’ll look at some productivity enhancements found in Visual Studio .NET 2003.
Visual Studio NET 2003
Visual Studio .NET 2003 is an incremental release over Visual Studio .NET 2002, yet it still contains numerous enhancements of interest to developers.
Changes to Add Web Reference
One of the first changes you come across when working with Visual Studio .NET 2003 is the improved Add Web Reference dialog box. This dialog box is shown in Figure 1-1.
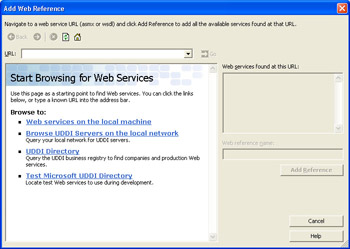
Figure 1-1: The Add Web Reference dialog box.
The Add Web Reference dialog box in Visual Studio .NET 2003 posseses capabilities beyond those that were offered with the Add Web Reference dialog box found in Visual Studio .NET 2002. First, the new Add Web Reference dialog box can easily browse local Web services. In addition, when viewing Web Services Description Language (WSDL) documents for Web services, the Add Web Reference dialog box now applies a simple style sheet instead of only showing the user the raw WSDL document for the Web service. This makes it easier to find the actual methods exposed by the Web service. Also, you can now easily change the name of the proxy class before actually adding the Web reference. This new feature saves the previously required step of renaming the proxy after it was created by Visual Studio .NET 2002. You can see the formatted WSDL described in Figure 1-2.
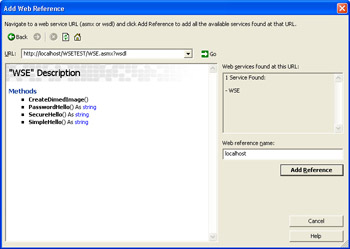
Figure 1-2: Formatted WSDL in the Add Web Reference dialog box.
The new Add Web Reference dialog box also lets you easily navigate to and browse local, Microsoft, and test Universal Description, Discovery, and Integration (UDDI) nodes. From these nodes, you can query for existing Web services and add them to your project. Figure 1-3 shows the Add Web Reference dialog box at the Microsoft UDDI node.
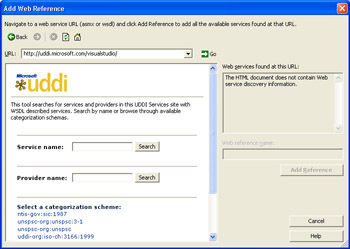
Figure 1-3: Browsing UDDI with the Add Web Reference dialog box.
Coding Enhancements
In this section, you’ll learn about the various coding enhancements that have been added to Visual Studio.NET 2003. The most significant of these are detailed below.
Auto-Stub
One of the nicest new features that helps you to write code using Visual Studio .NET 2003 is the Auto-Stub feature. Auto-Stub takes methods that are declared as MustOverride and automatically adds procedure stubs for you when you specify the base class for a new class you are creating. In Figure 1-4, a custom trace listener is being created. Notice that no members are specified for the class.
After adding an Inherits statement and then hitting the Enter button, the two MustOverride members are automatically added to the class definition. Even though you still have to write the implementation code for these members, this new Auto- Stub feature eliminates some boilerplate coding and mouse-clicking that was previously required to achieve the same objective. This also works if you implement an existing interface for a class you’re creating. In Figure 1-5, you can see what Auto- Stub does.
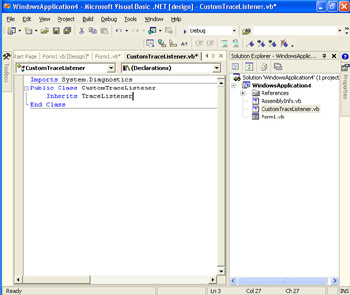
Figure 1-4: The world before Auto-Stub.
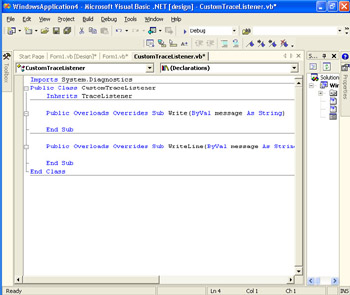
Figure 1-5: Code created by the Auto-Stub feature.
Most Recently Used IntelliSense
The Visual Studio .NET 2003 version of IntelliSense now keeps track of items you’ve used most recently and displays them first in IntelliSense—no more scrolling to find StreamWriter every time you need it when it’s the thing you most recently used in the System.IO namespace.
Procedure Separators
Another new coding enhancement is the use of procedure separators. These separators have been in view in most of the screen shots used so far in this chapter.
Track Active Item
Another new option in Visual Studio .NET 2003 is to have Visual Studio .NET automatically track and open the folder tree that contains the file you’re currently working on in the editor. You no longer have to manually open a folder in the Solution Explorer to access a file in that window. This quick access is useful when working with objects such as Web service proxy classes that are always a few folder levels down. Selecting Environment, and then Projects And Solutions in the Visual Studio .NET Options dialog box allows you to access the Track Active Item In Solution Explorer check box, which allows you to specify whether you want this tracking done automatically. This option is enabled by default.
Debugging Enhancements
You can once again use IntelliSense in the Immediate window. This useful feature that you probably greatly missed when it was gone is now back in Visual Studio .NET 2003. Now it’s very easy to drill into an object’s properties and methods using IntelliSense in the Immediate window. In Figure 1-6, the properties and methods of the Me object are shown.
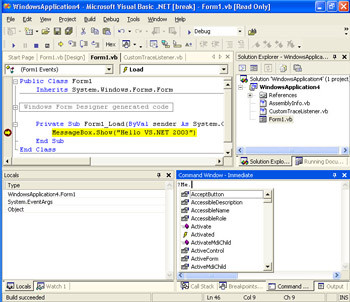
Figure 1-6: The Immediate window and IntelliSense.
In addition, some nice changes were made to the way certain debugging windows display information. For example, members are now displayed in alphabetical order. Also, private members are not shown by default, which greatly cleans up the list of members.
Easy Access to the Object Browser
You can now simply double-click an assembly in the Solution Explorer window and be taken directly to the Object Browser window with the focus placed on the assembly you double-clicked. This step-saver is one more small productivity difference between Visual Studio .NET 2002 and Visual Studio .NET 2003.
Changes to the Start Page
The start page has two enhancements in Visual Studio .NET 2003. First, it’s much faster to load. So those of you who disabled the start page in Visual Studio .NET 2002 because it caused Visual Studio .NET to load slowly can now re-enable it. Also, the start page now contains valuable links to community and technical information that are regularly updated. Figure 1-7 shows the improved start page.
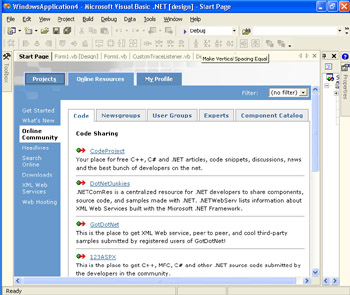
Figure 1-7: The changes to the start page.
Code and Project Migration
Visual Studio.NET 2003 also includes some tools to aid in migration tasks. Tools exist to help with the migration of Visual Basic 6 code as well as the migration of solutions and projects built with Visual Studio .NET 2002.
Project Migration
Visual Studio .NET 2002 projects and solutions are automatically upgraded to the Visual Studio .NET 2003 project and solution file format when opened in Visual Studio .NET 2003. When you open a project file in this way, a prompt appears asking whether you are sure you want to upgrade the project.
An important point to remember is that there is a supported process that uses the integrated development environment (IDE) to migrate project and solution files to the Visual Studio .NET 2003 format. Once migrated, though, they can no longer be opened in Visual Studio .NET 2002.
You can, however, make a manual change to a project or solution file once it’s upgraded to open it again in Visual Studio .NET 2002. In the .sln file, you need to change File Version 8.00 to 7.00. In the .vcsproj file, you need to change ProductVersion 7.10.2215 to 7.0.9466 and Schema Version 2.0 to 1.0. Keep in mind that this manual change is not officially supported and might not work in the future.
A final point, and an important one, concerning project migration is that when the upgrade is performed, the migration process does not create a backup of the project and solution files in the Visual Studio .NET 2002 format. So if you want to open the project and solution files in Visual Studio .NET 2002 after the migration, you need to manually create a backup of the files prior to performing the migration.
The Visual Basic 6 Code Snippet Tool
Visual Studio .NET 2003 contains a Visual Basic 6 to Visual Basic .NET Code Snippet tool that allows you to easily migrate snippets of code instead of entire projects. The Code Snippet tool is easy to use and can be found by selecting Upgrade Visual Basic 6 Code from the Tools menu when you are viewing a code window. Figure 1-8 shows the tool.
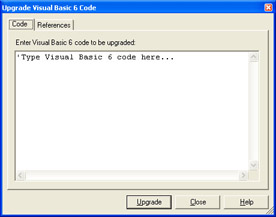
Figure 1-8: The Visual Basic 6 Code Snippet tool.
Significant Framework Changes
If someone told you that they made more than 1000 changes to something, your first thought typically would be that a great deal of changes were made. Although a great many changes were made to .NET Framework in the move from 1.0 to 1.1, many of them are minor or have limited benefit. However, there are changes that can have a positive impact on your development efforts. Those changes that have the most impact are detailed in this section.
Trust Levels
In this case, what is old is new again. For those who were familiar with .NET Framework 1.0 during its beta period, the concept of trust levels should be nothing new. The ability to set trust levels for ASP.NET applications was disabled in the .NET Framework 1.0 release just prior to the release to manufacturing (RTM). Now with the release of .NET Framework 1.1, the ability to select trust levels is back and fully enabled. Before we dive into trust levels, though, you need to have some background on Code-Access Security.
Code-Access Security
Code-Access Security describes a way of securing applications so that applications are granted or denied certain permissions based on permissions granted to the code itself. For ASP.NET applications, these grants and denials of permissions for an application are accomplished via the use of trust levels. For Windows Forms applications, these grants and denials can be generated declaratively via attributes and imperatively via method calls on permission objects. Some default trust levels for ASP.NET sites are initially defined in a set of configuration files found in the C:\%windir%Microsoft .NETFramework\%FrameworkVer%Config directory. If you view the contents of this directory, you find configuration files for the trust levels listed in Table 1-1.
|
Trust Level |
Description |
|---|---|
|
None |
No privileges are granted. |
|
Minimal |
This level merely grants the ability to execute. It doesn’t provide the ability to access protected resources. |
|
Low |
An application has the ability to read its own resources but not those of other applications. |
|
Medium |
Read and Write privileges are granted to an application’s own directories. The application can also interact with Microsoft SQL Server. |
|
High |
Most .NET Framework classes can be accessed. |
|
Full |
Applications can essentially execute any managed or native code they want to. |
Each trust level grants and/or denies certain permissions to the code of the ASP.NET application. For example, with the trust level set to Medium, the ASP.NET application can read and write to its own directories only and not to those of other ASP.NET sites on the same machine. For a detailed list of the permissions granted by default to a given trust level, you can simply open in Notepad the file that represents the trust level. In Notepad, you’ll see the XML representation of the permissions granted to an ASP.NET application running under the given trust level.
To begin to work with trust levels is easy. First create an ASP.NET application using Visual Studio .NET 2003. Then open the web.config file for the site. In between the <system.web> elements inside web.config, add the following code:
The value for the level attribute can initially be any one of the predefined trust levels (None, Minimal, Low, Medium, High, or Full). When this <trust> element is placed in web.config, the associated ASP.NET site is constrained by the permissions granted or denied in the given trust level.
You can also modify the existing trust level definitions or create new trust levels. All you need to understand is the code-access security permissions defined in the trust-level configuration files.
The simplest way to create a custom trust level would be to copy one of the existing files and then modify it as you see fit by adding new permissions or removing permissions from the file. Once you have modified the file and given it a new name, you then have to modify machine.config. The machine.config file is found in the same directory specified earlier: C:\%windir%Microsoft .NETFramework\%FrameworkVer%Config.
After opening machine.config in your favorite text editor, you’ll find the following section:
Here you can see the individual trust level configuration files associated with their friendly name. To add another custom trust level, all you need to do is add another element between the <securityPolicy> elements. The new element should have the friendly name for your trust level as well as the name of the file that represents it.
⋮

⋮
At this point, you can use the simple trust element specified earlier in a web.config file, and your custom trust level is then used to define the permissions granted or denied to the given ASP.NET Web site.
Services Without Components
In the previous release of the .NET Framework, working with COM+ services from managed code was possible. However, doing so entailed many boilerplate steps and a decent amount of repetitive coding to simply work with distributed transactions or other frequently used COM+ services. The release of .NET Framework 1.1 removes the need for much of this coding when your application is running on .NET Framework 1.1 and running atop the Windows Server 2003 operating system.
Applications built on top of .NET Framework 1.0 required you to first create a class that inherited from the ServicedComponent base class. This class was found in the System.EnterpriseServices namespace. Next you had to strongly name your component by generating a public/private key pair with the sn.exe command-line utility and then signing your assembly. Finally, you registered your class (and associated assembly) with COM+ services with one of two methods. The first method required a user to have administrative rights on his box when the application was first run. If the user had administrative rights, the serviced component would be automatically registered with COM+ services. If it could not be guaranteed that the first user to run the application would have administrative rights, the RegAsm.exe command utility could be used to preregister the serviced component with COM+ services prior to application execution.
All these steps and considerations for utilizing commonly used COM+ services (such as transactions) are no longer necessary with the release of .NET Framework 1.1. Two new classes eliminate the need for such complexity. The first of these classes is the ServiceConfig class; the second is the ServiceDomain class. In the following code snippet, you can see how they work together:
DimconfigAsNewServiceConfig
config.TrackingEnabled=True
config.TrackingAppName= "EntSrv"
ServiceDomain.Enter(config)
'COM+availablehere
ServiceDomain.Leave()
The ServiceConfig class encapsulates many tasks you would typically perform by decorating your code with attributes when building Serviced Components with the 1.0 release of the .NET Framework. Using this class, you can specify transaction attributes and other essential metadata. Here two configuration options are specified. First, tracking is enabled for the application. Enabling tracking allows the component to be visible as a running process in the Component Services snap-in while the application is running. Second, a friendly name is specified for the application so that it can be more easily recognizable in the Component Services snap-in.
The real magic begins after the call to the Enter method of the ServiceDomain class. The ServiceConfig instance is passed as an argument to this method, and when the method is done executing, everything after it has access to COM+ services until a call to the Leave method of the ServiceDomain class is made.
It’s as simple as that.
No more specifying a strong name for the component. No more inheriting from Serviced Component. And, in many cases, no more need to use additional attributes. The additional attributes used in Framework 1.0 applications to note things such as whether tracking was enabled or whether the TransactionOption enumeration was used are now merely specified by passing values to properties of the ServiceConfig class.
To see how this might work with distributed transactions, we’ll walk through a slightly more lengthy example.
| Note |
We’re beginning at the end with “Application #101: New for 2003.” We thought it best to begin the book by introducing all the .NET Framework 1.1 news that’s fit to print. You can continue on with Chapter 1 and run Application #101 or jump ahead to other chapters and applications that interest you. |
Application #101 New for 2003
In Application #101, the sample application associated with this chapter, there is a tab named Services Without Components. On this tab, you’ll find a button named Using Transactions. A portion of the code for the click event handler for this button is as follows:
DimconfigAsNewServiceConfig
config.Transaction=TransactionOption.Required
config.TrackingEnabled=True
config.TrackingAppName= "EntSrv"
config.TrackingComponentName= "EntSrvComponent"
ServiceDomain.Enter(config)
Try
'UpdateProductPrices
scmd.CommandText= "UPDATEPRODUCTSSETUNITPRICE= " &_
 "UNITPRICE*1.12WHEREUNITPRICE>15"
DimrecordsAffectedAsInteger=scmd.ExecuteNonQuery()
'Writeoutthenumberofchangedrecordstoanaudittable
scmd.CommandText= "INSERTPriceAuditVALUES(1.12," &_
recordsAffected& ")"
scmd.ExecuteNonQuery()
CatchexAsException
ContextUtil.SetAbort()
MsgBox("Aerroroccurredwhenprocessingthe " &_
 "transaction",MsgBoxStyle.OKOnly,Me.Text)
Finally
ServiceDomain.Leave()
scnnNorthwind.Close()
EndTry
Notice a couple of things about this code. First there is the creation of a ServiceConfig object, and this object is passed as a parameter to the Enter method of the ServiceDomain class. In this case, one additional property is set on the ServiceConfig class. This Transaction property specifies the type of transaction you want to use. These are the standard transaction options that have been used for some time now when developing applications that leverage COM+ distributed transactions. In most cases, the TransactionOption.Required enumeration value will suffice.
Next, note the execution of two different SQL statements. The first statement updates product prices in the Northwind database. The second statement takes the number of products that were updated and records this value in the audit table named PriceAudit.
Next, note the call to the SetAbort method of the ContextUtil object in the Catch portion of the Try/Catch exception handling block. By calling this method in the case of an exception, both the modifications of the INSERT and UPDATE statements are rolled back. This rollback happens because both T-SQL statements are part of a distributed transaction. A distributed transaction is brought about by simply wrapping the two ExecuteNonQuery method calls in between the calls to the Enter and Leave methods of the ServiceDomain class.
Side By Side Execution
Side-by-side execution is the phrase used to describe the ability to install and use two distinct versions of .NET Framework on the same machine. Currently, only two distinct versions exist, .NET Framework versions 1.0 and 1.1. When both versions are installed simultaneously on the same machine, it is important to understand the effect this has on .NET applications already installed on the machine.
Windows Forms Applications
The first rule to remember is that a Windows Forms application compiled against .NET Framework version 1.0 will float up to run against .NET Framework version 1.1 if version 1.0 isn’t present. While this behavior can be modified through the use of configuration files, note that this is the standard default behavior for Windows Forms applications. However, applications built with Visual Studio .NET 2002 and compiled against .NET Framework 1.0 assemblies will choose to run against the .NET Framework 1.0 if both versions of the framework are present on a machine. The floating-up behavior occurs if only .NET Framework 1.1 is present. This means that if a version 1.0 application is moved to or installed on a machine that contains only .NET Framework 1.1, the application attempts to execute against the 1.1 version of Framework without any prompt or notification that it is doing so.
If you want to change this default behavior, the first step you need to take is to create a configuration file. Visual Studio .NET 2003 makes it easy to create configuration files for this purpose.
Simply access your project’s Property Pages dialog box and choose the Build property page, as shown in Figure 1-9.
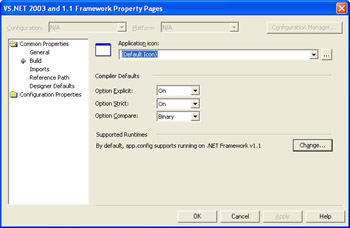
Figure 1-9: Build properties.
Then click the Change button. You’ll see a dialog box like the one shown in Figure 1-10.
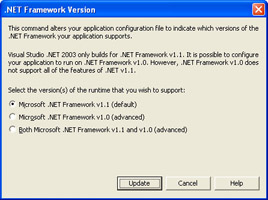
Figure 1-10: Choosing a framework version.
In the dialog box shown in Figure 1-10, you can choose from three different options for creating configuration files. You can create a configuration file that causes your application to target only .NET Framework 1.1, a configuration file that causes your application to target both versions of the .NET Framework, or a configuration file that forces the application to run against version 1.0 only.
These configuration files give you the flexibility you need to ensure that your application runs against only the version of .NET Framework you intend it to be run against. However, you need to remember that the default behavior when a configuration file is not present is for your application to try to run against a later version of .NET Framework if the version the application targets is not available. Therefore, many times the best approach is to include a configuration file with your application. Doing so gives you control over which version of .NET Framework your application runs against. This configuration file should allow your application to run only against the .NET Framework versions you’ve done sufficient testing against with your application.
Additional Scenarios
Table 1-2 details some interesting implications of side-by-side execution for Windows Forms applications.
|
Application Compiled Against |
Machine Configuration |
Result |
Messages |
|---|---|---|---|
|
.NET Framework 1.0 |
.NET Framework 1.1 only |
Application runs against .NET Framework 1.1. |
No notification is given that the application is running against .NET Framework 1.1 assemblies. |
|
.NET Framework 1.0 |
1.0 Framework and 1.1 Framework Installed |
Application runs against the 1.0 Framework. |
No notification is given that the application is running against .NET Framework 1.0 assemblies. |
|
.NET Framework 1.1 |
.NET Framework 1.0 only |
Application runs against .NET Framework 1.0 if a configuration file is present that redirects the application to use .NET Framework 1.0. |
An error message is raised if the configuration file is not present at first execution of the application. The application fails to execute. |
ASP NET Applications
ASP.NET applications have a slightly different set of rules than Windows Forms applications. Because all your ASP.NET applications run from the single instance of Internet Information Server (IIS) installed on the local machine when the .NET Framework 1.1 is installed, all the Web sites are upgraded to use the .NET Framework 1.1 by default. This is because the default Web site is upgraded to version 1.1. Because all the other Web sites inherit from the default Web site, they are then upgraded to run against version 1.1 as well. If you want to change the version of .NET Framework your Web site is running against, you need to use the aspnet_regiis utility:
aspnet_regiis-sw3svc/1/root/MyWebApp
This example changes the Web site MyWebApp so that it runs against the .NET Framework 1.0 assemblies. The aspnet_regiis application is .NET Framework specific, and one is included with each version of .NET Framework. To have a Web site target a given .NET Framework version, you merely run the command just shown with the version of the aspnet_regiis application that matches the version of .NET Framework you want a given site to run against. You can find aspnet_regiis in the C:\%SystemRoot%Microsoft.NETFramework\%FrameworkVer% directory.
Finally, if you are installing .NET Framework version 1.1 by itself, you can also use the following command-line switch to prevent the upgrade of ASP.NET applications to 1.1:
dotnetfx.exe/q:a/c:"install/noaspupgrade/l/q"
No Touch Deployment
No-Touch deployment refers to running a Windows Forms application from a URL. By executing a Windows Forms application from a URL, you can gain ease of deployment and still retain the rich user interface people have come to expect from Windows Forms applications. While the purpose here is not to rehash issues surrounding the implementation of a No-Touch application deployment as a whole, it’s important to touch on the impact of side-by-side .NET Framework installations when you are using this deployment strategy.
Fundamentally, the issues that affect a No-Touch deployed application are the same as those that affect applications that are deployed via more traditional means. Therefore a configuration file must be present in a given side-by-side scenario for an application to succesfully execute. For example, if a Windows Forms application is compiled against the 1.1 Framework assemblies and is placed on a Web server for clients to retrieve, what happens if a client machine only has the .NET Framework 1.0? The answer is the application fails to execute. This result is exactly what one would expect if a locally installed copy of the application was being executed.
What makes No-Touch applications different is that by default ASP.NET applications do not allow configuration files to be accessed from client machines. Specifically the serving of files with a .config extension is prohibited. Therefore, you must configure a Web site to allow clients to download configuration files so that machines that don’t have .NET Framework 1.1 and have only .NET Framework 1.0 can succesfully run your application. You could also choose not to deploy the No- Touch application to these machines until they have been upgraded to .NET Framework 1.1. Or you could choose to create an additional copy of your application that has been tested and compiled against .NET Framework 1.0 and install it on machines that have only .NET Framework 1.0 installed. However, the point to remember is that the issue of having to have the appropriate configuration file present on the client machine does not go away in a No-Touch deployment scenario.
Components
I’ve saved the discussion of components for last because, honestly, there isn’t anything you can do to change the default behavior of a given component. Components associated with a given application run against the .NET Framework version chosen by the application. There is no configuration file you can create for a component that ensures it runs against a given version—and only that version—of .NET Framework. This means you have to take special care to inform users of your component what framework versions it has been tested against. You also have to take considerable care when leveraging features found only in version 1.1. If a 1.0 Windows Forms application attempts to use a component that was originally compiled against version 1.1, and this component leverages features found only in .NET Framework 1.1, serious problems could arise from the use of the component. At best, a simple error message is raised and certain features are disabled in the application. At worst, data corruption or inconsistent application behavior occurs. It all depends on how your component was constructed, whether it was leveraging functionality found only in .NET Framework version 1.1, and so on.
Until configuration files exist for components, the safest approach when you don’t have compete control over the .NET Framework versions installed on a client is to compile against the earliest version of .NET Framework your client base could have.
Framework Configuration
.NET Framework version 1.0 installs a Framework Configuration tool that can be found by opening Administrative Tools in the Control Panel. With the release of version 1.1, there are now two different .NET Framework configuration tools you need to use. One targets .NET Framework 1.0, and the other targets .NET Framework 1.1. Functionality between the two is identical, and if you’re familiar with setting configuration settings using the .NET Framework 1.0 tool, you should find no challenges in using the .NET Framework 1.1 tool.
Language Changes
Compared to the sweeping changes to the Visual Basic language brought about by the first release of the .NET Framework, the changes to version 1.1, although beneficial, are minor. There are two changes: an easier way to declare a loop variable, and the use of BitShift operators.
Loop Variable Declaration
In Visual Basic .NET, you can now easily declare a loop variable as part of a For or For Each loop. This makes coding For Each loops much easier, as you don’t have to declare the variable before entering the For Each loop. Here’s an example:
DimsqlDAAsNewSqlDataAdapter(_
 "selectfirstname,lastnamefromemployees",scnnNorthwind)
DimdsEmployeesAsNewDataSet
sqlDA.Fill(dsEmployees)
DimsbAsNewStringBuilder
DimfullNameAsString
ForEachdrAsDataRowIndsEmployees.Tables(0).Rows
fullName=CStr(dr("FirstName"))& " " &CStr(dr("LastName"))
sb.Append(fullName&vbCrLf)
Next
MsgBox(sb.ToString(),MsgBoxStyle.OKOnly, "NorthwindEmployees")
Note that in this example, the variable named dr is not declared as being of type DataRow except within the declaration of the For Each loop itself. If you attempt to write this exact code and compile it against .NET Framework 1.0, you would recieve a compile error. To fix the error, you would have to declare the variable named dr and specify its type as DataRow before declaring the For Each loop.
Here’s an example of the appropriate syntax for the .NET Framework 1.0:
DimsqlDAAsNewSqlDataAdapter(_
 "selectfirstname,lastnamefromemployees",scnnNorthwind)
DimdsEmployeesAsNewDataSet
sqlDA.Fill(dsEmployees)
DimsbAsNewStringBuilder
DimfullNameAsString
DimdrasDataRow
ForEachdrIndsEmployees.Tables(0).Rows
fullName=CStr(dr("FirstName"))& " " &CStr(dr("LastName"))
sb.Append(fullName&vbCrLf)
Next
MsgBox(sb.ToString(),MsgBoxStyle.OKOnly, "NorthwindEmployees")
Simply put, Visual Basic .NET’s new loop-variable declaration feature just makes your life a bit easier when writing For and For Each loops.
BitShift Operators
Visual Basic .NET now supports BitShift operators. So now you can write statements such as the following:
Dimi1asInteger=1
Dimi2asInteger
i2=i1<<2'i2wouldequal4
i2=i1<<4'i2wouldequal16
Dimi3asInteger=16
Dimi4asInteger
i4=i3>>2'i4wouldequal4
i4=i3>>4'i4wouldequal1
Dimi5asInteger=23334
Dimi6asInteger
i6=i5<<4'i6wouldequal373344
Additional Framework Changes
While some of the most significant .NET Framework and tool changes have already been detailed, there are a few more changes of interest in version 1.1. What follows is not an exhaustive list of changes by any means, but merely changes that might be of most interest to the majority of developers.
The ODBC Namespace
The Open Database Connectivity (ODBC) data provider is now included in .NET Framework 1.1. While not entirely new—as it has been available as a separate download for some time—it’s now included in the .NET Framework 1.1 installation. The ODBC namespace gives .NET Framework applications more ability to consume data from additional legacy data sources such as mainframes.
Enabling Windows XP Theme Support
One of the sample applications in this book covers how to support Microsoft Windows XP themes in such a way that your application can be used on machines whether they have only version 1.0 or both .NET Framework 1.0 and .NET Framework 1.1 installed. However, if you’re sure that all machines you will deploy have version 1.1 installed, you can enable Windows XP theme support in a much easier way than the use of the manifest files detailed in the sample application.
The .NET Framework 1.1 Application object contains a method not found in the Application object found in version 1.0. This additional method is named EnableVisualStyles. Calling this method at the proper place in your application enables Windows XP theme support for your application.
To use the EnableVisualStyles method appropriately, your Windows Forms application needs to call the method before calling the InitializeComponent method.
Note that all the standard rules apply for Windows XP theme support. The need to set the flat-style property for some controls and the fact that some controls still do not support Windows XP theming is still true even with the use of the EnableVisualStyles method. For details on these additional restrictions, turn to Chapter 4 and see Application #43: XP Theme Support.
Folder Browser
The folder browser is not exactly a new control, but being able to get to it easily from managed code is what has changed with the release of .NET Framework 1.1.
The folder browser is now available through the toolbox in Visual Studio .NET 2003. It can also be easily displayed by instantiating the control in code:
DimfldBrwseAsNewFolderBrowserDialog
fldBrwse.Description= "TheNewFolderBrowserControl"
fldBrwse.ShowNewFolderButton=True
fldBrwse.RootFolder=Environment.SpecialFolder.MyComputer
IffldBrwse.ShowDialog()=DialogResult.OKThen
MsgBox("Youselected: ",_
fldBrwse.SelectedPath,_
MsgBoxStyle.OKOnly,Me.Text)
EndIf
Working with the folder browser control is similiar to working with the OpenFileDialog or SaveFileDialog controls. First you create an instance of the control. Next, you specify the default properties you want. In this case, a description is set for the dialog box, the new folder button is enabled, and the dialog box’s default location is set to the MyComputer location through use of the RootFolder property.
The dialog box is then shown to the user by calling the ShowDialog method. The return value of this method call is of type DialogResult. In this case, if the return value is equal to DialogResult.OK, the folder the user selected is displayed in a Message Box.
SpecialFolder Enumeration
.NET Framework 1.0 provided easy access to special folder locations—for example, accessing the Desktop folder with an enumeration named SpecialFolder. The paths for these folders can be obtained by calling the GetFolderPath method of the Environment class and passing as a parameter to this method call one of the SpecialFolder enumerations, as shown here:
MsgBox(System.Environment.GetFolderPath_
(Environment.SpecialFolder.Desktop),_
MsgBoxStyle.OKOnly,Me.Text)
.NET Framework 1.1 extends this ability by adding two more folders to the SpecialFolder enumeration. The first is MyMusic, and the second is MyPictures.
MsgBox(System.Environment.GetFolderPath_
(Environment.SpecialFolder.MyMusic),_
MsgBoxStyle.OKOnly,Me.Text)
MsgBox(System.Environment.GetFolderPath_
(Environment.SpecialFolder.MyPictures),_
MsgBoxStyle.OKOnly,Me.Text)
As you can see in this code, the MyPictures and MyMusic folders can be easily retrieved by passing the appropriate enumeration to the GetFolderPath method of the Environment class.
System IO
Another useful change is the ability to get and set UTC datetimes for files and directories. The following code illustrates how this is accomplished with the File and Directory classes found in .NET Framework 1.1.
DimmsgAsString
msg= "UTCCreationTime: " &_
CStr(File.GetCreationTimeUtc("..ReadMe.htm"))&vbCrLf

msg&= "UTCWriteTime: " &_

CStr(File.GetLastWriteTimeUtc("..Readme.htm"))&vbCrLf
MsgBox(msg,MsgBoxStyle.OKOnly,Me.Text)
DimmsgAsString
msg= "UTCCreationTime: " &_
CStr(Directory.GetCreationTimeUtc("..ReadMe.htm"))&vbCrLf
msg&= "UTCWriteTime: " &_
CStr(Directory.GetLastWriteTimeUtc("..Readme.htm"))&vbCrLf
MsgBox(msg,MsgBoxStyle.OKOnly,Me.Text)
Conclusion
The .NET Framework 1.1 and Visual Studio .NET 2003 contain a moderate number of enhancements over their predecessors. Considering the incremental nature of the release, it would be unreasonable to expect more changes to the framework and Visual Studio .NET. Taken as a whole, the changes that were made are a nice, solid set of enhancements to the framework and development tools. I’ve found each one of the enhancements to be useful in a variety of cases in my development projects.
The remainder of the book introduces you to the 101 sample applications that shipped with this book. You’ll find versions of the samples built for .NET Framework 1.0 and Visual Studio .NET 2002 as well as .NET Framework version 1.1 and Visual Studio .NET 2003. I encourage you to work with both versions of the sample code. You’ll probably find that your development machines contain both frameworks. Knowledge of the differences between .NET Framework version 1.0 and version 1.1 will be a good skill to have moving forward as you do more .NET Framework development.
About the Applications
- Working with Microsoft Visual Studio .NET 2003 and Microsoft .NET Framework 1.1
- Working with the Microsoft Visual Basic .NET Language
- Data Access
- Building Windows Forms User Interfaces
- Building Web Applications
- Working with Console Applications
- Interacting with the Operating System
- Working with the .NET Framework
- Advanced .NET Framework
- GDI+
- Building Enterprise Services Applications
- COM Interop/PInvoke
- Visual Studio .NET
- Securing Applications
- Coding Conventions
- Windows Server 2003 for .NET Developers
EAN: 2147483647
Pages: 157
