Building Web Applications
One of the wonderful aspects of Microsoft .NET development is how easy it is to leverage your skills between the Microsoft Windows and Web Forms worlds. Much of the code is, of course, reusable; but even more important are the close similarities in development methodology. Thanks to new features in Microsoft Visual Studio .NET, developers with Windows Forms experience can quickly learn how to build Web applications.
What follows are two three-application series that endeavor to equip you with some foundational skills for building robust Web applications. You will first learn how to build various types of data manipulation interfaces that are centered mainly around the DataGrid control. The final three applications cover the topic of Web services. These are also Web applications. However, they primarily expose their application logic not to humans via a user-friendly interface, but rather to remote applications using cross-platform open standards such as XML, SOAP (Simple Object Access Protocol), and HTTP. In this regard, these applications are the new COM and provide a way to make the Internet a truly shared-application environment.
Application #47 Build Data Entry Web Forms
Data entry in the form of a standard CRUD (Create, Read, Update, Delete) interface is an integral feature of many Web applications. This sample introduces you to ASP.NET and demonstrates how to build a data-entry Web form for products in the Northwind database. A DataGrid is used to display the products. Each row contains buttons to edit and delete the product. You can also click the Add New Item button located above the DataGrid. (See Figure 5-1.) Clicking the buttons to add or edit displays a simple entry form below the DataGrid.
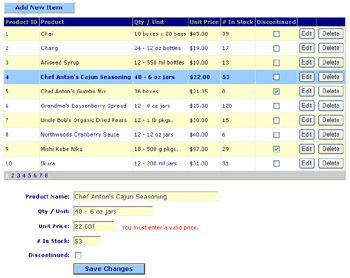
Figure 5-1: Application #47 showing the DataGrid and Add New Item Form controls.
Building Upon…
Application #4: Try/Catch/Finally
Application #12: Use a DataSet and DataView
Application #20: Build a Data-Entry Form
Application #27: Compare Data Binding in Web and Windows Forms
New Concepts
Space limitations for this book require us to assume you already have a basic understanding of foundational Web-application concepts such as the stateless nature of the Web and the life cycle of an ASP.NET Web Form. (If this isn’t the case, see the upcoming “Tip.”) Given this, building a Web-based data-entry application is conceptually identical to building a Windows Forms data-entry application. The data access logic is identical. (In fact, you may recall from Application #21 that one of the advantages of decoupling data-access code from the presentation tier is that you can reuse it with any type of front end.) And although a few differences in data-binding syntax exist, these were covered towards the end of Chapter 3. Therefore, the focus of this topic and the next two topics is on the “Code Walkthrough” sections so that ample space can be given to the implementation details.
| Tip |
If you’re new to ASP.NET or need to refresh your understanding of basic, yet critical, Web Forms development concepts, a great place to start is the series of pages in the Framework documentation under the heading “Introduction to Web Forms Pages.” This documentation can be found by typing Web Forms, about in the Look For field of the Help browser’s Index tab. Then click the Sync Contents button on the toolbar and you’ll be shown how these introductory pages fit into the overall table of contents. Of particular importance is the document titled “Web Forms Page Processing” (vbconWebFormsPageProcessingStages.htm). |
Code Walkthrough
This code walkthrough is divided into two main sections, “The .ASPX Page” and “The Codebehind Page.” This is an arbitrary but convenient division that follows the practice of many Web developers who like to first lay out their controls on the Web Form and then wire them up by adding code to the .aspx.vb file.
| Best Practices |
Although for logistical and pedagogical reasons the Framework Quickstart Tutorials include Visual Basic .NET code in the .aspx page itself, it’s considered a best practice to put this code in the Web Form codebehind page whenever possible, restricting the contents of the .aspx page to markup elements such as HTML, CSS, and ASP.NET control-declaration syntax. Some programming tasks, however, are more cumbersome when using strongly typed code as opposed to ASP.NET tags and attributes. As a rule of thumb, if any given task is more difficult to implement in the codebehind, move it to the .aspx page. When you do this, however, keep in mind you might lose some of the benefits that strong typing affords, such as IntelliSense and precompiler error checking. |
The .ASPX Page: DataGrid
The ASP.NET DataGrid is often the Web control of choice for displaying a set of records. With it, you can easily display data in a grid-like control that supports important data-interface features such as sorting and paging (topics that are covered in subsequent topics). The DataGrid is also flexible enough to allow ample control over how data in its cells is bound and formatted.
The ASP.NET syntax for working with a DataGrid can be quite simple. For example, if you were to change the code for this application’s DataGrid control to the following, it would display Northwind products in a simple, yet fully functional, DataGrid that even supports paging:
AllowPaging="True" />
If you were then to compare the DataGrid rendered using this line of code with the DataGrid in the previous screen shot, you would see that the only difference—aside from presentation style and data formatting—is the absence of the Edit and Delete button columns. Of course, these buttons are essential to a data-entry application. The point is that you can get pretty far with only one line of code. (The required codebehind logic, covered a bit later, would be identical.)
To configure a DataGrid for full use in a data-entry application, you must add and modify some DataGrid properties, as well as work directly with the DataGridColumnsCollection exposed by the Columns property. DataGrid properties are written as attributes of the <asp:DataGrid> tag:
DataKeyField="ProductID" AllowPaging="True">
Following the standard id and runat attributes that accompany all ASP.NET controls, you find three additional attributes. Setting AutoGenerateColumns to False will prevent the DataGrid from automatically displaying the data in bound columns. The default value is True, so if you want to create your own columns, this property must be set to False. (This is an all-or-nothing setting. You cannot set the DataGrid to autogenerate only a subset of the columns.) With the DataKeyField attribute, you can use a field in the data source as a key that can uniquely identify each row. You will see why this is important later in the code walkthrough. AllowPaging displays a subset of the records in the data source at any one time, allowing the user to page through the results. The LinkButton controls for paging appear at the bottom of the DataGrid. Javascript is automatically added to the page to invoke a PageIndexChanged event handler.
With these attributes set, you can get to work on writing the code that renders the columns. You do this by adding DataGridColumn objects to the DataGridColumnsCollection. The latter is declared on a Web Form by using the <Columns> tag. The DataGridColumn class is abstract. It serves as the base class for the column controls listed in Table 5-1.
|
Class/Control Name |
Purpose |
|---|---|
|
BoundColumn |
This is the most basic type of column that displays bound data. When AutoGenerateColumns is not set to False, the DataGrid automatically creates a BoundColumn control for each field in the data source and adds it to the DataGridColumnsCollection. |
|
ButtonColumn |
Use this column to create a command button for each row in the DataGrid. Clicking a command button raises the DataGrid.ItemCommand event, which can be handled in the codebehind. |
|
EditCommandColumn |
Similar to a ButtonColumn, use this to add Edit, Update, and Delete command buttons for each row in the DataGrid. Each of these buttons is associated with a more specialized event, such as UpdateCommand. |
|
HyperLinkColumn |
This column renders its bound data as a hyperlink. Several properties are available to configure the hyperlink, such as DataTextField and DataNavigateUrlField. This is typically used for drill-down scenarios. |
|
TemplateColumn |
This column gives you the most control over how the data is presented. Use this when you need a custom solution that is not supported by the other column types. |
This application uses five BoundColumn controls, a TemplateColumn control, and two ButtonColumn controls. Each control exposes a number of properties that can be set by using their equivalent tag attributes. To step through these in the order they appear in the DataGrid, you’d begin with the BoundColumn controls:
DataFormatString="{0:c}" />
The DataField attribute maps to a field in the data source for data binding. DataFormatString allows you to apply format codes to render the data in a variety of ways. Here, c denotes currency formatting.
Next is the TemplateColumn, which requires some explanation.
HeaderText="Discontinued">

Checked='<%#CBool(Container.DataItem("Discontinued"))%>'/>
Remember from Table 5-1 that this type of column gives you full control over the data binding and how it is rendered. A TemplateColumn was chosen here to display a CheckBox control that indicates whether a product has been discontinued. You can bind data to many different control properties, and the Checked property is no exception. Data-binding syntax takes the following form:
<%#CType(Container.DataItem("FieldName"),Type)%>
Notice the use of <%# %>, which delineates a data-binding expression. Container.DataItem will return an Object that you can then explicitly cast to the type needed. In the preceding code, the value of each row in the Discontinued column will be cast to a Boolean for binding to the Checked property.
| Best Practices |
You will often see an alternate form of data binding syntax: <%# Databinder.Eval(Container.DataItem, "FieldName") %>. Databinder.Eval always returns a string. (NULL values are converted to an empty string.) Although this consistency is a nice convenience for beginners, you should avoid using Databinder.Eval because it uses late binding for the string conversion. This can cause performance degradation. |
| Tip |
One very nice feature of ASP.NET is the ability to data-bind to a function. This can open many doors, allowing you to implement complex logic to determine the data that ultimately gets rendered on the page. For example, you could write a Public function named IsDiscontinued that accepts a single argument of type Object and returns a Boolean. Your data-binding syntax would then look like this: <%# IsDiscontinued(Container.DataItem("Discontinued")) %> |
The ButtonColumn controls use two self-explanatory attributes and a CommandName attribute that needs further elaboration:
CommandName="Edit" />
CommandName="Delete" />
The DataGrid, like the DataList and Repeater controls, supports event bubbling. This means that events raised in a child control bubble up to the containing control so that you don’t have to write an event handler for each control in the container. The DataGrid and DataList support five events: ItemCommand, UpdateCommand, EditCommand, DeleteCommand, and CancelCommand. (The Repeater supports only ItemCommand.) You can associate a control with one of the five events by setting the CommandName attribute to the first word in the event. ItemCommand is the default event. If wired up, this event will always fire when a Button contained by the DataGrid is clicked. You will learn more about wiring and handling these events in the upcoming “The Codebehind Page” sections.
Changing the appearance of the DataGrid is easy using the CssClass and ___Style attributes as seen in the <Columns> listing shown earlier, or by using various style tags, as shown in the following code listing. These child tags can be placed anywhere inside the <asp:DataGrid> tag, one level deep:
Note that the CssClass attribute maps to classes in the .css file referenced in the HTML
tag.
The .ASPX Page: Data-Entry Controls
If the Add New Item or Edit buttons are clicked, data-entry controls appear below the DataGrid. The TextBox containing the product price appears below. Associated with it are two validation controls, which provide client-side and server-side validation for the TextBox. The code for the other data-entry controls is similar.
Columns="10"/>
ControlToValidate="txtPrice" Display="Dynamic"
ErrorMessage="Required!" />
ControlToValidate="txtPrice" Display="Dynamic"
ErrorMessage="Youmustenteravalidprice."
ValidationExpression="d+[.]?[d]{0,2}" />
The RequiredFieldValidator control is used as its name implies and for a very common task: to make data entry required for the field associated with it. This association is made by setting its ControlToValidate attribute to the ID of the TextBox. The RegularExpressionValidator is wired up in a similar manner. With it, you can use regular expressions to validate data that is entered into the TextBox. In this case, the data must be numeric only, with an optional decimal and trailing digits up to two decimal places. Both controls have a Display attribute you can set to Dynamic so that they do not take up space on the page when there is no validation error. The default value is Static.
The Codebehind Page: DataGrid
This section explains how to wire up the event handlers to the child controls in the DataGrid. Click events that are raised by child Button controls and bubbled up to the containing DataGrid must be wired to their respective handler. (Setting the CommandName attribute for a ButtonColumn is only the first step.) You can do this in two ways. First, you can add an OnEventNameCommand attribute to the DataGrid tag in the .aspx page. For example, to wire the ItemCommand event to a handler in the codebehind class, you would add the following code to the DataGrid tag:
OnItemCommand="grdProducts_ItemCommand"
Although it’s a good idea to follow a NamingContainer__EventName nomenclature, the name of the handler routine can be anything you like. The only stipulation is that it must be a Public or Protected method with the proper argument signature.
Perhaps a more preferable way is to use the Handles clause with the handler. This reduces the code in the .aspx page. Additionally, if you use the convenient Class Name and Method Name drop-down menus in the Code Editor to create the shell of your handler, the DataGrid event-wiring attributes are redundant.
The code in the ItemCommand event handler is as follows:
PublicSubgrdProducts_ItemCommand(ByValsourceAsObject,_
ByValeAsDataGridCommandEventArgs)HandlesgrdProducts.ItemCom mand
Ife.Item.ItemIndex>-1Then
intProductID=CInt(grdProducts.DataKeys(e.Item.ItemIndex))
EndIf


grdProducts.SelectedIndex=e.Item.ItemIndex
btnSave.CommandArgument= ""
EndSub
Recall that this event is the default for all child Buttons. As such, it will fire any time one of the other four DataGrid Command events fires, or when it’s explicitly used by setting the CommandName attribute to Item. This makes the ItemCommand event handler a good place to put any code that you would like to run across multiple controls. In this case, the handler does three things.
First, it retrieves the Product ID. Earlier you saw that the DataKeyField attribute is set to ProductID in the DataGrid tag. This fills the DataKeyCollection exposed by DataKeys with a list of Product IDs. These values are accessible using an index-based lookup. The index is contained in the ItemIndex property of the DataGridItem object exposed by the DataGridCommandEventArgs argument.
The trick here is that, because all Button Click events—including those raised by the sorting and paging LinkButtons—are first handled by the ItemCommand handler, you must check for a positive index prior to retrieving the Product ID. If the index equals -1 (the value used by the Framework when nothing is selected), you know that an Edit or Delete Button was not clicked.
Second, it explicitly selects the associated row in the DataGrid. If you fail to do this, the SelectedIndex property will equal -1 when you later try to use it in the SaveItem method to look up the Product ID. The DataGrid row will also not indicate a highlighted state, depriving the end user of some helpful feedback. (Row highlighting requires that you also include a SelectedItemStyle tag beneath the DataGrid tag, as you saw in an earlier listing.) Note that you could use CommandName="Select” in the ButtonColumn tag to cause row selection when the Button is clicked. However, the Button would lose its association with all but the ItemCommand event. See the “Conclusion” section for further remarks about this option.
The last line in the ItemCommand handler clears the Save Button CommandArgument property, which is set to Add in the btnAddNew_Click event handler as a way of implementing a quasi-modal operation.
All but the EditCommand event handler, discussed in the next section, are left for your own study. You should have no difficulty understanding the code if you’re comfortable with what has been presented here and in the data-access topics upon which this topic builds.
The Codebehind Page: Data-Entry Controls
When you click the Edit button, data-entry controls appear with their values set to the data in each corresponding cell of the selected DataGrid row. How are these values retrieved? The answer is found in the EditCommand event handler:
PrivateSubgrdProducts_EditCommand(ByValsourceAsObject,_
ByValeAsDataGridCommandEventArgs)HandlesgrdProducts.EditCom mand
txtProductName.Text=e.Item.Cells(1).Text
txtQtyUnit.Text=e.Item.Cells(2).Text
'Trimthedollarsignofftheprice.
txtPrice.Text=e.Item.Cells(3).Text.TrimStart(NewChar()_
{CChar("$")})txtInStock.Text=e.Item.Cells(4).Text
chkDiscontinued.Checked=_
CType(e.Item.Cells(5).FindControl("chkDiscontinuedGrid"),_
CheckBox).Checked
pnlForm.Visible=True
EndSub
The methodology is straightforward. Each row in the DataGrid has a collection of cells that can be accessed by a zero-based column index, numbered from left to right. Like the ItemIndex you saw earlier, the Cells property is accessible from the DataGridItem object. Currency formatting was used for the product price, so you have to trim the dollar sign. Also, to access properties of a control contained within a cell, you can use the FindControl method, passing the value of the control’s id attribute. Cast the returned object to the control type.
Finally, to bring this lengthy code walkthrough to a close, a few points about the validation controls are worth mentioning. First, you’ll notice in the codebehind class that these controls are not declared. If you were to place these controls onto the Web Form by using the Visual Studio .NET designer, variable declarations would be added automatically. There is, however, no need for such declarations because the codebehind class is not interacting with them programmatically. Thus, they were removed.
Second, placing validation controls on the page only ensures that you’ll have client-side validation (assuming that you did not set the control’s EnableClientScript property to False or that the user did not disable JavaScript for his or her browser). To take advantage of server-side validation, you have to check the page’s IsValid property before calling the SaveItem method:
PrivateSubbtnSave_Click(ByValsenderAsObject,ByValeAsEventAr gs)_
HandlesbtnSave.Click
IfIsValidThen
SaveItem()
EndIf
EndSub
Conclusion
This completes a rather ambitious introductory topic on building Web applications. The majority of the discussion centered around how to configure the DataGrid and wire up events fired by command Buttons contained within it. One of the more important things you learned is that the ItemCommand event is always fired when another Command event is raised. In fact, you could merge all the Command event handlers into a single ItemCommand handler that uses a Select...Case construct on e.CommandName for flow control. In this case, you would want to use CommandName=“Select” in the ButtonColumn tag.
In the next two topics, you’ll expand upon what you have learned here. The three topics together will serve to round out a basic suite of Web Form skills, equipping you with the knowledge and sample code you need to get off the ground quickly in the exciting arena of Web-application development.
Application #48 Implement DataGrid Sorting
This application is less complex than its immediate predecessor in Application #47, although it does build upon it. The focus of the discussion will be on how to implement sorting for a DataGrid. You’ll also learn a variation on the master-details interface you saw in the previous topic—that is, you’ll see how to connect several DataGrids in a three-level master-details relationship: Customers, Orders, and Order Details. Clicking an Orders Button in the Customers DataGrid causes the Orders DataGrid on its right to show only the orders for the selected customer, as shown below in Figure 5-2. As the figure also shows, clicking a Details Button in the Orders DataGrid causes the Order Details DataGrid below it to show the products associated with the selected order.
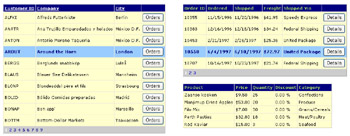
Figure 5-2: Application #48 showing the three related DataGrid controls presenting an increasing level of detail (clockwise from left).
Building Upon…
Application #4: Try/Catch/Finally
Application #12: Use a DataSet and DataView
Application #47: Build Data-Entry Web Forms
Code Walkthrough
The flow of the Code Walkthrough is similar to the previous topic. You will step through the code in the .aspx page and then complete the walkthrough in the codebehind page.
The .ASPX Page
The Customers DataGrid is the top-level master display control. It’s the only one that allows sorting. The code for this control is similar to what you saw in the previous topic:
SortExpr="CustomerID" AutoGenerateColumns="False" AllowPaging="True"
DataKeyField="CustomerID">


HeaderText="CustomerID" />
HeaderText="Company" />
HeaderText="City" />
CommandName="Select" />
When comparing this to the DataGrid in the previous topic, you’ll see that the new feature here is sorting. To implement sorting, you must do three things. First, the AllowSorting property must be set to True. As with most properties of a Web control, this can be done using a tag attribute, as you see here, or by setting the property in the codebehind class. With AllowSorting="True", the header text for each column renders as a LinkButton, the Click event for which bubbles up to the DataGrid, which in turn fires a SortCommand event on the Button’s behalf.
Second, if AutoGenerateColumns is set to False, you must supply a sort expression for every column that will support sorting. This is a data-source field name and is typically identical to the value of the DataField attribute. However, if, for example, you wanted to display a person’s first and last name (that is, concatenated in the stored procedure into an aliased virtual column named FullName) but sort only on the last name, you could set DataField to FullName and SortExpression to LastName.
Realize that the DataGrid does not actually do the sorting. It merely passes the sort expression—contained in a DataGridSortCommandEventArgs object—to the SortCommand event handler. Thus, the third step in implementing DataGrid sorting is to add code to this handler. As you will see in the next section, this typically involves sorting a DataView and rebinding it to the DataGrid.
There can be a fourth step involved, which is optional but recommended. Because of the stateless nature of the Web, the sort expression will not persist during DataGrid paging (covered in the next topic). In other words, if the user sorted on the City column and then clicked a paging control, the sort order would revert to either some default expression hard-coded in the codebehind class or to the order inherent to the data source itself—for example, in a T-SQL ORDER BY clause. Moreover, the sort expression is not included as a member of the DataGridPageChangedEventArgs object. Therefore, when handling paging, you do not have access to the latest column-dependent sort expression unless you store it someplace.
This is where the custom SortExpr attribute comes in. WebControl—the base class for all Web controls—exposes an AttributeCollection object you can use to store custom key-value attribute pairs that do not correspond to a control property. This makes AttributeCollection a convenient container for any number of items, including custom JavaScript routines that provide user feedback. For example, if you wanted a confirmation dialog box to appear when a delete Button is clicked, you could add the following line to the page’s Load event handler:
btnDelete.Attributes.Add("onclick", "if(!confirm(""AreyousureyouŒ
wanttodeletethis?""))returnfalse;returntrue;")
As you will see in the next section, the custom SortExpr attribute is used to store the latest sort expression, which can then be easily retrieved by any method to persist column sorting.
The methodology for setting up the master-details DataGrid relationships is similar to what you saw in the previous topic when data-entry controls were initialized to the values in a selected DataGrid row. The user clicks a Button in a ButtonColumn, which fires the ItemCommand event and another event determined by the CommandName property. Using the row’s index, you can then retrieve an ID from the DataGrid DataKeyCollection object and set properties of child controls based on this value. The difference in this application is that instead of using the CommandName property to wire an additional event, the Select keyword is used:
CommandName="Select" />
This causes the row to be selected when the user clicks the Button. It also applies style attributes set in the SelectedItemStyle tag. Therefore, you don’t have to explicitly select the row in the codebehind class.
The Codebehind Page
Handling the SortCommand event is usually quite simple. In this application, it involves two lines:
PublicSubgrdCustomers_SortCommand(ByValsourceAsObject,_
ByValeAsDataGridSortCommandEventArgs)HandlesgrdCustomers.So rtCommand
grdCustomers.Attributes("SortExpr")=e.SortExpression
BindCustomersGrid()
EndSub
The first line obtains the latest sort expression from the DataGridSortCommandEventArgs object and stores it in the DataGrid AttributeCollection. Following this, you are ready to reacquire the data source and bind it again to the DataGrid:
SubBindCustomersGrid()
DimstrSQLAsString=_
 "SELECTc.CustomerID,c.CompanyName,c.City, " &_
 " COUNT(o.OrderDate)ASOrderCount " &_
 "FROMCustomersc " &_
 "INNERJOINOrdersoONc.CustomerID=o.CustomerID " &_
 "GROUPBYc.CustomerID,c.CompanyName,c.City"
DimdsAsDataSet=CreateDataSet(strSQL)
DimdvAsDataView=ds.Tables(0).DefaultView


dv.Sort=grdCustomers.Attributes("SortExpr")
WithgrdCustomers
.DataSource=dv
.DataBind()
EndWith
EndSub
Notice that the latest sort expression is retrieved from the AttributeCollection and assigned to the Sort property of the DataView. The sorting implementation is now complete.
As for the master-details feature, recall from the previous topic that DataGrid Command events first flow through the ItemCommand event handler. Therefore, you have to ensure that code in this handler works properly, whether a Button in a ButtonColumn or a LinkButton in a column header is clicked. As an alternative to checking whether e.Item.ItemIndex equals -1, as was done in the previous topic, you can access e.Item.ItemType. This property contains a ListItemType enumeration value. If ItemType is Pager, you know that a paging control was clicked. ListItemType.Header indicates that a sorting control was clicked:
PrivateSubgrdCustomers_ItemCommand(ByValsourceAsObject,_
ByValeAsDataGridCommandEventArgs)HandlesgrdCustomers.ItemCo mmand
Ife.Item.ItemType=ListItemType.PagerOrElse_
e.Item.ItemType=ListItemType.HeaderThenExitSub
Following this check, you find code for displaying the Orders DataGrid. A SqlParameter object is created and then its value is initialized to the Customer ID retrieved from the DataKeyCollection of the Customers (master) DataGrid:
DimparamAsNewSqlParameter("@CustomerID",SqlDbType.NChar,5)
param.Value=grdCustomers.DataKeys(e.Item.ItemIndex)
BindOrdersGrid(param)
EndSub
The Order Details DataGrid is implemented similarly using the ItemCommand event handler for its master, the Orders DataGrid.
Conclusion
This topic has shown you how to implement sorting and set up master-details relationships between DataGrids. You learned that sorting involves three main steps:
- Turn DataGrid sorting on.
- Specify the sort expression for each sortable column.
- Handle the SortCommand event.
An optional but recommended best practice is to persist the sort expression in the AttributeCollection for the DataGrid.
A common alternative to the master-details interface presented here is to use a HyperLinkColumn in the master DataGrid that links to a separate details Web Form page. To experiment with this, remove the first BoundColumn in the Customers DataGrid and replace it with the following:
DataNavigateUrlField="CustomerID"
DataNavigateUrlFormatString="details.aspx?id={0}"
SortExpression="CustomerID" HeaderText="CustomerID" />
Then add a Web Form named details.aspx to the Project and use the id querystring variable to set up the details DataGrids.
Application #49 Implement DataGrid Paging
The ability to page through records instead of having to scroll through one large list is an essential feature of a Web-based data manipulation interface. This application builds upon what you’ve learned in the previous two topics by explaining how to implement DataGrid paging. We’ll explain options that lead to four possible configurations: built-in paging, custom paging, built-in navigation controls, and custom navigation controls.
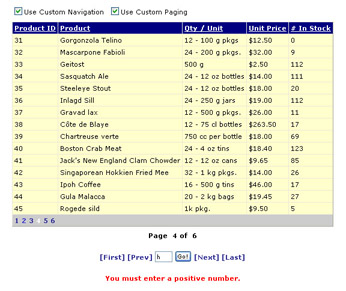
Figure 5-3: Application #49 showing the DataGrid with custom paging.
Building Upon…
Application #4: Try/Catch/Finally
Application #12: Use a DataSet and DataView
Application #16: Data Binding with Navigation
Application #47: Build Data-Entry Web Forms
Application #48: Implement DataGrid Sorting
New Concepts
The DataGrid offers tremendous support for paging. In its simplest incarnation, you need only to set a few properties and add a few lines of code to a PageIndexChanged event handler, and the DataGrid takes care of the rest. With slightly more effort, you can use your own navigation controls instead of those built into the DataGrid.
How does the DataGrid do this? The internal nuts and bolts are beyond the scope of this book. Let it suffice to say that the DataGrid is able to pull from its data source only those records it needs for a page of results, as defined by the value of its PageSize and CurrentPageIndex properties. The only problem with built-in paging is that the data source must be filled with all the records, even if only 10 or 20 are shown at any one time. Caching the data source will help to a certain point. Use of the Application Cache mechanism is demonstrated in this sample. However, if your recordset contains millions—or even thousands—of rows, the resource requirements and probable performance degradation might prove unacceptable.
This is where custom paging comes in. With it, you can select from the data source the rows you want to display at any one time. This option will also work with the built-in or custom navigation controls. The only caveat is that you are most likely connecting to the database and retrieving data every time the user clicks a paging control. Database connections are expensive.
The bottom line is that DataGrid paging is flexible. With a little experimentation, and perhaps some stress testing, you can determine which implementation is best for your situation.
Code Walkthrough
As with the previous two topics, the walkthrough begins with the code in the .aspx page and then finishes with code in the codebehind page.
The .ASPX Page
Configuring a DataGrid for built-in paging requires that you set the AllowPaging and PageSize properties. This is typically done on the .aspx page using attributes:
PageSize="15"


AllowPaging="True" AutoGenerateColumns="False" AllowSorting="True"
SortExpr="ProductID">
The PageSize attribute defaults to 10. The setting here will allow 15 records to be displayed in the DataGrid at any one time.
Use the PagerStyle tag to set attributes that affect the appearance of the built- in navigation controls:
Mode is the most important attribute. You have two options: NextPrev (the default) and Numeric. The former displays paging controls as previous and next LinkButtons. (You can specify the text.) Numeric displays a series of numbers. The default location is along the bottom of the DataGrid. However, this can also be changed using the Position attribute.
The code for the custom navigation controls requires no explanation. It’s omitted here to conserve space.
Although it’s permissible to display both the built-in and custom navigation controls, you’ll probably want to turn off the built-in controls when displaying custom navigation. To do this, right-click the DataGrid when in the Design View and then click Property Builder. In the Properties dialog box, click Paging. Uncheck Show Navigation Buttons and then click OK.
The Codebehind Page
For built-in paging, you must handle the PageIndexChanged event. This typically involves setting the DataGrid CurrentPageIndex property to the NewPageIndex passed via the DataGridPageChangedEventArgs object and then rebinding the grid:
PrivateSubproductDetails_PageIndexChanged(ByValsourceAsObject, _
ByValeAsDataGridPageChangedEventArgs)_
HandlesgrdProducts.PageIndexChanged
grdProducts.CurrentPageIndex=e.NewPageIndex
intCurrentPage=e.NewPageIndex+1
BindGrid()
EndSub
The variable intCurrentPage has class scope and is used for the custom paging and navigation options. It’s set here only to permit the built-in and custom paging controls to stay in sync when displayed simultaneously. Custom navigation is only slightly more complicated. Instead of handling PageIndexChanged, you handle the Command events raised by the LinkButtons and the Click event for the “Go!” Button. In this application, intCurrentPage is set in the handler and then assigned to the CurrentPageIndex property in the SetCustomNavigation method.
Custom paging involves three additional steps. First, both the AllowPaging and AllowCustomPaging properties must be set to True. For demonstration purposes, this is coded in the chkUseCustomPaging_CheckedChanged event handler. Normally you would simply add an AllowCustomPaging attribute to the DataGrid tag in the .aspx page.
In this application, the two remaining steps are completed in the GetOnePageOfProducts function. After some initial variable declarations, you find code for setting the DataGrid VirtualItemCount property:
PrivateFunctionGetOnePageOfProducts()AsDataSet
DimstrSQLAsString
DimscnnAsSqlConnection
DimscmdAsSqlCommand
DimsdaAsSqlDataAdapter
DimdsAsNewDataSet()


scnn=NewSqlConnection(SQL_CONNECTION_STRING)
scmd=NewSqlCommand("",scnn)


IfgrdProducts.VirtualItemCount=0Then
scmd.CommandText=_
 "SELECTCOUNT(ProductID)FROMProducts"
scnn.Open()
grdProducts.VirtualItemCount=CInt(scmd.ExecuteScalar)
scnn.Close()
EndIf
The DataGrid needs to know the total number of records in the data source to set its PageCount property (data source record count / DataGrid.PageSize) and accurately display the built-in navigation controls. With built-in paging, the DataGrid would determine this automatically from the data source. However, when you are only retrieving a subset of the records at any one time, you must inform the DataGrid via the VirtualItemCount property. Notice that this is done only once to avoid unnecessary trips to the database on each click of a paging control.
The last step is to retrieve a single page of records. If you enabled DataGrid sorting, you’ll want to move the sort expression to the T-SQL statement, as follows:
scmd.CommandText=_
 "SELECTProductID,ProductName,UnitPrice,QuantityPerUnit,Œ
UnitsInStockFROMProductsORDERBY " &_
grdProducts.Attributes("SortExpr")
Then create a SqlDataAdapter and use the overloaded Fill method that accepts a start record and a maximum number of records to retrieve:
sda=NewSqlDataAdapter(scmd)
sda.Fill(ds,grdProducts.CurrentPageIndex*grdProducts.PageSize ,_
grdProducts.PageSize, "products")


Returnds
EndFunction
This covers the key steps involved with implementing built-in and custom paging.
Conclusion
In this topic, you completed a three-part series on Web-application development that focused on data-manipulation interfaces involving the DataGrid control. You learned that the DataGrid offers flexible support for four configurations: built-in paging with built-in navigation controls (the easiest), built-in paging with custom navigation controls (almost as easy), custom paging with built-in navigation controls (more difficult, but only requires three additional steps), and custom paging with custom navigation controls. These configurations will support any scenario you can envision.
Application #50 Expose a Simple Web Service
You now begin another three-part series on Web-application development. In this topic, you’ll learn how to build an XML Web service that exposes two methods. One method returns an untyped DataSet of the ten most expensive products from the Northwind database. The other, more complex, method returns an instance of a custom class containing a typed DataSet of products ordered by a customer, as well as the company name.
The Framework automatically renders a Web service test user interface when you load a Web service page (.asmx) in a browser. When the page first loads, you’re presented with a list of links to the methods offered by the service. Clicking a link takes you to the method’s test interface, as you can see in Figure 5-4.
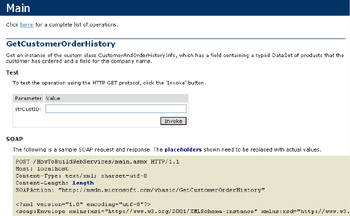
Figure 5-4: ASP.NET-generated Web service test page for Application #50.
Building Upon…
Application #4: Try/Catch/Finally
Application #12: Use a DataSet and DataView
Application #19: Use a Typed DataSet
New Concepts
The Framework documentation defines a Web service as “a programmable entity that provides a particular element of functionality, such as application logic, and is accessible to any number of potentially disparate systems using ubiquitous Internet standards, such as XML and HTTP.” In other words, a Web service enables platform- independent remote procedure calls because it’s based on widely accepted open standards.
This simple concept is spearheading the most significant evolution of the Internet since its inception. Using Web services, businesses can make application logic available to any client that can send and receive XML text messages. The potential, especially for business-to-business integration, is enormous.
The Framework has extensive support for Web services. It incorporates the Simple Object Access Protocol (SOAP) as its messaging protocol and the Web Services Description Language (WSDL) as its interface description language. It provides base classes, special attributes, and command-line utilities that take care of the low-level Web service implementation details, freeing you up to focus on the application logic. Visual Studio .NET takes it even further, offering many significant features that greatly facilitate building and consuming Web services.
Code Walkthrough
When creating an ASP.NET Web Service project in Visual Studio .NET, a number of tasks required for building a Web service are completed for you. It’s important to understand these requirements. A good way to do this is by examining the simple “Hello World” Web service that Visual Studio .NET automatically generates for a new project. The main item of discussion is the Web service page (.asmx). Like a Web Form page (.aspx), a Web service page has a codebehind page associated with it (.asmx.vb). However, unlike Web Forms, the .asmx page contains only one line of code, in this case:
<%@WebServiceLanguage="vb" Codebehind="main.asmx.vb"
 %>
Notice the @ WebService directive, which along with the .asmx extension, causes the ASP.NET runtime to process this page as a Web service.
The codebehind page contains the following code for the Web service class:
ImportsSystem.Web.Services


_
PublicClassService1
InheritsSystem.Web.Services.WebService
PublicFunctionHelloWorld()AsString
HelloWorld= "HelloWorld"
EndFunction
EndClass
Notice the Imports statement. This refers to the Framework assembly of the same name, which is where the Web service base classes are found. The custom class, Service1, is like any other class you might build. Although Visual Studio .NET creates it to derive from System.Web.Services.WebService, this is not a requirement. It is, however, a good idea. WebService conveniently exposes numerous properties that make it easier to build your service. (As an interesting aside, WebService derives from System.MarshalByRefObject, which is the base class for .NET Remoting.) Service1 is also declared with an optional WebService attribute that allows you to set several properties—such as a name, description, and namespace—for the Web service.
You should realize that the only code required to set up a Web service is the WebMethod attribute. By marking up a Public subroutine or function, you turn it into HTTP-accessible application logic. With this attribute, you can also set other method-level properties, including a description, cache duration, and even transaction options.
In the Web service for this topic, you find two Web methods. GetTenMostExpensiveProducts returns an untyped DataSet. Recall that DataSets have native support for XML serialization. As such, they make an excellent return type for a Web method. The code for this method is as follows (with the data-access logic omitted to save space):
expensiveproductsfromtheNorthwinddatabase.")>_
PublicFunctionGetTenMostExpensiveProducts()AsDataSet
'...Dataaccesslogic...
DimsdaAsNewSqlDataAdapter(scmd)
'CreateandfillanuntypedDataSet.
DimdsTenMostExpProdsAsNewDataSet()
sda.Fill(dsTenMostExpProds)
ReturndsTenMostExpProds
EndFunction
The code in this method is straightforward. In fact, there is no logic here that you haven’t already seen in previous topics. The only addition is the WebMethod attribute. In other words, converting your application logic into a Web service is as simple as declaring it with the Public keyword and the WebMethod attribute!
The other Web method in this sample is GetCustomerOrderHistory. This function returns a custom type, CustomerAndOrderHistoryInfo, that contains two Public fields:
PublicClassCustomerAndOrderHistoryInfo
PublicOrdersAsdsCustOrderHist
_
PublicCompanyNameAsString
EndClass
Orders is of type dsCustOrderHist, which is a typed DataSet. It was created by adding a DataSet to the project and then dragging the Northwind stored procedure CustOrderHist to its design surface. (See “Application #19: Use a Typed DataSet” in Chapter 3 for more information.) The other field, CompanyName, is a simple string that has been declaratively marked with an XmlAttributeAttribute. This attribute is not required. It’s used merely to demonstrate how to shape the XML that is generated when this class is serialized as part of the XML SOAP message returned by the Web method.
The Web method contains the following code. Comments are supplied to help you follow along (with self-explanatory data-access logic again omitted):
CustomerAndOrderHistoryInfo,whichhasafieldcontainingatypedΠDataSetofproductsthatthecustomerhasorderedandafieldforth eΠcompanyname.")>_ PublicFunctionGetCustomerOrderHistory(ByValstrCustIDAsString)_ AsCustomerAndOrderHistoryInfo '...Dataaccesslogic... 'Createaninstanceofthecustomreturntype. DimcohiAsNewCustomerAndOrderHistoryInfo() 'CreateandfillthetypedDataSet. DimdsOrderHistoryAsNewdsCustOrderHist() sda.Fill(dsOrderHistory.CustOrderHist) 'AssignthetypedDataSettotheOrdersproperty. cohi.Orders=dsOrderHistory 'RetrievetheCompanyNameandassignittotheotherfieldint he 'returntype. DimobjReturnValAsObject=scmd.ExecuteScalar() IfNotIsDBNull(objReturnVal)Then cohi.CompanyName=objReturnVal.ToString EndIf 'Returnthecustomtype. Returncohi EndFunction
To test the Web service, build the project, open a browser, and then navigate to http:/ /localhost/HowToBuildWebServices/main.asmx. Click a Web method link to access its test page. Then click the Invoke button to view the XML that is returned. Use ALFKI for the Customer ID when testing GetCustomerOrderHistory.
Conclusion
This has been a very quick explanation of Web services and how to build them. You learned how easy it is to convert existing application logic to a Web method and expose it to anyone who has access to the Web service address. All that is required is a Public routine—declared with the WebMethod attribute—residing in the codebehind page for a Web page with an .asmx extension and an @ WebServicedirective.
The next topic will show you how to build a client application to consume a Web service.
Application #51 Consume a Web Service
This second topic in the series on Web services focuses on how to consume a Web service. The sample application has four examples, each of which demonstrates interaction with real-world Web services. “Local Time By Zip” is the simplest example. It returns the local time at a Zip Code you enter. “Book Info By ISBN” shows how to retrieve the sales rank and current price from Amazon.com and Barnes & Noble for any book with an ISBN. “Dilbert (Async Demo)” is more advanced, demonstrating how to call the Daily Dilbert Web service asynchronously. (See Figure 5-5.) Finally, the “Failover (UDDI Demo)” simulates using the Microsoft UDDI Business Registry to provide failover support for another local time service.
Space limitations prohibit walking through the code for each example. Therefore, the discussion will focus on the Daily Dilbert service. You should, however, have no problem understanding the other examples because the methodology for consuming a Web service is the same in each.
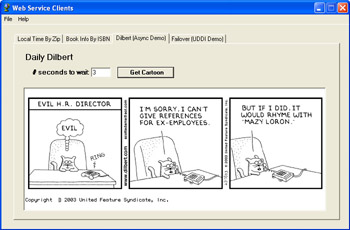
Figure 5-5: Application #51 showing the asynchronous Web service invocation example.
Building Upon…
Application #4: Try/Catch/Finally
Application #12: Use a DataSet and DataView
Application #24: Load Images From and Save Images To a Database
Application #50: Expose a Simple Web Service
New Concepts
The concept of a proxy is important to understanding how a client application consumes a Web service. A proxy can be viewed as a class that represents, or stands in the place of, the Web service. Instead of working directly with the Web service’s API, you will work with a high-level wrapper class that not only models the service’s API but also provides inherited functionality that takes care of the low-level details involved with connecting to the service, creating and serializing SOAP request messages, and deserializing SOAP response messages.
A Web service proxy class is generated by a Framework command-line tool, WSDL.exe, or by Visual Studio .NET when you add a Web reference to your project. It does this by deserializing an XML document used for describing the Web service’s API. This document uses the open-standard Web Services Description Language (WSDL). A Web service’s WSDL document is generated automatically by the Framework by appending ?wsdl to a Web service address. For example, the WSDL document for the Daily Dilbert service is located at http: //www.esynaps.com/ WebServices/DailyDilbert.asmx?wsdl. If you open this in your browser, you’ll see an XML document that describes the service’s interface.
You can view the code in the proxy class by taking the following steps. First, in the Solution Explorer, click the View All Files icon. Next, expand Web References | Esynaps | Reference.map. Finally, right-click the Reference.vb file and select View Code. While scrolling through the proxy class, note that it derives from System.Web.Services.Protocols.SoapHttpClientProtocol. This is where it gets the functionality for handling the low-level details. Next, notice that the Url property maintains a reference to the Web service address (.asmx).
If the Web service returns any complex types, such as a typed DataSet or custom class, you’ll also find child classes representing them in the proxy. For example, if you view the code for the Book Info service (Web reference “PerfectXML”), you’ll find the following class within the proxy class:
[Namespace]:="http://www.PerfectXML.com/NETWebSvcs/BookService")>_
PublicClassAll
PublicAmazonSalesRankAsString
PublicAmazonPriceAsString
PublicBNSalesRankAsString
PublicBNPriceAsString
EndClass
In the code that consumes this Web service, you’ll notice that a variable of type PerfectXML.All is created to contain the return value from the call to the service’s GetAll Web method.
Proxy methods have also been generated for both the synchronous and asynchronous invocation of each Web method exposed by the service. Calling a Web method synchronously means that the client must wait for it to return before the thread can continue with other processes. This is often fine. However, if the Web method performs a time-consuming task, the wait might not be acceptable. By invoking the asynchronous proxy methods, you limit the amount of time the client thread is tied up.
There are two ways to conduct asynchronous operations:
- Callback delegatesThe AsyncCallback is a pointer to a delegate that you want to invoke when the Begin Web method completes (more on Begin later). Use this if you are not concerned about how long it takes for the Web service to return.
- Wait handlersThe ASyncWaitHandle class allows you to set a time limit on the return. If the limit is exceeded, the call is abandoned.
Wait handlers are often the best approach. They’re certainly the simplest. You’ll see how to use them in the “Code Walkthrough” section.
Finally, a brief mention of UDDI is in order. UDDI is an acronym for Universal Description, Discovery, and Integration. As a key component of the Web services stack, it provides both a specification and a mechanism that facilitate the publication and discovery of businesses and services over the Internet. Windows Server 2003 also features native UDDI support for extranet and intranet scenarios. UDDI is extremely important for a variety of reasons, not the least of which is the ability to dynamically configure (for example, at run time) a client application for Web service consumption. Study the commented code in the “Failover” example and spend some time at http://uddi.microsoft.com/developer/default.aspx to learn more about UDDI.
Code Walkthrough
The Daily Dilbert Web service returns a different Dilbert cartoon each day in the form of a serialized byte array (Base64-encoded). In “Application #24: Load Images From and Save Images To a Database” you learned how to convert a byte array to an image and display it in a PictureBox. The same concepts apply here. The only difference is that you’re receiving the byte array from a deserialized SOAP response message instead of a database.
The code for consuming the Daily Dilbert Web service is contained in the btnCartoon_Click event handler.
PrivateSubbtnCartoon_Click(ByValsenderAsSystem.Object,_
ByValeAsEventArgs)HandlesbtnCartoon.Click


IftxtAsyncWaitPeriod.Text= "" Then
MessageBox.Show("Youmustenteranumberofsecondsyouwish Œ
towait.", "WebServiceDemoInformation",_
MessageBoxButtons.OK,MessageBoxIcon.Information)
Return
EndIf


'CreateaninstanceoftheWebserviceproxyclass.
DimwsDailyDilbertAsNewEsynaps.DailyDilbert()
The first key step is to instantiate the Web service proxy class, as you see here. “Esynaps” is both the name of the Web reference and the proxy’s namespace. When you add a Web reference, this defaults to a variation of the host’s domain (for example, “com.esynaps.www”). You can, however, rename it in the Solution Explorer.
You are now able to invoke the Daily Dilbert Web method. If you were to do this synchronously, the code would appear as follows:
DimarrPicture()AsByte
arrPicture=wsDailyDilbert.DailyDilbertImage
However, when calling asynchronously, several additional steps are required. Asynchronous proxy methods come in Begin-End pairs. Use BeginWebMethodName to invoke the Web method, and EndWebMethodName to retrieve the return value if the Begin method call completes in the time you specify. Begin methods return an object that implements the IAsyncResult interface. This object exposes an ASyncWaitHandle property of type WaitHandle, which you can use to specify the wait time:
Try
DimresultAsIAsyncResult=_
wsDailyDilbert.BeginDailyDilbertImage(Nothing,Nothing)


result.AsyncWaitHandle.WaitOne_
(NewTimeSpan(0,0,CInt(txtAsyncWaitPeriod.Text)),False)
Here, the wait handler’s WaitOne method is invoked. This will block the thread started by the Begin call until one of two things happens: a return value is received within the time specified in the TimeSpan structure, or the wait period exceeds the specified time.
To determine whether the call completed in time, check the value of the IAsyncResult.IsCompleted property. If the call was successful, invoke the corresponding End proxy method to retrieve the byte array:
If(result.IsCompleted)Then
arrPicture=_
CType(wsDailyDilbert.EndDailyDilbertImage(result),Byte( ))
The remaining code for displaying the image is omitted because it was explained in an earlier topic. Binary data manipulation is also the subject of the final Web service topic.
Conclusion
In this topic, you learned how to consume real-world Web services. The steps for conducting synchronous operations are simple. When you add a Web reference to your project, Visual Studio .NET creates a proxy class for you. All that remains to be done is to instantiate the proxy, call the Web method, and process the return value. In each example, you saw that the same methodology was followed.
You also learned about asynchronous operations. Although they’re more difficult, you saw that only a few extra steps are required to limit how long the client application waits for the Web method to return its data.
Application #52 Transfer Binary Data from a Web Service
Capping off this three-part series on Web services is a fairly complex sample involving a Windows client application that displays images retrieved from a Web service. The sample ties into one package concepts and code that are sprinkled throughout the book. As such, what follows is not a comprehensive walkthrough, but rather a brief discussion of some key highlights.
The Web service exposes three Web methods. Browse returns an array of custom ImageInfo objects that contain information about images residing in a child images folder. This is used to fill a ListBox for selecting an image, as well as for displaying data such as image size and pixel format. GetImage accepts a filename and returns the corresponding image as a serialized byte array. GetThumbnail works similarly, but it returns a thumbnail instead of the full image. The Web service also contains other methods that support the Web methods but are not exposed as such.
With the client application, you can retrieve a list of available images and then click a filename to view the thumbnail and image information. (See Figure 5-6.) If you double-click a thumbnail or click the Display Image Button, a form appears that displays the full image and allows you to manipulate it in various ways. You can even save the image to your hard disk in one of several image formats.
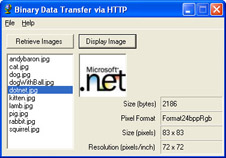
Figure 5-6: Application #52 showing a list of images retrieved from a Web service.
Building Upon…
Application #4: Try/Catch/Finally
Application #12: Use a DataSet and DataView
Application #20: Build a Data-Entry Form
New Concepts
Although Web services generally return XML as text, as you’ve already seen in the previous topic with the Daily Dilbert Web service, it’s possible to have a Web Service return binary information. Because the SOAP serializer automatically serializes byte arrays using Base64 encoding, Web Services can easily return images, sounds, and much more. All you have to do is convert the source files into byte arrays and the Framework’s serialization mechanism takes care of the rest. On the client side, the encoded string representing the image will be deserialized into a byte array, which must then be converted to a Bitmap object.
Code Walkthrough
As this sample consists of two applications, the Code Walkthrough first steps through the code in the Web service and then moves to the code in the Windows client that consumes the service.
The Graphics Service
As mentioned earlier, the Browse method returns an array of custom ImageInfo objects. For serialization, the ImageInfo class is declared as Public and contains Public fields:
PublicClassImageInfo
PublicNameAsString
PublicSizeAsLong
PublicHeightAsInteger
PublicWidthAsInteger
PublicHorizontalResolutionAsSingle
PublicVerticalResolutionAsSingle
PublicPixelFormatAsImaging.PixelFormat
PublicThumbnailAsByte()
EndClass
Browse invokes DirectoryInfo.GetFiles on the images subfolder and then assigns FileInfo properties to ImageInfo objects:
_
PublicFunctionBrowse()AsImageInfo()
DimiAsInteger
DimfiAsFileInfo
DimaImagesAsImageInfo()
DimdiAsNewDirectoryInfo(Server.MapPath("./Images"))
DimafiAsFileInfo()=di.GetFiles("*.jpg")
ReDimPreserveaImages(afi.Length-1)


ForEachfiInafi
aImages(i)=NewImageInfo()
aImages(i).Name=fi.Name
aImages(i).Size=fi.Length
FillImageInfo(aImages(i),fi.Name)
i+=1
Next
ReturnaImages
EndFunction
The Web method GetImage contains only one line of code, the return from a private helper function:
_
PublicFunctionGetImage(ByValFileNameAsString)AsByte()
ReturnReadFile(Server.MapPath("./Images/" &FileName))
EndFunction
ReadFile is where the source image is converted to a byte array:
PrivateSharedFunctionReadFile(ByValFilePathAsString)AsByte()
DimfsAsFileStream
Try
fs=File.Open(FilePath,FileMode.Open,FileAccess.Read)
DimlngLenAsLong=fs.Length
DimabytBuffer(CInt(lngLen-1))AsByte
fs.Read(abytBuffer,0,CInt(lngLen))
ReturnabytBuffer
Finally
fs.Close()
EndTry
EndFunction
First, a FileStream object is opened on the source file. Read is then invoked to read the binary data from the stream and write it to the supplied buffer.
The GetThumbnail Web method uses a helper function that is more involved. Consult the sample’s ReadMe file and source-code comments for more information.
The Graphics Client
The code for retrieving the available images and displaying their filenames in a ListBox resides in the btnRetrieve_Click event handler. First, variables representing the Web service proxy class and the return type for the Browse Web method are declared. The proxy is then instantiated and the ImageInfo array variable aInfo, already declared at the class level, is assigned to the return value from the Web method:
DimwsGraphicsAsGraphicsServer.ImageService
DiminfoAsGraphicsServer.ImageInfo
wsGraphics=NewGraphicsServer.ImageService()
aInfo=wsGraphics.Browse()
All that remains is to clear the existing ListBox items and then iterate through the ImageInfo array to refill the control with the image filenames:
lstImages.Items.Clear()
ForEachinfoInaInfo
lstImages.Items.Add(info.Name)
Next
The code for displaying a full image resides in DisplayImage. The key lines for retrieving the image from the Web service are as follows:
wsGraphics=NewGraphicsServer.ImageService()
strName=aInfo(lstImages.SelectedIndex).Name
bmp=GetImage(wsGraphics.GetImage(strName))
When the GetImage Web method is invoked, its return is passed to a private GetImage helper function on the client, which does the work of converting the deserialized byte array to a Bitmap:
PrivateFunctionGetImage(ByValabyt()AsByte)AsBitmap
Try
ReturnNewBitmap(NewMemoryStream(abyt))
CatchexpAsException
MessageBox.Show(exp.Message,Me.Text)
EndTry
EndFunction
As you can see, it’s a little easier to convert from a byte array than to a byte array. A Bitmap object is readily derived from a MemoryStream object.
The remainder of the code is not Web-service specific and is thus not covered further here.
Conclusion
This sample completes a three-part series on Web services and the discussion on building Web applications. You learned that binary data can be sent via HTTP because the Framework serialization mechanism converts a byte array to Base64- encoded text, which can then be contained in an XML SOAP message. Using the concepts and code presented here, you can quickly set up a Web service that can be used to serve up any type of binary content.
About the Applications
- Working with Microsoft Visual Studio .NET 2003 and Microsoft .NET Framework 1.1
- Working with the Microsoft Visual Basic .NET Language
- Data Access
- Building Windows Forms User Interfaces
- Building Web Applications
- Working with Console Applications
- Interacting with the Operating System
- Working with the .NET Framework
- Advanced .NET Framework
- GDI+
- Building Enterprise Services Applications
- COM Interop/PInvoke
- Visual Studio .NET
- Securing Applications
- Coding Conventions
- Windows Server 2003 for .NET Developers
EAN: 2147483647
Pages: 157
