Adding Views to a Template
Highlights
In this chapter, you will learn how to
- Create an alternative, simplified view of a form
- Modify views of a form to selectively display sections and controls
- Design views for distribution by e-mail or as e-mail attachments
- Add default and multiple print views to a form
- Create a Microsoft Word print view from an XSLT file
For more information
- See the sections Adding Controls in a Layout Table and Working with Repeating Tables, in Chapter 5, Laying Out Forms, for altering layout and repeating tables.
- See the section Applying Conditional Formatting, in Chapter 7, Formatting Forms for help with conditional formatting expressions.
Overview
To work through this chapter
- You need experience adding sections to a form and manipulating layout and repeating tables.
- You must understand conditional formatting and data validation techniques.
- You must know how to establish event- based rules to set default values.
- You should have installed in your C:Microsoft PressIntroducing InfoPath 2003Chapter10 folder the sample files from the CD that accompanies this book.
Up to this point on your Microsoft InfoPath 2003 learning curve, youve worked only with default views of forms. This chapter introduces you to forms with multiple views that users choose from the View menu. Hiding data entry sections and controls when theyre not required for a particular activity is a typical use for multiple views. You can also add a rule that determines the role of the user and switches to the appropriate view.
Multiple views also let you repurpose a form to serve several functions. A typical use for multiple views is adapting an order entry form to deliver an order acknowledgment, print acknowledgments, and generate invoices with e-mail and printing views added. Each view is based on the same XML data document. The documents status in the order workflow process determines the content of fields and the conditional formatting rules that apply at each step.
Adding a Simplified Form View
Removing unneeded elements from a form s default view is the quickest and easiest way to add a new view to a form. The example in this section assumes that unneeded elements have default values for new forms or obtain their values from an existing XML data document that users edit. Here s the basic process:
- Create and name a new, empty view.
- Copy the original form s contents to the new view.
- Remove the unneeded objects from the new view.
- Rename the original default view.
- Assign the added view as the default view.
The following procedure removes the required Channel and optional Image sections from the default view of the RSS 2.0 form. Your C:Microsoft PressIntroducing InfoPath 2003Chapter10Rss2v4 folder contains a formatted version of Chapter 4 s Rss2v4.xsn template. To add the simplified view to this template, follow these steps.
Add a new view by pasting a copy of the default view
- Navigate to C:Microsoft PressIntroducing InfoPath 2003Chapter10Rss2v4, and open the Rss2v4.xsn template in design mode.
- Press Ctrl+A to select all form elements, and press Ctrl+C to copy the elements to the Clipboard.
- Choose View, Manage Views to activate the Views task pane.
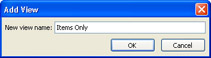
- Click the Add A New View link to open the Add View input box, and type Items Only as the New View Name, as shown here:
- Click OK to add the new, empty view.
- Press Ctrl+V to paste the copied form elements to the view.
- Click the Version label to select the first embedded layout table, click the table s selection handle to select all elements, and press Delete to remove the table.
- Click the Section tab to select the Image section, and press Delete to remove it.
- Remove the horizontal line and the spaces above and below it.
- Drag the bottom of the master table up to the bottom of the Repeating section tab. Your form now appears as show here:
- In the Views task pane, double-click the View 1 (Default) item in the Select A View drop- down list to open the View Properties dialog box.
- In the View Name text box on the General tab, replace View 1 with All Sections or the like, as shown here:
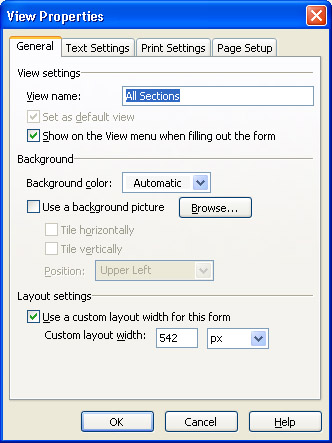
- Click OK to close the properties window and save your changes.
- Open the Items Only drop-down list, and select Set As Default to make Items Only the default view.
- Click Preview Form to display the default view.
- Choose View, All Sections to display the original form version.
- Save your changes, open the Rss2v4.xml sample data document in the same folder as Rss2v4.xsn, and check both form views.
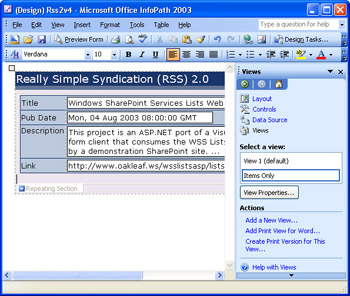
Figure 10-1 shows the default Items Only view of the Rss2v4.xml test data document, which has multiple items.
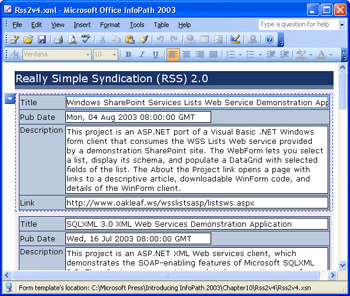
Figure 10-1: Select the simplified Items Only view, shown here, or the All Sections view of a sample RSS 2.0 data document by choosing a View menu option.
Presenting Multiple Views of Complex Forms
The Northwind Traders Order Entry form is an example of a form that can serve at least two purposes: order entry and editing, and invoice generation and editing. These processes represent the order processing workflow s starting and ending points, unless someone cancels the order or invoice. You can add other views for e-mailing order acknowledgments and invoices to the purchaser and specify a view as the default printing view. The section Designing a Default Print View, later in this chapter, describes modifications to adapt the view for printing.
Following are basic design guidelines for creating multiple views of a complex form:
- Plan to copy and paste elements of the initial default view to new views. Copying and pasting sections and controls between views maintains their binding to primary data sources and, for list boxes, secondary data sources.
- Add an integer field to specify the workflow status. You can use this value to determine the view that appears when users open a data document.
- Place groups of controls that shouldn t appear in all views in their own sections. You can remove sections from a view, but you can t selectively hide or show individual layout table rows. Conditional formatting enables hiding individual controls on a per-view basis.
- Design the most complex view first, when possible, and apply all conditional formatting rules to that view. Doing this lets you base other views on a single view for consistency.
- Modify conditional formatting rules as necessary for the specific view. Data validation rules apply to all views.
Creating an Invoice Entry View from the Northwind Order Entry Form
The NWOrdersCh10.xsn template in your C:Microsoft PressIntroducing InfoPath 2003Chapter10NWOrdersCh10 folder is a modified version of the ...Chapter08NWOrdersFinalNWOrdersFinal.xsn template. New fields, secondary data sources, and controls have been added to better represent a real-world order entry form and provide for issuing an invoice.
Table 10-1 describes the fields added to the NWOrdersCh10.xsn data source s OrderInfo and Invoice Info groups.
|
Field Name |
Type |
Purpose |
Datatype |
Required |
|---|---|---|---|---|
|
my:CustOrderID |
Element |
Customer order number. (In use, substitute buyer name if no order number is provided.) |
string |
Yes |
|
my:PaymentTerms |
Element |
Code for payment terms defined by the PaymentTerms secondary data source (PaymentTerms.xml). |
integer |
Yes |
|
my:WorkflowStatus |
Attribute |
Code for the current link in the workflow chain as defined by the WorkflowStatus secondary data source (WorkflowStatus.xml). |
integer |
Yes |
|
my:LastUpdated |
Attribute |
Date and time of last update by workflow process or manual entry. (Should default to system time, which requires code.) |
dateTime |
Yes |
|
my:UpdatedBy |
Attribute |
Initials of data entry operator. (Defaults to WF , for workflow process.) |
string |
Yes |
|
my:InvoiceInfo |
Section |
Has the OrderID attribute (described next in this table) and contains the InvoiceID and InvoiceDate elements. |
N/A |
Yes |
|
OrderID |
Attribute |
Primary key value of the order for this invoice. |
integer |
Yes |
|
InvoiceID |
Element |
Sequential invoice number (primary key) assigned by the workflow process or a database lookup. |
integer |
No |
|
InvoiceDate |
Element |
Defaults to shipping date (rule-based). |
date |
No |
|
my:CustOrderID |
Element |
Customer order number. (In use, substitute buyer name if no order number is provided.) |
string |
Yes |
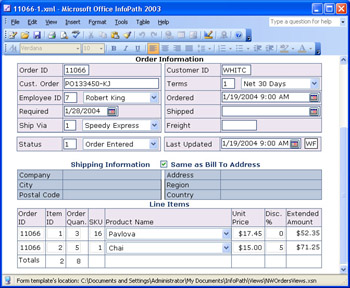
Figure 10-2 shows a test form created from the NWOrdersCh10.xsn template that you modify in this and later sections. The Order Information section has the added Cust. Order and Terms controls. The added Status section has the (workflow) Status and Last Updated controls. The Status section is for internal use only and doesn t appear in views of the form you create that are sent to the customer.
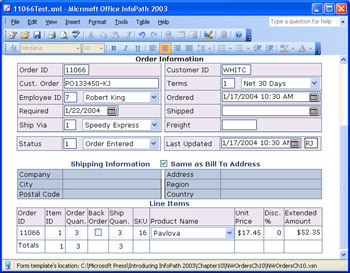
Figure 10-2: This template and its test data document are the starting point for adding invoice generation and other views.
To create a new InvoiceEntry view, as illustrated in Figure 10-3, and save a sample XML data document for use in subsequent exercises, follow these steps.
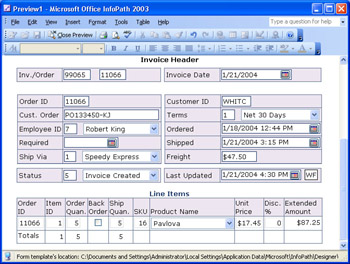
Figure 10-3: The InvoiceEntry view of a test XML data document illustrates most changes you make in this section to a copy of the original OrderEntry view.
Start an invoice entry view
- Navigate to the C:Microsoft PressIntroducing InfoPath 2003Chapter10NWOrdersCh10 folder, and open the NWOrdersCh10.xsn template in design mode.
- Press Ctrl+A, and then press Ctrl+C to copy the view to the Clipboard.
- Choose View, Manage Views to activate the Views task pane, which displays OrderEntry (Default) in the Select A View list.
- Click the Add A New View link to open the Add View input box, and type InvoiceEntry as the View Name.
- Click OK to close the dialog box and open the new, blank view, and press Ctrl+V to paste the Order Entry view.
- Change Order Entry in the title cell to Invoice Generation. Choose File, Save As, change the file name to NWOrdersViews.xsn, save your changes in a new My DocumentsInfoPathViews folder, and change the form name to NWOrdersViews - Test1.
Invoices often have a different layout than order entry forms. As an example, bill to and ship to information is adjacent in most paper invoice forms. Invoices also require an invoice number and invoice date; invoice date usually is the same as the shipped date. Invoices commonly use different terms than order entry forms to describe their sections. Do the following to make these changes to the InvoiceEntry view.
Rearrange the form and add the Invoice Header section
- With the Invoice Entry view active, select the Shipping Information layout table, press Ctrl+X, position the insertion point at the beginning of the Order Information label, and press Ctrl+V to move the layout table to its new location below the Customer Information layout table.
- Delete the empty line above the Line Items repeating table, preview your changes, and return to design mode.
- Position the insertion point at the end of the Order Information label, choose Insert, More Controls to activate the Controls task pane, and click the Section item in the list to open the Section Binding dialog box.
- Double-click the my:InvoiceInfo node to bind the new section to the node.
- To shortcut the layout table generation process, select the first row of the Order Information layout table, and copy it to the Clipboard. Click inside the new, empty section, paste the table row, and remove the two empty lines.
- Change Order ID to Inv./Order, and add a few spaces in front of the Order ID text box. Move the insertion point to the left border of column B, click Text Box in the Insert Controls list, and bind the new text box to the my:InvoiceInfo group s InvoiceID field. (The OrderID text box doesn t have a label, because it s hidden in the invoice sent to customers.)
- Remove the added label, shorten the text box, remove the digit-grouping symbol, and apply an outline border to the text box with the first color of the Blueberry color scheme.
- Right-click the OrderID text box, choose Change Binding from the shortcut menu, and double-click the InvoiceInfo s OrderID attribute in the Text Box Binding dialog box. If the default value appears with a digit-grouping symbol, remove it.
- Change the Customer ID label to Invoice Date, delete the Customer ID text box, and drag a date picker control bound to my:InvoiceInfo s InvoiceDate field to the cell.
- Remove the added label, shorten and add a border to the date picker control, and change the date format to short date (M/D/YYYY).
- Change the Customer Information label at the top of the form to Bill To, the Shipping Information label to Ship To, and the Order Information label to Invoice Header.
- Optionally, reverse the positions of ID and Company in the first table row, and change the labels to more invoice-like terminology, as shown here in preview mode:
- Preview the form and examine both views by selecting each view from the View menu.
- Return to design mode, and save your changes.
For views that represent steps in a workflow, each document might have a numeric code to represent its current status. The sample form s Status drop-down list has nine choices, ranging from Order Canceled (0) to Invoice Canceled (9). The two views you ve created so far represent the Order Entered (1) and Invoice Created (5) steps in the workflow process. In the following example, the data document file name is the Order ID value, a hyphen, and the workflow status code. To create the two data documents, follow these steps.
Create test data documents
- Activate the task pane, choose Fill Out A Form, and click the form name link to open the default OrderEntry view as Form1.
- Change the Ordered and Required dates to more recent values, clear the Shipped date picker control, clear the Freight text box, and match the Last Updated date to the Ordered date.
- Add an item to the Line Items table, set Ship Quan. values to 0, and select the Back Order check box to eliminate the data validation errors. (You ll fix this problem in the next section.)
- Save the test form as 11066-1.xml in the template s folder. 11066-1 corresponds to the Order Entered status. (Open the Status drop-down list to see all the steps in the workflow.)
- Choose View, InvoiceEntry; add an arbitrary Invoice number; and add identical Invoice Date, Shipped, and Last Updated dates. Select a shipper, add a freight amount, select Invoice Created as the Status of the workflow, and specify Ship Quan. values for both line items, as shown here:
- Choose Save As, save the form as 11066-5.xml for Invoice Created status tests, and return to design mode.
Making Workflow Dependent Changes
A workflow status code is important as a criterion for handling view-dependent changes to conditional formatting and data validation expressions. For this example, the Line Items table s Back Order and Ship Quan. fields aren t applicable to order entry operations, and 3 as the default Order Quan. and Ship Quan. values isn t appropriate for a real order entry form. You must also change the Extended expression box to display extended amounts based on Order Quan. rather than Ship Quan. for the OrderEntry view.
To make the required changes to the OrderEntry view, follow these steps.
Change default values and data validation expressions for order entry
- Select the OrderEntry view, and in the Line Items table, change the default Order Quan. value to 1 and the default Ship Quan. value to 0.
- Right-click the Back Order check box, choose Check Box Properties to open the Properties dialog box, and click Data Validation. With the first Conditions With Data Validation entry selected, click Modify to open the Data Validation (BackOrdered) dialog box.
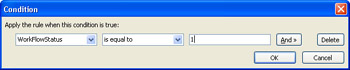
- Click the And button, and select Select A Field Or Group. Double-click my:WorkflowStatus under the OrderInfo node in the Select A Field Or Group dialog box, select Is Greater Than Or Equal To and Type A Number, and type 5 in the text box, as shown here:
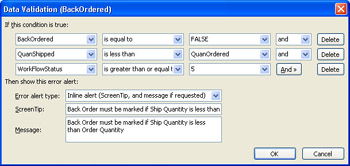
- Click OK three times to close the dialog boxes and save changes to the data validation rule.
- Open the Data Source task pane, double-click OrderDate, delete its Default Value and click OK to save your changes. Do the same for RequiredDate, ShippedDate, and Freight.
- Close the template, save your changes, and double-click 11066-1.xml.
- Clear the two Back Order check boxes to verify that the validation rule works for this view.
- Close and save 11066-1.xml, and open 11066-5.xml.
- Verify that the Back Order check boxes show data validation flags based on the ordered and shipped quantities , and then close 11066-5.xml.
Multiple views created from an initial default view often include controls that aren t applicable to all views. In the OrderEntry view, the Line Items repeating table shouldn t contain controls that are related to shipping, which occurs later in the order processing workflow. Thus, you delete the Back Order check box and Ship Quan. text box. The Extended expression box value is based on the QuanShipped field, so you must change the XPath expression to use the QuanOrdered field.
Remove unneeded Line Items controls and update the Extended expression box
- Reopen the NWOrdersViews.xsn template in design mode, and switch to OrderEntry view, if necessary. (In design mode, InfoPath opens the last active view by default.)
- Select the Back Order and Ship Quan. columns , and press Delete to remove them.
- Open the Extended expression box s Properties dialog box, change QuanShipped to QuanOrdered in the XPath box, and click OK to save your changes. The default Extended value is equal to the Unit Price amount.
- Increase the width of the table to match that of the Shipping Information section, and adjust the widths of the three rightmost columns to permit increasing the available width of the Product Name drop-down list.
- Save your changes, and open 11066-1.xml to test the view, as shown here:
- Close 11066-1.xml and open 11066-5.xml, switch to InvoiceEntry view, and verify that this view s Extended expression box responds as expected to changes in Ship Quan.
Adding Workflow Dependent Rules
SP-1 Rules that supply default date and time values and automatically open the view for the current workflow status speed form completion and minimize data entry errors. In this section, you ll add rules to set the value of the Last Updated date picker control to the current date and time when the user opens a form at any stage in the workflow process, to set the OrderDate value when entering a new order, and to open the InvoiceEntry view if the Workflow ID value is 5 (Invoice Created).
To add these three rules, follow these steps.
Add rules to set dates and change the default view
- With the NWOrdersViews template open in design mode, choose Tools, Form Options, to open the dialog box, and click the Open and Save tab. Click the Rules button to open the Rules for Opening Forms dialog box, click Add to open the Rule dialog box, and change the Name of the rule to Set Last Updated.
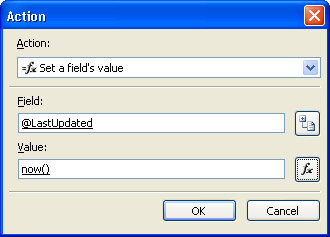
- Click Add Action to open the Action dialog box, and select Set A Field s Value in the drop- down list. Click the Field box s Set XPath button at the right of the Field text box to open the Select A Group Or Field dialog box, and double-click the LastUpdated attribute under the OrderInfo node.
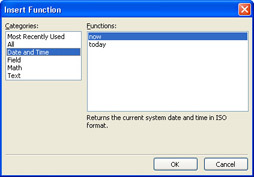
- Click the Value box s Formula ( f x) button to open the Insert Formula dialog box, and click Insert Function to open the dialog box of the same name. Select Date And Time in the Categories list and Now in the Functions list, as shown here:
- Click OK to close the dialog box and verify your Action settings, as shown here:
- Click OK twice to return to the Rules For Opening Forms dialog box, and click Apply to save your rule.
- Click Add to add another rule, name the rule Set Order Date, and click Set Condition to open the Condition dialog box.
- Click Select A Field Or Group in the first list, double-click the WorkFlowStatus attribute in the dialog box, accept Is Equal To, select Type A Number, and type 1, as shown here:
- Click OK, and repeat steps 2 through 5, but select the OrderDate attribute in step 2.
- Click Add again, name this rule Show InvoiceEntry View, and specify a WorkFlowStatus Is Equal To 5 condition.
- Click Add Action, select Switch Views as from the drop-down list, select InvoiceEntry in the Views list, and click OK four times to close the dialog boxes apply the last condition.
- Save your changes, preview the OrderEntry view to verify the default Order Date and Last Updated values, and then close the preview window. Open 11066-5.xml to verify that the InvoiceEntry view is the default. Then open 11066-1.xml to verify that it opens in the default OrderEntry view with the current date and time in the Order Date and Last Updated date picker controls.
Modifying Views for E Mail Delivery
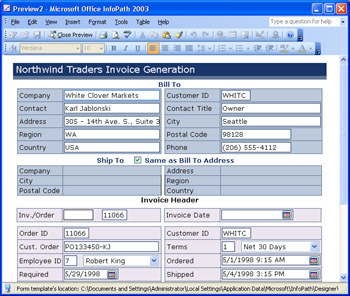
Sending messages to customers for order confirmation and perhaps invoice payment requires modifying views that are optimized for data entry. The OrderEntry and InvoiceEntry views contain information that isn t germane to the purchaser, and you ll need to add a section for address information below the title bar. The following procedure shows you how to hide information from the e-mail recipient based on the Order Acknowledged workflow status and how to change conditional formatting rules that don t apply to the view. The e-mail view, shown in Figure 10-4, serves as the source for the default print view of the form.
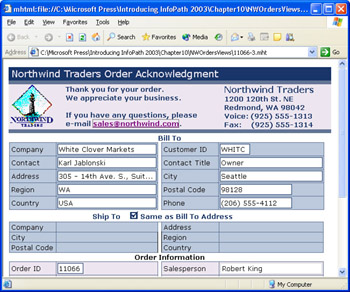
Figure 10-4: The OrderAcknowledgment view of the 11066-3.xml data document shows the changes needed to generate a fully formatted e-mail order acknowledgment. The e-mail link is active in the static .mht attachment.
To create an e-mail OrderAcknowledgment view that you can send with an XML file or export as an .mht file for an e-mail attachment, follow these steps.
Create and modify an OrderAcknowledgment view
- With the NWOrdersViews template open in design mode, copy the OrderEntry view to the Clipboard, add a new view named OrderAcknowledgment, and paste the OrderEntry elements into it.
- Change Entry in the title to Acknowledgment, position the insertion point in front of the Customer Information label, and choose Tables, Insert, Rows Above.
- Decrease the height of the added row to less than 1 inch, add a the fourth scheme color as the row s shading color , click the Align Left button, and split the cell into three columns .
- With the insertion point in column A, choose Insert, Picture, From File, navigate to the C:Microsoft PressIntroducing InfoPath 2003Chapter10NWOrdersCh10 folder, and double-click NWLogoBlueberry.gif to insert the image. Change the height to 80 px.
- Adjust the column widths, and add the text shown in Figure 10-4 to columns B and C. When you add the e-mail address, InfoPath automatically creates a Mailto link.
- Optionally, rearrange the form and change the section labels to better resemble the InvoiceEntry view.
- Select the Status section, delete it from the view, and remove the space between Order Information and Line Items.
- The values in the three value text boxes adjacent to the drop-down lists in the Order Information section aren t meaningful to customers, so delete them and set the width of the drop- down lists to 100%.
- Delete the duplicate Customer ID label and text box, and delete the Shipped label and date picker control, which isn t applicable to an order acknowledgment. Rearrange the remaining controls so that you can delete an empty table row. (Refer to Figure 10-4 for layout guidelines.) Finally, add the prefix Est. to the Freight label.
- Select the Est. Freight box, and choose Format, Conditional Formatting. Remove the three Conditions With Formatting list items, and click OK to remove the text box s conditional formatting for this view.
- Preview the form to verify the design, save your changes, and open 11066-1.xml for a final test.
- In the default data entry view, select Order Acknowledgment in the Status list, and save the form as 11066-3.xml.
- Switch to the OrderAcknowledgment view, and add an estimated freight amount to verify the conditional formatting change you made in step 10.
- Choose File, Export To, Web. Save the file as 11066-3.mht, and double-click the file in Windows Explorer to open the exported file in Internet Explorer.
Designing a Default Print View
The default print view prints automatically when you choose File, Print or File, Print Preview. You designate the default view for printing on the Print Settings tab of the View Properties dialog box. You can design other views for printing, but (obviously) only one view can be the default.
Views you design for e-mail distribution are logical candidates for conversion to print views. To create a default print view from the OrderAcknowledgment view, which you designed in the preceding section, follow these steps.
Create a default print view from the OrderAcknowledgment view
- Open the OrderAcknowledgment view in design mode, copy its contents to the Clipboard, add a new view named PrintOrderAck, and paste the elements to the new view.
- Double-click the PrintOrderAck item in the Select A View list to open the View Properties dialog box, and select the Print Settings tab.
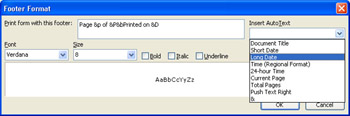
- SP-1 Click the Header or Footer buttons to add a header, footer, or both to your form. You can type text and select AutoText codes to customize headers and footers, as shown here:
- SP-1 Select the Page Setup tab to specify a particular printer, paper size , or paper source or to change margins. Click OK to close the dialog box.
- Switch to the OrderAcknowledgment view, click View Properties, and click the Print Settings tab. Select PrintOrderAck in the Select An Existing View To Use When Printing This View list, and click OK.
- Preview the form, and choose File, Print Preview to verify the default printing view assignment for the OrderAcknowledgment view.
- Borders around text boxes detract from the design. Close both preview windows , use Ctrl+click to select every text box and date picker control in the view, and choose Format, Borders And Shading, to open the Borders And Shading dialog box. Click the None button to remove the borders, and then click OK.
- The Customer Code label and some Line Items labels wrap to two lines, so adjust the width of table columns to prevent incorrect wrapping.
- The logo bitmap has a background color that is printed, so replace it with the NWLogoPrint.gif file from the same location as the logo you added in the preceding section. (NWLogoPrint.gif has a white background.)
- To make it evident to users that the form is intended for printing, remove the shading color from row 2 of the master form and all other layout tables. (InfoPath doesn t print table or form shading colors by default, so this step is optional.)
- If you want to print background colors or images, choose Tools, Options, and select the Print Background Colors And Print Background Pictures check box on the General tab. (This setting applies to all views.)
- Save your changes, open 11066-3.xml, choose File, Print Preview for a final test, and print the form.
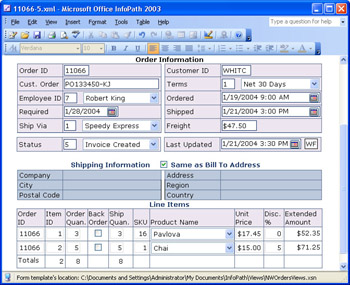
Figure 10-5 shows the 11066-3.xml data document open in print preview mode.
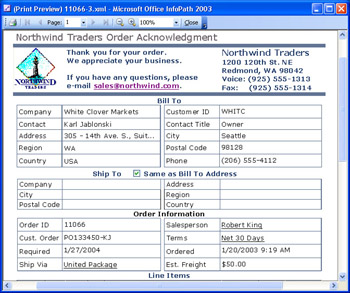
Figure 10-5: Print preview confirms that the default OrderAcknowledgment print view is ready for use.
Adding a Microsoft Word Print View
SP-1 A Microsoft Word print view applies a custom .xsl file that transforms an InfoPath form into an HTML document that contains Word formatting tags, and then uses the Microsoft Office System 2003 s Microsoft Office Image Writer print driver to create a Microsoft Document Imaging (.mdi) or TIFF (.tif) bitmap file from the document. You can print the .mdi or .tif file or apply Office s optical character recognition (OCR) feature to the image to generate a formatted Word .htm, .doc, or .rtf file. The tricky part of the process is authoring the .xsl file, which requires XSLT expertise and a working knowledge of the Word XML document schema.
Word print views are best suited to simple forms with few controls and a large quantity of plain text content, such as paragraphs contained in a text box of a repeating section. This section s example consists of excerpts from the text of a Microsoft press release.
To create a sample Word print view, generate a printable .mdi file, and create Word .htm and .doc files with Office s OCR feature, follow these steps.
Create, test, and save a Word print view
- Open the sample PDC2003PR.xml document in your C:Microsoft PressIntroducing InfoPath 2003Chapter10WordPrintView folder. If you re interested in viewing the transform file, open WordView.xsl in Internet Explorer.
- Click the Design This Form button to switch to design mode, and click the Views link to activate the Views task pane.
- Click the Add Print View For Word link to start the Add Print View For Word Wizard, and click Next.
- Click Browse, double-click the transform file for the form (WordView.xsl in the template s folder for this example), and click Next.
- Type Print Word View as the name of the view, and click Next and Finish to complete the wizard.
- Double-click the View1 (Default) entry in the Views task pane to open the View Properties dialog box, click the Print Settings tab, select Print Word View as the default print view, click OK, and save your changes.
- Choose Windows Start, Settings (if necessary), Printers And Faxes to open the Printers And Faxes dialog box, right-click Microsoft Office Document Image Writer, and choose Set As Default Printer on the shortcut menu.
- Close and reopen PDC2003PR.xml, and choose File, Print to open the Save As dialog box. (The File, Print Preview menu item is disabled for Word print views.)
- Navigate to the template folder, change the file name from Document1.mdi to PDC2003PR1 or the like, and click Save. A fully formatted version of your InfoPath data document opens in a Microsoft Office Document Imaging window, as shown here:
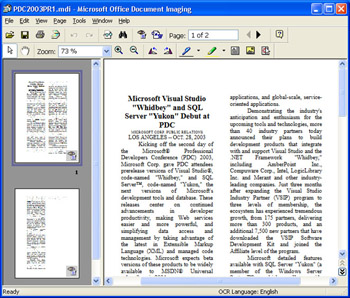
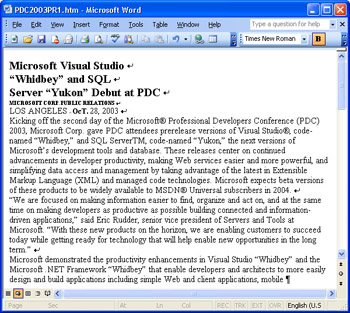
- Click the Send Text To Word toolbar button to open the eponymous dialog box, click Browse, navigate to the template folder, and click OK twice. If you haven t installed Word s OCR feature, you re asked to install it from the Office 2003 CD-ROM or a network share. Word performs an OCR operation on the document and then opens a PDC2003PR.htm file.
- Save a copy of the file as a Word Document (*.doc), as shown here:
- Close Word and the Document Imaging window, save your changes, and reset your default printer to its original setting.
You can substitute a rich text box for a plain text box, but only basic text formatting, such as bold or italic font attributes, appears correctly in a final .doc file. Files named PDC2003PR-RT contain basic rich-text formatting. Font colors are lost in the OCR process, and tables with multiple lines of text appear in the default font (Verdana) in an .htm document but don t covert properly to tables in .doc files. Files named PDC2003PR-RT2 demonstrate the formatting problem with tables in .doc files. You can t remove a Word print view from the default view; restore the Backup Copy of PrintView.xsn in the current folder if you want to repeat the preceding exercise.
Summary
InfoPaths capability to display multiple views of a form is an important incentive for adopting InfoPath as a general-purpose XML data entry and editing tool. Copying and pasting form design elements between views makes repurposing existing views easy. Pasted elements retain their bindings to the data sources sections, elements, and attributes. You can delete sections and controls you dont need for alternative views, add new sections and controls to the view, and alter conditional formatting to suit the views purpose. Data validation rules apply to all form views.
Multiple views enable a single form to accommodate changes in data entry operations and document content at each step in an automated workflow environment. You can customize views for e-mail distribution as .xml or .mht files and define a default printing view. Choosing File, Print Preview or File, Print in data entry mode automatically opens the select views default print view. Printing to Microsoft Office Document Imaging files and applying OCR to create formatted Word .htm and .doc files is an alternative if you have the requisite XSLT authoring skills.
Q A
|
1. |
Is there a limit to the number of views I can add to a template? |
|
|
2. |
Recipients need Internet Explorer to open forms e-mailed as .mht files. Is there an alternative for recipients who use other browsers? |
|
|
3. |
Can I change the data document s file name automatically based on a workflow status or the current view? |
|

Answers
|
1. |
There s no published or theoretical limit to the number of views, but the size of your template file for a complex form increases with each view you add. For example, the original NWOrdersCh10.xsn file s size is 14,636 bytes and contains 128 KB of compressed files. Adding the three additional views increases the file s size to 37,866 bytes and the size of the extracted files to 354 KB. You ll probably encounter noticeable performance impairment with template files larger than 200 KB or so, which corresponds to about 2 MB of compressed files. |
|
2. |
Yes. The InfoPath 2003 Software Development Kit (SDK) includes a Downlevel command- line tool (XDown.cmd) to transform form views to formatted HTML with an XDown.xsl transform. The process isn t simple, and some InfoPath features might not display correctly. If you ve installed the InfoPath 2003 SDK, open the InfoPath 2003 SDK documentation, expand the Tools node, and read the Using the Downlevel Tool topic. |
|
3. |
Yes. The form must be fully trusted and you must write programming code to accomplish this feat. Fully trusted forms are one of the subjects of Chapter 12, Publishing Form Templates. Chapter 16, |
On Your Own
Here are a few additional exercises that you can use to test your view and rule design prowess:
- Create an e-mail version of the InvoiceEntry view.
- Create a print version of the InvoiceEntry e-mail view.
- Modify the print version to more closely resemble a printed form by increasing the forms width to about 7.5 inches, decreasing the font size to 8 pt, and rearranging the Ship To and Bill To tables as side-by-side address blocks without labels. (You can use the Text tab of the View Properties dialog box to change the size of all the views controls at once.)
- Add a rule to set the Customer ID value in the Order Information or Invoice section equal to the Customer ID value in the Customer Information or Bill To section.
- Add a rule that applies only to the InvoiceEntry view to set the value of the my:InvoiceInfo groups OrderID attribute to the OrderID value of the OrderInfo group .
Part I - Introducing Microsoft Office InfoPath 2003 SP-1
Part II - Designing InfoPath Forms
- Creating Forms
- Laying Out Forms
- Adding Basic Controls and Lists
- Formatting Forms
- Validating Form Data
- Working with Advanced Form Elements
- Adding Views to a Template
- Setting Form Template and Digital Signing Options
- Publishing Form Templates
Part III - Working with Databases and Web Services
Part IV - Programming InfoPath Forms
EAN: 2147483647
Pages: 248
