Connecting Forms to Databases
Highlights
In this chapter, you will learn how to
- Use the Data Connection Wizard to create a main data source for a form bound to Jet or SQL Server tables
- Create a default query and data entry view of a data-bound form
- Add data entry controls to the default view
- Edit and delete parent and child table records with a Submit Changes button
- Apply conditional formatting rules to buttons to prevent data entry errors
- Add and delete parent and child table records
- Create secondary data sources for list boxes from Jet or SQL Server tables
- Change the primary data source for a data-bound form
For more information
- See the section Using Secondary Data Sources with Lists, in Chapter 6, Adding Basic Controls and Lists, for more detailed information about adding secondary data sources for list boxes.
Overview
To work through this chapter
- You need to know how to add layout tables with controls and how to rearrange layout tables, as described in Chapter 5, Laying Out Forms.
- You need Microsoft Access 2000 or later with the sample databases installed on your computer or network read/write access to the Northwind.mdb sample database. (The Microsoft Office System 2003 Setup program with default options doesn t install Northwind.mdb.)
- You need read/write access (at least db_datareader and db_datawriter roles) to the Northwind sample database of Microsoft SQL Server 2000 Service Pack 3 (SP-3) or later or to NorthwindCS, the sample database for Microsoft SQL Server Desktop Engine (MSDE) 2000 SP-3 or later, for the client/server examples.
- You should be familiar with relational database terminology. Some experience using Access 2000 or later is helpful, and familiarity with Access data project s SQL Server designer is useful but not essential for the client/server samples.
- You ll find it useful, but not essential, to be familiar with adding secondary data sources based on static XML documents.
The Data Connection Wizard in Microsoft InfoPath 2003 lets you connect forms to Jet (Access) .mdb database files and Microsoft SQL Server 2000 SP3 and later databases, including the Microsoft SQL Server Desktop Engine (MSDE). You can issue queries to retrieve records, edit records, add new records, submit your changes, and delete records, if you have the required database permissions. You also can specify tables or queries to populate secondary data sources for drop-down and conventional list boxes. This chapter s examples require create (insert), retrieve (query), update, and delete permissions for the Jet or SQL Server sample databases. You can execute stored procedures to retrieve data, but supplying variable argument values to a stored procedure requires adding code behind your form, which is one of the subjects of Part IV of this book, Programming InfoPath Forms.
| Note |
Downloading MSDE Release A |
InfoPath 2003 won t replace Microsoft Access as a rapid application development (RAD) tool for retrieving and editing relational data, nor can it compete with the versatility offered by data-bound Microsoft Visual Basic 6 or Microsoft Visual Studio .NET Windows forms. However, InfoPath enables Office System 2003 power users and developers to create basic Jet-based and SQL Server “based online and offline data query and editing forms quickly and easily. If you re familiar with ActiveX Data Objects (ADO) disconnected recordsets, InfoPath s ADOAdapter provides similar retrieve, disconnect, edit, reconnect , and update capability.
The default format for saved InfoPath data documents is an ADO Recordset object transformed to an XML document, which has an unconventional, attribute-centric structure. The structure corresponds to an ADO Rowset schema, which is written in Microsoft s Annotated XML-Data Reduced (XDR) language. The XML Schema recommendation has caused XDR to become obsolete, but many production Visual Basic 6 and C++ applications continue to use ADO recordsets. Complex document structure and a nonstandard schema severely limit the utility of saved ADO-style XML data documents in workflow processes.
Using the Data Connection Wizard
SP-1 The InfoPath Data Connection Wizard calls the Office Data Connection Wizard to create an .odc file for Jet and SQL Server data sources. The wizard embeds required data from the .odc file in the manifest.xml file and creates a default query and data-entry form when you complete the multistep data source definition process. To use the Data Connection Wizard with Jet or SQL Server databases, you ll need to know these basic guidelines for defining main data sources that generate updatable data entry and editing forms:
- Codeless data entry forms are best suited for creating and editing forms for a single record of one table, which can have one child table. An example is a query view that accepts an order number and returns order information to a data entry view. You add a section or layout table with controls for order header data and a repeating table for line items to the data entry view.
- As a rule, master/detail sections aren t well suited to displaying multiple master records and their dependent child records, because the master record usually contains detailed information that isn t easily viewed in a repeating table.
- Adding a second child table makes the data entry form read-only. As an example, adding a related customer record as a child of an order record with line items prevents submitting changes to the database.
- InfoPath queries don t support wildcard searches ”for example, LIKE ˜A% to return all records whose specified field value begins with the letter A . Query values must match corresponding field values exactly; the database determines case-sensitivity of string values. (You can write code to enable wildcard searches, but the code is very complex.)
- Deleting a parent record with child records requires enabling cascading deletions for the related table. Cascading deletions are a property of the database s relationship object.
The following two sections show you how to use the Data Connection Wizard to establish a connection to Jet and SQL Server databases and generate the default view from the tables you specify. The resulting forms will be used in procedures later in this chapter.
Creating a Query and a Data Entry Form with a Jet Connection
Connections to Access (Jet) databases use the Microsoft Jet 4.0 OLE DB Provider to generate ADO Recordset objects. To create a connection to the Northwind.mdb sample database, follow these steps.
Create a connection to a local copy of Northwind.mdb
- Start InfoPath, click the Fill Out A Form dialog box s Design A Form link, and click the Design A Form task pane s New From Data Connection link to start the Data Connection Wizard.
- Select the Database (Microsoft SQL Server Or Microsoft Office Access Only) option, and click Next.
- Click Select Database to open the Select Data Source dialog box, shown here:
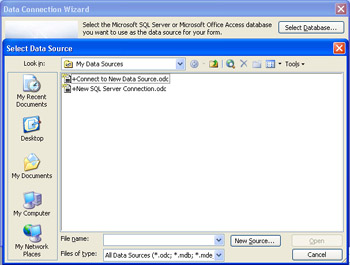
- Double-click the +Connect To New Datasource.odc item to open the Welcome To The Data Connection Wizard screen.
- Select Other/Advanced in the list, and click Next to open the Data Link Properties dialog box.
- Select Microsoft Jet 4.0 OLE DB Provider in the OLE DB Provider(s) list, as shown here:

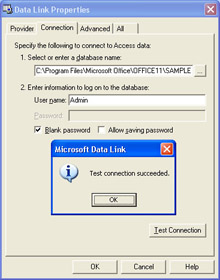
- Click Next. On the Connection tab, click the browse (...) button to the right of the Database Name box to open the Select Access Database dialog box. Navigate to your copy of Northwind.mdb, which is in your Program FilesMicrosoft OfficeOffice11Samples folder by default, and double-click Northwind.mdb to close the dialog box and add its well- formed path to the Database Name box. Leave the default Admin user with a blank password.
Note Connecting to a secure Jet database
If you re connecting to a secure Jet database, you must provide User Name and Password values and then click the All tab of the DataLink Properties dialog box. Select the Jet OLEDB: System Database property in the Name list, click Edit Value, type the well-formed path to the System.mdw workgroup file, and click OK. If you want to maintain database security, don t select the Save Password In File check box in step 10. - Click the Test Connection button to verify the connection, as shown here:
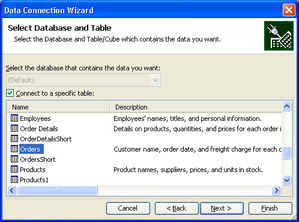
- Click OK twice to close the dialog boxes and go to the Data Connection Wizard s Select Database And Table screen, which displays all tables and queries in the database. The following procedures use the Orders table as the parent table, so scroll to and select Orders, as shown here:
- Click Next, and replace (Default) Orders.odc with a more descriptive name for the data connection ”NWOrdersJet.odc for this example. Leave all the remaining default values, as shown here:

- Click Finish to complete the wizard and open a dialog box that displays the Orders table s fields.
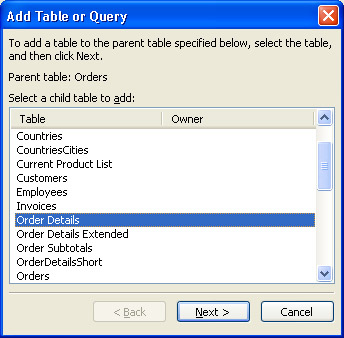
- You need order line items for the form, so click Add Table to open the Add Table Or Query dialog box, and select the Order Details table, as shown here:
- Click Next to open the Edit Relationship dialog box, which displays OrderID as the primary and foreign key fields for the relationship. Click Finish to display the Orders and Order Details tables in the Data Source Structure tree view list.
- Click the Edit SQL button to open the Edit SQL dialog box, and click Test SQL Statement to verify the query, which is written in the SHAPE command syntax of the MSDataShape Provider, as shown here:
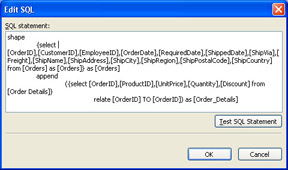
See Also To learn more about SHAPE command syntax, which enables InfoPath to handle hierarchical recordsets, go to msdn.microsoft.com , search for the term Q189657 in the Microsoft Knowledge Base, and open the HOWTO: Use the ADO SHAPE Command article.
- Click OK twice, and with the Orders table selected, click the Modify Table button to open the Sort Order dialog box. You need a single Orders record and its related Order Details records for this example, so clear the Allow Multiple Records From This Table To Be Displayed In The Form check box, as shown here:

Caution If you don t clear this check box, your Order/Order Details form won t work.
- Click Finish, and click Next to display a summary of your selections. Name the data connection NWOrdersJet, verify that the Submit Status value is Enabled in the Summary section, and click Finish to generate the default form with New Record and Run Query buttons .
- Type Northwind Order Form - Jet in the title table s first row, delete the second row, save the template to a new NWOrdersJet subfolder of My Documents Infopath as NWOrdersJet.xsn.
- Choose File, Properties to open the Form Properties dialog box, assign Northwind Order Form - Jet as the Form Name, press Ctrl+S to save the change, and close InfoPath.
Generating a Default Form with an SQL Server Connection
Creating a connection to an SQL Server database is similar to that for Jet database connections, but SQL Server uses the Microsoft OLE DB Provider for SQL Server. To create a connection to the NorthwindCS (MSDE) or Northwind (SQL Server) sample database, follow these steps.
Create a connection to an SQL Server instance
- Repeat steps 1 through 3 of the preceding procedure.
- Double-click the +New SQL Server Connection.odc item to open the Data Connection Wizard s Connect To Database Server screen.
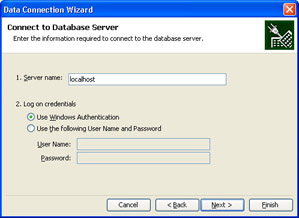
- Type localhost if SQL Server or MSDE is running on your computer. Otherwise, type the network (NetBIOS) name of the remote server running SQL Server or MSDE. Leave the default Use Windows Authentication option if your logon account has read/write access to the Northwind or NorthwindCS database, as shown here. Otherwise, select the Use The Following User Name And Password option and type your user name and password if the server is set up for SQL Server security.
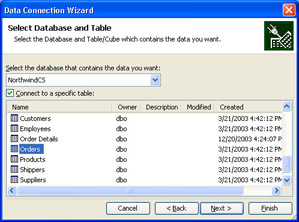
- Click Next to open the Select Database And Table screen. Click the drop-down arrow to display the Select The Database That Contains The Data You Want list, select Northwind or NorthwindCS, and select the Orders table, as shown here:
- Repeat steps 10 through 16 of the preceding procedure, but change the name of the file to NWOrdersSQL.odc in step 10 and the name of the data connection to NWOrdersSQL in step 16.
- Add Northwind Order Form - SQL Server as the title, delete the second title table row, and save the template to a new NWOrdersSQL subfolder of My DocumentsInfopath. For the SQL Server version, the template file name is NWOrdersSQL.xsn in the NWOrdersSQL subfolder, and the Form Name is Northwind Order Form - SQL Server.
Adding Controls to a Default Form
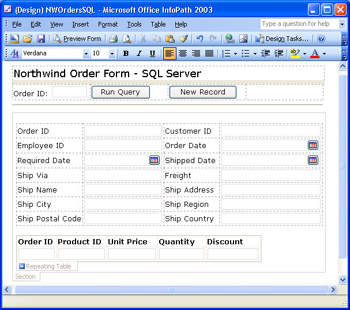
The Data Connection Wizard generates a data source with queryFields and dataFields groups; the data source fields are identical for Jet and SQL Server sample databases. The wizard generates the default form shown in Figure 13-1 for either connection type. The two empty layout tables are intended to contain query and data entry controls. This chapter s procedures use a simple query that returns a specified Orders record and its related Order Details records. The first step is to add an Order ID text box to the query layout table to specify the Orders record. You then replace the empty data entry layout table with a layout table with controls.
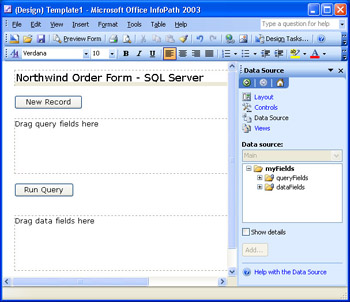
Figure 13-1: The Data Connection Wizard creates this default form for all connections to Jet or SQL Server databases.
To add the initial set of controls to a form based on either Jet or SQL Server tables, follow these steps.
Add controls and test the initial form design
- With the NWOrdersJet.xsn or NWOrdersSQL.xsn template open in design mode and the Data Source task pane active, expand the queryFields and q:Orders nodes, and drag the OrderID field to the upper (query) layout table.
- Decrease the width of the Order ID box, and drag the bottom of the query table up to the bottom of the text box.
- Select the query table, and split it into four columns . Drag the Run Query button to column B and the New Record button to column C, insert a horizontal line below the table, and remove the empty lines above and below the table.
- Delete the lower layout table, drag the dataFields node below the horizontal line, and select Section from the shortcut menu. You bind the empty section to the dataFields node, so you can add a layout table with controls for the Orders field and a repeating table for the Order_Details field.
- Expand the dataFields node, drag the d:Orders group to the added section, and select Controls In Layout Table from the shortcut menu to add the controls for the Orders fields.
- Expand the d:Orders node, drag the Order_Details node inside the section below the Orders layout table, and select Repeating Table from the menu.
- Reduce the widths of the repeating table s fields and the section, and save your changes.
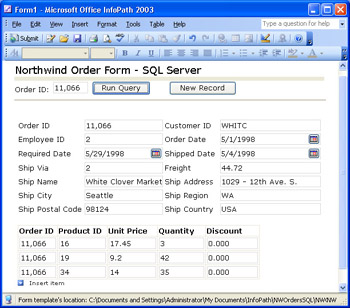
- Optionally, increase the width of the table, split column B into three cells , and rearrange the fields to conserve vertical space. The form with the table coalesced appears as shown here:
- Save your changes, activate the task pane, select Fill Out A Form, and click the form s friendly name link to open a new Form1.
- Type a valid OrderID value, such as 11066, in the text box, and click Run Query to display data from the selected Orders record and related Order Details records:
- Save the data document in the template s folder as NW11066.xml or the like.
| Note |
Fixing fractional value rounding errors |
If you re interested in the data document s structure, open the 9 KB NW11066.xml file with Notepad. The < dfs:queryFields > and < dfs:dataFields > elements contain the data for the query and data entry sections of the form, which totals about 1870 bytes. The remaining 7 KB consists of an embedded schema and the original data before editing in the data entry tables. InfoPath uses the original data to prevent concurrency errors; if the data in the tables doesn t correspond to the original data, InfoPath displays an error message when you submit your changes.
Editing and Submitting Forms
The Data Connection Wizard automatically adds a Submit button to the forms toolbar, which lets you submit edited values for the selected order to the database tables. This button isnt likely to be easily identified by users, and its location is inconsistent with other buttons on the form. To add and configure a more evident Submit Changes button, follow these steps.
Add a Submit Changes button
- With the Northwind Orders Form in design mode, activate the Controls task pane, and drag a button control to the right of the New Record button.
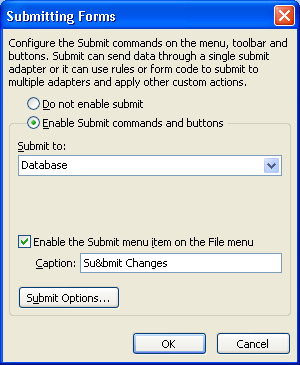
- Right-click the button, and choose Button Properties from the shortcut menu to open the Button Properties dialog box. Change the Label from Button to Submit Changes, and in the Action drop-down list, change Rules And Custom Code to Submit to open the Submitting Forms dialog box. Add Changes to the Caption box, as shown here:
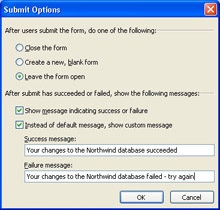
- Click Submit Options to open the Submit Options dialog box, and accept the default Leave The Form Open option. Select the Instead of Default Message, Show Custom Message check box, and add appropriate Success and Failure messages, such as these:
- Click OK twice to close dialog boxes and save your changes, and then save your template changes.
The data in the cached recordset returned from a query and the templates schema combine to enforce data concurrency rules and constraints on data values when you submit the form to the database. To test the submit process, follow these steps:
Test data submission, concurrency issues, and constraint violations
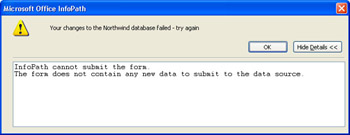
- Give the new button a try by opening a preview, running a query for Order ID 11066, making no changes, and clicking the Submit Changes button or choosing File, Submit Changes. In the custom Failed message that appears, click Details to display this explanation:
- Click OK, and make a minor change to the record, such as changing the Employee ID value to 5. Then click Submit Changes. You receive the custom Success message. (If your update fails, you probably dont have write permission for the tables.)
- To verify that InfoPath performs concurrency tests, keep the preview open, open the NW11066.xml form in another InfoPath instance, and click Query to verify that the Employee ID value changes to the value you typed in step 2.
- Change the Employee ID to a different number, such as 2, click Submit Changes, and close the form without saving changes.
- Return to the preview, enter yet another Employee ID value, such as 8, and click Submit Changes. Youll receive an error message that contains this statement in the Details box: Row cannot be located for updating. Some values may have been changed since it was last read.
- Click the previews Query button to refresh the data, click Yes to acknowledge the warning message, type a nonexistent Employee ID value (10 or greater), and click Submit Changes. The error message from SQL Server states: UPDATE statement conflicted with COLUMN FOREIGN KEY constraint 'FK_Orders_Employees'. The conflict occurred in database 'NorthwindCS', table 'Employees', column 'EmployeeID'.
- Close the preview.
Youve now verified that InfoPath wont submit data that doesnt differ from the original values, performs data concurrency tests, and observes the Order tables foreign key constraints.
Disabling Buttons with Conditional Formatting
If a user clicks the Run Query button with an empty Order ID text box, InfoPath displays the two message boxes shown in Figure 13-2 in succession.
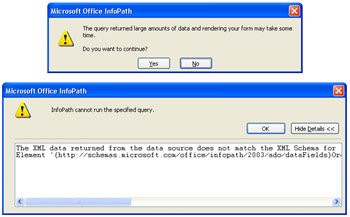
Figure 13-2: These two messages appear when you click the Run Query button without an Order ID value.
Users receive similar error messages if they submit changes without adding foreign key field values. You can use conditional formatting to disable buttons if specific conditions aren t met. In this exercise, you ll disable the Run Query button if a valid Order ID value isn t present and disable the Submit Changes button if required field values aren t provided. You ll also learn how to apply a regular expression pattern-matching test to the Customer ID text box value, which must contain five uppercase letters .
Conditionally disable the Run Query and Submit Changes buttons
- Open the Properties dialog box for the Run Query button, click the Display tab, and click the Conditional Formatting button to open the Conditional Formatting dialog box.
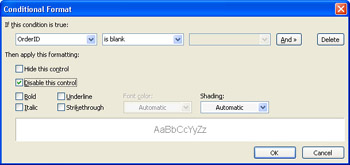
- Click Add to open the Conditional Format dialog box. Click Select A Field Or Group, expand the queryFields and q:Orders nodes, and double-click the OrderID field. Select Is Blank as the condition, and select the Disable This Control check box, as shown here:
- Click OK three times to apply your changes and close the dialog boxes.
- Repeat step 1 for the Submit Changes button.
- Repeat step 2, but expand the dataFields and d:Orders nodes, select the CustomerID field, and select Does Not Match Pattern. Click Select A Pattern to open the Data Entry Pattern dialog box, and select Custom Pattern.
- Open the Insert Special Character list, select Any Letter: p-{L}, and click OK. Copy and paste the special character five times, as shown here, and click OK twice to return to the Conditional Formatting dialog box.

- Click Add, select Select A Field Or Group, select Employee ID under the d:Orders node, and click OK. Select Is Blank in the condition list, select the Disable This Control Check box, and click OK to return to the Conditional Formatting dialog box.
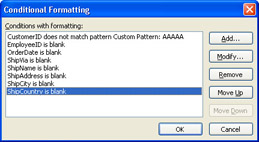
- Repeat step 7 for the ShipVia, OrderDate, ShipName, ShipAddress, ShipCity, and ShipCountry fields. Your Conditions With Formatting list for the Submit Changes button appears as shown here:
- Click OK twice to apply the conditional formatting rules.
- Open a preview window, and verify that the Run Query and Submit Changes buttons are disabled. Add an OrderID value, press Tab, click Run Query, and verify that the resulting data enables the Submit Changes button. Make changes to the Orders values that violate the rules you added to verify the other conditional formatting rules.
| Note |
Removing the Submit toolbar button and menu item |
Adding and Deleting Records
InfoPaths default New Record button simply clears the form in preparation for adding a new record. Users must type or select required values in the forms controls and click the Submit Changes button to perform an INSERT operation on the tables.
InfoPath provides a Delete & Submit button to remove the current record. As mentioned in the section Using the Data Connection Wizard, earlier in this chapter, deleting a record with dependent child records displays an error message unless the relationship between the parent and child records implements cascading deletions.
Adding New Records
Using a read-only Jet Autonumber or SQL Server identity field to store the OrderID value simplifies adding new records to the Orders and Order Details tables. Autonumber and identity fields automatically add a new 32-bit integer value thats greater by 1 than the largest value that has ever existed in the field. As an example, if you start such a field with 100000, add 100 records, and then delete the 100 records you added, the value for the next record you add will be 100101. Its a common practice to use an Autonumber or identity field as a tables primary key field, which must have a unique value to identify each record.
InfoPath takes full advantage of Autonumber and identity field values by assigning the primary key value to the corresponding foreign key field of related records automatically. In this procedure, InfoPath assigns the Orders tables OrderID value to the OrderID field of Order Details records you add to a new or existing order. Thus, you can remove the OrderID text box and its label from the repeating table to simplify data entry operations. Follow these steps to remove the OrderID column of the repeating table and test the addition of a new Orders record with Order Details records.
Remove the tables OrderID column and test the line item addition
- With the Northwind Orders Form template open in design mode, select the Order ID column of the repeating table, and press Delete to remove it.
- Click Preview Form, type a valid OrderID in the text box, and click Run Query.
- Click the Insert Item link or its adjacent button to add an empty Order_Details row.
- Type a valid ProductID value (between 1 and 77) that doesnt duplicate other ProductID values, and type values for Unit Price, Quantity, and Discount. (Discount must be 0 or less than 1).
- Click Submit Changes to verify that InfoPath successfully updates the Order Details table without supplying its OrderID value from a bound text box, and click Run Query again to confirm the addition.
- Click the selector button for the Order Details item you added, select Remove Order_Details, and click Submit Changes to reverse the changes.
Add new Orders and Order Details records
- With the Northwind Order Form open in design mode, open a new Form1, leave the OrderID box empty, and type a valid CustomerID value, such as WHITC or ALFKI, and an EmployeeID value between 1 and 9. (InfoPath ignores values in the OrderID box when adding a new record with an Autonumber or identity primary key value.)
- Add todays date to the Order Date and Required Date fields, specify a ShipVia value between 1 and 3, enter a Freight amount, and type short text values in the required address text boxes.
- Add a couple of Order Details items, observing the constraints described in step 4 of the preceding procedure. Your data entry form should appear similar to this:
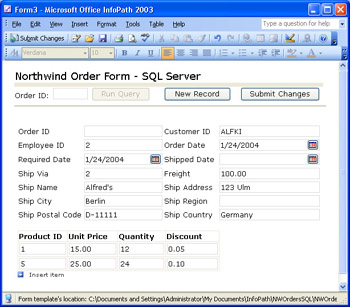
- Click Submit Changes to add the new record and display the new order number in the Orders sections OrderID box.
- Verify the added records by typing the new OrderID value in the querys OrderID box and clicking Run Query.
- Close the form, noting the added Order ID value.
Deleting Records
If youre familiar with the Microsoft Access Relationships window or with SQL Server Database Diagrams, you can alter the relationship between parent and child records to implement cascading deletions. The following procedure is based on unmodified versions of the Northwind and NorthwindCS sample databases, so you must delete the Order Details items manually, submit the changes, and then delete the parent Orders record.
Follow these steps to add a Delete & Submit button and delete the records you added in the preceding procedure.
Add a Delete & Submit button and delete an Orders record
- With the Northwind Order Form template open in design mode, add a new row above the Orders tables first row, and drag the Submit Changes button to column B.
- Drag a Button control from the Controls task pane to column D.
- Right-click the button, and choose Button Properties from the shortcut menu to open the Button Properties dialog box. Change the Label to Delete & Submit, select Delete & Submit from the Action list, clear the Enable The Submit Menu Item On The File Menu check box, and click OK twice. The button inherits the custom messages you provided when you added the Submit Changes button.
- Click Preview Form, type the OrderID value for the order you added in the preceding procedure as the query OrderID value, and click Run Query.
- Click Delete & Submit, click Yes to confirm the deletion, and verify that InfoPath displays a error message containing the explanation DELETE statement conflicted with COLUMN REFERENCE constraint . Click OK to dismiss the message.
- Select and remove the Order Details records you added in the preceding procedure, and click Submit Changes.
- Click Delete & Submit to delete the Orders record, which erases the Orders section.
- Verify that the Orders record deletion succeeded by clicking Run Query again, which returns this error message:

This error message appears when you click Run Query with any invalid OrderID value in the text box.
Creating Secondary Data Sources for List Boxes
The secondary data sources you created to populate drop-down lists in the section Using Secondary Data Sources with Lists, in Chapter 6, rely on static XML documents. Updating these documents isn t easy, especially if they re embedded in the template s .xsn file. InfoPath s Data Connection Wizard lets you create dynamic secondary data sources that reflect the current values in the underlying table. The only drawback to this approach is that InfoPath must download and cache the secondary data source s rows when you open the form. If your form has several list boxes with many items, opening the form can be delayed by a few seconds or more, depending on the speed of the database connection and the load on the database server.
You must create a new .odc file for each secondary data source you add, because the .odc file specifies the table or query that provides the data. It s a common practice to populate secondary data sources from saved Jet queries or SQL Server views; alternatively, you can write your own SQL SELECT statement to return customized data for drop-down list value names .
Follow these steps to create a secondary data source for a drop-down list that displays the employee names for selections you make in the Northwind form s Order EmployeeID text box and test the added control and its data source.
Create the employee name secondary data source
- With the Northwind Orders Form open in design mode, choose Tools, Data Connections to open the Data Connections dialog box, and click the Add button to start the Data Connection Wizard.
- Select the Receive Data option in the first wizard screen, and click Next. Select the Database (Microsoft SQL Server Or Microsoft Office Access Only) option in the next wizard screen, and click Next .
- Repeat the steps you followed for the Jet or SQL Server data source in the section Using the Data Connection Wizard, earlier in this chapter, but name the ODC file NWEmplLookupJet.odc or NWEmplLookupSQL.odc, as appropriate, and specify Employees as the table name.
- In the wizard s Data Source Structure list, clear all but the EmployeeID, FirstName, and Last Name check boxes.
- Click the Edit SQL button to open the Edit SQL dialog box, and change select "EmployeeID","LastName","FirstName" to select "EmployeeID","LastName" + ˜, ˜ + "FirstName" as "EmplName", leaving the remainder of the statement the same, as shown here for SQL Server:
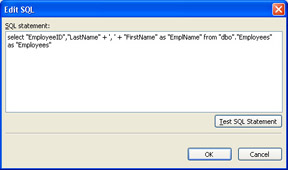
Note Modifying the SQL statement for a Jet data source
SQL Server queries use identifiers enclosed in quotation marks to accommodate spaces and other punctuation in table and field names; Jet databases use square brackets for this purpose. The full Jet SQL statement for the preceding query is: select [EmployeeID],[LastName] & ", " & [FirstName] as EmplName from [Employees] as [Employees] . - Click Test SQL Statement to verify your changes, click OK to dismiss the message that warns that you can t represent the statement in a tree view, and click Next. Click Yes to dismiss the warning about unsafe queries.
- Replace Employees with NWEmplLookupJet or NWEmplLookupSQL in the text box, leave the Automatically Retrieve Data When The Form Is Opened check box selected, and click Finish and Close to close the dialog boxes and add the secondary data source.
To add a drop-down list to the Employee table cell , bind the value of the list box to the secondary data source you added, and display the employee name, follow these steps:
Add an EmplName drop-down list and link it
- Reduce the width of the EmployeeID box, and drag a drop-down list from the Controls task pane s list and drop it to the right of the text box, which opens the Drop-Down List Box Binding dialog box.
- Expand the dataFields and d:Orders nodes, and double- click the EmployeeID field to bind the drop-down list to the text box.
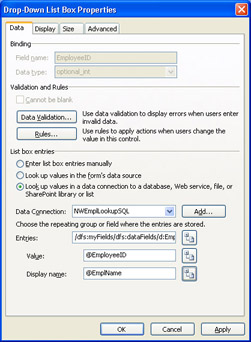
- Remove the label, and reduce the width of the control. Right- click the control, choose Properties from the shortcut menu to open its Properties dialog box, and select the Look Up Values In A Data Connection To A Database, Web Service, File, Or SharePoint Library Or List option.
- Select the name you assigned to the secondary data source in step 7 of the preceding procedure in the Data Source list.
- Click the Select XPath button to the right of the Entries box to open the Select A Field Or Group dialog box, and double-click the d:Employees node.
- Click the button to the right of the Display Name text box, and double-click the d:EmplName item. Your Drop-Down List Box Properties dialog box should appear as shown here:
- Click OK. Optionally, change the Ship Postal Code label to Ship PostCode, and decrease the width of column A to leave more width available for the drop-down list.
- Save your design changes.
Test the linked drop-down list
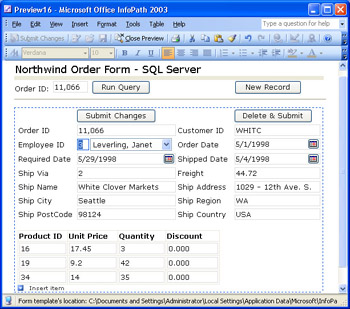
- Open a form preview window, type a valid OrderID value, and click Run Query to verify that the drop-down list displays the correct employee name.
- Change the employee name, and verify that the EmployeeID value changes, as shown here:
- Click Submit Changes, and then click Run Query to verify that the drop-down list is working correctly.
- Close the preview window to return to design mode.
Changing the Main Data Connection for a Form
SP-1 You can change the main data connection for the form, if the new data source has the same or a similar structure and field names as the original. This feature is especially useful when you upsize Jet databases to SQL Server or need to change an SQL Server connection s server name from a test to a production server.
To change the data connection for a database from SQL Server to Jet, from Jet to SQL Server, or from one instance of SQL Server to another instance, follow these steps.
Change the main data source from SQL Server to Jet, or vice versa
- Choose File, Save As, make a backup copy of your form, close the template, and reopen the original version in design mode.
- Choose Tools, Convert Main Data Source to start the Data Connection Wizard.
- Select the Database (Microsoft SQL Server Or Microsoft Office Access Only) option, and click Next.
- Click Change Database to open the Select Data Source dialog box.
- Repeat the steps of the procedure in the section Using the Data Connection Wizard, earlier in this chapter, for the new database type. The preceding procedures use SQL Server, so this example changes the form to a Jet database by following steps 4 through 16 of the Jet database procedure.
- If the data entry controls lose their bindings in this process, it s likely that the data connection is returning multiple records instead of a single record based on the query. To fix this problem, choose Tool, Data Connections, select your new data source, click Modify, select the Orders table and click Modify Table, and clear the Allow Multiple Records From This Table To Be Displayed In The Form check box.
- If you added secondary data sources for drop-down lists, repeat the procedure Create the employee name secondary data source in the section Creating Secondary Data Sources for List Boxes, earlier in this chapter, with the alternative secondary data source, and remove the original secondary data source.
- Save your form with a new name, such as NWOrdersJet.xsn for this example, and name the form Northwind Orders Form - Jet
Summary
InfoPaths capability to create data-bound forms that you can use to edit, add, and delete records from Jet and SQL Server tables is useful for designing basic data entry applications. The Data Connection Wizard automates generation of a default form with Query and New Record buttons . A completed data entry section typically contains a section with controls for the parent table and, for a child table in a one-to-many relationship, a repeating table or section.
Data-bound forms are best suited to editing a single parent table record and, if needed, a single child tables records. Adding a Delete & Submit button lets you delete records, but deleting a record with dependent records requires specifying cascading deletions for the relationship or deleting dependent records before deleting the parent record.
InfoPath lets you create secondary data sources to populate list box controls from queries against tables in Jet and SQL Server databases. If you dont have a saved Jet query or SQL Server view to provide the secondary data source, you can write a custom SQL query to return the data structure you need.
You can change the main data connection for a form from, for example, a Jet to an SQL Server database that you upsize from Jet. You also must change the main data connection if you move an SQL Server database to another server or change from a test database to a production database.
Q A
|
1. |
Can I bind an InfoPath form to tables of databases other than Access or SQL Server 2000? |
|
|
2. |
Is there any limit to the number of secondary data sources for an InfoPath form? |
|
|
3. |
Can I populate a list box from an SQL Server 2000 stored procedure? |
|

Answers
|
1. |
Yes, but you must write custom code to connect to other databases. An alternative for Oracle and other databases that have .NET native or ODBC data providers is to create a Microsoft ASP.NET XML Web service that connects to the Oracle database and use the Data Connection Wizard to consume the Web service. You ll find a detailed example of this approach at www.perfectxml.com/InfoPathOracle.asp . |
|
2. |
No. You can add as many secondary data sources as you need to populate list box controls. To minimize form opening delays and stress on the underlying database, it s a good practice to use static XML files for data that changes infrequently, such as U.S. states and their abbreviations, or countries and their ISO country codes. |
|
3. |
Yes, but you must write an EXEC ProcName statement in the Edit SQL Statement dialog box, and users must have EXECUTE permission for the procedure. Assigning database users to the db_datawriter role doesn t give them blanket EXECUTE permissions for the database. |
On Your Own
Here are some additional exercises for enhancing your secondary data source and developing general form design skills:
- Add drop-down lists populated by secondary data sources for selecting CustomerID values by CompanyName, ShipVia by CompanyName, and ProductID by ProductName.
- Add an Extended expression box to calculate individual Order Details amounts and column totals as described in the section Calculating Values with the Expression Box, in Chapter 6.
- Add data validation rules to the form based on the examples in Chapter 8, Validating Form Data.
Part I - Introducing Microsoft Office InfoPath 2003 SP-1
Part II - Designing InfoPath Forms
- Creating Forms
- Laying Out Forms
- Adding Basic Controls and Lists
- Formatting Forms
- Validating Form Data
- Working with Advanced Form Elements
- Adding Views to a Template
- Setting Form Template and Digital Signing Options
- Publishing Form Templates
Part III - Working with Databases and Web Services
Part IV - Programming InfoPath Forms
EAN: 2147483647
Pages: 248
