Adding Basic Controls and Lists
Highlights
In this chapter, you will learn how to
- Classify controls by type, associate controls with field data types, and set property values that are common to most controls
- Add conventional and rich text boxes, hyperlinks , and three types of lists to your form
- Describe the format of XML Schema s date and dateTime datatypes
- Create drop-down lists and list boxes with items populated from data you type or add from secondary data sources
- Add option buttons to option groups and insert check boxes bound to True/False ( boolean ) fields
- Use XPath expressions to display calculated numeric values in expression boxes, and add
Base64-encoded images and ink drawings to forms
For more information
- Refer to the section Navigating Documents with XPath, in Chapter 3, for XPath terminology.
- See the section Summing Numeric Values in a Table Footer, in Chapter 5, for help completing the On Your Own exercise at the end of this chapter.
- See Chapter 9, Working with Advanced Form Elements, for descriptions and examples of the new control and section types added to the original version of Microsoft InfoPath 2003 in Service Pack 1 (SP-1).
- Refer to Chapter 13, Connecting Forms to Databases, and Chapter 14, Designing InfoPath Web Service Clients, for creating secondary data sources from database tables and queries or XML Web services.
- Review the World Wide Web Consortium (W3C) XML Schema Part 2: Datatypes recommendation at www.w3.org/TR/ xmlschema-2/ .
Overview
To work through this chapter
- You need experience working with layout and repeating tables, which you gained in Chapter 5, Laying Out Tables.
- You should be familiar with formatting text and adding other elements to rich text boxes from working through the section Formatting Rich Text Data, in Chapter 2, Filling Out Forms.
- You need an understanding of the XML Schema terminology outlined in the section Validating Documents with XML Schemas, in Chapter 3, Understanding Form Technologies.
- You should be familiar with XPath expressions from reading the section Navigating Documents with XPath, in Chapter 3, and completing the procedures in the sections Using the Insert Formula Feature to Calculate Default Values and Summing Numeric Values in a Table Footer, in Chapter 5.
- You need the sample files from the CD that accompanies this book installed in your C:Microsoft PressIntroducing InfoPath 2003Chapter06 folder. As in previous chapters, you use the XML data documents in the subfolders as the data source for the forms you create in this chapter.
The preceding chapters have concentrated on standard text boxes bound to fields as the primary controls for entering data, with a few examples of the date picker control and one instance of a check box to set True/False ( boolean ) values. It s a good bet that most of your production forms will consist primarily of text boxes, date pickers, drop-down lists, and expression boxes. Runners-up in the control popularity contest include check boxes, option buttons and groups, list boxes, lists (plain, bulleted, and numbered), pictures, rich text boxes, and ink pictures. Rich text boxes trail the HTML- based control ratings, because rich text Extensible Hypertext Markup Language (XHTML) content is uncommon in structured XML documents, because its structure isn t governed by a schema. At the time this book was written, ink picture controls weren t yet heavily in use, because Tablet PCs were still a relatively new technology and therefore not very common.
This chapter explains how to add, format, and customize behavior of basic InfoPath controls that are bound to text, numeric, logical, or Base64-encoded fields in the form s XML data document. The emphasis is on basic controls and lists that you haven t worked with in earlier chapters. Most procedures use a sample form that s similar to the NWOrderEntry.xsn template that you created in Chapter 5, but this version has an element-centric XML data document as its data source. You ll modify this template and then use the final version in Chapter 7, Formatting Forms, and Chapter 8, Validating Form Data, and in Part IV, Programming InfoPath Forms.
| Note |
Adding advanced controls and sections InfoPath 2003 SP-1 classifies controls as Standard, Repeating and Optional, File and Picture, Advanced, and Custom controls. This chapter covers all of the Standard and File and Picture controls, except file attachment, and includes expression box and ink picture controls, and hyperlink text box controls, which the SP-1 version categorizes as Advanced. |
Relating Controls to Data Types
This chapter categorizes controls by their most commonly assigned field data types: text or rich text ( xsd:string ); date, time, or date and time ( xsd:date , xsd:time , or xsd:dateTime ); numeric ( xsd:integer or xsd:double ); logical ( xsd:boolean ); and image ( xsd:base64binary ). (InfoPath s and most other XML-aware applications schemas use the xsd: or xs: namespace prefix to designate XML Schema datatypes.)
| Note |
Differentiating between data type and datatype |
Figure 6-1 shows the design of a template (IPControls.xsn) with working examples of the 13 controls that this chapter discusses.
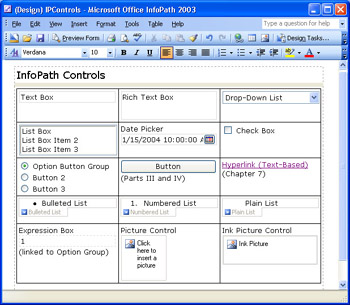
Figure 6-1: This template has examples of the 8 standard InfoPath controls, a text-based hyperlink control, the three types of repeating lists, an expression box, and graphical picture and ink picture controls.
| See Also |
Part III, Working with Databases and Web Services, and Part IV, Programming InfoPath Forms, cover the use of buttons in your forms. Chapter 7 describes the text-based version of a hyperlink control; you add a hyperlink that obtains its values from the data source s fields in the section Bound Hyperlink Controls later in the chapter. |
Figure 6-2 illustrates each of the components of Figure 6-1 in data entry mode with a GIF bitmap and simulated ink drawing added by the user to the two graphical controls.

Figure 6-2: This is the form generated by the design of Figure 6-1 with user-added character formatting, list items, and graphics.
Many controls can be bound to one of several different InfoPath field data types and their corresponding XML Schema datatypes. Following are the InfoPath data type categories assigned to the controls shown in Figures 6-1 and 6-2:
- Text and rich text The XML Schema datatype is xsd:string for elements bound to the IPControls form s text box and rich text box and the bulleted, numbered, and plain lists. The rich text box and bulleted list s InfoPath field data type is rich text (XHTML) to permit character formatting; numbered and plain list examples bind to text fields.
- Hyperlink A hyperlink control has display and link values, similar to an HTML hyperlink (anchor), and is read-only in form preview and data-entry modes. The sample form has static values you type in Link To Address and Display Text text boxes on the control s Edit Hyperlink dialog box. The bound version links either or both values to a field of the xsd:anyURI datatype. URI is an abbreviation for Uniform Resource Identifier. The most common type of URI in InfoPath forms is an Internet URL, but the XML Schema recommendation doesn t specify the format of xsd:anyURI values.
- Date and time Date picker controls support xsd:date or xsd:dateTime XML Schema datatypes. The date picker example is bound to an xsd:dateTime element. You can t bind a date picker control to a field of the xsd:time data type.
- Numeric The preferred datatype for elements bound to the drop-down list and list box controls is xsd:integer, but xsd:string is permissable. By default, these controls return the position of the selection as a numeric value; 1 denotes the first value, which usually is the default. Text that appears in the list is called the display name . The numeric value and display name are called value/display name pairs. Option button groups also return numeric values assigned by default to each button of the group . The InfoPath field data type assigned to these three controls is Whole Number (integer).
- Logical The check box control binds to a True/False field of the xsd:boolean datatype. Check boxes can return true and false or 1 and for the checked and unchecked states, respectively. You can specify blank for either state, but doing so isn t common.
- Image The picture and ink picture controls bind to fields of the xsd:base64Binary datatype, which corresponds to InfoPath s picture data type.
| Note |
On the CD |
Setting Common Control Properties
Before you get into the detailed descriptions of individual controls and how to use them, the Size and Advanced tabs of the ControlType Properties dialog box deserve explanation. You used a few of the Size tab s features in earlier chapters, but this will be your first introduction to the Advanced tab.
Changing the Size of Controls
The Size tab s layout is identical for all controls, but some elements are disabled for specific control types. Figure 6-3 shows the Text Box Properties dialog box Size tab with InfoPath s default settings.
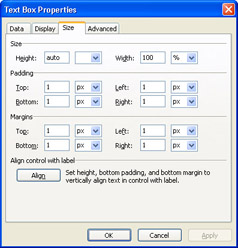
Figure 6-3: The Size tab of the Text Box Properties dialog box displays default values for the IPControls form s text box control.
The following list describes the purpose of the settings in the Size tab s three sections:
- Size Sets the height and width of the control. The default value of Height is Auto, which adjusts the vertical dimension to suit the font size of controls that contain text, or the original size of a graphics image. The Height setting isn t available for drop- down list boxes, so it s disabled. The Width setting defaults to 100% of the available width of the control s layout table cell or 130 px (pixels) for most controls that aren t contained in layout tables. Use the Width setting to adjust the size of controls to maintain vertical alignment of their right borders. The Width setting doesn t change the appearance of check boxes and option buttons ; it only affects the space the control occupies.
- Padding Sets the space between the contents of the control and its border. The default Padding value is 1 px for most controls. Padding is disabled for drop-down lists, list boxes, check boxes, option buttons, picture controls, and ink picture controls.
- Margins Set the space between the border of the control and adjacent controls; the default value is 1 px for most controls. Picture and ink picture controls disable Margin settings. If a layout table contains these controls, set the table s cell Padding values rather than its Margin values. You can change the margins of all controls at once by selecting the entire table and applying new cell Padding values.
The drop-down lists adjacent to each setting text box offer a choice of eight units of measurement. Pixels (px) is the default and most common setting for all InfoPath control size adjustments.
| See Also |
You can customize the border and background color of controls by changing settings in the Borders And Shading dialog box. Chapter 7 covers formatting layout tables and controls. |
Specifying Advanced Control Properties
On the Advanced tab, you can add a Screen Tip or an accessible name , assign a specific position for the control in the tab order sequence, and specify a shortcut key (Alt+ Key ) for setting the focus to a control. The view s stylesheet (view1.xsl for this example) stores the advanced setting values. Each control of the IPControls example has advanced settings applicable to the control type. Figure 6-4 shows the Advanced tab for the IPControls example form s text box control.
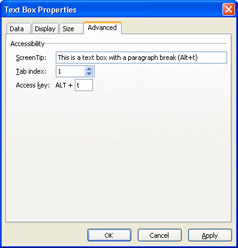
Figure 6-4: The Advanced tab of the Text Box Properties dialog box lets you set Screen Tips and shortcut keys, and change the control s tab order.
Here are the Advanced tab control settings options:
- ScreenTip Useful for explaining the purpose, required formatting, or other special characteristics of the control, such as its shortcut key assignment. Some controls, such as ink picture controls, substitute accessible names for ScreenTips.
- Tab Index Lets you customize the tab order. A 0 Tab Index value specifies the default tab order ” left-to-right , top-to-bottom. Only controls that can receive the focus appear in the tab order. Expression boxes, empty ink pictures, and unselected option buttons can t receive the focus. Assign Tab Index numbers starting with 1 to set a custom tab order. The IPControls example form has a custom top-to-bottom, left-to-right tab sequence.
- Shortcut keys Provide quick navigation to controls that can receive focus. Shortcut keys work for most controls except bulleted, numbered, and plain lists. All controls on the IPControls form have shortcut key combinations, which are noted in the Screen Tip for the control.
| Note |
Avoiding shortcut key conflicts |
Working with Controls for Text Data
Chapters 4 and 5 described most text box design-mode details in the context of form design and layout. Chapter 2 provided a detailed explanation of the rich text box s capabilities in data entry mode. For the sake of brevity (and tree conservation), this chapter doesn t repeat the previous content. This following sections concentrate on the InfoPath and XML Schema data types that are compatible with text-based controls.
Text Boxes
Text boxes are InfoPath s most versatile control type. You can bind text boxes to fields of almost all of the InfoPath field data types ”picture is the only excluded data type ”as shown in Figure 6-5. (XHTML, which also is excluded, is an InfoPath format, not an XML Schema datatype.)
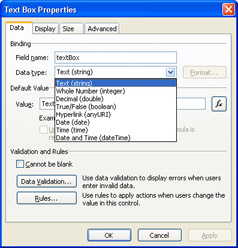
Figure 6-5: These InfoPath data types and their corresponding XML Schema datatypes are compatible with the text box control.
The default XML Schema datatype for fields you add to the form s data source is xsd:string . When you select an InfoPath data type on the Text Box Properties dialog box s Data tab, InfoPath changes the XML Schema datatype to correspond to your selection, if your schema isn t locked. (Basing a form on a custom schema, rather than an XML document locks the schema.) XML content, with the exception of xsd:base64Binary (encoded) data, is readable text; thus, it s possible to assign any text box content ”including numbers and dates ”to elements of the xsd:string datatype. Using the xsd:string datatype for numbers and dates defeats the datatype checking provided by the associated schema and doesn t let you specify formatting of decimal places, currency, or date values.
SP-1 Text boxes support linefeeds if you select the Paragraph Break check box on the Display tab of the Text Box Properties dialog box. InfoPath doesn t add an HTML < br / > tag for a paragraph break; instead, a carriage return/ linefeed pair is embedded within the XML document. (To see this, you can open IPContacts.xml in Notepad, and scan for Paragraph Break , which has a trailing carriage return/linefeed pair.) The price of mixing content and presentation in an XML data document, which is a questionable practice at best, is loss of formatting of InfoPath data documents that you open in Notepad or other basic text editors. Raw XML code that s missing white space (indents before and line-breaks after element tags) is very difficult to read.
SP-1 A more useful addition, which has appeared in SP-1, is the ability to limit the length of the text by selecting the Limit Text Box To check box and specifying the maximum number of characters in the Characters spin box, as shown in Figure 6-6. Limiting the number of characters prevents errors when submitting forms that update limited-width fields in database tables.
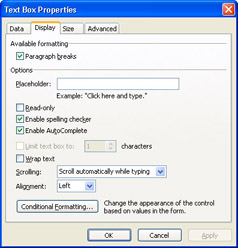
Figure 6-6: The Text Box Properties dialog box s Display tab has controls to permit recognition of paragraph breaks and limit the maximum number of characters users enter in text boxes.
Rich Text Boxes
InfoPath denotes rich text boxes XHTML content by a local namespace declaration ” xmlns="http://www.w3.org/1999/xhtml" ” following the tag name . As an example, here s the XML code for the sample form s rich text box:
Rich Text
Box with

XHTML-formatted text
The section Formatting Rich Text Data, in Chapter 2, explains how to enter rich text in data-entry mode, and the section Restricting the Contents of Rich Text Boxes, in Chapter 4, describes how to limit users choices of inserted objects and text formatting.
Bound Hyperlink Controls
You haven t yet seen an example of InfoPath s Hyperlink field, which corresponds to XML Schema s xsd:anyURI (any Uniform Resource Identifier) datatype. The primary purpose of the Hyperlink field is to provide URLs that link to Web pages in XML data documents. Note that you also can add Universal Resource Names (URNs) as URIs. The bound hyperlink s display is the same as the IPControls form s Hyperlink (Text-Based) example.
To test a bound hyperlink format with the IPControls.xsn template, follow these steps.
Add a text box bound to a hyperlink field
- Open IPControls.xsn in design mode, activate the Data Source task pane, and select the Show Details check box.
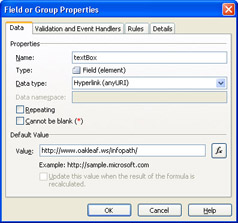
- Right-click the textBox field, and choose Properties from the shortcut menu to open the Field Or Group Properties dialog box.
- In the Data Type drop-down list, select Hyperlink (anyURI), and add the URL http://www.oakleaf.ws/infopath as the Default Value, as shown here:
- Close the dialog box, and drag the textBox field under the original text box to format the text as a hyperlink. (You must add a new text box control to gain hyperlink formatting; changing the data type of an existing text box doesn t work.)
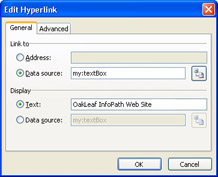
- Right-click the hyperlink control, and choose Edit Hyperlink from the shortcut menu to open the dialog box of the same name. Select the Text option in the Display section, and type OakLeaf InfoPath Web Site in the adjacent text box, as shown here. (If you select the Address option in the Link To section and type an address in the adjacent text box, the control no longer binds to an anyURI field and becomes a text-based hyperlink.)
- Click OK, and click Preview Form to display the name you typed as Display Text, and if you specified a valid URL, click the text to follow the link.
- Right-click the hyperlink, and observe that all shortcut menu items are disabled. However, you can edit the Link To value of the text box.
- Click Close Preview, and close IPControls.xsn without saving your changes.
Bulleted, Numbered, and Plain Lists
SP-1 A group with a repeating field accommodates the three types of InfoPath s XML lists, which default to the Text ( string ) data type. You can add a small button and an adjacent link to prompt users to add a new list item by selecting the Data tab s Show Insert Button And Hint Text check box and typing a prompt in the associated text box, as shown in Figure 6-7.
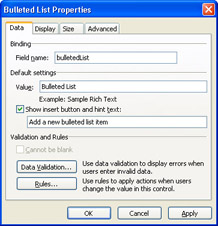
Figure 6-7: Prompt the user to add list items by selecting the Show Insert Button And Hint Text check box and replacing the default Insert item text with a more descriptive phrase.
The three empty bulleted list items that the sample Status Report form displays when creating a new data document appear as a result of template modifications ”the addition of two empty < sr:item >< /sr:item > elements ”to the template.xml file. If you want to encourage users to fill out more than one bulleted item, use the Edit Default Values dialog box to specify the number, as described in the section Customizing Templates by Editing Default Values, in Chapter 11, Setting Template and Digital Signing Options.
Binding the Date Picker Control
The date picker control is self-explanatory, but XML Schema s representation of the xsd:date , xsd:dateTime , and xsd:time datatypes deserves a bit more detail. As mentioned in Chapter 4, the XML Schema Part 2: Datatypes recommendation uses International Standards Organization (ISO) 8601 format to specify date, time, or date and time instances. (The xsd:duration datatype specifies date and time intervals.)
The ISO 8601 format for date and time is CCYY-MM-DDThh:mm:ss , where CC is the century, YY is the year, MM is the month, and DD is the day of the month. T is the time separator, and hh:mm:ss represent hours, minutes, and seconds, which can include a decimal value. A minus sign ( - ) preceding CCYY indicates years before the Common Era. As an example, 2004-04-01T10:00:00 represents 10:00 A.M. on September 1, 2003. A 0000 value for the century and year is prohibited .
InfoPath translates an empty text box to an element similar to < my:datePicker xmlns:xsi="http://www.w3.org/2001/XMLSchema-instance" xsi:nil="true" >< /my:datePicker >. To accept a nil value, the schema definition for the field must contain a nillable="true" attribute, as in < xsd:element name ="datePicker" nillable="true" type="xsd:dateTime"/ >. Clearing the DatePicker Properties dialog box s Cannot Be Blank check box on the Data tab makes date values nillable.
An optional Z time-zone separator followed by a plus sign (+) or minus sign (-) enables specifying the difference in hh:mm format between local time and Universal Coordinated Time (UTC), also known as Zulu (Z) or Greenwich Mean Time (GMT). Unlike many other Microsoft XML-based applications and programming tools, InfoPath doesn t append the time zone information.
| Note |
Dealing with Null date values |
Using Drop Down Lists and List Boxes
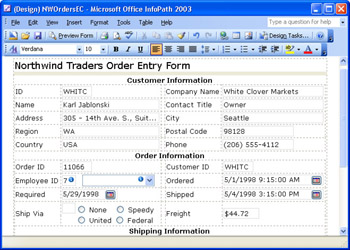
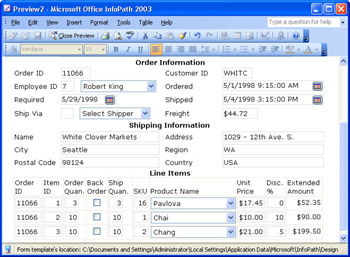
Chapter 2 introduced the use of a drop-down Currency list in data entry mode, but none of the sample forms that you ve worked with so far in design mode include drop-down lists. The NWOrdersEC.xsn template and its element-centric data source have fields ” such as ShipVia and EmployeeID ”that lend themselves to selection by drop-down lists. Figure 6-8 shows a preview of NWOrdersEC.xsn with default data supplied by the 11066.xml source document. Each section of the form represents a data source group : CustomerInfo, OrderInfo, and LineItems.
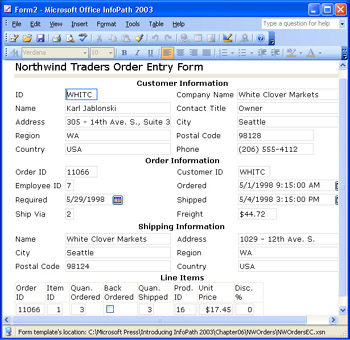
Figure 6-8: This is the initial version of the NWOrdersEC form in preview mode.
| Note |
Using the sample files |
Drop-down lists and plain list boxes share common design mode features. Drop-down lists consume much less form real estate than plain list boxes, which makes drop-down lists the more popular type. The following sections deal with drop-down lists only; list boxes differ only in appearance.
As mentioned near the beginning of this chapter, items in drop-down lists consist of value/display name pairs. InfoPath offers five alternatives for populating drop-down lists: manually entered values you type on the Data tab of the Drop-Down List Properties dialog box, an XML data document, a database table, a Web service, or a Microsoft Windows SharePoint Services library or list. The following section covers the first option ”manually entered values, which are similar to Microsoft Access s value lists for combo and list boxes. The section Using Secondary Data Sources with Lists, later in this chapter, covers XML documents as a secondary data source. Chapters 13 and 14 show you how to use database tables or queries and XML Web services as secondary data sources.
Populating Lists with Manually Entered Values
To add list items, values, and display names manually and embed them in your form, follow these steps.
Replace the Ship Via text box with a drop-down list
- Navigate to your C:Microsoft PressIntroducing InfoPath 2003Chapter06NWOrders folder, and open the NWOrdersEC.xsn template in design mode.
- Activate the Data Source task pane, and expand all group nodes to become familiar with the structure of the data source.
- Right-click the Ship Via text box, and choose Change To, Drop-Down List Box from the shortcut menu to morph the control to a drop-down list that occupies the entire layout table cell .
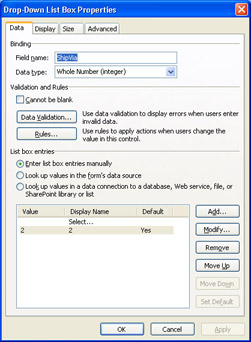
- Right-click the drop-down list, and choose Drop-Down List Box Properties from the shortcut menu to open the Drop-Down List Box Properties dialog box with the Data tab active. The Data tab s List Box Entries section contains a default Select item with no value and a 2 item added from the text box s default value, as shown here:
- Select the first entry in the List Box Entries list, and click Modify to open the Modify Choice dialog box. Leave the default empty Value because the ShipVia field isn t required and needs a blank value, change Select... to Select Shipper, and click OK.
- Click Set Default to make Select Shipper the default item.
- Select the 2 item, and click Remove to delete it.
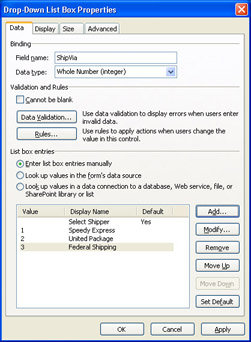
- Click Add to open the Add Choice dialog box, type 1 as the Value and Speedy Express as the Display Name. Click OK to add the item.
- Click Add again, but specify 2 and United Package in the Add Choice dialog box. Repeat the step again and add 3 and Federal Shipping. Your ShipVia list now appears as shown here:
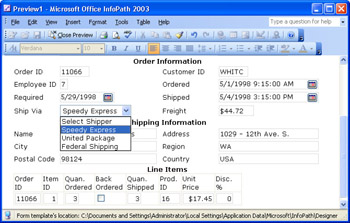
- Click OK to apply your changes. Reduce the width of the control, click Preview Form, and open the list to verify the items, as shown here:
- Close the preview, and press Ctrl+S to save your changes, and choose File, Close to close the form
- Choose File, Fill Out a Form, and click the Northwind Order Entry (EC) link to open the form with the template s default values. Select United Express in the drop-down list, save the form as NW11066.xml in a new My DocumentsInfoPath Controls folder, and close it.
- Reopen NW11066.xml to verify that InfoPath saved your drop-down list setting, and then close the form.
Using Secondary Data Sources with Lists
Typing even a moderately short list in the Drop-Down List Properties dialog box can become tedious . In many cases, you can export an XML document that can serve as a secondary data source to populate the list. The ...Chapter06NWOrders folder contains four element-centric XML documents exported from Microsoft Office Access 2003 queries: CustLookup.xml, EmplLookup.xml, ProdLookup.xml, and ShipLookup.xml. In this section, you ll take advantage of the Data Connection Wizard to use an XML document as a secondary data source for a drop-down list. The source document is EmplLookup.xml. To replace the Employee ID text box with a drop-down list based on an XML document, follow these steps.
Create a drop-down list populated by a secondary data source
- With the NWOrdersEC form open in design mode, convert the Employee ID text box to a drop-down list using the method described in step 3 of the previous procedure.
- Open the Drop-Down List Box Properties dialog box, select the Look Up Values In A Data Connection To A Database, Web Service, File Or SharePoint Library Or List option, and click Add to open the Data Connection Wizard.
- Accept the default XML Data File option in the first page of the Wizard, and then click Next .
- Browse to the C:Microsoft PressIntroducing InfoPath 2003Chapter06 NWOrders folder.
- Double-click EmplLookup.xml to select it and close the dialog box, and click Next.
- In the next screen of the wizard, accept the default data source name, leave the Automatically Retrieve Data When This Form Is Opened check box selected, and click Finish. You ll see the message box shown here:
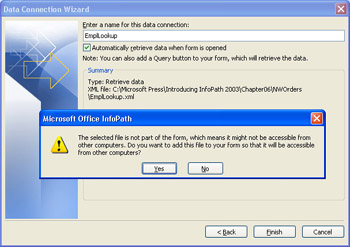
- Click Yes to include the secondary data source document in the NWOrdersEC.xsn template, and return to the Drop Down List Box Properties dialog box.
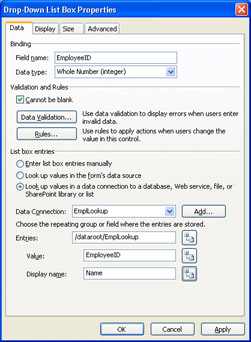
- Click the Select XPath button to the right of the empty Entries text box to open the Select A Field Or Group dialog box, and select the EmplLookup group node, as shown here. (The dataroot group and generated attribute nodes are artifacts of Access s Export As XML feature.)

- Click OK to return to the Properties dialog box, which automatically populates the Value and Display Name text boxes with EmployeeID.
- The Name field, which concatenates the Employees table s FirstName and LastName fields, should serve as the Display Name value, so click the Select XPath button to the right of the Display Name text box to open the Select Field Or Group dialog box again.
- Double-click the Name node to specify it as the Display Name value and return to the Properties dialog box, which now appears as shown here:
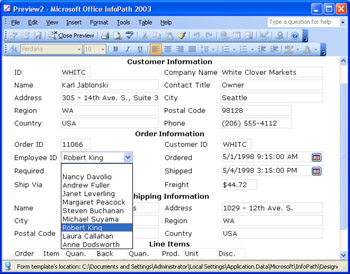
- Click OK, click Preview Form, and open the Employee ID drop-down list. The original default value (7) for the EmployeeID field applies to the morphed drop-down list, so Robert King, the seventh name in the list, is selected by default, as shown here:
- Save your template design, and repeat steps 12 and 13 of the previous procedure to verify that the form preserves changes you make to the EmployeeID list selection.
You might have noticed that the Cannot Be Blank check box was selected by default on the Drop-Down List Properties dialog box s Data tab, but the drop-down list contains a blank item at the top. Selecting the empty item displays a schema validation warning (a red asterisk).
Linking Lists to Text Boxes
In many cases, you probably want to display the value of a drop-down list selection, which often corresponds to the primary key field of a table, in an adjacent text box. Binding two controls to the same field synchronizes their values but adds a spurious Information icon to the controls that states the obvious ” Control stores duplicate data . You can safely disregard this icon.
To display a list s selected value in a text box and synchronize the list selection with a value typed in a text box, follow these steps.
Bind a text box to the Ship Via drop-down list s value
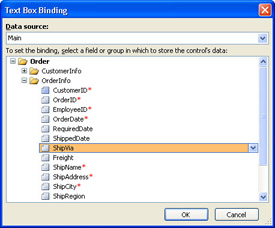
- Add a couple of spaces in front of the Ship Via drop-down list, move the insertion point to the left margin of the cell, and choose Insert, Text Box to open the Text Box Binding dialog box.
- Expand the OrderInfo node, and double-click the ShipVia node, as shown here, to add a label and text box bound to the ShipVia field:
- Delete the added label, and reduce the width of the text box so that both controls are on a single line.
- Repeat steps 1 through 3 for the Employee ID drop-down list, binding the text box to the EmployeeID field.
- Save your template design, preview the form, and verify that the text box values synchronize with drop-down list selections and vice versa.
Adding Check Boxes and Option Buttons
Check boxes and option buttons share a common property ”they have two states: on (selected) or off (cleared.) Check boxes bind to a single field; multiple option buttons automatically form an InfoPath option (button) group , which also binds to a single field. If you ve designed Access forms, you ll find the default behavior of InfoPath s check boxes and option groups to be almost identical to their Access counterparts.
Adding Check Boxes
The NWOrdersEC.xsn template includes a check box to indicate whether an order line item was backordered. Check boxes most commonly bind to fields of the XML Schema s boolean datatype, which is specified for the backordered field, but it s possible to specify any of the eight InfoPath data types that are valid for text boxes. Figure 6-9 shows the default settings for check boxes bound to fields of InfoPath s True/False ( boolean ) data type. Value When Cleared and Value When Checked settings are limited to (Blank), TRUE, FALSE, 0, or 1. The TRUE and FALSE settings set element values to true and false . The XML Schema specification allows or 1 values, but true or false are preferred.
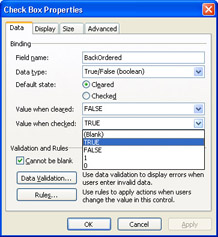
Figure 6-9: This Data tab for a check box control displays the value options for the control s checked state.
If you select an InfoPath data type other than True/False ( boolean ), you can type appropriate text in the Value When Cleared and Value When Checked text boxes ”even dates and times. You could reverse the True/False logic by selecting FALSE or 0 for checked and TRUE or 1 for cleared, but doing so is definitely not recommended.
Option Buttons and Groups
When you add an option button to a form, InfoPath displays the dialog box shown in Figure 6-10. Although you can select a single option button, doing so violates the ground rules of UI design: an option group must contain two or more buttons, and only one button of the group can be selected at a time. By default, InfoPath assigns option buttons sequential numeric values, starting with 1.
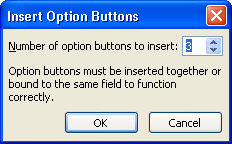
Figure 6-10: The Insert Option Button dialog box, showing the default number of buttons selected.
To replace the NWOrdersEC.xsn template s Ship Via drop-down list with a three-button option group, follow these steps.
Add an option group with four option buttons
- Select and delete the Ship Via drop-down list. (If you choose Change To, Option Button, InfoPath inserts a single option button without a label.)
- Activate the Controls task pane, and drag the Option Button control to the right of the Ship Via text box to open the Option Button Binding dialog box.
- Expand the OrderInfo node, and double-click the ShipVia node to display the Insert Option Button dialog box.
- Select 4 in the Number Of Options To Insert spin box, and click OK to insert four option buttons with Ship Via labels in the cell .
- Delete the linefeed equivalents after the first and third buttons, and replace the labels with None, Speedy, United, and Federal. In this case, the Information icon that warns about double-bound controls doesn t appear. Optionally, add spaces to the left of the Speedy label to align it vertically with the None button, as shown here:
- Right-click the None option button, choose Option Button Properties from the shortcut menu, remove the 1 value, and select the This Button Is Selected By Default check box, as shown here:
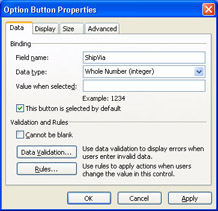
- Click OK to close the dialog box, right-click each of the remaining three buttons, choose Option Button Properties from the shortcut menu, and substitute 1, 2, and 3 for their values.
- Click Preview Form, and click the three option buttons to verify that the buttons and the adjacent text box are bound to the ShipVia field, as shown here:
- Option buttons aren t an efficient use of form real estate, so press Ctrl+Z repeatedly to undo the changes, or close the template and do not save your changes.
Here s a general InfoPath form design recommendation: Use drop-down lists or conventional list boxes, not option groups, for situations in which more than two or three buttons are required. Drop-down lists usually are the best choice, unless you want the user to see all or most options without taking any action. In the latter case, consider using a conventional list box instead. The sample Applicant Rating form that you can open from the Fill Out A Form dialog box s Sample Forms list is an exception to the recommendation because of its clever use of option buttons to calculate average rating values for several optional sections. Calculating the average ratings requires code to execute multiple XPath functions.
Calculating Values with the Expression Box
An expression box is an unbound , read-only text box that displays the value of an XPath expression. The most common use of expression boxes is to display the result of mathematical operations on numeric field values, but you also use expression boxes to display text values, such as the full name of a person from firstName and lastName field values. As you learned in Chapter 3, XPath is a language for navigating the in-memory representation of XML documents ”called the XML Document Object Model , or XML DOM ” to select specific nodes and subnodes by name. If you specify a leaf node or an attribute name as the expression, XPath returns the value of the node or attribute to the expression box. XPath also offers aggregate functions, such as sum and count , and common mathematical operators for addition, subtraction, multiplication, and division of numerical field values. XPath also has string functions, such as concat for concatenating (combining) strings and substring for extracting partial string values. The JScript behind InfoPath s sample forms makes extensive use of XPath expressions and operators.
SP-1 The section Summing Numeric Values in a Table Footer, in Chapter 5, introduced you to the read-only expression box control and the XPath sum function for calculating totals of numeric values in a repeating table s footer. The section Using the Insert Formula Feature to Calculate Default Values, also in Chapter 5, introduced you to the Insert Formula dialog box that simplifies creating XPath expressions. In this section s procedure, you use the same XPath expression to add calculated extended order line item values to an expression box. For this example, the data source for the NWOrderEC.xsn template is an element-centric XML document, so the XPath expression you create doesn t include the @ symbols that designate attribute values. Instead of using the Insert Field Or Group dialog box to add fields to the XPath expression, you type the XPath expression into the Insert Formula dialog box s Formula text box, because typing the expression is faster than selecting individual fields and then editing the expression.
To add an Extended Amount expression box to the LineItem repeating table, follow these steps.
Add an expression box and an XPath expression
- Open the NWOrdersEC.xsn template in design mode, and scroll to the LineItem repeating table.
- Select the Disc. % column, and choose Table, Insert, Columns To The Right to add a column for the expression box. Increase the width of the column by about half its default width.
- Position the insertion point in the added column s bottom cell , choose Insert, More Controls to activate the Controls task pane. In the Insert Controls list, scroll to and click the Expression Box item to open the Insert Expression Box dialog box.
- Click the Edit Formula ( f x) button to the right of the XPath text box to open the Insert Formula dialog box.
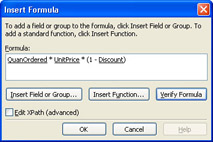
- Type QuanOrdered * UnitPrice * (1 - Discount) in the Formula text box, and click the Verify Formula button to test your expression, which adds underlines to the field names , as shown here:
- Click OK twice to close the two dialog boxes, right-click the newly inserted expression box, choose Expression Box Properties from the shortcut menu to open its Properties dialog box, and select Decimal in the Format As list on the General tab. Click the Format button to open the Decimal Format dialog box, select Currency as the format and 2 for Decimal Places, and click OK twice to apply the formatting. The expression box displays $52.35 as the calculated value from the default values for QuanShipped, UnitPrice, and Discount.
- Type Extended Amount as the expression box s label, select the expression box, and click the Align Right button.
- Click Preview Form to test the calculation by adding two or more line items with different quantity and discount values, as shown here:
- Close the preview, and save your template changes.
Calculations of this type are the most common use for expression boxes added to the data row of repeating tables. You use XPath functions to add counts, sums, and averages ” calculated by dividing the sum by the count ”to expression boxes in table footers. Unfortunately, you can t total values of expression boxes by XPath expressions you type in the XPath text box of the Expression Box Properties dialog box s General tab. You must add code to perform calculations with expression box values, because expression boxes aren t bound to data source fields. Chapter 17, Writing Advanced Event Handlers, illustrates summing expression box values with Visual Basic .NET code.
Incorporating Pictures
Adding pictures to a form is a straightforward process, although the methods differ from those you used in Chapter 2 to add pictures to rich text box controls. Conventional picture and ink picture controls store the binary values of Graphics Interchange Format (GIF) files in elements of XML Schema s base64Binary datatype. (Conventional picture controls can use most common graphics file types; ink picture controls are limited to GIF images.) Conventional picture controls also support linked images; ink picture controls don t.
The Gory Details of Base64 Encoding
IETF RFC 2045, Multipurpose Internet Mail Extensions (MIME) Part One: Format of Internet Message Bodies (at www.ietf.org/rfc/rfc2045.txt ) defines Base64 Content-Transfer-Encoding in section 6.8. The objective of Base64 encoding is to permit binary data to be expressed by groups of 6-bit representations of printable ASCII characters . The allowable 65-character ASCII subset includes A through Z, a through z, 0 through 9, + and /, and the equal sign (=), which is a padding character. The subset doesn t include characters ”such as <, >, ˜, and & ”that are illegal within XML element and attribute values. Encoding binary data occurs in 3-byte (24-bit) chunks , which the encoding processor converts to four 6-bit character codes ranging from 0 through 63. The output chunk for four printable characters represented in conventional 8-bit ASCII is 4 bytes, which causes a 33 percent increase in the size of Base64-encoded data.
| See Also |
Base64 encoding supports both ASCII and EBCDIC as input and output, but Base64 is used more commonly for encoding binary data. For more information about ASCII and EBCDIC standards, see the sidebar Encoding Text, in Chapter 3. Open the IPControls.xml file ”mentioned in the section Relating Controls to Data Types, earlier in this chapter ”and scroll to the < my:pictureControl ... > element to see an example of a Base64-encoded GIF image. |
The word what encoded as Base64 is d2hhdA== . The four input characters become six encoded characters plus two characters of padding represented by the two equal signs. The padding characters, which occur at the end of the encoded stream, compensate for two missing characters in the second 3-byte chunk; wha is the first 3-byte chunk. Base64 decoders interpret the first padding character encountered as a shortcut to the end of the data stream.
Adding Picture Controls
Adding a picture control to a template automatically adds a field of the Picture (base64Binary) InfoPath data type to the data source. When you drag a picture control to a template, the Insert Picture Control dialog box opens, as shown in Figure 6-11. In this dialog box, you can choose between incorporating the Base64-encoded image data in the data document (as a base64Binary element or attribute value) or adding a link to a valid URI for the image (as an anyURI element or attribute value). The URI must point to a file that s accessible to all potential users from a server share or a valid Internet or intranet URL for an image file.
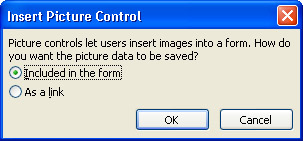
Figure 6-11: The Insert Picture Control dialog box lets you choose whether to embed the Base64-encoded graphic in the data document or add a link to the file.
| Note |
Keeping XML data documents self- contained |
The picture control adds by default a placeholder for images to be inserted by the user , as shown in Figure 6-1. You can substitute a default picture for the placeholder in design mode by clicking the Browse button on the Data tab of the Picture Properties dialog box, shown in Figure 6-12, and specifying a file or an Internet URL in the Insert Picture dialog box s File Name text box. Your C:Microsoft Press Introducing InfoPath 2003Chapter06 IPControls folder includes the OakLeaf.gif file for the leaf logo shown earlier in Figure 6-2. You can insert the same image using a link to http://www.oakleaf.ws/OakLeaf.gif .
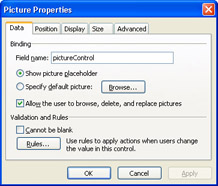
Figure 6-12: The Picture Properties dialog box s Data tab has controls for adding a default image and restricting users ability to browse for images.
You can prevent users from changing the default image by clearing the Allow The User To Browse For New Pictures check box, but doing this is counterproductive ”the default image becomes embedded in every data document users produce. If you want to add a static graphic to a form, it s much more efficient to choose Insert, Picture and embed an image in the form s template.
The Position tab in the Picture Properties dialog box controls text wrapping; you can choose In Line With Text, Left, or Right wrapping styles. Only the Height and Width text boxes are enabled on the Size tab.
Using Ink Picture Controls
Ink picture controls add an empty region to the form in which Tablet PC “equipped users can ink their signatures or draw sketches . InfoPath saves the strokes as a Base64-encoded GIF file for compatibility with conventional PCs, Web sites, and databases. The only property values you can change using the Ink Picture Properties dialog box are the field name, the height and width, and the settings on the Advanced tab.
| Note |
Converting strokes to text |
Summary
InfoPaths set of 13 basic controls and lists contribute to form design versatility. Some general-purpose input controls, such as text boxes, can bind to fields of all but one of the nine XML Schema datatypes that InfoPath supports. Special-purpose input controls bind to specific data typesdate picker controls bind only to date , time , or dateTime elements or attributes, and picture controls store image data as base64Binary element values. Rich text boxes bind to string elements; InfoPaths XHTML data type is an identifier for formatted text, not an XML Schema data type. Bulleted, numbered, and plain lists bind to string elements and support optional XHTML character formatting. General-purpose input controls, including bound hyperlinks , also bind to anyURI elements, which usually contain URNs or URLs, but arent limited to these constructs.
Drop-down lists, list boxes, and option button groups are selection controls, which limit users choices to two or more values. Selection controls have value/display name pairs; the value of the selected item or option binds to an element or attribute. (Option button display names are labels.) The integer datatype is most common for selection control values, but you can bind the value to other common XML Schema datatypes. Check boxes, which are limited to selected or cleared states and dont have display names, usually bind to boolean fields but offer the same datatype choices as other selection controls.
You create value/display name pairs for drop-down lists or list boxes by adding item entries on the Data tab of the Properties dialog box. Alternatively, you can use the Data Connection Wizard to create a secondary data source that provides the value/display name pairs. The wizard can generate secondary data sources from XML documents, database tables or queries, or XML Web services. XPath expressions specify the secondary data source fields for values and display names.
Expression boxes are unbound , read-only text boxes that display the result of XPath expressions. XPath expressions perform calculations on numeric fields or manipulate text values. The most common use of expression boxes is counting rows and computing totals or averages of numeric values in repeating tables or sections.
Q A
|
1. |
Why should I be concerned with control data types, taking into account that XML data documents store all values as text? |
|
|
2. |
Why is InfoPath s Whole Number ( integer ) the most common data type for list box values? |
|
|
3. |
How do I update an XML file that serves as the secondary data source for a list box? |
|
|
4. |
Are links to image files on a public Web site safe enough for a picture control? |
|

Answers
|
1. |
The need for data type checking of XML data documents ( infosets ) was one of the primary incentives for the development of the XML Schema recommendation. One of InfoPath s strong points is schema-based validation of all form data entry values, which is called strong (data) typing by many XML-aware applications. If you type alphabetic characters in a text box bound to an integer or a double element, InfoPath flags the data type error with a dashed red outline and displays a This form includes errors. Do you still want to save it? message when you attempt to save the form. You can save a form with errors, but you can t submit it to a database or an XML Web service. Declarative data validation can detect some data type entry errors but isn t an adequate substitute for strong data type checking by the form s schema. |
|
2. |
The original source or ultimate destination for information contained in XML data documents often is a database. Primary key values relate a display name to a particular row of a database table or query. As an example, an EmployeeID value uniquely identifies a record in the Northwind database s Employees table. The most common primary key data type is a 32- bit integer partly because most databases support automatic generation of sequential-integer primary key values. Some tables use character values, such as the five-letter CustomerID field of Northwind s Customers table, as the primary key, but this practice is less common. |
|
3. |
The answer depends on whether you incorporated the XML source file in the template file. If you don t specify inclusion in the template file, you can replace the XML file with an updated version or edit it with an XML-aware application. In this case, all users must have access to the file from a server share when they open a new form or edit an existing form. If you incorporate the XML file in the template, you must rebuild the template s .xsn file each time you change the XML file s contents. |
|
4. |
Not for forms of moderate or higher importance. When you link a file, even to a well-known and professionally maintained site, you add uncertainty to the validity of the form. If the form s recipient can t connect to the site and download the image, the workflow process is interrupted . In many cases, form intermediaries are server-based processes that might be blocked from direct Internet access by a firewall. |
On Your Own
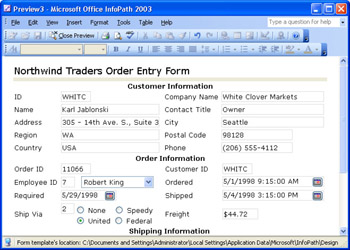
This additional exercise tests your understanding of secondary data sources and XPath expressions that populate expression box controls. You add a Product Name drop-down list and three expression boxes to the NWOrdersEC.xsn form. Figure 6-13 shows a preview of the Line Items section s final appearance.
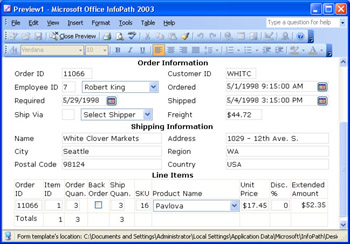
Figure 6-13: A preview of the Northwind Traders Order Entry form after adding the controls in this exercise.
- Open the NWOrdersEC.xsn form in design mode, change the Prod. ID column name to SKU , and reduce the width of the Quan. Ordered, Quan. Shipped, and SKU columns , as shown in Figure 6-13, to make more space for adding the Product Name drop-down list.
- Expand the width of the Line Item table to the border of the master table. Add a table column to the right of the SKU column, and adjust the column widths to leave as much room as possible for the added list.
- Add a drop-down list that uses the ProdLookup.xml file as its secondary data source.
- Add a footer to the repeating table with Totals as the label in its first column.
- Add an expression box in column B to count the number of line items in the order. The XPath expression is count(OrderInfo/LineItems/LineItem) to display the number of items in a group. For this example, the XPath expression requires the full path to the group or field.6. Add expression boxes in columns C and E to total the quantities ordered and shipped. The XPath expressions are sum(OrderInfo/LineItems/ LineItem/QuanOrdered) and sum(OrderInfo/LineItems/LineItem/QuanShipped) , respectively.
- Format all expression boxes as Whole Number, and right-align their contents.
- Test your form in preview mode, save the template, and save a data document with several line item entries to verify that the form works as expected.
Part I - Introducing Microsoft Office InfoPath 2003 SP-1
Part II - Designing InfoPath Forms
- Creating Forms
- Laying Out Forms
- Adding Basic Controls and Lists
- Formatting Forms
- Validating Form Data
- Working with Advanced Form Elements
- Adding Views to a Template
- Setting Form Template and Digital Signing Options
- Publishing Form Templates
Part III - Working with Databases and Web Services
Part IV - Programming InfoPath Forms
EAN: 2147483647
Pages: 248
