Creating Forms
Highlights
In this chapter, you will learn how to
- Describe InfoPath s form design process
- Create and modify a copy of an InfoPath sample form in a new folder
- Create an InfoPath template and data document from a new blank form
- Generate a schema and template from an existing XML data document
- Create a template and XML data document from an existing XML schema
- Modify an existing XML data document for use with an altered or a relocated template
- Modify a form s schema to remove or change the default my: namespace declaration
For more information
- Refer to Chapter 3, which explains element and attribute naming conventions, XML namespaces, and document validation with XML schema.
- See Chapter 7, Formatting Forms, which describes how to apply conditional formatting to text boxes.
- Refer to Chapter 8, Validating Form Data, which explains how to ensure that users enter required data and that entries have reasonable values.
- See the Designing Forms topics listed in the table of contents of InfoPath s online help.
Overview
To work through this chapter
- Youll need the Microsoft InfoPath data entry skills that you acquired in Chapter 2, Filling Out Forms.
- You should be familiar with InfoPath terminology, Extensible Markup Language (XML) data documents and schema, and the components of template files, as described in Chapter 3, Understanding Form Technologies.
- You should have the sample files from the CD that accompanies this book installed in your C:Microsoft PressIntroducing InfoPath 2003 Chapter04 folder. Youll use these XML data document and schema files for most of the example forms you create in this chapter.
This chapter is the first step in your InfoPath form creation journey. The remaining chapters of this book cover one or more specific aspects of the form design process. As Chapter 1, Presenting InfoPath 2003 SP-1, points out, you dont need to be an XML guru or a programming wiz to modify an existing InfoPath sample template or create a new template thats based on an existing XML document or schema. InfoPaths Microsoft Officestandard interface and wizards minimize the time and effort needed to develop, test, and deploy a new form to its user community. Thus, InfoPath forms have the potential to deliver a very high return on investment (ROI), which is the primary business justification for new IT projects.
Understanding the Form Design Process
InfoPath s Design A Form task pane lists five basic design tasks ”Layout, Controls, Data Source, Views, and Publish. Why InfoPath s developers didn t put the Data Source topic at the top of this list is a mystery; the form s data source is the key to the entire design process. Even more important than the data source, however, is up-front planning and requirements analysis for production forms before you begin their design. In the overall form design process, why is as important as how .
Following are the basic design steps and some advice for creating a successful InfoPath form:
- Clarify the business need for and objectives of the form. As an example, the initial objective for an expense report form might be to replace a complex expense worksheet that has proven difficult for users to complete accurately or that the accounting department has discovered won t integrate with its new accounting software. A possible secondary objective is enhancing workflow by e-mailing expense reports for management approval and routing approved reports to the accounting department. Bear in mind that the purpose of the form is to generate a return on the organization s investment in your time to learn InfoPath, design and test the form, and roll it out for use by your coworkers.
- Determine the scope of the form s use within your organization. If you work for a large organization, don t expect the entire enterprise to adapt its modus operandi to your new form and its XML data documents. Start small ”at the team, group , or department level ”and demonstrate the new form s ROI to management.
- Get user input early and often in the form design process. You don t need a design review committee to shepherd a modest InfoPath project, but bear in mind that you re creating the form for coworkers to complete. If potential users find your form design cumbersome to use, incomplete, or subject to data entry errors, your design is doomed from the start.
- Define the data source for the form carefully . If your organization has an XML infrastructure in place or under development, you ll probably use an existing XML schema or data document as the data source for the form. In this case, don t reinvent the wheel by creating your own XML document design. Changes to the data document structure after you design, format, and publish a form can wreak havoc on your form development budget.
- Beautify the form after the initial usability tests. Don t squander your design budget on adding logos, background colors, and other frills until you ve proven that the basic design meets user and business needs. Chapters 5 and 7 describe techniques for conforming your design to your organization s graphics standards.
- Validate data entry where possible. InfoPath s conditional formatting and declarative data validation rules are easy to implement. Take advantage of them to ensure that users enter required data, don t enter numeric values outside reasonable minimum and maximum limits, and don t make other mistakes that you can trap with a validation expression. Chapters 7 and 8 cover InfoPath s conditional data formatting and validation features. Part IV, Programming InfoPath Forms, shows you how to write Microsoft Visual Basic .NET managed code to validate dates and other element or attribute values that declarative validation can t handle.
| Note |
Creating a real-world form |
Modifying an Existing Template
The quickest and easiest way to become familiar with InfoPath form design techniques is to customize one of the 25 sample forms. You re already familiar with the Status Report form, so it s a good candidate for a design change. The following sections show you how to make changes to the form s sections and controls by adding new fields and removing unneeded fields. You also learn how to provide default values for text box controls.
Creating a Copy of a Sample Template
InfoPath makes it easy to modify any of its included sample forms. To create a copy of the Status Report form for modification, follow these steps.
SP-1 Make a copy of the Status Report sample form
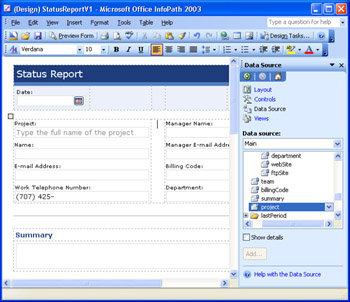
- Start InfoPath. In the Fill Out A Form dialog box, click the Sample Forms link under the Form Categories heading, select the Status Report form, and click the Design This Form link under the Form Tasks heading. The Status Report form opens in design mode as the default Template1 with the Design Tasks task pane active.
- Press Ctrl+S or choose File, Save to open a message box that gives you the option of saving or publishing your form, as shown here:
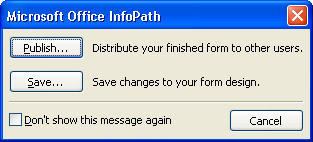
- Click Save to open the Save As dialog box, which defaults to your My Documents folder.
- If you didn t create an InfoPath subfolder in Chapter 2, click the Create New Folder toolbar button to open the New Folder input box, name the new folder InfoPath, and click OK to create the folder.
- Create a subfolder of My DocumentsInfoPath named StatusReportV1.
- Change the file name from Template1.xsn to StatusReportV1. InfoPath adds the .xsn extension automatically. Click Save.
- SP-1 Choose File, Properties to open the Form Properties dialog box, and change the template s name to Custom Status Report, as shown here:
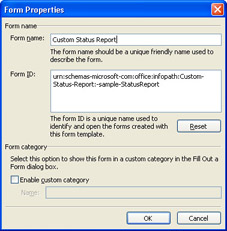
As you change the form name, the Form ID values changes, substituting hyphens for spaces.
- Click OK to close the Form Properties dialog box.
- In the form, click the Status Report label, press the Home key, add the word Custom to the label text, and close the Design Tasks task pane. The only text you see in design mode at this point is in labels; you can edit all form labels by clicking their text and adding or deleting characters .
- Press Ctrl+S to save your design change.
Adding and Relocating Controls
Learning to add controls introduces you to InfoPath s Data Source task pane and drag- and-drop addition of text boxes bound to the data source s fields. A useful addition to the Status Report form is the manager s e-mail address, which you must alter to conform to the layout of the other text boxes in the second layout table on the form. The term layout table distinguishes tables whose cells contain manually added labels and controls from the repeating tables that InfoPath generates for you automatically. You can drag controls to relocate them, but you must cut and paste labels. Remove controls and labels by selecting them and pressing the Delete key.
Add a manager s e-mail text box to a layout table
- Press Ctrl+F1 to open the Design Tasks task pane, if it isn t open, and click the Data Source link to make the Data Source task pane active.
- Click the plus sign (+) in front of the manager field in the Data Source list to display the standard subelements for individuals. All sample InfoPath forms share a common set of fields to specify personal properties.
- Pass the mouse pointer over the E-Mail Address field on the form to display an icon that identifies the element for storing the employee s e-mail address, emailAddressPrimary , as shown on the next page:
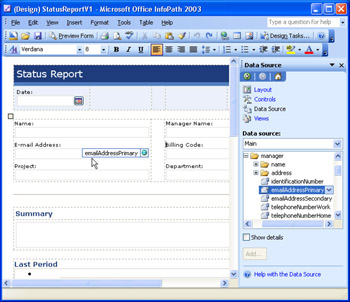
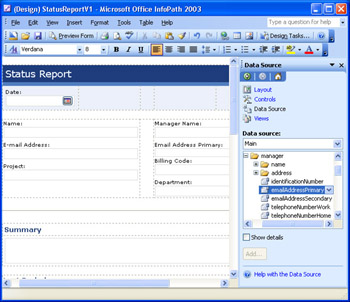
- The manager s e-mail address should use the same element name as the employee s, so select the manager s emailAddressPrimary field in the Data Source list, hold down the left mouse button, and drag the insertion point to the left of the Billing Code label, just before the B. Releasing the mouse button adds a new field and a friendly name label above the Billing Code label, as shown here:
- Click the label, and change its name to Manager E-mail Address.
- Press Ctrl+S to save your changes.
| Note |
Generating friendly names |
Change a text box s height and margins
- To conform the height of the text box and maintain the same spacing as other text boxes in the table, right-click the Manager Name text box, and choose Text Box Properties to open the eponymous dialog box.
- Click the Size tab to determine the height and bottom margin of a typical text box. The Auto setting for height doesn t shed much light on the correct setting, which is 20 px. The Bottom margin setting (7 px) applies to all text boxes in the table. Click OK to close the dialog box,
- Right-click the Manager E-Mail Address text box, choose Text Box Properties, and click the Size tab. Type 20 in the Height text box, select px (pixels) from the adjacent list, and type 7 in the Bottom text box in the Margins section, as shown here:
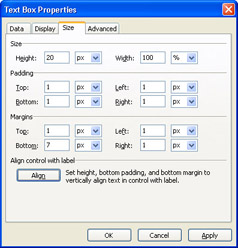
SP-1 The Align button formats the text box so that its contents align vertically with the text of an adjacent label. This text box doesn t have an adjacent label, so vertical alignment isn t required.
- Click OK to close the dialog box, and press Ctrl+S to save your changes.
Relocate a text box and its label
- Select the Project text box, and drag it to a position after the N in the Name label. (It s a bit tricky to position the insertion point before a label s first character, and positioning it after the first letter adds space for the label you add later.)
- Use the mouse pointer to select the Project label, cut the label, and paste it in front of the N.
- Delete the trailing N and add an N to the Name label.
- Add a 7 px bottom margin to the Project text box, as you did in step 3 of the preceding procedure. This text box doesn t have a bottom margin because it was originally at the bottom of the table. Notice that the Data Source list s selection corresponds to the selected control on the form, as shown here:
- Press Ctrl+S to save your changes.
Change the font size of a label and a text box
- In the Data Source task pane, expand the Employee node, and drag the telephoneNumberWork node to the bottom of the table. At this location, the default autogenerated label font size is 10 points and the text box height is 20 px. (If you drag the node immediately below the E-Mail Address field, the label font size is 8 points and the text box has a height less than 20 px. In this case, press Ctrl+Z to undo the change, and repeat this step.)
- Select the entire label, and select 8 from the toolbar s Font Size list to match the size of the other labels.
- Position the insertion point above the label, and delete the empty line.
- Change the label to Work Telephone Number:
- Change the font size of the Manager E-Mail Address text box from 8 points to 10 points by selecting the text box and then selecting 10 from the toolbar s Font Size list.
- Press Ctrl+S to save your changes.
Setting Default Control Values and Adding Placeholders
Supplying default values for text boxes saves users time when filling out the form and minimizes formatting and data entry errors. Placeholders consist of text that disappears when a user types the first character in a text box; a placeholder prompt is especially useful if a text box requires a particular format. Follow these steps to add default values for text boxes.
Add default text box values
- Right-click the Work Telephone Number text box, and choose Text Box Properties from the shortcut menu to open the Properties dialog box with the default Data tab active.
- Type the default text to display in the form for the text box by entering the desired text into the Value field in the Default Value area. For this example, enter (707) 425- , as shown here.
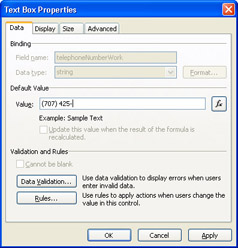
- Click OK to close the dialog box and display the default text in the text box.
- Add default values to other fields in the form, such as the prefix for the billing code, the department name, and the domain name for the two e-mail addresses.
| Note |
Understanding disabled controls in the Text Box Properties dialog box |
Follow these steps to add placeholder text to text boxes.
Add text box placeholders
- Right-click the Project text box and select Text Box Properties from the shortcut menu.
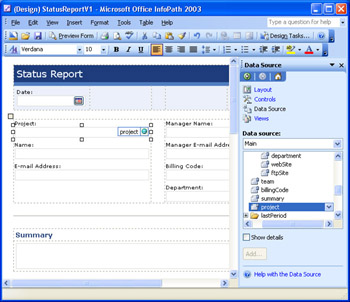
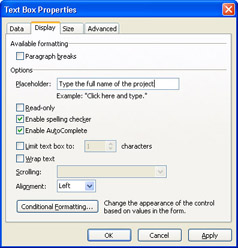
- SP-1 On the Display tab, type the placeholder prompt in the Placeholder text box ”in this case, Type the full name of the project. You can specify whether to use the spelling checker, AutoComplete, or both. (Selecting the Paragraph Breaks check box or selecting the Wrap Text check box and specifying a Scrolling option lets you add a multiline text box, which isn t appropriate for this field.)
- Click OK to apply your changes, and press Ctrl+S to save them. Your form in design view appears as shown here:
| Note |
Previewing the form as you work |
Restricting Formatting of Rich Text Boxes
You can limit users unbridled authority to add ransom-note-formatted text, family or pet pictures, and other creative elements to rich text boxes. To do so, right-click a rich text box, such as the Summary field in the Status Report form, choose Rich Text Box Properties from the shortcut menu, select the Display tab in the Properties dialog box, and set appropriate restrictions, as shown in Figure 4-1. You can specify text box scroll bar appearance and behavior by selecting an option in the Scrolling drop-down list.
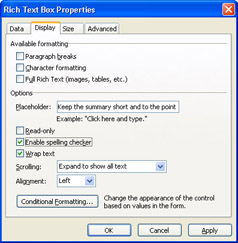
Figure 4-1: You can remove users rich text box formatting options by changing settings in the Rich Text Box Properties dialog box.
Removing Unneeded Elements and Sections
You can delete individual elements, such as entire plain, bulleted, or numbered lists, that the forms schema doesn t specify as required. To delete a bulleted list inside a layout table, such as Last Period, select the table and press Delete to remove the table and its contents. Press Delete again after removing a table to remove the remaining empty line.
| Note |
Reducing form length |
Similarly, you can delete an optional section and its contents by selecting the section and pressing Delete. The Time Report section is a good candidate for deletion if your forms users are salaried rather than hourly workers. Figure 4-2 shows a preview of the customized form with several elements deleted, all empty lines removed, and the Formatting and Tables toolbars hidden.
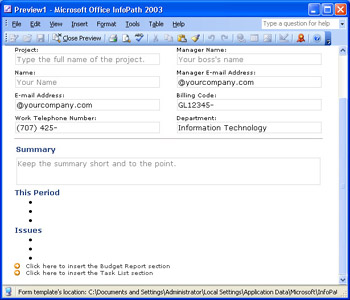
Figure 4-2: This preview shows the working area of a form that s been modified to minimize its length.
Changing a Section s Type
You can change a repeating table to a repeating section ”and vice versa ”but you lose the fields in the section or table when you make the change. As an example, change the Task List repeating table to a repeating section by following these steps.
Change the Task List repeating table to a repeating section
- Right-click the Task List s Repeating Table tab to select the table (not the Optional Section), and choose Change To, Repeating Section. The contents of the table will disappear.
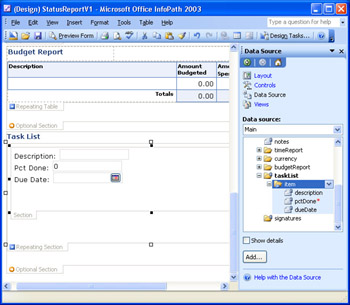
- Select the item node in the list, drag it to the empty repeating section, and select Section With Controls to add three text boxes surrounded by a lot of unneeded white space, as shown here:
- Press Ctrl+Z twice to return the section to a repeating table, and save your changes.
As a general rule, repeating elements that have only a few short fields and, especially, numeric values ”such as the Status Report s three examples ”should be added as repeating tables. The Rss2v1 form you create later in this chapter has a repeating section because some of the elements are text boxes that require long, descriptive text.
Testing Your Modified Form for Usability
Now that you ve completed the modifications to the Status Report form, it s time to give the design a test drive with the procedure on the next page.
Test the Status Report form
- Choose the Fill Out A Form task pane from the task pane menu.
- Click the Custom Status Report link to open Form1 in data entry mode. Notice that saving the modified template adds it to your most recently used (MRU) list in the File menu.
- Complete a sample form, and save it in the same folder as the template, and then close the form and design windows .
- Ask one of your colleagues to fill out the form, and verify that the placeholder prompts and default values make sense and reduce completion time.
| Note |
Using the sample files |
Starting with a New, Blank Form
It s a better practice to base a form on an existing XML document than to design a form from scratch. Creating a form template and XML schema from a sample XML document ensures that your form design can produce usable data documents. If you don t have a well- formed .xml file to use and don t want to write one in Notepad, you can design the XML data document s schema in the Data Source task pane. Before you embark on designing the data document and form simultaneously , create the document design on paper and review it with the form s users or your organization s developers to make sure that it contains elements or attributes for all required data values.
| Note |
Avoiding ad hoc template and document designs |
When you start a design with a new, blank form, InfoPath automatically adds to the data source a default root element named myFields , which can contain group and field elements. A group contains one or more child elements, which can be either groups or fields. Groups bind to required or optional form sections; repeating groups bind to repeating sections or repeating tables. Fields bind to HTML controls. Fields represent either elements or attributes; most simple XML documents don t include attributes.
You can use either or a combination of the following two design approaches when starting from an empty form:
- Add and define groups and fields in the Data Source task pane, and then bind sections to the groups and controls to the fields using the drag-and-drop method described earlier in this chapter. When you drag a field to the form, InfoPath adds a friendly name label to the left of the control.
- Add sections and controls from the Controls task pane in from the top to the bottom of the form. Adding a section adds a consecutively numbered group, starting with group1 to the form's data source. Adding a control adds a consecutively numbered field of the controls data type to the data source. This method doesn t add a label for the control.
Note Avoiding ad-hoc data document structure
The most important aspect of InfoPath form design is the structure and content of the form's XML data document. The goal of form design is to make entering or editing content an easy and foolproof task for users, not to define the document's structure. Although dragging sections and controls from the Controls task pane to the form work area might appear to be the simplest way to create a new form, you must assign meaningful element names to the sections and fields in the Data Source task pane. You'll probably need to alter the sequence of sections and fields in the data document with the Move, Move Up, or Move shortcut menu options. Thus, you'll find that designing the data source first and then adding sections and controls to the form is the more efficient form design process.
This section s example is based on a modified version of the Contacts-WellFormed.xml document from Chapter 3, with two added date attributes. (Contacts-WellFormed.xml is located in your C:Microsoft PressIntroducing InfoPath 2003Chapter03XMLDocs folder.) The root element name is contacts , which contains a repeating child group, contact , which in turn has dateAdded and dateUpdated attributes. The contact group has two text fields, firstName and lastName , and a personal child group. The personal group contains address , city , state , zipCode , phone , and eMail fields.
Defining Groups and Fields in the Data Source Task Pane
To begin creating your XML data source by defining its groups and fields, follow these steps.
Start a new Contacts form
- With InfoPath open and the Fill Out A Form task pane active, click the Design A Form link.
- In the Design A Form task pane, click the New Blank Form link to activate the Design Tasks task pane.
- Click the Data Source link to activate the Data Source task pane, which contains a single myFields node.
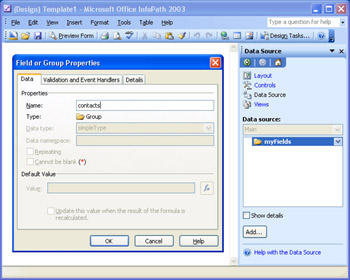
- Right click the myFields node, and choose Properties from the shortcut menu to open the Field Or Group Properties dialog box.
- Change the group name to a more descriptive root element name, contacts, as shown here:
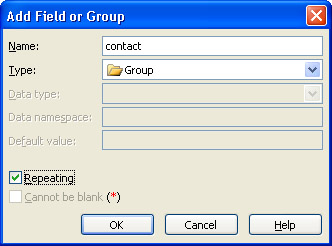
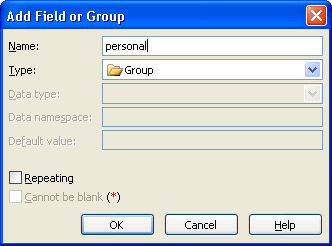
- Click OK to close the dialog box, and click the task pane s Add button to open the Add Field Or Group dialog box to add the contact repeating group.
- Type contact in the Name text box, select Group from the Type drop-down list, and select the Repeating check box, as shown here. Click OK to close the dialog box.
| Note |
Avoiding element and attribute sequence problems |
Add attribute fields to the group
- With the contact repeating group node selected, click Add to add the first of the two date attributes to the contact group.
- In the Add Field Or Group dialog box, type dateAdded as the attribute name, select Field (Attribute) from the Type drop-down list, and select Date (Date) from the Data Type drop- down list, as shown here, and click OK.
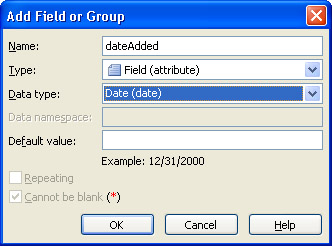
A red asterisk (*) following the name in the Data Source list indicates elements or attributes that have required values. Elements can have blank date or numeric field values, but attributes can t.
- Click Add, and repeat step 2, but type dateUpdated as the name.
Add element fields and a subgroup to the contact group
- With the contact node selected, click Add to add the group s firstName element.
- In the Add Field Or Group dialog box, type firstName as the element name, accept the default Field (Element) as the Type and Text (String) data type, and select the Cannot Be Blank check box, as shown here:
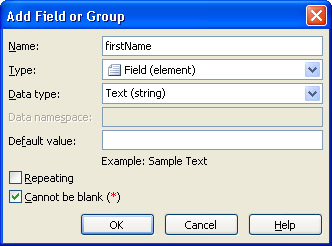
- Click OK, repeat step 2 for the lastName element, and click OK to add the element. Notice that element node icons have a lighter gray background than attribute icons.
- With the contact node still selected, click Add to add the personal element as a nonrepeating group, as shown here:
- Press Ctrl+S, click Save in the dialog box, and save your template as ContactsCh4.xsn or the like in a new ContactsCh4 subfolder of your My DocumentsInfopath folder.
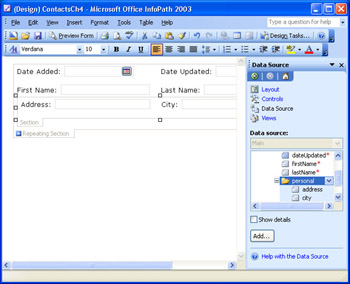
If you select the Show Details check box in the Data Source task pane, your Data Source list appears as shown in Figure 4-3. The data type names listed under the node names are XML schema datatypes, such as string for text fields. When you add default values, the value appears after the data type name.
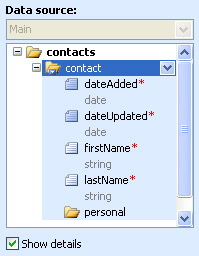
Figure 4-3: This Data Source list for the contacts form has initial groups, attributes, and elements added.
Using Drag and Drop to Add Sections and Controls
The drag-and-drop method of adding sections and controls from the data source is the easier of the two approaches described in the section Starting with a New, Blank Form, earlier in this chapter. The contacts root element binds to the form automatically, so the first child element of the root and its element and attributes contribute sections and controls to the form.
To add the sections and controls you ve specified so far, drag the contact node onto the form. Choose Repeating Section With Controls from the shortcut menu that opens when you release the left mouse button. InfoPath automatically adds the controls and labels and an optional section for the empty personal group to the repeating section. Your form appears as shown in Figure 4-4.
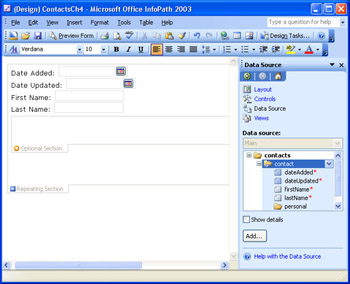
Figure 4-4: Dragging the contact node to the form generates a repeating section with controls for attributes and elements and an empty optional section for the personal group.
The default control arrangement wastes space on the form by stacking controls vertically and adding empty lines to the sections. InfoPath adds nested sections as optional sections; for this example, the personal element isn t optional. To rearrange the controls, conserve form area, and change the optional section to a required section, do the following.
Customize the default sections and controls
- SP-1 Hold down the Shift key, select the four text boxes, and then right-click the Last Name text box and select Properties from the shortcut menu to open the Properties (Multiple Selection) dialog box. Click the Align button to align the text box contents with the label text, and click OK to close the dialog box.
- Position the insertion point to the right of the Date Added date picker, press Delete, and add 10 spaces to separate the Date Added and Date Updated controls. Move the insertion point to the right of the Date Updated date picker and press Enter to add an empty line.
- Position the insertion point after the First Name text box, press Delete, and add 4 spaces.
- Select the First Name text box, and drag the right-middle sizing handle to the right to increase the available text width. (As you increase the text box s width, the Last Name label and text box move to the right.)
- Repeat step 4 for the Last Name text box, making its width approximately equal to the First Name text box. (If you increase the width beyond the right margin, the text box moves to the next line.)
- Click to the right of the Last Name text box to select the repeating section, and drag the right margin of the form to within a few pixels of the right edge of the text box.
- Delete all but one empty line in the optional section and all empty lines in the repeating section.
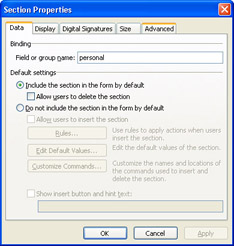
- Right-click the Optional Section tab, and choose Section Properties from the shortcut menu to open the dialog box of the same name with the Data tab active.
- Clear the Allow Users To Delete This Section check box, as shown here, to change the optional section to a required section, and click OK to apply your change:
- Press Ctrl+S to save your changes.
- Click Preview Form. The form at this point, shown in Figure 4-5, won t win any graphic design awards, but it is operable. You will notice the red asterisks in the Date Added, Date Updated, First Name, and Last Name text boxes indicating that entries are required for these fields.
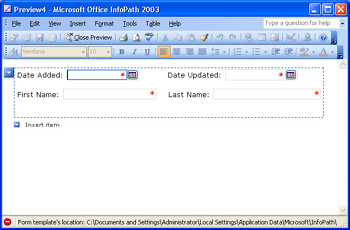
Figure 4-5: The contacts form has attribute and element controls rearranged and the optional personal section changed to a required section. - Click Close Preview.
Adding Elements and Controls Simultaneously
The alternative to dragging and dropping a section with its controls is adding a text box or other control to the main form or a section. In this example, you ll add text box controls and elements to the personal section. The process is cumbersome, so here you ll add only fields for the address and city elements.
To add the two controls and elements and then perform the required fix-up, follow these steps.
Add address and city elements to the form
- Press Ctrl+F1 to reopen the Data Source task pane, if it isn t open.
- Click the Controls link to make the Controls task pane active.
- With the Automatically Create Data Source check box selected, drag the Text Box control to the section to add a text box bound to the new field1 field.
- Press Enter, and repeat step 3 to add a second text box bound to the field2 field.
- Open the Data Source task pane, and right-click the field1 node and select Properties from the shortcut menu to open its Field Or Group Properties dialog box.
- Replace field1 in the Field Name box with address, select the Cannot Be Blank check box, and click OK to apply your changes.
- Repeat steps 6 and 7 for field2, renaming it city.
- Add Address: and City: labels to the left of the two text boxes. Remove the blank line between the text boxes, and align the labels with the text boxes in the contact section.
- Select both text boxes, right-click one of the items you have selected and choose properties from the shortcut menu. In the Properties (Multiple Selection) dialog box that appears, click Align. Your form appears as shown here:
Completing and Testing the ContactsCh4 Template
You still have four elements to add to the template: state , zipCode , phone , and eMail . It s faster to add these elements by adding the fields to the Data Source list, as you did in the section Defining Groups and Fields in the Data Source Task Pane, earlier in this chapter. Make state and zipCode required (select the Cannot Be Blank check box), and specify the phone and eMail fields as optional. Drag the four fields to the personal section, align the text boxes and labels, adjust the label and text box sizes and locations to conform approximately to those shown in Figure 4-6, and save your changes.
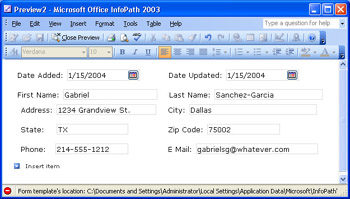
Figure 4-6: Preview mode displays the final version of the Contacts form.
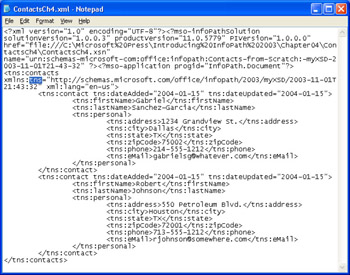
Your work isn t complete until you verify the XML data document produced by the form. Make the Fill Out A Form task pane active, click the link for the name you gave the form (ContactsCh4 for this example), and fill in a couple of records. Save the data document, and then open it in Notepad. Figure 4-7 shows the sample data document ”less the XML declaration and InfoPath processing instructions (PIs) ”after reformatting it for readability. The ubiquitous xmlns:my namespace declaration appears at the top of Figure 4-7, and my: prefixes each element and attribute name.
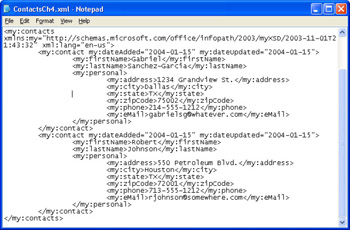
Figure 4-7: This sample XML data document was produced by the contacts template with the default InfoPath namespace declaration and element/attribute prefixes.
| Note |
Removing or changing my namespace |
Creating a Template from an XML Document
If you found the preceding exercise a bit too complex, you ll appreciate InfoPath s automatic form generation capability. The Data Source Wizard delivers an almost-completed form in a minute or less, if the XML data document you specify to create the data source is well- formed , not overly complex, and representative of the final production version.
| Note |
Making sure InfoPath recognizes repeating elements |
The example in this section is based on a simplified version of a publicly available Really Simple Syndication version 2.0 (RSS 2.0) document at www.oakleaf.ws/rss.xml . Your organization can use the form you create in this section to establish its own RSS 2.0 feed ”an XML document usually named rss.xml ”to notify employees and customers of new content available from a Web site. The orange XML buttons you see on Web pages open rss.xml or a similarly named file, which usually is in RSS 2.0 format.
| Note |
Getting a Grip on RSS 2.0? |
To create the initial version of the RSS 2.0 form, Rss2v1.xsn, follow these steps.
Create a form from an existing XML document
- Close and reopen InfoPath, and click the Design A Form link in the Fill Out A Form dialog box.
- SP-1 Click the New From XML Document Or Schema link to start the Data Source Wizard.
- In the first wizard screen, click Browse to display the Open dialog box, and navigate to your C:Microsoft PressIntroducing InfoPath 2003Chapter04Rss2v1 folder.
- Double-click Rss2v1.xml to close the dialog box and add the path and file to the text box, as shown here:

- Click Next, accept the No option (the default) in the second wizard screen, and click Finish, which opens a message box asking whether you d like to use data from the sample document to provide default values for the form, as shown here:
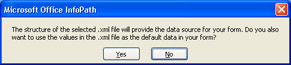
- For this example, click Yes to close the message box and add the document s single attribute and all elements to the Data Source list.
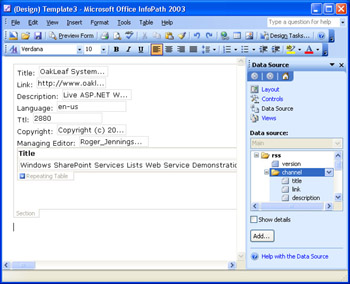
- Drag the channel node to the form, and select Sections With Controls from the shortcut menu that opens when you release the left mouse button to add all controls except the text box for the version attribute to the form, as shown here:
Adding a Missing Attribute and Fixing the Initial Form Layout
A control for the version attribute isn t important, because the default value (2.0) applies to all instances of RSS 2.0 data documents you create. It s a good practice, however, to provide controls for all attributes and elements in the initial design. InfoPath adds repeating tables for repeating sections ”in this example, item . RSS 2.0 items contain too much text to display in a repeating table of reasonable length, so you should change the repeating table to a repeating section to accommodate wide single-line and multiline text boxes.
| Note |
Adding extra fields to the data source |
To add the missing attribute, change the repeating table to a repeating section, and remove most empty lines from the design, follow these steps.
Modify the default section with controls
- Add the missing version attribute s text box to the form by dragging the version node to the left of the Title label and pressing Enter.
- Right-click the Repeating Table tab, and choose Change To, Repeating Section from the shortcut menu. All item fields disappear from the repeating section.
- Drag the item node to the repeating section, and choose Controls from the menu that appears when you release the mouse button. (You already have a section, so don t choose Section With Controls.)
- Use the mouse pointer to select the three empty lines below the repeating section, and press Delete.
- Do the same for the empty lines below the Link text box of the repeating section.
- Press Ctrl+S, click Save in the message box, and save your form as Rss2v1.xsn in a new My DocumentsInfoPathRss2v1 folder.
- Choose File, Properties to open the Form Properties dialog box, type RSS 2.0 Version 1 in the Form, and click OK to close the dialog box.
Figure 4-8 shows the result of the changes you made in the preceding steps.
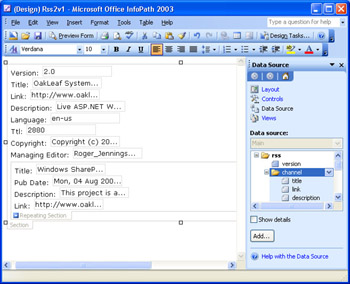
Figure 4-8: This is the Rss2v1.xsn template after adding a missing attribute, changing a repeating table to a repeating section, and removing empty lines.
Performing a Quick Check of the Template s Data Document
Before you expend time and energy optimizing the form design for data entry, it s a good policy to inspect the XML data document produced by the form. Adding default values when you generate the design simplifies the test process; you can change or delete the default values when you tweak the form s design.
To create a test data document to compare against the document you specified as the data source, using Rss2v1.xml as an example, follow these steps.
Create a test document from the template
- Open the Fill Out A Form task pane, and click the RSS 2.0 Version 1 link to open an instance of Form1 with default values provided for all fields.
- SP-1 Scroll to the end of the items, click the Insert Item button or click an empty region of the repeating section to select the entire section, and press Ctrl+Enter to add a duplicate item to the document.
- Press Ctrl+S and save the document as RssTest1.xml or the like in the template s folder.
- Open the data document in Notepad, and compare its contents with the original version. Disregard the InfoPath PIs and formatting (white space) differences, which have no effect on most readers/aggregators.
If you followed the steps in the two preceding procedures carefully , you ll find no significant differences between Rss2v1.xml and RssTest1.xml other than the group and fields of item element you added.
Optimizing the Form for Data Entry
If you re interested in using the RSS 2.0 form to create production rss.xml files or you want to show off your new design skills to your colleagues, take a few minutes to modify the form s layout for easier data entry. Following are a few redesign suggestions that take less than 10 minutes to implement:
- Make fields whose default values you don t want users to change read-only fields. Select the Read-Only check box on the Display tab of the control s Properties dialog box.
- Move seldom-changed or read-only fields above the data entry fields, and separate them from the primary fields with a horizontal line. Select the label and text box, and then cut and paste the combination where you want it. Choose Insert, Horizontal Line to add a line below the insertion point.
- Adjust the width of text boxes to suit their expected content.
- Use the Text Box Properties dialog box s Display tab to enable multiline text boxes for text box controls that contain lengthy text, such as descriptions. Select the Wrap Text check box for these controls, and choose the appropriate Scrolling action: Expand To Show All Text or Show Scrollbar When Necessary.
- Align all text boxes with their labels. To increase the space between text boxes on successive lines, select all text boxes, right-click a text box, and select Properties to open the Properties (Multiple Selection) dialog box., Click the Align and Apply buttons, replace the default 1 px Top Margin value with 3 px, and click OK to close the dialog box.
- Add horizontal lines between sections to make the transition between sections evident to users. Chapters 5 and 7 show you how to add layout tables with borders and background colors that make individual sections evident.
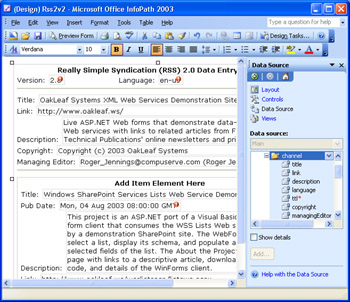
Figure 4-9 shows a preview of the final version of the template with the preceding layout enhancements. The entire channel section is read-only for this example, because the example is for an entire Web site.
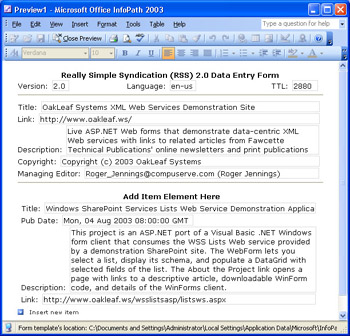
Figure 4-9: A few quick formatting fixes improve the Rss2v1.xsn template s usability.
| Note |
Using the sample files |
Adapting the RSS 2 0 Form for Production Use
The only modifications you need to make to the Rss2v1.xsn schema to create rss.xml files for your organization s internal or external Web site is to replace the default values of channel elements with the appropriate text and remove the default values from item elements. Chapter 12 will show you how to make the Rss2v1.xsn template available to users from a server share or an intranet Web site.
You can merge new item elements in other forms using the technique you learned in the section Merging Forms, in Chapter 2. RSS files require a last-in, first-out (LIFO) format with the most recent addition at the top of the list. For RSS files, open the form with the new content, and merge the existing production file.
Basing a Template on an XML Schema
If you have an existing schema that conforms to the W3C XML Schema recommendation, InfoPath can generate a form design from it in most cases. The same recommendation for document-based forms applies to schema-based forms: start simple. As an example, you can create a data source from a very complex schema, such as the schema for business documents that conform to Universal Business Language (UBL) requirements. But you probably won t be able to create a usable form automatically from a schema of this complexity.
One of the disadvantages of using an XML schema to create the data source is that sections are locked unless explicitly declared open (for modification) by an added xsd:any element. You can t add new elements or attributes to a locked data source. InfoPath s sample forms schemas are open, but most schemas aren t, for good reason: altering an existing schema when creating an InfoPath form probably would make the XML data document invalid in a workflow process.
| Note |
Exploring UBL schemas and data documents The folder also contains a sample instance (XML data document) of an office supply invoice ” OfficeSupplyInvoiceInstance.xml ”on which you can base a form design, but the form contains a myriad of nested optional sctions, which make it extremely difficult to complete. (The invoice instance s xsi:schemaLocation value has been modified to prevent use of its schema and allow InfoPath to infer the schema.) |
Creating and Refining a Schema for a Data Document
If you don t have a schema on which to base a form, it s a more straightforward process to create a form from an XML data document than to design your own schema. But you might encounter a situation in which the form design must handle different versions of a document with optional sections to support the differences. One approach to this problem is to fabricate a sample source document that contains elements and attributes for all document versions. In this case, you must change sections that don t appear in all documents to optional sections.
SP-1 Another approach is to let InfoPath merge multiple XML documents when you create the form s data source in the Data Source Wizard. If you start with the simplest document, InfoPath designates sections added by other document versions as optional sections.
An alternative to creating the schema with InfoPath is to use the Microsoft XSD (XML Schema Definition) Inference 1.0 tool to generate an initial schema from one XML data document instance and then refine the schema by adding elements and attributes from other related document instances. This tool generates basic XML schemas that typify those in common use for simple business documents.
| Note |
Avoiding multiple schemas |
This section s examples use an abbreviated version of Rss2v1.xml and a second document ” Rss2v2.xml ”for refining the schema. Rss2v2.xml doesn t include the optional language , ttl , and, copyright elements, but it does have an added docs element, an image element with subelements to add an image file that displays the site s logo, and a guid element with an IsPermaLink attribute.
| Note |
Using the sample files |
To infer a schema for Rss2v1.xml and refine it with Rss2v2.xml and then save the resulting schema file, follow these steps.
Use the Microsoft XSD Inference 1.0 tool to generate a schema
- Start Internet Explorer, and open the Microsoft XSD Inference 1.0 tool at apps.gotdotnet.com/xmltools/xsdinference/ .
- Click Browse to open the Choose File dialog box, and navigate to your C:Microsoft PressIntroducing InfoPath 2003Chapter04Rss2v2 folder.
- Double-click Rss2v1.xml to select the file, and click Infer Schema to generate the initial schema, as shown here:
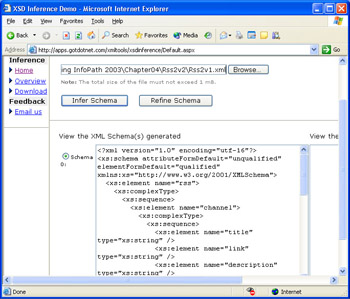
- Click Browse, double-click Rss2v2.xml in the Choose File dialog box, and click Refine Schema to add the missing elements and attribute to the schema.
- Click in the schema text box, press Ctrl+A to select all its contents, and press Ctrl+C.
- Start Notepad, and press Ctrl+V to paste the contents to the file.
- Replace utf-16 with UTF-8 as the encoding method, and save the file as Rss2v1+2.xsd with UTF-8 encoding in a new My DocumentsInfoPathRss2v2 folder. InfoPath requires UTF- 8 encoding for all XML document types.
| See Also |
You can learn more about the Microsoft XSD Inference 1.0 tool by clicking the Overview link on the tool s Web page, scrolling to the bottom of the page, and following the links to articles about XSD schemas and use of the tool. |
Modifying an Inferred Schema for InfoPath
You need to make minor modifications to the inferred schema to create a usable form from the schema. The XSD Inference 1.0 tool assumes that a single instance of each element is required The tool also detects multiple occurrences of elements, such as item , and adds a maxOccurs= unbounded attribute for these elements. Many RSS 2.0 elements aren t mandatory, and it s a good practice to add a minOccurs= 0 attribute to these elements. A minOccurs= 0 attribute accommodates document versions that don t contain the element, which is one of the purposes of this exercise.
To modify the Rss2v1+2.xsd schema to accommodate both document versions, follow these steps.
Edit the inferred schema
- Open Rss2v1+2.xsd in Notepad.
- Add minOccurs= 0 attributes to the language , ttl , copyright , managingEditor , and docs elements. Look ahead to Figure 4-10 for examples.
- Add minOccurs= 0 maxOccurs= 1 to the image element.
- Add minOccurs= 1 to the item element, because a valid RSS 2.0 file requires at east one item.
- Save the file as Rss2v1+2Modified.xsd with UTF-8 encoding.
At this point, the schema is ready for use as an InfoPath data source. Figure 4-10 shows most of the Rss2v1+2Modified.xsd schema.
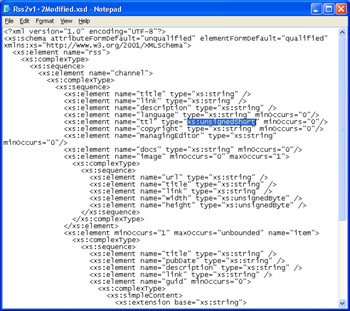
Figure 4-10: These modifications to the Rss2v1+2.xsd schema accommodate multiple document versions with an optional section.
One of the advantages of using the XSD Inference 1.0 tool is that it infers XML Schema datatypes from values in the XML source document. For example, the tool detects that the version element s value is 2.0, so it s assigned the xs:decimal data type. Numeric data types without decimal values receive the smallest numeric datatype that will accommodate the element s value, such as xs:unsignedByte for values less than 255 and xs:unsignedShort (highlighted in Figure 4-10) for values between 256 and 65,535. Elements and attributes with a true or false value become xs:boolean . If the pubDate value had used XML Schema s ISO 8601 date and time formatting standard ( CCYY-MM- DDThh:mm:ss ±zz:00 ), its data type would be xs:dateTime . Scroll through Rss2V1+2Modified.xsd to inspect all non-string data types.
| Note |
Deciding on data types |
Creating a Form from the Modified Schema
The process of creating a form from an XML schema is almost identical to that for creating a form from an XML data document, as described in the section Creating a Template from an XML Document, earlier in this chapter. You substitute the schema s .xsd file for an .xml file in the second page of the Data Source Setup Wizard.
When you create the template from the Rss2V1+2Modified.xsd schema, save it as Rss2v2.xsn in the folder containing the schemas. The primary difference you see in the Data Source task pane s list is a small lock symbol overlaid on field and group icons, which indicates the node is locked for most modifications.
The change you made to the image element in the preceding section lets you change the default image section to an optional section by opening the Section Properties dialog box and selecting the Allow Users To Delete This Section check box. Figure 4-11 shows the initial form design generated from the Rss2v1+2Modified.xsd schema. Create a test data document from the new template, save it as Rss2v1+2Modified.xml , and check its contents by opening it in Notepad.
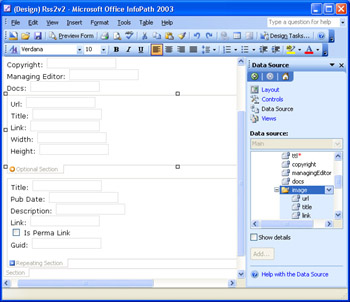
Figure 4-11: This initial form design is based on the Rss2v1+2Modified.xsd schema.
Copying a Form Design and Adding New Elements
Reworking the new form layout to correspond with that in the section Optimizing the Form for Data Entry, earlier in this chapter, takes only a few minutes, but laying out and formatting a more complex form can take several hours. You can take advantage of your prior design by using copy-and-paste methods to copy the design to your new form. When you paste the sections and fields to the new form, you must rebind them to the appropriate node in the Data Source list.
Replace the template s sections and controls
- With Rss2v2.xsn open, click in the work area, press Ctrl+A to select the entire design, and then press Delete to delete all sections and controls.
- Open another InfoPath instance, and open the C:Microsoft PressIntroducing InfoPath 2003Chapter04Rss2v1Rss2v1.xsn file in design mode.
- Click in Rss2v1.xsn s work area, press Ctrl+A, and press Ctrl+C to copy the sections and their controls to the Clipboard.
- Switch back to the Rss2v2.xsn instance, click in its work area, and press Ctrl+V to paste the copied elements, as shown here. Red exclamation marks indicate sections and controls that aren t bound to Data Source nodes.
- Close the Rss2v1.xsn instance.
- Scroll to the Section tab at the bottom of the form, right-click the tab, and choose Change Binding from the shortcut menu to open the Section Binding dialog box, expand the nodes, and select the channel section node, as shown here:
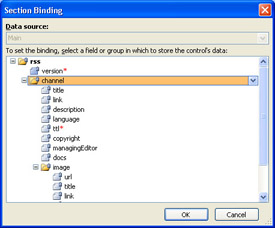
- Click OK to close the dialog box and change the binding.
- Repeat steps 6 and 7 for each channel field, the item section, and its fields. (Skip the image section node, which you add later.) Default text box values disappear when you change bindings to a node without a default value specified.
Add the missing controls and optional section
- Drag the docs node to a position under the Managing Editor text box. (Look ahead to Figure 4-12 for new control locations.)
- Drag the guid node below the item section s Link text box.
- Drag the IsPermaLink attribute node to the right of the Guid text box. InfoPath adds a check box to set IsPermaLink s xs:boolean value.
- Drag the optional image section to under the first horizontal line.
- Remove empty lines from the image section, rearrange the controls, and add another horizontal line between the image and item sections, as shown in Figure 4-12.
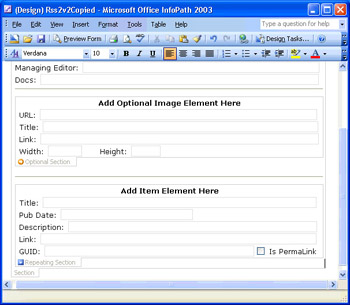
Figure 4-12: This final version of the modified Rss2v2.xsn form has design tweaks to add optional sections and controls. - Save your template as Rss2v2Copied.xsn.
- Create a test data document with a completed image section, save it as Rss2v2Copied.xml, and open the file in Notepad to verify its contents.
- Attempt to remove the only item section from Rss2v2Copied.xml. You ll receive the error message The item cannot be removed . This message indicates that InfoPath adheres to the schema s requirement of at least one item element in a form.
Using Existing XML Data Documents with a New Template
When you alter the structure of the data source for a form, InfoPath automatically updates data documents you open with the modified template. If you change the template s name , location, or both, you must manually edit existing data documents PIs to point to the renamed or relocated template.
The RssTest1.xml data document you created in the section Performing a Quick Check of the Template s Data Document, earlier in this chapter, is a good candidate for verifying that the final Rss2v2Copied.xsn schema works with earlier data documents. RssTest1.xml s PIs point to the Rss2v1.xsn template in your My DocumentsInfoPathRss2v1 folder.
To make a copy of RssTest1.xml that opens in Rss2v2Copied.xsn, follow these steps.
Change RssTest1
- Copy RssTest1.xml from your My DocumentsInfoPathRss2v1 folder to your My DocumentsInfoPathRss2v2 folder, and rename the copy RssTest1Copied.xml.
- Open RssTest1Copied.xml in Notepad, and change the value of the URL-encoded href attribute from href="file:///C:PathRss2v1Rss2v1.xsn" to href="file:/// C:PathRss2v2Rss2v2Copied.xsn".
Note Encoding URLs
Internet URLs don t permit spaces and certain punctuation marks. URL-encoding replaces restricted characters with a percent sign (%) followed by the hexadecimal code for the ASCII character. As an example, %20 is the code for a space. You won t need to change the partial Path prefix in the preceding example if you stored the files in the recommended subfolders of My DocumentsInfoPath. - Save the file with UTF-8 encoding.
- Double-click Rss2v2Copied.xml to open it in Rss2v2Copied.xsn. The optional image section is missing from the data document, as indicated by the two closely spaced horizontal lines between the channel and item sections. The expected menu button for the image section doesn t appear when you position the mouse pointer in that region.
- Right-click in the active form area to open a shortcut menu with Insert Item and Insert Image choices, as shown on the next page.
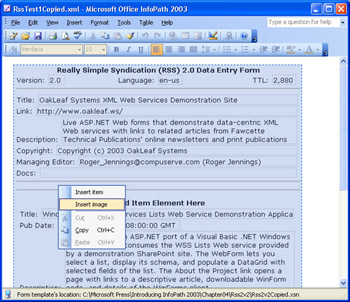
- If you want to add an optional image section to the form, choose Insert Image, and complete the section data.
Getting Rid of the my Namespace
It would be reasonable to expect that you could extract the template files and simply remove or replace the my: namespace prefix, and if replacing my: with another namespace name , change xmlns:my to xmlns:tns (or whatever) in every file. This technique works when you replace the my: namespace prefix with another prefix, but it usually doesn t work when you remove the namespace prefix. In the latter case, attempting to open manifest.xsf displays schema error messages. It s possible to manually alter the schema, but doing this is impractical for even moderately complex documents.
| Note |
Using the sample files |
Replacing the my Namespace with a Different Name
The ContactsCh4.xsn template you created in the section Starting with a New, Blank Form, earlier in this chapter, is an especially egregious example of my mania. Even the standard schema.xsd file turns into myschema.xsd when you create a data source from scratch. To remove all vestiges of my from the project (except from myschema.xsd) and replace them with tns (short for for this namespace ), follow these steps
Replacing all instances of my: in a project
- Make backup copies of ContactsCh4.xsn and ContactsCh4.xml.
- Open ContactsCh4.xml in Notepad.
- Choose Edit, Replace. In the Find And Replace dialog box, type my: in the Find What text box, type tns: (or another namespace prefix you want to use) in the Replace With text box, and click Replace All.
- Replace my in the xmlns:my declaration of the contacts element with tns, as shown here:
- Press Ctrl+S to save the modified file, and close it.
- Open ContactsCh4.xsn in design mode. Choose File, Extract Files, and extract the template files to the current folder.
- Open each extracted file, and repeat steps 3, 4, and 5. Be especially careful not to omit step 4.
- Right-click manifest.xsf, and choose Design from the shortcut menu to open the manifest file in design mode.
- Choose File, Save As, and save your file as ContactsCh4.xsn.
- Open ContactsCh4.xml to verify that your namespace changes work correctly.
Removing the my Namespace
The easiest method of removing a namespace is to create a sample XML data document, remove the namespace prefixes from it, and create a new, blank form from the document. Use the techniques from the sections Creating a Template from an XML Document and Copying a Form Design and Adding New Elements, earlier in this chapter, to create the new template and schema. The On Your Own section at the end of this chapter provides abbreviated instructions for removing namespace prefixes.
Summary
InfoPaths Data Source Wizard makes creating data sources for new form templates a quick and easy process. You can base the data source for a form on a sample XML data document or an XML schema. If you dont have a schema for your document, you can let InfoPath infer the schema or use the Microsoft XSD Inference 1.0 tool to create one. Alternatively, you can design your data source and form interactively, but starting from scratch is a more tedious and error-prone process. Designing an XML data document and its schema in the Data Source task pane adds an undesirable my: namespace prefix to the resulting document.
Dragging a data source nodeoften the first child of the root nodeto InfoPaths work area adds sections and their controls to the form automatically. If the data source is based on a data document or schema, InfoPath adds labels to the controls automatically. Depending on the forms data source, repeating groups generate repeating tables or repeating sections with controls. You can modify data sources you create from scratch or from data documents; data sources created from XML schemas are locked. You cant add, remove, or alter elements or attributes of a locked schema.
InfoPaths capability to copy and paste sections and controls from one template to another simplifies form cloning, but you must reestablish binding between form objects and their data sources.
InfoPath lets you change the namespace declaration and prefix of a form by extracting the template files and replacing the current namespace name in all documents, including any data documents you created previously. Removing a namespace usually requires creating a new template from a data document that has the namespace prefixes removed.
Q A
|
1. |
I have an XML schema and a sample data document for my form. What s the better choice for use as the data source generated by the Data Source Setup Wizard? |
|
|
2. |
Do my XML data documents require a namespace declaration? |
|
|
3. |
How do I remove the my: namespace prefix that results from adding fields to an existing form without namespace prefixes? |
|
|
4. |
Does InfoPath impose a limit on the size or complexity of a schema or form design? |
|

Answers
|
1. |
The easiest way to decide on the better approach is to try both. Schemas often include many attributes and elements that production documents don t use. A form generated from such a schema will require substantial reworking, if you don t selectively add sections and controls for the elements that you know are required. On the other hand, if the XML data document contains a wide variety of data types, using a schema eliminates the need to specify a data type for non-string elements and ensures that values entered in a form conform to the data types without the need for adding declarative validation rules or Visual Basic .NET validation code. |
|
2. |
There s no hard and fast rule regarding use of namespace declarations and namespace qualifiers for elements and attributes. As an example, RSS 2.0 documents don t use namespaces for RSS content, although namespaces are permitted to extend the document. Unless your document must be assigned a default namespace or use namespace prefixes to conform to an external requirement, stick to not in a namespace documents. |
|
3. |
Depending on the type of fields you add, you might be able to use the approach described in the section Replacing the my: Namespace with a Different Name , earlier in this chapter, with an empty Replace With text box. If that doesn t work, you re probably stuck with the more tedious process described in the section Removing the my: Namespace. |
|
4. |
There are no published limitations, but caching large, complex forms consumes a substantial amount of RAM. If InfoPath uses up your PC s RAM and uses the Microsoft Windows XP or Windows 2000 or later paging file to store cached data, you ll notice dramatically reduced performance. The UBL samples mentioned in this chapter can bring InfoPath to its knees on a Windows XP computer with 500 MB RAM. |
On Your Own
Heres an abbreviated step-by-step exercise for removing a namespace (in this case, my: ) from a form:
- Copy the ContactsCh4.xml file you created in the section Replacing the my: Namespace with a Different Name to a new folderin this example, My DocumentsInfoPathContactsNoNS.
- Replace all instances of my: with nothing (by leaving the Replace With text box empty).
- Remove the InfoPath PIs and the namespace and language attributes from the root contacts element so that it appears as < contacts >.
- Save the file as ContactsNoNs.xml with UTF-8 encoding.
- Use the Data Source Wizard to create a data source for the new template.
- Copy the form sections and controls from ContactsCh4.xsn.
- Bind the sections and controls to the appropriate groups and fields of the data source.
- Change the optional personal section to a required section.
- Create a test document to verify that the namespace prefix is gone.
Part I - Introducing Microsoft Office InfoPath 2003 SP-1
Part II - Designing InfoPath Forms
- Creating Forms
- Laying Out Forms
- Adding Basic Controls and Lists
- Formatting Forms
- Validating Form Data
- Working with Advanced Form Elements
- Adding Views to a Template
- Setting Form Template and Digital Signing Options
- Publishing Form Templates
Part III - Working with Databases and Web Services
Part IV - Programming InfoPath Forms
EAN: 2147483647
Pages: 248
- Integration Strategies and Tactics for Information Technology Governance
- Assessing Business-IT Alignment Maturity
- Linking the IT Balanced Scorecard to the Business Objectives at a Major Canadian Financial Group
- A View on Knowledge Management: Utilizing a Balanced Scorecard Methodology for Analyzing Knowledge Metrics
- Governance in IT Outsourcing Partnerships
