Connectivity, Authentication, and Privileges
This chapter covers the installation and configuration of the components required to use Crystal Reports with Oracle. The Crystal Reports Access sample database and reports are modified for use with Oracle. Different connectivity options are compared, and Oracle user IDs, authentication methods, and basic database privileges are explained. After reading this chapter, you will be able to connect to Oracle from Crystal Reports using one of seven possible methods, and you will understand the tradeoffs of those connection methods.
All connectivity discussions that follow assume Crystal Reports version 9, Oracle 9i (with differences for Oracle 8i noted), and a Windows client workstation. A direct client/server type of connection is also assumed. Connection through a middle tier or application server is not covered.
Making the Connection
Getting Crystal Reports to interface with Oracle requires two levels of drivers. At the lower level, for all connectivity options except Wire Protocol, the Oracle client (Oracle networking components) must be installed and functional. At the higher level, you can use the Crystal native Oracle OCI connection components, ODBC or OLE DB.
Database Administrator Tasks
For some of the materialized views used in the book, the database parameter Query Rewrite Enabled must be set to True:
ALTER SYSTEM SET QUERY_REWRITE_ENABLED=TRUE;
Your DBA will need to create a database role and grant it privileges as shown:
CREATE ROLE XTREME_REPORTER;


GRANT ALTER SYSTEM, CREATE MATERIALIZED VIEW
 TO XTREME_REPORTER;
GRANT EXECUTE ON DBMS_FLASHBACK TO XTREME_REPORTER;
GRANT SELECT ON V_$SESSION TO XTREME_REPORTER;
GRANT SELECT ON V_$SESSTAT TO XTREME_REPORTER;
GRANT SELECT ON V_$SQL TO XTREME_REPORTER;
GRANT SELECT ON V_$SQLAREA TO XTREME_REPORTER;
GRANT SELECT ON V_$SQL_CURSOR TO XTREME_REPORTER;
GRANT SELECT ON V_$SQL_PLAN TO XTREME_REPORTER;
GRANT SELECT ON V_$SQL_PLAN_STATISTICS TO XTREME_REPORTER;
GRANT SELECT ON V_$SQL_WORKAREA TO XTREME_REPORTER;
GRANT SELECT ON V_$STATNAME TO XTREME_REPORTER;
GRANT SELECT ON V_$SQLTEXT TO XTREME_REPORTER;
The DBA also needs to create a user named XTREME. The XTREME user must have the CONNECT and RESOURCE roles in addition to the XTREME_REPORTER role. The password for the XTREME user is assumed to be “xtreme” throughout the book, but it can be anything you desire. The XTREME schema will be used as the Oracle incarnation of the Crystal Reports Xtreme Access database:
CREATE USER XTREME IDENTIFIED BY XTREME;
GRANT CONNECT, RESOURCE, XTREME_REPORTER TO XTREME;
GRANT QUERY REWRITE TO XTREME;
Text files containing these commands are available in the download files for the book at Chapter 1XTREME DBA Script.sql and XTREME DBA Script 8i.sql.
Installation of Oracle Components
The following instructions will install the Oracle client, the Oracle ODBC driver, and the Oracle OLE DB provider.
Oracle Client
The Oracle client software or networking components are usually installed either by the DBA or systems administrator or as part of an Oracle-based application. An installation will be described here, but other installation methods are possible. In addition to the networking components, the following discussion will explain the installation of the Oracle OLE DB provider and the Oracle ODBC driver. Neither of these drivers is recommended for use with Crystal. Their installation is included if you wish to compare them to other drivers.
The Oracle tool SQL*Plus is used in some sections of the book and will be installed along with the networking components. SQL*Plus or some other tool that enables the user to execute SQL and PL/SQL is required for testing of queries and creating backend objects to optimize report writing. No serious Oracle report writer should consider development without access to such a tool.
For installation and verification of the Oracle client, you will create an Oracle service name, also called the TNS name. You will need to know the host name and port number of the Oracle database that you will connect to, along with the user ID and password you should use for the Xtreme user in order to create the TNSnames.ORA file.
The installation described in this chapter uses the Oracle 9i Database, release 2 for Microsoft Windows NT/2000/XP, set of three CDs. Alternatively, the client files can be downloaded from technet.oracle.com or may be supplied on a separate client-only CD.
Insert CD 1 of 3 and run setup.exe if it does not launch automatically. From the Welcome screen, select Next and you will see Figure 1-1. Choose Next.
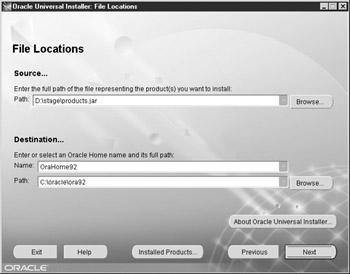
Figure 1-1: File locations
You will then see the product options shown in Figure 1-2. The options may differ if you are not using the Database CD. Choose the Client option and click Next. Choose Runtime and click Next.
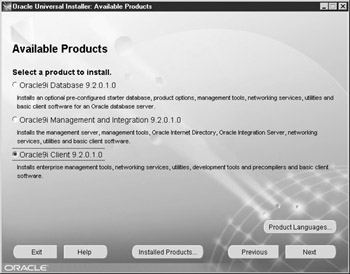
Figure 1-2: Available products
You will see a Summary screen listing the components that will be installed. Click Install, and the screen in Figure 1-3 will appear.
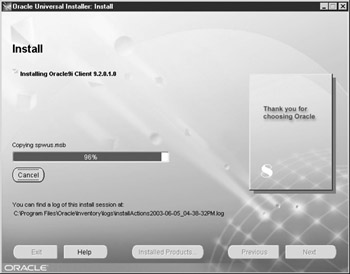
Figure 1-3: Install screen
During this stage, you may be asked to insert another disk. When the install completes, the Net Configuration Assistant will start, as shown in Figure 1-4.
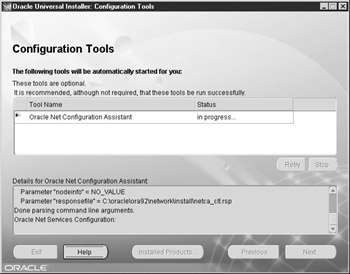
Figure 1-4: Configuration Tools screen
On the Oracle Net Configuration Welcome screen, choose No and then Next to create the Oracle service name. See Figure 1-5. If your environment uses a directory service, consult your DBA for setup instructions.
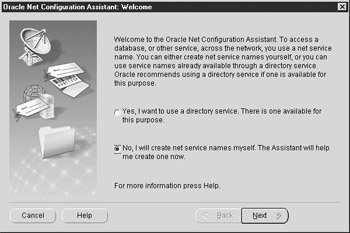
Figure 1-5: Net Configuration Welcome screen
On the Database Version screen, choose 8i or Later Database or Service and click Next. Enter the service name of the Oracle database that you want to use for the sample database for the book. This should be the global database name including the Oracle domain, such as Ora92.StageLink. Click Next. Choose TCP as the network protocol and click Next. Enter the host name of the database server, verify the port number (the default of 1521 is provided), and click Next. On the Test screen, select Yes to perform a test. If the test does not succeed and you see a screen like Figure 1-6, choose Change Login, and enter Xtreme for the username and password.
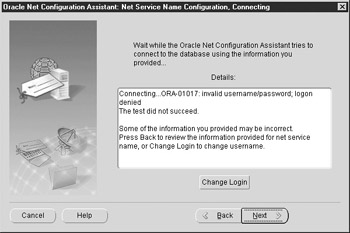
Figure 1-6: Connecting failed
Select OK, and you should see the successful login screen as shown in Figure 1-7. If the test is still unsuccessful, click Back to verify the selections you have made in each of the screens.
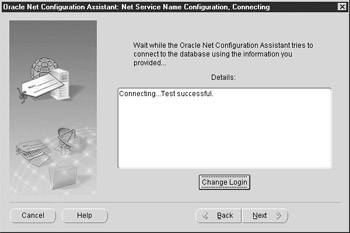
Figure 1-7: Connecting successful
Choose Next and set the Net Service Name to ORA. ORA is used throughout the book and in the supplied Crystal Reports. Creating your TNS Name as ORA will allow you to use the supplied reports without needing to change the data source location.
Choose Yes to configure a second Net Service Name. This second name is used in some reports in the book. Complete the dialogs exactly as you did for ORA, but set the Net Service Name to ORA2. Then choose No when you’re asked if you need to configure another Net Service Name. Continue choosing Next until you reach the screen with the Finished button. Click Finished. Back in the Universal Installer, choose Next. When you see the screen in Figure 1-8, choose Exit.
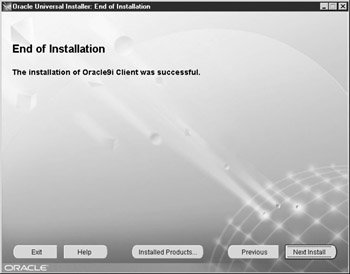
Figure 1-8: End of Installation screen
You have completed the Oracle client installation. You should now verify that you can log in to ORA as the user Xtreme from SQL*Plus.
Installation of the client for Oracle 8i is very similar, although some screens may differ slightly.
Oracle ODBC
To install the Oracle ODBC driver, download the most recent version of the Oracle ODBC drivers for your database version from technet.oracle.com. The book uses ora9204.exe for Oracle 9i and ora8178b.exe for Oracle 8i. Unzip the file to a temporary folder. Go to Start | Programs | Oracle Installation Products | Universal Installer. From the Welcome screen, choose Next. Browse to the location where you unzipped the files. Continue browsing down the path to stageDisk1stageproducts.jar, as shown in Figure 1-9. Choose Next.
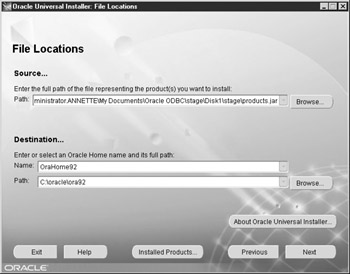
Figure 1-9: File locations for ODBC installation
The summary screen will be displayed. Choose Install. The Install screen will appear and when the install is finished, you will see the End of Installation window. Choose Exit.
Installation steps for the 8i ODBC driver are identical.
Oracle OLE DB
To install the Oracle OLE DB drivers, download the most recent version of the Oracle OLE DB Provider for your database version from technet.oracle.com. OraOLEDB_81730.zip and OraOLEDB_92020.exe are used in this book. Uninstalling older versions of the OLE DB provided is recommended before installation of the new versions.
For Oracle 9i, unzip the download file. It will unzip into the same directory where the zip file resides. Under that directory, run Disk1InstallWin32setup.exe. The Universal Installer will run with the correct path already listed in the box, as shown in Figure 1-10. Choose Next. On the Summary screen, choose Install. The progress bar will be displayed, and finally, the End of Installation screen will appear. Choose Exit, and the installation will be complete.

Figure 1-10: OLE DB file locations
For Oracle 8i, unzip the download file into a temporary directory. From the temporary directory, run installwin32setup.exe. The rest of the installation is similar to the 9i installation just discussed.
Installation of the Crystal XTREME Sample Data
Crystal Decisions distributes an Access database and sample reports with the Crystal Reports application. The database contains data for a fictional company called Xtreme Mountain Bikes, Inc., which will be used as the data source for the sample reports. For use with this text, the sample data has been uploaded to Oracle, and the sample reports have been revised to point to the XTREME schema. Two methods for uploading the data from Access to Oracle are described in this section.
Dump File Method
Dump files containing the Xtreme database can be found in the download files. The filename is XTREME92.DMP for the Oracle 9i version and XTREME817.DMP for the Oracle 8i version. To import the Xtreme data to your Oracle database, you will need to execute the following statement at a system command prompt or from Start | Run:
IMP xtreme/xtreme@ora FILE=xtreme92.dmp
This statement assumes that the Xtreme user’s password is xtreme, your database service name is ORA, and the XTREME92.dmp file is located in your root directory. You should modify the password, TNS name, and file path and name as needed for your environment.
Upload Method
The dump files are large, so an alternative method for obtaining the sample data is provided here. The alternative involves uploading the sample data from the Crystal- supplied Access database. This method will upload only the data originally supplied with Crystal Reports.
Create Schema Objects
The first step is to create the schema objects, which you will populate with data from the sample Access database. Log in as the Xtreme user and run either Chapter 1XTREME Objects for Oracle 9i.sql, or XTREME Objects 8i.sql for Oracle 8i databases. The schema objects will be created.
Populate Schema Objects
Open the sample Access database that is installed with Crystal Reports at C:Program FilesCrystal DecisionsCrystal Reports 9Samples EnDatabasesxtreme.mdb. To create database links to the Oracle tables, choose File | Get External Data | Link Tables. In the Files of Type box, choose ODBC. Choose the Oracle ODBC connection. Note that even if you have already installed the Crystal ODBC drivers for Oracle, they will not work for this task (they are licensed for use only from Crystal Reports). Log in as Xtreme. Choose the Credit, Customer, Employee, Employee_Addresses, Financials, Orders, Orders_Detail, Product, Product_Type, Purchases, Supplier, and Xtreme_Info tables, and links will be created.
Once the links are created, choose New Query. Select Simple Query Wizard, and pick the Employee table in the Tables/Queries drop-down box. Move all fields from Available Fields to Selected Fields as shown here:

Click Next, leave the Detail radio button selected, and choose Next. Name the query Employee Upload Query and select the Modify Query Design radio button. Click Finish. When the query design appears, choose Query | Append Query and select XTREME_EMPLOYEE in the drop-down (XTREME_EMPLOYEE is the name that has been given to the linked Employee table in the Oracle XTREME schema). Click OK. On the Employee Upload: Append Query screen, you may notice that some Append To fields are missing. These fields are not shown when the Oracle field name does not match the Access field name due to embedded spaces. For each missing Append To field, select the proper Oracle field from the cell’s drop-down box as shown in the following illustration:
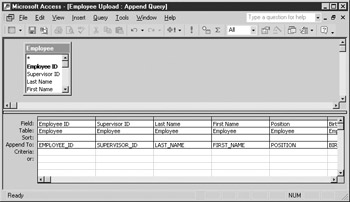
Run the query to upload the Employee records from Access to Oracle.
Repeat this process for each linked table in this order: Employee, Employee_Addresses, Product_Type, Product, Supplier, Customer, Credit, Financials, Purchases, Orders, and Orders_Detail.
The Orders and Purchases tables have fields defined as Booleans, which are uploaded to Oracle as 0 for False and -1 for True. The convention used in the book is 0 for False and 1 for True. To modify the fields, run the following update queries:
UPDATE ORDERS SET Shipped=1 WHERE Shipped=-1;
UPDATE ORDERS SET Payment_Received=1 WHERE Payment_Received =-1;
UPDATE PURCHASES SET Received=1 WHERE Received =-1;
UPDATE PURCHASES SET Paid=1 WHERE Paid =-1;
Populate Book-Only Objects
A few of the objects in the XTREME schema were added to demonstrate various capabilities for this book. To populate them, run the Chapter 1Populate Book Objects.sql script.
Sample Xtreme Reports
The sample reports provided with Crystal Reports were converted to use the native Oracle driver and the Oracle TNSname, ORA, and are available with the download files for the book at Chapter 1Crystal Sample Reports.
Installation of the Crystal Data Access Components
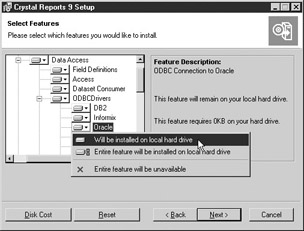
The Crystal Data Access components required for using Oracle as a data source for reports can be installed during the original installation of Crystal Reports, or they can be installed later via the Control Panel | Add/Remove Programs | Crystal Reports option. In either case, you will be presented with the Crystal Reports 9 Setup dialog box. In the Setup dialog, expand the Data Access folder. Under the ODBCDrivers folder, verify that Oracle is set to install to the hard drive (shown next). This will install the Crystal ODBC drivers for Oracle.
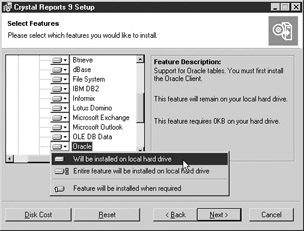
In addition, verify that Oracle and OLE DB Data are also set to install to the hard drive. (See the following illustration.) This will ensure that the DLLs required for native access and access via OLE DB from Crystal Reports are installed.
Continue clicking Next until the install completes.
Configuration of the Native Oracle OCI
Crystal Reports supports what it calls “native” Oracle connections via its Native Oracle OCI Connectivity driver. This type of connection from Crystal makes calls directly to the Oracle Call Interface or OCI.DLL, bypassing the extra layers imposed by ODBC or even OLE DB connections. The native connection has many benefits over OLE DB or ODBC connections and should be used where possible, unless there is a specific reason to prefer one of the other connection types. A comparison of the benefits of each connection type is shown later in this chapter in Table 1-1. For Crystal Reports version 9, the Oracle client must be version 8.0.6 or later to support the native connection type.
|
|
|---|
To create a native connection, execute the following steps:
- From Crystal Reports, open the Database Expert.
- Expand the Create New Connection folder.
- Open the Oracle Server folder.
- Fill in the TNS name of your database in the Service field, enter your user ID and password, and then click the Finish button.
- Your connection will open and a list of the database schemas that your user ID can access will appear as folders.
Expanding a schema folder will display the object type folders under which the tables, views, synonyms, standalone stored procedures and packages belonging to the schema are listed.
OLE DB
To use OLE DB, an OLE DB Provider must be installed on your system. Two possible OLE DB Providers will be discussed, the Oracle OLE DB Provider, whose installation was covered in a preceding section, and the Microsoft OLE DB Provider for Oracle. The Microsoft OLE DB Provider should be installed as part of the Microsoft Data Access Components or MDAC.
To create an OLE DB connection, execute the following steps:
- Open the Database Expert.
- Expand the OLE DB (ADO) folder.
- Scroll to the Oracle Provider for OLE DB, or choose the Microsoft OLE DB Provider for Oracle and click Next.
- Enter the necessary connection information and click Finish. The Data Source textbox should be filled in with the TNS name of the Oracle database you wish to connect to.
- The connection will be made and schemas that you have access to will be displayed.
ODBC Connection Setup
To use ODBC connectivity from Crystal Reports, two configuration steps are required. First, an ODBC Data Source Name (DSN) must be created using the ODBC Administrator. Second, a Crystal data source that uses the ODBC DSN must be created.
DSN Creation
DSN creation for several different Oracle ODBC drivers will be covered. Note that each is an ODBC driver for Oracle; they are simply supplied by different vendors.
Crystal ODBC for Oracle
The Crystal Reports ODBC driver was installed with the Crystal Reports product as discussed previously. This driver is owned and developed by DataDirect and is licensed for use with Crystal Reports. It is not usable outside of Crystal Reports.
To configure an ODBC Data Source Name for the Crystal ODBC driver, execute the following steps:
- Open the ODBC Data Source Administrator, which may be accessed from the Control Panel or Control Panel | Administrative Tools, depending on your version of Windows.
- You may configure a User DSN, a System DSN, or a File DSN. A User DSN will be available only to you. A System DSN will be available to anyone logged on to the system where it is defined. A File DSN stores the connection information in a text file that may be copied readily from computer to computer. For the example, you will set up a System DSN. Choose the System DSN tab. Choose Add.
- Scroll to the CR Oracle ODBC Driver 4.10. This is the Crystal Reports ODBC driver for Oracle.
- Click Finish and enter your choice of a Data Source Name and Description, and the TNS name for the database you wish to connect to in the Server Name box. See Figure 1-11.
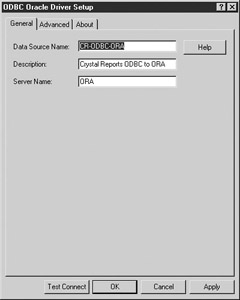
Figure 1-11: Crystal Reports ODBC DSN - Click Test Connect. A logon box will appear.
- Enter your username and password and click OK to test the connection.
- Click OK to return to the ODBC configuration. Choose OK again and your DSN will be created.
Oracle ODBC
To set up an Oracle ODBC DSN, execute the following steps:
- From the ODBC Administrator, choose the System DSN tab. Then choose Add.
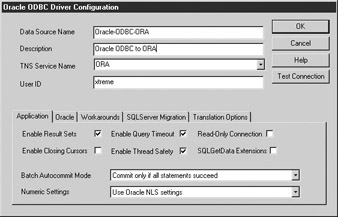
- Scroll to the Oracle in [OracleHome] driver name, where [OracleHome] is your Oracle Home directory. Click Finish. The Oracle ODBC Driver Configuration dialog box will appear.
- Enter your desired Data Source Name and Description. From the TNS Service Name drop-down box, choose the service that you wish to connect to. Enter your User ID. Your screen should be similar to the following illustration. Click Test Connection.
- A logon box will appear. Enter your password and click OK.
- The connection will be tested. Click OK to return to the ODBC Administrator, and click OK again. Your DSN will be created.
Microsoft ODBC
To set up a Microsoft Oracle ODBC DSN, execute the following steps:
- From the ODBC Administrator, choose the System DSN tab. Then choose Add.
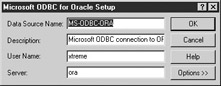
- Scroll to the Microsoft ODBC for Oracle driver name. Click Finish. The Microsoft ODBC for Oracle Setup dialog box will appear.
- Enter your desired Data Source Name and Description, your User ID in the User Name box, and the service that you wish to connect to in the Server box. Click OK, and your DSN will be created. There is no Test Connection capability. See the following illustration for an example:
Crystal Wire Protocol ODBC for Oracle
To set up a Crystal Wire Protocol ODBC DSN, execute the following steps. Note that installation of the Oracle client is not required when using the Wire Protocol driver.
- From the ODBC Administrator, choose the System DSN tab. Then choose Add.
- Scroll to CR Oracle Wire Protocol ODBC Driver. Click Finish. The ODBC Oracle Wire Protocol Driver Setup dialog will appear.
- Enter your desired Data Source Name and Description and the IP address or host alias for the machine where the database resides in the Host box. If the port differs from the default of 1521, enter the correct value. Enter the database name in the SID field, as shown in Figure 1-12.
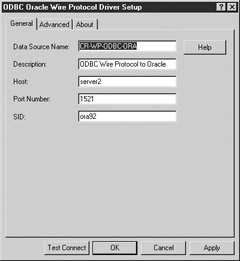
Figure 1-12: Wire Protocol DSN - Click Test Connect.
- Enter your username and password and click OK. Your connection will be tested.
- Click OK, and your DSN will be created.
Crystal Connection Setup
Once the ODBC DSNs are created, Crystal connections can be configured. The Crystal-side configuration is the same for all ODBC drivers.
To connect to Oracle from Crystal Reports using ODBC, execute the following steps:
- From the Database Expert, under Create New Connection, choose ODBC (RDO).
- Select the Select Data Source radio button and find the DSN that you created in the previous section.
- Enter your user ID and password and click Finish.
- The connection will be opened, and the list of schemas to which you have access will be displayed.
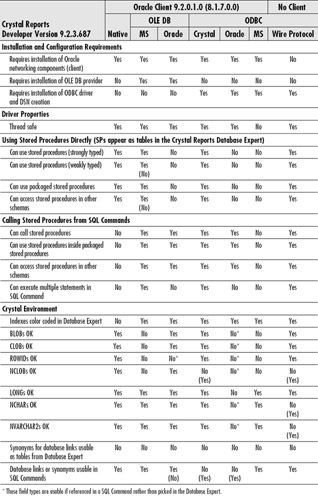
Choosing a Connection Method
As just described, there are several ways to connect to Oracle from Crystal Reports. Table 1-1 lists different capabilities and requirements for seven different connection types; note that results may differ depending on your environment. In addition, the table is specific to the stated versions of each piece of software or middleware, and the capabilities can be dependent upon driver settings. These settings are noted where known.
If you need to make a decision about which type of access to use, you should determine the required capabilities and test the various connection methods in your own particular environment. You should also measure response time, which varies dramatically across the various connection types.
Before doing extensive tests, you should be aware that the most recent service packs or hot fixes for Crystal Reports are available from www.crystaldecisions.com. You will be warned that the hot fixes have not been through a full QA regression test and must decide for yourself whether to take the risk in using them. Updates for the Oracle components can be downloaded from technet.oracle.com.
Other notes concerning various drivers are
- For the Crystal ODBC drivers, both regular and Wire Protocol, stored procedures owned by other users will be displayed in the Database Expert only if the ODBC Advanced option Use Current Schema for SQL Procedures is unchecked. The downside to unchecking this option is the increase in time required to open the Database Expert. I have seen it take 40 minutes in my test environment.
- When using the Crystal-supplied ODBC drivers, you must verify that the Advanced option Procedure Returns Results is checked if you plan to use stored procedures.
- For the Oracle ODBC driver and OLE DB Provider, stored procedures can be called from SQL Commands using the {Call …} syntax with the Oracle 9i provider, but not using the BEGIN … END, anonymous block syntax.
- When using the Microsoft OLE DB provider with stored procedures, it is vital that you give each column an alias in the SELECT query that defines the REF Cursor.
- You may receive an error stating that the table does not exist when refreshing reports that use stored procedures and an OLE DB provider. Answer No when asked if you want to delete the table, and the report will run as expected.
- When writing stored procedures, never return datatypes that the particular connection method you are using does not support.
- To access stored procedures owned by other users, you must have the EXECUTE privilege for the stored procedure.
- Crystal will truncate some of the Oracle string types. CLOBs and NCLOBs will be truncated at 64K bytes and Longs will be truncated at 4000 bytes.
- Object columns, nested tables, and varrays cannot be used directly with Crystal Reports, but workarounds exist and are discussed in subsequent chapters.
The Crystal Data Access Component drivers installed with Crystal Reports or via a hot fix or service pack for Crystal Reports and used in Table 1-1 are
- Native: crdb_oracle.dll, version 9.2.1.116
- OLE DB: crdb_ado.dll, version 9.2.0.517
- ODBC: crdb_odbc.dll, version 9.2.1.593
The other required OLE DB or ODBC drivers used in Table 1-1 are
- MS OLE DB: MDAC 2.7
- Oracle OLE DB: oraoledb.dll, version 9.2.0.2 (8.1.7.3 for Oracle 8i)
- Crystal ODBC: cror818.dll, version 4.10.0.4
- Oracle ODBC: sqora32.dll, version 9.2.0.4.0 (8.1.7.8.0b for Oracle 8i)
- MS ODBC: msorcl32.dll, version 2.573.9030
- Crystal Wire Protocol ODBC: crora18.dll, version 4.10.0.4
Note that table values shown in parentheses are the Oracle 8i values where they differ from the 9i values.
Note that for the Oracle ODBC driver, other combinations of software versions have fewer problems. With the particular combination listed in Table 1-1, an error is generated as soon as Crystal Reports attempts to list the field names. Older Crystal Reports hot fix versions such as 9.2.3.666 do not have this problem.
Crystal Database Options
Crystal Reports maintains a set of database options. To see the options, right-click any data source in the Database Expert and choose Options. A window similar to Figure 1-13 will be displayed.
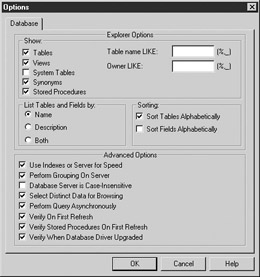
Figure 1-13: Database Options
The Database Options settings apply to every data source, but the effect of the settings may differ between connectivity types. For instance, leaving System Tables unchecked for the Crystal ODBC driver will result in the SYS and SYSTEM schema being excluded from the Database Explorer lists, but it has no impact on the native driver, which shows the SYS and SYSTEM schemas regardless of this setting. You should set the Explorer Options section according to your preferences.
Advanced Options
The settings in the Advanced Options section can be used to fine-tune some performance characteristics. These settings are global settings that may be overridden for individual reports using the File | Report Options dialog.
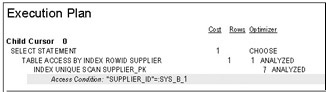
Use Indexes or Server for Speed
This option is checked by default. Unchecking it will cause a reduction in performance because appropriate indexes will not be used, so make sure that this option is checked. The following illustration shows a SQL execution plan if you check Use Indexes or Server for Speed.
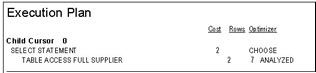
The next illustration shows the execution plan for the same SQL statement if Use Indexes or Server for Speed is not checked for the report.
Perform Grouping on Server
The Perform Grouping on Server option is not checked by default and cannot be checked unless Use Indexes or Server for Speed is also checked. This setting corresponds to the Database | Perform Grouping on the Server menu option, but the menu option is at the individual report level and overrides the setting at the Database Options level. Checking this option controls whether or not Crystal will create an aggregate query when all detail sections are suppressed. You should check this option for Oracle databases.
Database Server Is Case-Insensitive
This setting has no affect on Oracle databases.
Select Distinct Data for Browsing
The Select Distinct Data for Browsing option controls the creation of the queries used to return field-browsing lists, such as in the Select Expert. The queries are always written to return 500 records. If this option is checked, the query will be a distinct query, and up to 500 distinct values will be listed. If this option is not checked, the first 500 records will be returned and the browse list will contain the distinct values contained in those records.
This setting has no impact on actual report performance because it applies only during the development of reports.
Perform Query Asynchronously
Perform Query Asynchronously is not checked by default. Checking it allows Crystal Reports to halt query execution if requested by the user.
Verify on First Refresh
Verify on First Refresh should be checked so that Crystal will verify the record structure the first time a report is run.
Verify Stored Procedures on First Refresh
Verify Stored Procedures on First Refresh should be checked so that Crystal will verify the record structure of the REF Cursor for stored procedures when a report is first run.
Verify When Database Driver Upgraded
This option should also be checked so that the database is verified if the driver is changed.
User IDs and Schemas
New Oracle users are sometimes confused by the concepts of User_IDs versus Schemas. Every Oracle User_ID that is a Database User_ID has a corresponding schema. The schema is a logical storage place for the user’s objects, and its name is the same as the User_ID. Therefore, for user MARY, there is a MARY schema. If MARY has the RESOURCE privilege, she can create a table in her schema. If MARY creates a table called TAB1 in her schema and grants user JOE the SELECT privilege on it, JOE would access it as MARY.TAB1.
In most report-writing environments, users will not be reporting on objects in their own schemas. They may not even be allowed to create objects in their own schemas. They will most likely be reporting on objects in various schemas that were created specifically to hold an application’s objects.
Of course, there are exceptions. An application may be written to create a set of objects for each user in each user’s schema. The difficulties in reporting in such an environment are discussed in Appendix A. In the newer versions of Oracle, there can also be lightweight or proxy User_IDs. Such User_IDs do not have their own schemas; they share a schema or schemas.
Authentication Methods
Oracle allows several types of authentication. The most straightforward is when the user has an ID with a password created in the Oracle database. If your database uses this type of authentication, you will be given both a user ID and password to use for Oracle access. The other methods of authentication allow Oracle to rely on an external provider for authentication. This could be the operating system, an LDAP directory, or some other method. If any of these authentication methods are being used, check with your DBA for logon instructions. In the case of OS authentication, you would log on with either a slash (/) or a null for the username, depending on the driver, and a null password. Your credentials will then be verified with the operating system and you will be logged on.
Oracle logons are case insensitive. If your user name is XTREME, you may successfully log on as xtreme, Xtreme, or XTREME. Passwords are also case insensitive.
Database Privileges
There are two main types of privileges in Oracle: system privileges and object privileges. For reporting, you will be most concerned with object privileges that govern which tables, views, and stored procedures you can see. To access a table or view from Crystal Reports, you must have the SELECT privilege for the table or view. You do not need the UPDATE, INSERT, or DELETE privilege. To access stored procedures, you will need the EXECUTE privilege for the stored procedure.
To simplify the maintenance of privileges, Oracle uses roles. A role can be created and then granted a set of privileges. A user ID can then be granted the role. For instance, there may be a role called Reporters, and each report developer will be granted the Reporter role rather than privileges on individual objects.
In addition, you will have all privileges for any objects in your own schema—that is, the schema that matches your user ID.
Connection Options Used in Book
All examples in the rest of the book use a native connection to Oracle 9i except where noted. All examples have been tested for Oracle 9i (9.2) and Oracle 8i (8.1.7), with both native and Crystal Oracle ODBC connectivity using the driver versions listed in Table 1-1. Issues with any of the four combinations are noted.
EAN: N/A
Pages: 101
- Structures, Processes and Relational Mechanisms for IT Governance
- Measuring and Managing E-Business Initiatives Through the Balanced Scorecard
- Technical Issues Related to IT Governance Tactics: Product Metrics, Measurements and Process Control
- Managing IT Functions
- Governing Information Technology Through COBIT
