Setting Form Template and Digital Signing Options
Highlights
In this chapter, you will learn how to
- Enable form protection
- Disable InfoPath design mode during installation of InfoPath 2003 on users computers
- Restrict users from merging or submitting forms
- Prevent users from saving, exporting, printing, or e-mailing data documents
- Remove unneeded fields from new forms
- Add digital signatures to entire data documents or parts of documents with a Client Authentication certificate
- Add custom HTML task panes to forms, specify how InfoPath handles form upgrades, specify the script programming language, and export a version of the form for users who do not have Microsoft InfoPath 2003 SP- 1 installed
Overview
For more information
- See Windows 2000 Certificate Services and PKI, Chapter 16 of the Microsoft Windows 2000 Server Resource Kit . Search for Web enrollment on www.microsoft.com , and click the link under the Technical Resources heading.
- See the topic Certification Authority Web Enrollment Services in the Windows 2000 Server documentation. Click the More Technical Resources Results link to display the link to this topic. Both articles apply to Microsoft Windows Server 2003.
To work through this chapter
- You should have installed in your C:Microsoft PressIntroducing InfoPath 2003Chapter11 folder the sample files from the CD that accompanies this book.
- You need an Internet connection to submit forms by the HTTP POST protocol to the OakLeaf Web site.
- You should have some experience with the use of digital certificates for authenticating documents, such as e-mail messages.
- You must have a commercial Client Authentication certificate that supports digital document signing or access to a Microsoft Windows 2000 or later certificate server from which you can obtain a Client Authentication certificate and, if the certificate server isnt in your Trusted Certificate Authorities list, access to the certificate servers certificate (.crt) file.
The Form Options dialog box is a catchall for setting form design properties that arent accessible through menu options or task panes. This chapter shows you how to use features on the dialog boxs General, Open and Save, Digital Signature, and Advanced tabs. Chapter 12, Publishing Form Templates, will show you how to configure settings on the Form Options dialog boxs Security and Form Library Columns tabs.
Enabling Form Protection
After spending a few hours designing and testing a new or modified form for production, you certainly don t want users to be able to alter the template at will by clicking the Design This Form button or choosing Tools, Design This Form and opening the form s template in design mode. When you publish your template to a server share, to an Internet Information Services virtual directory on your company s intranet, or to a Windows SharePoint Services site, unauthorized template changes affect all users of the production form.
| See Also |
The sections Sharing Templates from a Network Folder and Publishing Templates to an Intranet Site in Chapter 12 will cover deployment of URL-based, untrusted ( sandboxed ) or fully trusted, digitally signed templates to server shares and intranet Web servers. These two sections will also show you how to secure shared templates against user modification. |
To rein in users who are tempted to modify a form s template, choose Tools, Form Options to open the Form Options dialog box with the General tab displayed. Select the Enable Protection check box, as shown in Figure 11-1, and click OK to save your changes. Form protection disables the Design This Form toolbar button and the Tools, Design This Form menu option.
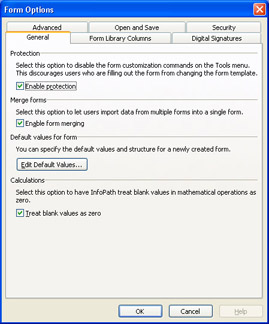
Figure 11-1: Selecting the Enable Protection check box on the General tab of the Form Options dialog box is the first step in protecting templates against modification by users.
| Note |
Testing the Enable Protection feature |
Form protection doesn t prevent users from attempting to modify the template. Users must have Read access to the shared template file, which requires at least Read permission for the server share, shared folder, and .xsn file. This means that users can open the .xsn file, regardless of whether they have permission to save changes to the file. Anyone opening a protected .xsn file receives the warning shown in Figure 11-2.
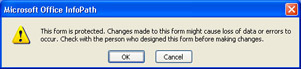
Figure 11-2: This warning message appears when anyone (including you) opens a protected template on the local computer or from a server.
Disabling InfoPath Design Mode
If your organization has acquired InfoPath as part of Microsoft Office Professional Enterprise Edition 2003, you can request that InfoPath be installed on users computers with design mode disabled. Step 10 of the Microsoft Office 2003 Custom Installation Wizard s process displays a dialog box for setting individual installation options for all Office System 2003 applications. Figure 11-3 shows the expanded Microsoft InfoPath 2003 node with a Miscellaneous subnode. This subnode has a single setting ”Disable InfoPath Designer Mode.
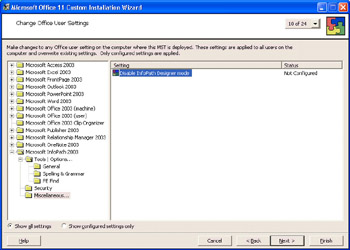
Figure 11-3: The Disable InfoPath Designer Mode setting is accessible in step 10 of the Office System 2003 installation configuration process.
Double-clicking the setting item opens the Disable InfoPath Designer Mode Properties dialog box. Selecting the single check box and selecting the Apply Changes option, as shown in Figure 11-4, and then clicking OK disables design mode for all users who have InfoPath installed with this configuration.
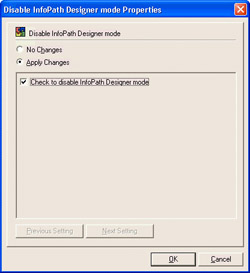
Figure 11-4: These settings disable design mode for Office System 2003 installations that use this wizard configuration.
| See Also |
To learn how to emulate the registry change that the Custom Installation Wizard makes to disable design mode, see the section Disabling Design Mode for Deployed Fully Trusted Forms, in Chapter 12. |
Controlling Merging and Form Submission
The General tab of the Form Options dialog box has an Enable Forms Merging check box that s selected by default. If your form isn t designed specifically for merging, clear the check box to prevent users from inadvertently or deliberately merging data documents. As examples, RSS 2.0 data documents you create with Rss2v4.xsn are designed for merging, but merging is totally inappropriate for documents you create with the Northwind Order Entry form examples. Clearing the Enable Forms Merging check box disables the File, Merge Forms menu option in data entry mode.
Submitting forms to SharePoint form libraries, databases, and XML Web services are advanced topics that are covered in later chapters, but you should be aware of another restriction that you can apply to forms ”specifying how users can submit a form. You specify submission options by choosing Tools, Submitting Forms to open a dialog box of the same name , which offers the following selections in the Submit To list:
- SP-1 E-Mail Opens the Message dialog box specified by the selected data connection and sends the data document as an e-mail attachment to the named recipients
- SP-1 Web Service Sends updated form content to an XML Web service method that s designed for receiving data
- SharePoint Form Library Sends the data document to an existing form library of a Windows SharePoint Services site to which the form s template has been published
- Web Server (HTTP) Sends the form to a Web page that accepts HTTP POST operations
- Custom Submit Using Form Code Specifies a Microsoft JScript, Visual Basic Scripting Edition (VBScript), or Visual Basic .NET event handler for the OnSubmitRequest event that s triggered when users click the Submit button or choose File, Submit
- Custom Submit Using Rules Lets you specify rules that select one or more data connections to use for form submission, depending on conditions you apply to the rules.
The Do Not Enable Submit option, which disables the File, Submit menu option in data entry mode, is the default selection.
| See Also |
Chapter 12, Publishing Form Templates, covers submitting forms to SharePoint form libraries, because you must publish the template to create the library before you can submit a form to it. Chapter 13, Connecting Forms to Databases, and Chapter 14, Designing InfoPath Web Service Clients cover submitting forms to databases and XML Web services. These operations require enabling submissions. |
Submitting a Form Through HTTP
You can submit a form to a Web page that processes HTTP POST operations. The protected version of the RSS 2.0 form (Rss2v4Prot.xsn) has HTTP POST submission enabled. A simple ASP.NET Web page at www.oakleaf.ws/ipsubmit/ipsubmit.aspx accepts the POST submission. A production version of this page might automatically update your intranet or Internet Web server s rss.xml file.
To explore form submission options and test the submission process, follow these steps.
View submission options and submit the RSS 2.0 form
- Navigate to your C:Microsoft PressIntroducing InfoPath 2003Chapter 11Rss2V4 folder, and open the Rss2v4Prot.xsn template in design mode. Click OK to dismiss the protection warning message.
- Choose Tools, Submitting Forms to open the Submitting Forms dialog box. As you can see, the Enable Submit and Submit Through HTTP options are selected, the URL for the OakLeaf submission page is provided, the Enable The Submit Menu Item On The File Menu check box is selected, and a modified menu caption is provided:
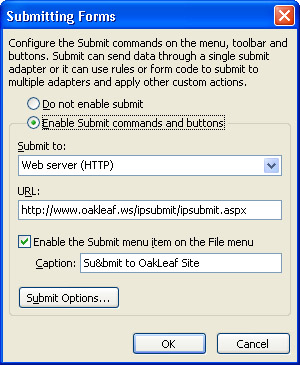
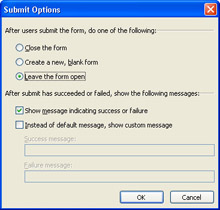
- Click the Submit Options button to open the eponymous dialog box with the default options selected, as shown here. (If you substitute a custom message, the Details button shown in step 6 doesn t appear in the Success Message box.)
- Click OK twice to close the two dialog boxes, and then click Preview Form.
- Click the Submit To OakLeaf Site button or choose File, Submit To OakLeaf Site to post the data document to the Web server. The following message box will appear, indicating that the POST operation succeeded:

- Click the Show Details button to display the posted data in a browser window, as shown here:
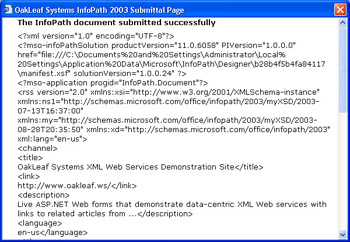
The processing instructions reflect the location of a temporary copy of the manifest.xsf file ”not the .xsn file ”in a subfolder of your Documents and Settings folder. (This is your only opportunity to see the modification to the processing instructions for previews.)
- Close the browser window and the preview.
- Choose Tools, Submitting Forms, and select the Do Not Enable Submit option to disable the remaining dialog box controls.
- Open a second preview window, and verify that the Submit menu option is disabled.
- Close the preview window and InfoPath without saving your changes.
| Note |
Creating your own ASP.NET page for POST operations |
Submitting a Form Through E Mail
Submitting a form through e-mail is similar to sending a form as an e-mail attachment but requires defining a data connection for the transmission. One advantage of submission over sending is that the template stores the recipient, subject, and comment information so that users don t need to type the information each time they submit the form. Another benefit of e-mail submission is the option to use the Insert Formula dialog box to insert e-mail addresses and add other transmission- related data from form field values. You must have Microsoft Office Outlook 2003 installed on your computer to submit a form through e-mail.
To give the Data Connection Wizard s e-mail submission feature a try, follow these steps.
Create a data connection and submit the form by e-mail
- Open the Rss2v4Mail.xsn template in your ...Rss2v4 folder in design mode, choose Tools, Submitting Forms Options to open the dialog box bearing the same name, select the Enable Submit option, and accept the default E-Mail selection of the Submit list.
- Click the Add button to open the Data Connection Wizard for e-mail form submission, and complete the form with To, Cc, Bcc, Subject, Introduction, and Attachment Name data, as shown here:
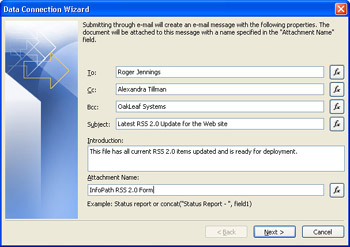
If your form has fields containing e-mail addresses or other information for the connection fields, click the Insert Formula ( f x) button to the right of the corresponding text box, and specify the field name with the appropriate value.
- Click Next , type a Name for the data connection, such as Rss2v4 E-Mail Submit, and click Finish to complete the wizard. In the Submitting Forms dialog box, add by E-Mail to the caption, as shown here:
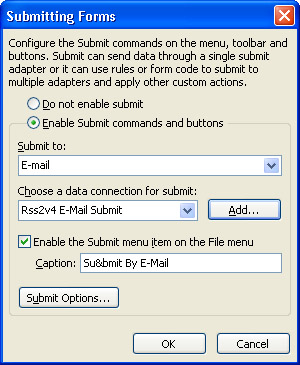
- Click OK to close the dialog box and create the data connection, open a form preview window, and click the Submit By E-Mail button to open the Subject -Message dialog box. Place the insertion point in the Attachment description to enable the View Attachment button, as shown here:
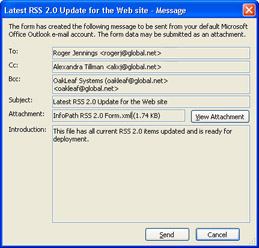
(E-mail addresses in this section s figures are fictitious.)
- Click OK to acknowledge the successful transmission. Outlook 2003 recipients open the Subject -Message (HTML) dialog box with the text of the introduction and the XML file attachment, as shown on the next page.
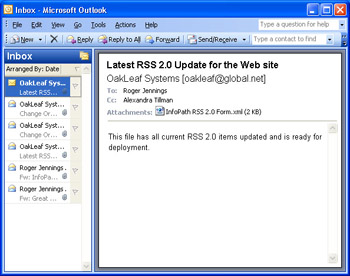
Recipients of forms sent or submitted by e-mail must have InfoPath installed and network, Web server, or SharePoint access to a published copy of the form s template. If you submit the Rss2v4Mail form as a message to your e-mail address and receive the message on the computer running InfoPath, you can double-click the Rss2v4Mail.xml attachment and edit it with the local template. Submitting a preview causes the e-mailed form to be read-only.
| Note |
Setting empty numeric elements to 0 and assigning templates to a custom category Selecting the Enable Custom Category check box and specifying a category name lets you categorize templates. Each category you add appears after Sample Forms under the Fill Out A Form dialog box s Form Categories heading. Clicking a category link displays the forms you ve added to the category. Removing all forms in a category removes the category name. |
Limiting a Form s Feature Set
SP-1 The Form Option dialog box s Open and Save tab, shown in Figure 11-5, Enable Features section has check boxes that let you prevent users from saving and autosaving the data document, exporting a form as an .mht file or to a Microsoft Excel worksheet, printing the form, or sending the document by e-mail. Clearing all check boxes has the effect of preventing users from preserving or distributing copies of confidential forms. In this case, the only means of saving confidential form data is to submit the form by the method specified in the Submitting Forms dialog box. Obviously, you must prevent users from modifying the template to make this confidentiality scenario effective. Chapter 12 shows you how to prevent users from modifying templates that you publish to server shares, Web servers, and SharePoint form libraries.
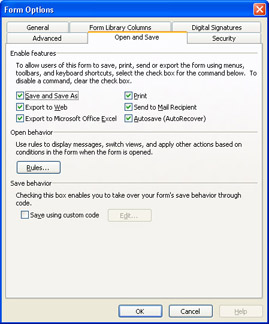
Figure 11-5: The Open and Save tab has check boxes that control users ability to save, export, print, and send the template s data documents.
Clicking the Rules button in the Open and Save tab s Open Behavior section displays the Rules For Opening Forms dialog box. The section Adding Workflow-Dependent Rules in Chapter 10, Adding Views to a Template, describes the use of this dialog box for setting field values and specifying the default view when opening a form.
Selecting the Save Using Custom Code check box in the Open and Save tab s Save Behavior section enables the Edit button. Clicking Edit opens the Microsoft Script Editor (MSE) with a JScript or VBScript handler for the OnSaveRequest event. Chapter 17, Writing Advanced Event Handlers, shown you how to program the OnSaveRequest event with Visual Basic .NET code.
Removing Unused Fields from New Forms
Forms based on schemas that have many optional sections, fields, or both create data documents with empty element values for these fields. The sample InfoPath forms provide examples of schemas that generate data documents with mostly empty elements. If your form doesn t have sections or controls bound to optional elements, you can use InfoPath s Edit Default Values dialog box to reduce the size of the XML data document substantially. Modifications you make in this dialog box don t affect the schema; changes affect only the template s template.xml file, which InfoPath uses as the starting point for new forms. The sample.xml file doesn t reflect the modifications.
You open the Edit Default Values dialog box by clicking the Edit Default Values button on the Form Option dialog box s General tab. Figure 11-6 shows two instances of the Edit Default Values dialog box for the sample StatusReport form.
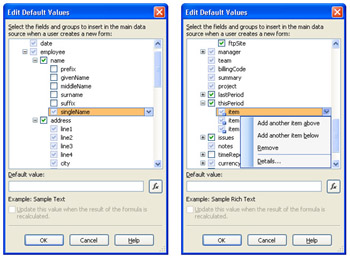
Figure 11-6: Clearing enabled check boxes in the Edit Default Values dialog box removes the sections or fields from new data documents (left). You add or remove default repeating sections with menu items (right).
Here s a brief explanation of how the InfoPath s Edit Default Values feature works:
- Disabled check boxes represent sections and fields that are bound to the form s required sections and controls.
- Enabled check boxes with green check marks represent unbound or not-required sections or fields. (A not-required section or field has a minOccurs= 0 attribute value.) Clearing the check box removes the section or field from the data document.
- Enabled section check boxes can contain disabled check boxes. Clearing a section check box clears the check boxes for all child sections and elements, so don t remove sections that contain disabled check boxes, such as the employee/ name section shown on the left in Figure 11-6, which has a required singleName element. Instead, remove individual child elements or sections.
- SP-1 Cleared section check boxes represent optional sections. Selecting these check boxes changes an optional section to a required section or a repeating section. You can specify the default number of occurrences of required repeating sections or rows of repeating tables by right-clicking the node and choosing Add Another ItemName Above, Add Another ItemName Below, Remove, or Details as shown on the right in Figure 11-6.
- The Default Value check box is enabled for most enabled fields. When it s enabled, you can specify a default value for the field as an alternative to specifying a default value on the Data tab of a control s Properties dialog box or the .
- You can specify a default value based another field value or XPath function by clicking the Insert Formula ( f x) button to open the Insert Formula dialog box and clicking the Insert Field Or Group or Insert Function button.
Saving a StatusReport form with only the Date field populated generates a 3539-byte data document that contains only 10 data bytes. Eliminating unneeded sections and fields reduces the size to about 17 bytes.
To take the Edit Default Values dialog box for a test drive with the StatusReport template, follow these steps.
Reduce the size of new status report documents
- Start InfoPath, and click the Design A Form link on the Fill Out A Form task pane to activate the Design task pane.
- Click the Customize A Sample link, and double-click Status Report on the Sample Forms tab.
- Save the template as SREditDefaults.xsn or the like in a new My Documents InfoPathSREditDefaults folder.
- Open the Fill Out A Form task pane, click the link to the newly saved template, and save the form as SRDefault.xml to provide a baseline for the data document size reduction process of the remaining steps. Close the form to return to design mode.
- Choose Tools, Form Options to open the Form Options dialog box, and click the Edit Default Values button.
- Clear the five enabled check boxes under the employee/name section. The name section isn t designated as required, but one of its elements ” singleName ” is bound to a control.
- Scroll to the employee/address section, and clear its check box.
- Clear all remaining employee check boxes except the emailAddressPrimary and the department check boxes; these two elements are bound to text box controls.
- Repeat steps 6 through 8 for the manager section and its children. (The manager s emailPrimaryAddress element isn t bound to a control, but it might be useful in future form versions.)
- Click OK twice to close the dialog boxes and apply the changes. Verify in design mode that you haven t removed any fields bound to controls, and then save your changes. You must save the template to create a new data document with the edited defaults.
- Repeat step 4, but save the data document as SREdited.xml to check its size ”about 1526 bytes. (The actual size varies with the length of the template s path and file name.)
- Optionally, open the two data documents in Notepad to compare their contents.
The sample Status Report form has bulleted lists that have three bullets by default and three optional repeating tables. You can change the default number of bullets or other list items and require repeating sections or tables in the Edit Default Values dialog box.
Adding Digital Signatures to Forms
SP-1 InfoPath supports the use of X.509 digital certificates to enable applying digital signatures to an entire form or to individual groups or fields of a form. InfoPath stores the digital signature data for an entire form in the data document s signatures group. Assigning signatures to individual form groups or fields adds signatures subgroups to the document s signatures group .
Applying a digital signature ensures recipients that a data document or its specific groups or fields originated from a specific person or computer and hasn t been modified by anyone else. If anyone alters the document s content subsequent to signing, the digital signature won t match a value (called a hash ) that s calculated from the file s text. If the entire form is signed, the data document is read only. In this case, you must remove the digital signature to modify the data document with InfoPath. InfoPath SP-1 forms also support multiple digital signatures; this feature enables auditable, multistep approval processes. Saving a copy of the data document with all required signatures prevents any signing party from repudiating an action, such as initiation or approval of a document.
| See Also |
To gain a better understanding of XML digital signatures, read An Introduction to XML Digital Signatures, at www.xml.com/pub/a/2001/08/08/xmldsig.html , and Enabling XML Security, at www-106.ibm.com/developerworks/ xml/library/s-xmlsec.html/index.html . |
Trusting the Certificate Authority
All users who need to digitally sign forms or verify the digital signatures of signed forms must trust the certificate authority (CA) that issues digital signing certificates to users. The CA for the examples in this section and in the following digital signature “ related sections is a Windows Server 2003 member server (OakLeaf-MS2K3) in a Windows 2000 ActiveDirectory domain running stand-alone Certificate Services with Web enrollment support installed. This configuration is common for intranets and extranets; extranets permit designated business partners to access specific parts of an organization s intranet. Extranet users must have access to the CA s certificate (.crt) file to add your organization s CA to their trusted CA lists, and they must be able to request and obtain certificates from the CA s certificate server.
If you already have a personal digital certificate that supports digital signing, skip to the section Signing and Cosigning a Form, later in this chapter. Otherwise , follow these steps to determine whether your computer trusts the CA.
Verify that the local computer trusts the CA
- Start Internet Explorer, choose Tools, Internet Options to open the Internet Options dialog box, and select the Content tab.
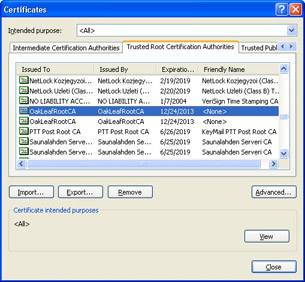
- Click the Certificates button to open the Certificates dialog box, and select the Trusted Root Certification Authorities tab.
- Scroll to the name of your CA (OakLeafRootCA is the sample CA in this and the following exercises), and verify that the Intended Purpose list displays < All > , as shown here: if not, the list must include < Non- Repudiation Signing > , which is required for digitally signing InfoPath forms. (Free or low-cost commercial e-mail signing certificates won t work.)
- If the name of your CA isn t listed, ask your network administrator for the location of the CA s certificate file, click Import to start the Certificate Import Wizard, and follow the wizard s instructions to add the CA to the Trusted Root Certification Authorities list.
- Click Close, and then click OK.
Obtaining a Digital Signing Certificate
The most common method of obtaining a certificate from a Windows 2000 and later certificate server is the Web enrollment process. The procedures aren t significantly different for a Windows 2000 or Windows 2003 enterprise CA, but they vary slightly depending on whether the CA issues certificates automatically or requires an administrator to approve certificate issuance. If your organization has established an enterprise CA, you probably have the required Client Authentication certificate. If so, skip to the next section.
| Note |
Enabling Web enrollment on a Windows Server 2003 computer running SharePoint |
Follow these steps to obtain a digital signing certificate from a Windows 2000 or 2003 server CA.
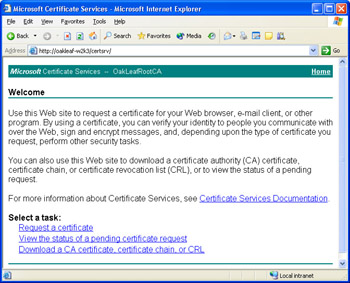
Obtain an advanced certificate from the CA
- In Internet Explorer, type the URL or server name of the certificate server followed by /certsrv/ to open the Welcome page of the Microsoft Certificate Services Web site, as shown here:
- Click the Request A Certificate link to open the Request A Certificate page.
- Click the Advanced Certificate Request link to open the next page.
- Click the Create And Submit A Request To This CA link to open another Advanced Certificate Request page.
- Fill out the Identifying Information section, and leave the default Client Authentication Certificate in the Type Of Certificate Needed list.
- Leave the default key options, unless you have a reason for doing otherwise. For this example, the Key Size is increased to 2048 bytes for additional security:

- Scroll to the Additional Options section, type a Friendly Name for the certificate, such as InfoPath Signing Cert, and click Submit.
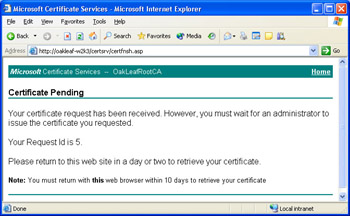
- Click Yes to dismiss the Potential Scripting Violation message and submit the request. If your CA issues certificates automatically, a Certificate Issued page opens. Click the Install This Certificate link, click Yes to dismiss the message, and skip to step 13.
- Most CA s don t issue certificates automatically, so you might see the following Certificate Pending page:
- After the CA administrator issues your certificate, return to the page you specified in step 1, and click the View The Status Of A Pending Certificate Request link to open a page of the same name.
- Click the Client Authentication Certificate link, which opens a Certificate Issued page, and click the Install This Certificate link.
- Click Yes to dismiss the Potential Scripting Violation message box, install the certificate, and display a Certificate Installed page.
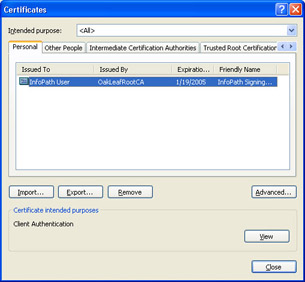
- Choose Tools, Internet Options to open the Internet Options dialog box. Select the Content tab, and click the Certificates button. In the Certificates dialog box, verify that the certificate is present in the Personal tab s list, as shown here:
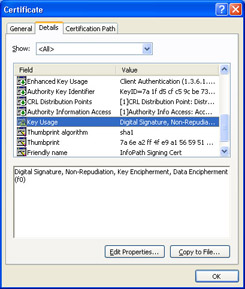
- With your signature item selected, click View to open the Certificate dialog box, click the Details tab, scroll to and select Key Usage in the list. The usages shown here should appear in the text box:
- Click OK, click Close, and click OK to close the dialog boxes, and then close Internet Explorer.
Signing and Cosigning an Entire Form
InfoPath s developers made signing entire forms a simple, point-and-click operation. To sign a form, you must enable digital signatures in design mode on the Form Options dialog box s Digital Signatures tab.
The following four procedures show you how to enable signing an entire document, add your signature to a document, test for modified documents, and emulate an approval cosignature.
Specify digital signing in design mode
- Navigate to your C:Microsoft PressIntroducing InfoPath 2003Chapter11Rss2v4 folder. Open Rss2v4Prot.xsn, which has form submission enabled, in design mode, and save it as Rss2v4Sign.xsn to a new My DocumentsInfoPathSigning folder.
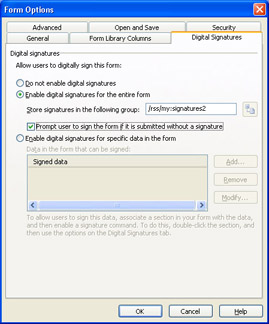
- Choose Tools, Form Options to open the Form Options dialog box, clear the Enable Protection on the General tab, and select the Digital Signatures tab. Select the Enable Digital Signatures For The Entire Form option, and select the Prompt Users To Sign The Form If It Is Submitted Without A Signature check box. Submission is enabled, so the Submitting Forms dialog box opens. Add Signed to the caption, and click OK to close to close the dialog box. The Digital Signature tab appears as shown here:
- Click OK to close the Form Options dialog box and save the changes. Save the template, and click Overwrite to close the warning message box.
- Save an unsigned data document as Rss2v4NoSign.xml. You will notice that you don t receive a prompt when you save an unsigned form that has submission enabled. The warning appears only if you submit the form.
Sign the entire data document
- Open a new Form1. Enabling digital signatures in step 2 of the preceding procedure enables the Digital Signatures toolbar button and the Tools, Digital Signatures menu option.
- SP-1 Click the Digital Signatures button to open the Digital Signatures dialog box, and click the Add button to start the Digital Signature Wizard. Click Next to accept Entire Form as the signature scope and open a certificate list in the second wizard screen, as shown here:
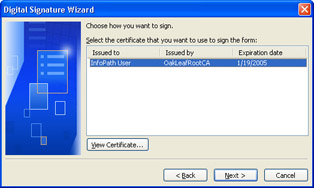
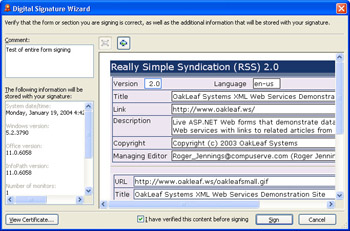
- Select the certificate you want to use, and click Next to display the third wizard screen, which displays key information about the certificate. Type a comment to accompany your signature, if you want, as shown here:
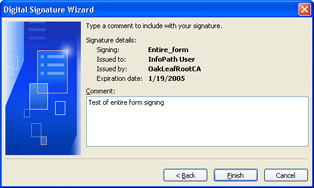
- Click Finish to display the Digital Signature Wizard s confirmation screen. Select the I Have Verified This Content Before Signing check box to enable the Sign button, as shown on the next page.
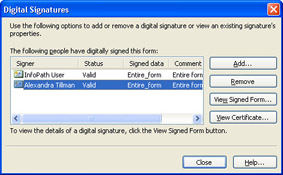
- Click Sign to display the Digital Signatures dialog box, shown here:
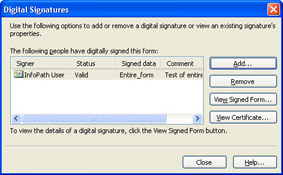
- Click Close to return to the form. Choose File, Save As, and save the form as Rss2v4Sign1.xml or the like, which is now read-only. The title bar adds the [Signed] to the file name.
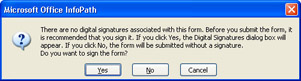
- If you want to edit the form, click the Digital Signatures button, click the Remove or Remove All button, click OK, and click Yes to confirm your action. Selecting the Prompt Users To Sign The Form If It Is Submitted Without A Signature check box in step 2 of the preceding exercise and submitting the form to the OakLeaf Web site without adding a signature displays the following prompt:
- With the form re-signed if you removed the signature, choose File, Submit To OakLeaf Web Site, and click Show Details to open the browser window with the data document s content. Scroll until you reach the < my:signatures# > element, as shown here:

- Continue to scroll through the content added to the data document by the digital signature, which includes the Base64 encoded signature and certificate.
- Close the browser window, and save two copies of the signed form as Rss2v4Sign2.xml and Rss2v4Sign3.xml for use in the following procedures.
Adding a digital signature increases the XML data document s size from about 1640 bytes to 19 KB. Base64-encoded copies of the digital signature, user s certificate, and a PNG bitmap of the form add most of the bulk.
Enabling digital signatures doesn t affect the document s original schema, which you can confirm by extracting the template files and opening schema.xsd in Notepad. Instead, InfoPath adds a myschema.xsd file to the template, which adds the signatures section and imports schema.xsd. The myschema.xsd schema doesn t validate the structure of the signatures# section; the xsd:any data type and processContents="lax" attribute permit unstructured content in the section. The W3C XML-DSig schema for digital signatures is close to 10 KB in size, so its omission from the InfoPath-generated schema is understandable.
Test a forged signed document
- Open Rss2v4Sign2.xml in Notepad, make a change to the content to simulate a forgery, such as adding (Modified) to the channel/title element, and save the file.
- Open Rss2v4Sign2.xml in InfoPath. The form displays the following invalid digital signature message:
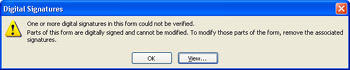
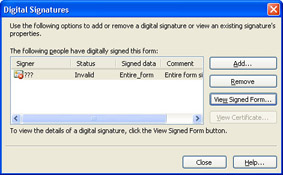
- Click the View button to open the Digital Signatures dialog box, which states that the signature is invalid, as shown here:
- Remove the digital signature, click Close to permit editing of the document, and save the unsigned form.
Simulate a cosignature
- Create a simulated digital signing certificate for another person. (This would appear to defeat nonrepudiation, but it doesn t. The forgery can be detected by comparing the person s real and simulated Base64-encoded certificates.)
- Open Rss2v4Sign3.xml in InfoPath, click OK to dismiss the digital signature message box, and click the Digital Signatures button. Click Add in the Digital Signatures dialog box, and click Next to display the second screen of the Digital Signature Wizard.
- Select the certificate you added in step 1, add an approval comment, and return to the Digital Signatures dialog box. The added signature appears as shown here:
- Save the cosigned document, which has grown to 36 KB.
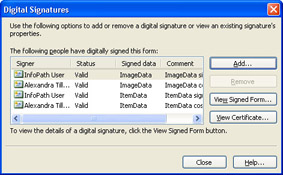
Signing Individual Form Groups or Fields
SP-1 An alternative to signing the entire form is to sign, cosign, or countersign individual groups or fields of a form. When you sign individual fields or groups, you have the option to specify a single signature, cosigning (all signatures are independent), or countersigning (each signature signs the preceding signatures). To countersign one group and cosign another group of the Rss2v4Sign.xsn template you created in the preceding section, Signing and Cosigning an Entire Form, follow these steps.
Enable digital signatures for individual groups
- Open Rss2v4Sign.xsn in design mode and save a copy as Rss2v4DS.xsn in the same folder.
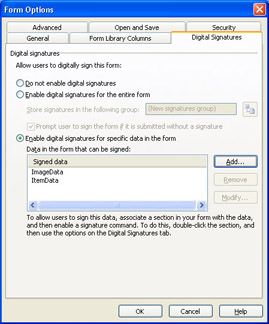
- Choose Tools, Form Options, select the Digital Signatures tab, and select the Enable Digital Signatures For Specific Data In The Form option to enable the Data In The Form That Can Be Signed list and its Add button.
- Click the Add button to open the Signed Data dialog box, and click the Select XPath button to open the Select A Field Or Group dialog box. Expand the channel node, select the image node, and click OK.
- Type a name for the signed data, such as ImageData, select the Each Signature Signs The Preceding Signatures (Counter-Sign) option, and modify the Signature Confirmation Message, as shown here:

- Click OK to add the signed data item to the list.
- Repeat steps 3 through 5, but select the item node in step 3. In step 4, change the name from ImageData to ItemData, and select the All The Signatures Are Independent (Co-Sign) option instead of Each Signature Signs The Preceding Signatures (Counter-Sign). The Digital Signatures tab of the Form Options dialog box now appears as follows :
- Click OK to enable countersigning and cosigning the two groups, and save your template changes, overwriting the original Rss2v4DS.xsn version.
Sign, countersign, and cosign the groups
- Open a new Form1 from the Rss2v4DS template, and click the Digital Signatures button to start the Digital Signature Wizard.
- Accept the default ImageData signed data block, and click Next. Select your certificate, and click Next. Add a comment, and click Finish.
- Select the I Have Verified This Content Before Signing check box, and click Sign to return to the Digital Signatures dialog box.
- Click Add, and repeat steps 2 and 3, but select the signature of the other person that you added in the preceding procedure.
- Click Add, and repeat steps 2 through 4 for the ItemData signed data block. The Digital Signatures dialog box appears as shown here:
- Click Close to apply the signatures, and save your form as Rss2v4DS1.xml, which now weighs in at 71 KB.
- Submit the form, and inspect the Web server s return message.
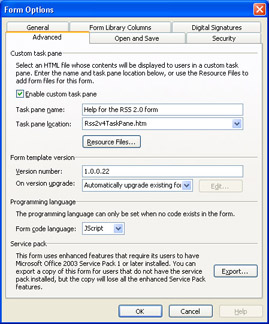
Setting Advanced Form Options
The Advanced tab of the Form Options dialog box has controls for specifying the following options:
- Enabling and adding custom task panes. You create custom task panes as HTML files, which often include links to script functions that program InfoPath operations or display data.
- Changing the form version number and specifying how InfoPath upgrades forms to the latest version.
- Changing the default scripting language from JScript to VBScript. Adding custom script in script.js or script.vbs disables the Form Script Language list. Adding Visual Basic .NET code behind InfoPath forms is discussed in of Part IV of this book, Programming InfoPath Forms.
- Exporting pre-SP-1 versions of the template for use by users without InfoPath 2003 SP-1 installed. Pre-SP-1 versions dont implement SP-1 features; if your form depends on SP-1 featuressuch as rules, formulas, digitally signed form groups or fields, or .NET managed codedont expect the exported template to behave correctly.
Adding a Custom Help Task Pane
Custom task panes are HTML documents that users can open in data entry mode. The most common use for custom task panes is providing users with help for filling out forms, especially complex forms. Your C:Microsoft PressIntroducing InfoPath 2003Chapter11Rss2v4 folder contains a very simple HTML file (Rss2v4TaskPane.htm).
To add Rss2v4TaskPane.htm as a custom task pane to the Rss2v4.xsn template, which has two views, follow these steps.
Add a custom task pane to the Resource Manager
- Navigate to your C:Microsoft PressIntroducing InfoPath 2003Chapter11Rss2v4 folder, and open Rss2v4.xsn in design mode.
- Choose Tools, Form Options to open the Form Options dialog box, and select the Advanced tab.
- Select the Enable Custom Task Pane check box, and click Resource Manager to open the Resource Manager dialog box.
- Click Add to open the Add File dialog box, navigate to the templates folder, double-click Rss2v4TaskPane.htm to add it to the Resource Manager dialog boxs Resource Files In This Form list, and click OK.
- Open the Task Pane Location list, and double-click the Rss2v4TaskPane.htm item, and click OK to close the dialog.
- Open the Task Pane Location list, select the Rss2v4TaskPane.htm item, and add a title for the new task pane, as shown here:
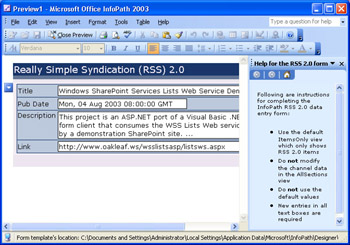
- Click OK to close the dialog box, and then click Preview This Form. The custom task pane opens by default, as shown here:
Understanding Form Versioning
InfoPaths template version number consists of four groups of up to four digits separated by periods. InfoPath documentation doesnt describe the usage of the groups, which you can interpret as InfoPathVersion.FormMainVersion.FormSubVersion.FormBuildNumber . The default value for a new template is 1.0.0.1. Each time you save a change to a template, InfoPath increments the value of the rightmost group by 1.
The On Version Upgrade list offers the following three selections:
- Automatically Upgrade Existing Forms The default.
- Do Nothing (Existing Forms Might Not Work Properly) Avoid this selection, because upgrades might cause previously-saved forms to fail to open or display errors when users open them.
- Use Script Event Enables the Edit button so that you can add custom programming code to handle the forms onVersionUpgrade event.
InfoPath automatically upgrades earlier data documents to the new form version by default. Unless you receive a warning message that previous forms wont be compatible with the new design, InfoPath lets users open forms created with an earlier template version.
InfoPath stores (caches) a copy of an untrusted or a digitally signed (fully trusted) template on the local drive when users first open the template. Each time the user opens a form, InfoPath attempts to check the current template version. If the users computer cant connect to the networked template location, InfoPath continues to use the cached copy, even if its out of date. Otherwise, InfoPath updates the user s cached version. You must upgrade custom-installed (unsigned) fully trusted forms manually by reinstalling them on users computers.
Summary
InfoPaths Form Options dialog box delivers a potpourri of design mode form property settings. The General tab lets you enable form protection, which disables the Design This Form toolbar button and File, Design This Form menu option. You also can disable form merging and open the Edit Default Value dialog box with the General tab selected. The Edit Default Value dialog box lets you eliminate unneeded sections and fields from new data documents you create from schema-based forms, such as InfoPaths sample forms. The Edit Default Value dialog box also enables you to change optional sections to required sections and specify the default number of list items, repeating sections, and rows of repeating tables. The Tools, Submitting Forms menu option lets you specify whether users can submit forms and, if they can, write custom messages for submission success or failure.
The Form Option Dialog boxs Digital Signatures tab is devoted to digital signatures, which deliver nonrepudiation features to entire InfoPath documents or individual groups or fields of documents. You can enable or disable digital signatures and specify a warning prompt if a user submits a form thats not signed. Adding digital signatures to a form requires a personal Client Authentication certificate, which you obtain from a commercial CA or your organizations certificate server.
The Form Option dialog boxs Advanced tab lets you add a custom task pane to a form, specify a new template version number, control how InfoPath handles form upgrades, and change the default scripting language from JScript to VBScript, if youre writing script instead of Visual Basic .NET code and havent added script to your form already. You also can export a copy of the template with SP-1 features removed.
Q A
|
1. |
Can I disable design mode for users by any means other than the Office 2003 Custom Installation Wizard s Disable InfoPath Designer Mode setting? |
|
|
2. |
Is it common to encounter XML data documents that contain what appear to be unneeded, empty fields? |
|
|
3. |
Is there a limit on the number of digital signatures I can add to a form? |
|
|
4. |
How can I take advantage of single-signature, cosign, and countersign options for an entire form? |
|
|
5. |
How can I ensure the security of an InfoPath data document that I send over the Internet? |
|
|
6. |
Can I add more than one custom task pane to a form? |
|

Answers
|
1. |
Yes. You can add an entry to users registries, as described in the section Disabling Design Mode for Deployed Fully Trusted Forms, in Chapter 12. |
|
2. |
Yes. In many cases, the schema for business documents requires elements to be present but permits empty text fields and nillable fields of other data types in required elements. Later steps in the workflow process add values to empty or nillable fields |
|
3. |
There s no published limit, but the data document grows by about 17 KB with each added signature. Decrypting digital signatures is a resource- intensive process, so you can expect opening a form to slow a bit with each signature you add. |
|
4. |
Select the Enable Digital Signatures For Specific Data In The Form check box on the Form Options dialog box s Digital Signatures tab, click Add, open the Select A Field Or Group dialog box, and select the root node of the form ” rss for the examples in this chapter. Signing the root node is as effective as signing the entire form. |
|
5. |
Use Secure HTTP (HTTPS) for all data document transmissions over the Internet. HTTPS encrypts the data on the Web server, and Internet Explorer decrypts it on the client. You need a commercial Web server certificate if the recipient doesn t trust your organization s CA. |
|
6. |
No. InfoPath supports only one custom task pane. |
On Your Own
Here are two additional exercises to test your digital signing and custom task pane skills:
- Add digital signatures to the NWOrders data documents you created in the procedures in Chapter 10, Adding Views to a Template. (If you didnt complete Chapter 10s procedures, the final version of the template and data documents are in your C:Microsoft PressIntroducing InfoPath 2003Chapter10NWOrdersFinal folder.)
- Write the HTML code for a detailed custom task pane for the final version of Chapter 10s NWOrders template that has multiple views, and add the task pane to the form.
Part I - Introducing Microsoft Office InfoPath 2003 SP-1
Part II - Designing InfoPath Forms
- Creating Forms
- Laying Out Forms
- Adding Basic Controls and Lists
- Formatting Forms
- Validating Form Data
- Working with Advanced Form Elements
- Adding Views to a Template
- Setting Form Template and Digital Signing Options
- Publishing Form Templates
Part III - Working with Databases and Web Services
Part IV - Programming InfoPath Forms
EAN: 2147483647
Pages: 248
- ERP System Acquisition: A Process Model and Results From an Austrian Survey
- The Effects of an Enterprise Resource Planning System (ERP) Implementation on Job Characteristics – A Study using the Hackman and Oldham Job Characteristics Model
- Intrinsic and Contextual Data Quality: The Effect of Media and Personal Involvement
- Healthcare Information: From Administrative to Practice Databases
- Development of Interactive Web Sites to Enhance Police/Community Relations
