Working with Objects on a Layout
As stated previously, a layout is essentially a collection of objects that is manifested as a "screen" that allows users to see and/or modify data. We'll refer abstractly to anything that can be placed on a layout as a layout object. There are many tools and techniques for configuring and manipulating layout objects. Some of these apply only to specific types of objects, whereas others are more general in nature. The better you know how to work with the tools for crafting layouts, the better your user interface will be. (Although there are of course no guarantees.)
Adding Objects to a Layout
The Status Area in Layout mode provides a set of design tools for adding and manipulating layout objects. These tools are shown in Figure 4.11.
Figure 4.11. The Status Area contains most of the tools you need for designing layouts.

Tip
In Layout mode, the book icon can be used to move from layout to layout. The keyboard shortcut for this, ( up arrow) [Ctrl+up arrow], is the same one used in Browse mode to move from record to record, and in Preview mode to move from page to page.
The layout tools in the middle of the Status Area are used to add new objects to a layout. There are tools for adding text blocks, lines, rectangles, rounded rectangles, ovals, buttons, fields with value list controls, Tab Control objects, and portals. With each, you can simply click on the tool to activate it, and then click and drag on your layout where you want the object to appear.
Normally, when you are finished creating an object, the pointer tool is reselected automatically. At times, however, you'll want to create multiple objects of the same type at once. In these cases, it's useful to lock in the selection of a particular tool. You can do this by double-clicking on the tool in the Status Area. There's also a preference on the Layout tab of the application preferences screen to Always Lock Layout Tools, though we generally advise against enabling it.
The Insert menu provides another means for adding objects to a layout. At the top of this menu, you'll find selections for adding all the object types found in the Status Area.
Caution
Unless your Status Area is closed and locked for some reason, we prefer not to use the Insert menu because it doesn't give you an opportunity to specify location or size during object creation. Either duplicate existing objects or use the tools from the Status Area when at all possible.
To insert a picture or another graphic element developed externally, you can use the Insert, Graphic menu command. Or you can simply cut and paste objects from many other applications directly into your FileMaker layouts.
Specifying Object Attributes
You have a great deal of control over the attributes of any object you place on a layout. Different object types may have different attribute options. You can always tell what attributes of an object can be configured by (Control-clicking) [right-clicking] the object. A contextual menu appears, listing any formatting options that are appropriate to that particular object type. There are menu commands and Status Area tools that provide access to the same attribute settings, but the most efficient way to set an object's attributes is to use the contextual menus.
The Format Painter Tool
You can copy the formatting attributes from one object to other objects on your layout by using the Format Painter tool. The Format Painter can be found under the Format menu and in the Standard toolbar, which you can enable from the View, Toolbars menu.
To use the Format Painter, you simply select an object that has the formatting attributes you want to propagate, and then turn on the Format Painter, using either of the two methods just mentioned. A small paintbrush appears next to your mouse pointer, indicating that the Format Painter tool is active. Then simply select an object (or a set of objects) to which you want to apply the formats. You can lock in the Format Painter tool by double-clicking its icon from the Standard toolbar. This enables you to click on several objects, applying formats as you go.
Setting Default Object Attributes
The default format attributes include such things as the font, font size, font color, text style (for example, bold, italics), pen width, alignment, shading, paragraph settings, and object effects. In short, any configurable attribute of a layout object has a default setting. Not all objects, of course, have all the potential attributes. Rectangles, for instance, have shading and pen width attributes but don't have any font attributes. When a new object of any sort is added to a layout with the layout tools, the applicable attributes of that object inherit the current default settings. You can, of course, change the attributes of an object after it has been placed on a layout.
The default format attributes are stored at the file level. This means that as you move from layout to layout within a file, the defaults stay the same, but if you're working with multiple files, each may have its own defaults.
When you first create a file, the default text format is fairly vanilla: 12point black Helvetica (Mac), 12point Arial (Windows), no object effects, no text styles, no field borders, and no shading. You can change the default settings in one of two ways:
- In Layout mode, if you have no objects selected, any formatting options you change are applied to the default text attributes. Only the attributes you change are affected.
- If you (click) [Ctrl+click] on an object, that object's characteristics become the default. This is the easiest way to set the default; you can simply format one object with the settings you want and then (click) [Ctrl+click] it. All that object's attributes together become the new default; any attributes that the object doesn't possess are not affected.
Tip
If multiple layout objects are selected and you (click) [Ctrl+click] on any one of them, the frontmost object's characteristics become the default.
If you have opened a file as a guest (either of FileMaker Pro or of FileMaker Server), any changes you make to the default attributes persist only until you close the file; those defaults aren't stored in the file and don't affect other developers in the system. When you're the host of a file, any changes you make to the default attributes are stored and persist until you change them again, even if you close and reopen the file.
Duplicating Layout Objects
Any object on a layout can be duplicated in one of two ways. When you duplicate an object (or a set of objects), the new objects have all the same attributes of the source objects. It therefore is often faster and more efficient to create a new object by duplicating an existing one and modifying it rather than adding a new one using the layout tools.
The first way is simply to select some set of objects and choose Edit, Duplicate or press (D) [Ctrl+D]. The entire set of objects is duplicated, with the new objects appearing 6 pixels to the right and 6 pixels lower than the original set. The new objects are selected (as opposed to the original set), so you can easily move them to wherever you want.
There's a useful technique for creating multiple copies of an object, spaced out at consistent intervals. Begin by selecting a set of objects, which we'll call set A, and duplicate it as described, creating set B. Without deselecting any of the objects in set B, move them to some desired place on a layout. Choose Edit, Duplicate again; and the new copy, set C, instead of having the "6 pixels to the right, 6 pixels down" relationship to its source, is spaced an equal distance from set B as B is from A. Continued selection of Edit, Duplicate results in additional new sets, each positioned a consistent distance from its source. This technique is very useful for creating columnar lists and grids of equally spaced lines.
The second way to duplicate layout objects is to (Option-drag) [Ctrl+drag] them. Simply select a set of objects, and then start to drag them as if you intended to move them to a new location on the layout. As you're moving the objects, however, hold down the (Option) [Ctrl] key. Continue to hold this key down until after you have released the mouse click; the objects are not moved, but a copy of them is placed at the new location.
Tip
You can also hold down the Shift key as you're dragging the objects to constrain movement to a vertical or horizontal axis. This is generally our preferred method for duplicating layout objects.
Positioning Objects on a Layout
Much of layout design is simply moving things around until they look just right. This is also one of the most intuitive things for new developers to learn. So much so, in fact, that many never learn some of the fine points of working with objects on a layout. We will attempt to remedy that problem here.
Selecting Objects On A Layout
Most all formatting and positioning of objects on a layout begins with the selection of a set of objects to work with. You can go about selecting objects in several ways; knowing these methods can greatly increase your efficiency at designing layouts. Here are your options:
- Click on an object You can select any object simply by clicking on it. When you do so, small squares, called handles, appear at the four corners of the object, indicating that the object is indeed selected.
- Shift+click When you have one or more objects selected, you can Shift+click on an additional object to add it to the selected set. Similarly, Shift+clicking on an object that is already selected removes it from the selected set.
- Selection box If you click on the background of the layout (that is, any place there's not an object), and drag a rectangle across the screen, when you release the mouse, any objects that were completely contained within your selection box are selected. This is typically the easiest and quickest way to select multiple objects.
Note
If you hold down the (
) [Ctrl] key while dragging a selection box on the screen, any objects touched by (instead of contained by) the box are selected. This technique works well for selecting objects that might partially overlap other objects, when using the enclosing method would result in too many selected objects. - Select all objects To select all the objects on a layout, choose Edit, Select All, or use the (A) [Ctrl+A]) keyboard shortcut.
- Select all instances of a type of object It's also possible to select all instances of a particular type of object, such as all the text objects, or all the fields, or all the rectangles. There are several ways to do this. If the Arrange toolbar is visible, you can select an object, and then click the Select Objects by Type button in that toolbar to select all similar objects. Or you can select an object, and then press (Option-A) [Ctrl+Alt+A] to accomplish the same thing. Finally, if you have a tool (other than the Button or Portal tool) selected from the layout tools, you can select all the objects of that type by choosing Edit, Select All.
Moving Objects
After you have selected a set of objects, you can move those objects around on the layoutprovided that they are not lockedin a few ways. First, you can click on the interior of any object in the selected set and drag the set to a new location. You can also use the arrow keys on your keyboard to move a selected set of objects pixel by pixel.
Using the click-and-drag method, hold down the Shift key after you start dragging the objects, and the movement will be constrained to either the vertical or the horizontal plane. That is, there would be no way of moving the objects other than up and down or from side to side. This is very useful for keeping objects properly aligned as you reposition them.
Resizing Objects
When you select an object, four small black or gray squares appear at the corners of the object. These define the object's boundaries; they are called the object's handles. All objects, even circular ones, have a rectangular "footprint" defined by the four handles. Gray handles indicate that the object is locked; it can't be moved or resized in this state. (Refer to the "Locking Objects" section later in this chapter.)
You can resize an object by clicking on one of the four handles and dragging in the desired direction. Unlike some other graphic applications, FileMaker does not enable you to click on the sides of the object to change just the height or width of the object. You must always use the object's corners. Just as when moving objects, you can, however, constrain movement to the vertical or horizontal plane by holding down the Shift key as you drag to resize the object.
If you have selected multiple objects, resizing any one of them causes all the objects to resize by a similar amount. This is very useful in cases in which you want to select, for instance, five fields and make them all slightly longer or shorter. Resizing them as a set ensures that they will all be changed by the same relative amount.
 |
FileMaker 8 introduced the new Resize To alignment tools. Available in the Arrange menu in Layout mode, these tools allow developers to make a group of objects consistent by resizing all objects in the group to the largest or smallest width or height of the objects selected. |
The Object Grid
You have the option, when working with layouts, of enabling or disabling an object grid. You can change the status of the object grid by toggling the Object Grids command, found at the bottom of the Arrange menu. You can also toggle the status of the object grid by pressing (Y) [Ctrl+Y].
When object grids are enabled, all movement and resizing of objects takes place against a virtual grid. Each square of the grid measures 6 pixels by 6 pixels. The effect of this is that when you are moving or resizing objects, movement happens in 6pixel chunks. When the object grids are disabled, movement happens in 1pixel units, resulting in fluid motion.
Tip
You can change the default grid spacing to something other than 6 pixels by using the Layouts, Set Rulers menu.
The object grids are defined relative to each object. That is, there's not a static grid to which everything snaps. If object A and object B are 2 pixels apart, with object grids enabled, you could move each object one "chunk" in any direction and they'd still be 2 pixels apart, each having moved 6 pixels from its original location.
Whether or not you choose to have object grids enabled as you design layouts is purely a personal preference. Some developers love object grids; others loath them. Even the authors of this book are passionately divided on this subject. The benefit of using the object grids is that they make it easy to keep things arranged and sized nicely. It's much easier to notice visually when an object is 6 pixels off-line rather than 1 pixel. Plus, if you ever need to move things in finer increments, you can simply use the arrow keys to "nudge" the objects into line. Also, you can temporarily suspend the object grids by holding down the () [Alt] key as you are moving or resizing an object. On the con side of things, for developers used to positioning things exactly to the pixel, the object grid can get in the way and prove simply cumbersome to work around.
The object grid's status is a file-level setting. That is, as you work on different layouts within a file, the grid status carries through to them all, but if you have multiple files in a solution, you can conceivably have the object grid enabled in some files and not in others.
The Size Palette
The Size palette is a floating toolbox that can be used to see and set very precise object positions. It's shown in Figure 4.12. To make the palette appear, choose View, Object Size.
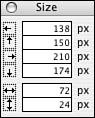
Figure 4.12. The Size palette is quite useful for positioning and sizing objects on a layout.
It's an application-level setting, so after you have the palette onscreen, it is available no matter which layout you are working with. You can move the palette around on your screen so that it's positioned optimally for whatever task you need it for.
The Size palette provides six pieces of data about the position and size of a selected object (or set of objects). From top to bottom, these data points represent the following:
- The distance from the left edge of the object to the left edge of the layout
- The distance from the top edge of the object to the top edge of the layout
- The distance from the right edge of the object to the left edge of the layout
- The distance from the bottom edge of the object to the top edge of the layout
- The object's width
- The object's height
In these definitions, the left edge and top edge of the layout may be outside the area you can actively work with. Most layouts have a default page margin, usually .25 inches on each side. You can make your layout's page margins visible by choosing View, Page Margins. Fixed page margins can be set under the Printing tab of the Layout Setup dialog.
Caution
It's important to know that page margins are factored into the distances displayed in the Size palette. You can't move or position an object in the page margin. If you are trying to use absolute positioning to align objects on different layouts, any differences in page margins need to be taken into consideration.
The Size palette can measure distance as inches, centimeters, or pixels. You'll see the unit displayed on the right edge of the palette itself. You can toggle among the three available units simply by clicking on any of the unit labels.
Tip
We find that setting the Size palette to display pixels is much more intuitive and useful than using inches or centimeters.
The Size palette doesn't merely report on the position and size of a selected object; it can also be used to set these attributes. With an object selected, you can click into and edit any of the six data points. Pressing the Tab or Return key moves you through the palette's fields.
Pressing the Enter key exits the palette (for users with both keys on their keyboard; if you're working on a laptop, there's usually just an Enter key). As you change the numbers in the palette, the selected object moves or resizes as you have specified. This makes it very easy to precisely align, position, and size objects on a layout.
Tip
If you're working on a laptop that lacks a Return key, (Enter) [Ctrl+Enter] will exit the Size palette and return focus to your prior window with your objects still selected.
Arranging Objects
FileMaker provides many tools to help you organize and arrange objects on a layout. This section discusses some of these tools.
Grouping Objects
Objects can be grouped together to form a new object. You do so by selecting the desired objects and choosing Arrange, Group or pressing (R) [Ctrl+R]. The resulting object behaves just like any other object. It has a single set of selection handles, and it can be moved and resized as described in the previous sections. Any formatting applied to the grouped object is applied to each of the elements of the group, as if you had simply selected all the elements individually. Grouped objects can be further grouped with other objects to form yet new objects.
To ungroup an object, select the object, and then choose Arrange, Ungroup or press (-Shift-R) [Ctrl+Shift+R]. If an object was formatted as a button, ungrouping it deletes the button definition.
Tip
Ungrouping an object is the easiest way to remove a button definition from an object. This works even if the object in question isn't a grouped object.
Locking Objects
To prevent an object from being moved, resized, reformatted, or deleted, you can lock it by selecting it and choosing Arrange, Lock or pressing (-Option-L) [Ctrl+Alt+L]. When you select a locked object, its handles appear grayed out rather than black.
When you select a combination of locked and unlocked objects, if you attempt to move or resize them as a set, only the unlocked objects are affected. If you attempt to change the formatting of the selected set, you see an error that the formatting can't be applied to some objects in the set because they are locked.
Locking objects is very useful when you have objects stacked on top of or overlapping one another. It's as if the locked objects become a backdrop against which you do your work. Whether you leave the objects permanently or temporarily locked, it becomes much easier to select and work with certain objects when the objects behind them are locked.
To unlock an object, choose Arrange, Unlock, or press (-Option-Shift-L) [Ctrl+Alt+Shift+L].
Aligning Objects
It's often desirable to align objects on a layout relative to one another, and FileMaker has some built-in tools to make this easy to do. For instance, you might have 10 fields on a layout that you want to be aligned along their left edges.
You can use the Align, Distribute, and Resize To menu options, under the Arrange menu, to manipulate objects relative to each other.
You can specify a Top to Bottom alignment, or a Left to Right alignment, or both. You can also distribute objects or resize to the largest or smallest dimensions of the selected objects.
When you align a set of objects relative to one another, one of the objects usually serves as the reference point. For instance, when you left-align a set of objects, the leftmost object is the reference point. The other objects move left while the leftmost object remains in place. Similar results are obtained for aligning to the right, top, and bottom. The exception to this is when one or more of the selected objects is locked. If this is the case, and you want to, say, left-align a set of objects, the leftmost locked object becomes the reference point.
The rules for centering are slightly different. When centering left to right, the objects are centered on the midpoint between the leftmost and rightmost selection points. For top-to-bottom centering, they are aligned on the midpoint between the topmost and bottommost selection points.
The option to distribute space is useful when you want to be sure that objects in a set are equidistant from one another. The two outermost objects, whether left-to-right or top-to-bottom, act as anchors for the distribution: The selected objects in between them are spaced apart evenly.
Tip
Even the sloppiest of developers can benefit from this simple process: Select a group of fields, irregularly placed and irregularly sized. Then choose Arrange, Align, Left Edges, followed by Arrange, Distribute, Vertically. Last, select Resize To, Largest Width and Height. Voiláyour layout objects are now nicely sized and positioned.
|
Although not a new feature, it's necessary to mention that FileMaker 8 did away with the old layout alignment dialog and keyboard shortcuts in favor of adding capabilities to the Arrange menu. We won't weigh in on the debate that ensued; we're just glad we don't have to be the ones making those sorts of decisions. |
Layering Objects
FileMaker maintains a stacking order for objects on a layout. When a new object is added to a layout, it becomes the frontmost item in the stacking order. The stacking order becomes important when objects overlap one another. If two objects overlap, object A appears in front of object B if it is forward in the stacking order. Also, if object B is completely behind object A, it is impossible to select object B simply by clicking on it. When you click on a spot on a layout where multiple objects overlap, you select the frontmost of the objects.
There is no way to visually review the stacking order of the objects on a layout, but you can manipulate the stacking order by using the Bring to Front, Bring For ward, Send to Back, and Send Backward functions, all of which can be found under the Arrange menu.
|
The stacking order also determines the tab order of layouts published to the Web with Instant Web Publishing. For more on IWP, see "Layout Design," p. 653. |
Note
The stacking order also determines the order in which objects draw on the screen. With a local file or on a fast network, it's probably imperceptible, but on slow networks, you will sometimes see the objects draw one by one, from back to front.
Sliding Objects
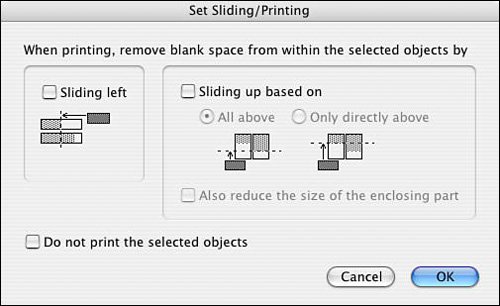
If you are developing layouts that are intended to be printed, and you have variable amounts of text in certain fields, you may want to configure some objects on your layout to slide. Sliding eliminates excess whitespace from an object, allowing it to appear closer to its neighboring objects. You can configure an object to slide either up or to the left, using the dialog shown in Figure 4.13, which you open by selecting a set of objects and choosing Format, Sliding/Printing.
Figure 4.13. You can configure an object to slide either up or to the left by using the Set Sliding/Printing dialog.
The effects of sliding can't be seen unless you are in Preview mode (or you actually print). If you set a field to slide, any whitespace in the field is removed in Preview mode. One caveat to know is that the contents of a field must be top-aligned to slide up and left-aligned to slide left.
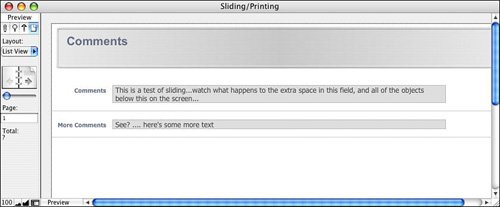
Sliding does not reduce the amount of space between objects. Say you have a large text field, as in Figure 4.14, with a horizontal line located 10 pixels below the bottom of the field. If you set both objects to slide up, empty space in the field will be removed, and the line will slide up until it is 10 pixels away from the bottom of the field. Figure 4.15 shows how the record in Figure 4.14 looks in Preview mode. All objects on the layout have been set to slide up.
Figure 4.14. You can't see any effects of sliding while in Browse mode.
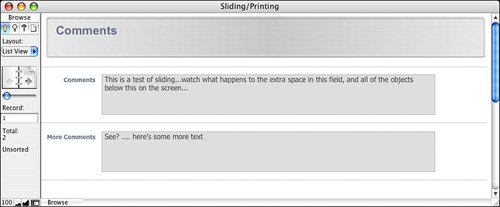
Figure 4.15. In Preview mode, objects slide either up or to the left, removing whitespace within fields.
The option to Also Reduce the Size of the Enclosing Part is useful when you have a list of variable-length records. Set the layout to accommodate the longest possible amount of data, and then turn on sliding for all the fields in the body and reduce the size of the enclosing part. The rows of the list will then have a variable length when they are previewed and printed. You must be sure to set all the objects in the list to slide; a single nonsliding object may cause the part to not reduce properly. Objects such as vertical lines do not shrink in size to accommodate variable record widths, so if you need this effect, use left or right field borders, which do shrink appropriately.
Sliding can be applied to portals as well, but objects in a portal can't slide. If a portal is set to slide up, any blank rows of the portal are suppressed, but there's no way to make the height of the individual rows of the portal variable. Portal sliding is useful and necessary in reports that must pull in data from related files. Typically, if there's a portal on a printable report, you should set the portal to display a large number of records and not to have a vertical scroll. If you enable sliding as well, any unneeded portal rows simply disappear.
The Set Sliding/Printing dialog also has an option to make a layout object nonprinting. As with sliding, this setting is apparent only in Preview mode. Typically, you use this option to allow buttons, background images, and data entry instructionsitems you typically wouldn't want to have on a printoutto be visible only in Browse and Find modes.
Part I: Getting Started with FileMaker 8
FileMaker Overview
- FileMaker Overview
- FileMaker and Its Marketplace
- Introduction to Database Software
- FileMaker Deployment Options
- Whats New in FileMaker Pro 8
Using FileMaker Pro
- Getting Started
- Working in FileMaker Pro
- Troubleshooting
- FileMaker Extra: Becoming a FileMaker Pro Power User
Defining and Working with Fields
- Defining and Working with Fields
- Working Under the Hood
- Working with Fields
- Working with Field Types
- Assigning Field Options
- Troubleshooting
- FileMaker Extra: Indexing in FileMaker
Working with Layouts
- Working with Layouts
- Whats a Layout?
- Creating and Managing Layouts
- Working with Parts
- Working with Objects on a Layout
- Working with the Tab Control Object
- Working with Fields
- Portals
- Troubleshooting
- FileMaker Extra: Designing Cross-PlatformFriendly Layouts
Part II: Developing Solutions with FileMaker
Relational Database Design
- Relational Database Design
- Understanding Database Design
- Database Analysis
- Working with Entities and Attributes
- Understanding Relationships
- Relationship Optionality
- Understanding the Role of Keys in Database Design
- Many-to-Many Relationships: Solving the Puzzle
- The Basics of Process Analysis
- FileMaker Extra: Complex Many-to-Many Relationships
Working with Multiple Tables
- Working with Multiple Tables
- Multitable Systems in FileMaker Pro
- Creating a One-to-Many Relationship in FileMaker
- Working with Keys and Match Fields
- Understanding Table Context
- Working with Related Data
- Creating a Many-to-Many Relationship
- Relational Integrity
- Rapid Multitable Development
- Troubleshooting
- FileMaker Extra: Building a Three-Way Join
Working with Relationships
- Working with Relationships
- Relationships Graphs and ERDs
- Relationships as Queries
- Creating Self-Relationships
- Creating Ranged Relationships
- Creating Cross-Product Relationships
- Working with Data from Distant Tables
- Working with Multiple Files
- How and When to Use Multiple Files
- Troubleshooting
- FileMaker Extra: Managing the Relationships Graph
Getting Started with Calculations
- Getting Started with Calculations
- Understanding How and Where Calculations Are Used
- Exploring the Calculation Dialog Box
- Essential Functions
- Using Conditional Functions
- Aggregate Functions
- Learning About the Environment
- Troubleshooting
- FileMaker Extra: Tips for Becoming a Calculation Master
Getting Started with Scripting
- Getting Started with Scripting
- Scripts in FileMaker Pro
- Creating Scripts
- Common Scripting Topics
- Triggering Scripts
- Working with Buttons on Layouts
- Troubleshooting
- FileMaker Extra: Creating a Script Library
Getting Started with Reporting
- Getting Started with Reporting
- Deriving Meaning from Data
- Working with Lists of Data
- Summarized Reports
- Delivering Reports
- Troubleshooting
- FileMaker Extra: Incorporating Reports into the Workflow
Part III: Developer Techniques
Developing for Multiuser Deployment
- Developing for Multiuser Deployment
- Developing for Multiple Users
- Sessions in FileMaker Pro
- Concurrency
- Audit Trails in FileMaker Pro
- Launch Files
- Troubleshooting
- FileMaker Extra: Development with a Team
Implementing Security
- Approaching Security
- User-Level Internal Security
- File-Level Access Security
- Troubleshooting
- FileMaker Extra: Working with Multiple Files
Advanced Interface Techniques
- Advanced Interface Techniques
- User Interfaces in FileMaker Pro
- Navigation
- Multiwindow Interfaces
- Working with Custom Menus
- Showing/Hiding Layout Elements
- Dedicated Find Layouts
- Data Presentation
- Working with Table View
- Troubleshooting
- FileMaker Extra: User Interface Heuristics
Advanced Calculation Techniques
- Advanced Calculation Techniques
- Whats an Advanced Calculation Technique?
- Logical Functions
- Text Formatting Functions
- Array Functions
- The Filter-ing Functions
- Custom Functions
- GetNthRecord
- Troubleshooting
- FileMaker Extra: Creating a Custom Function Library
Advanced Scripting Techniques
- Advanced Scripting Techniques
- What Is Advanced Scripting?
- Script Parameters and Script Results
- Script Variables
- Window Management Techniques
- Go to Related Record
- Troubleshooting
- FileMaker Extra: Recursive Scripts
Advanced Portal Techniques
- Advanced Portal Techniques
- Portals in FileMaker Pro
- Portal Basics
- New Record Only Relationships
- Horizontal Portals
- Using Portals to Create Calendars
- Selection Portals
- Filtered Portals
- Dynamic Portal Sorting
- Troubleshooting
- FileMaker Extra: Portals and Record Locking
Debugging and Troubleshooting
- Debugging and Troubleshooting
- What Is Troubleshooting?
- Staying Out of Trouble
- Planning for Trouble
- Troubleshooting Scripts and Calculations
- Troubleshooting in Specific Areas: Performance, Context, Connectivity, and Globals
- File Maintenance and Recovery
- FileMaker Extra: Other Tools of the Trade
Converting Systems from Previous Versions of FileMaker Pro
- Converting Systems from Previous Versions of FileMaker Pro
- Migration Choices
- Converting Files
- Pre-Conversion Tasks
- Post-Conversion Tasks
- Troubleshooting
- FileMaker Extra: Converting Web-Enabled Databases
Part IV: Data Integration and Publishing
Importing Data into FileMaker Pro
- Importing Data into FileMaker Pro
- Working with External Data
- Flat-File Data Sources
- Importing Multiple Files from a Folder
- Importing Photos from a Digital Camera
- Importing from an ODBC Data Source
- Importing from an XML Data Source
- Using a Script to Import Data
- Troubleshooting
- FileMaker Extra: Exploiting the FileMaker-to-FileMaker Import
Exporting Data from FileMaker
- Exporting Data from FileMaker
- Getting Out What You Put In
- The Basic Mechanics of Exporting
- Export File Formats
- Formatting Exported Data
- Exporting Related Fields
- Exporting Grouped Data
- Exporting to Fixed-Width Formats
- Working with Large Fields and Container Fields
- Scripted Exports
- Accessing FileMaker Data Using ODBC and JDBC
- Using FileMaker Pro as an ODBC Client
- Troubleshooting
- FileMaker Extra: Accessing FileMaker Data via JDBC
Instant Web Publishing
- Instant Web Publishing
- An Overview of Instant Web Publishing
- Enabling and Configuring IWP
- Designing for IWP Deployment
- Using an IWP Solution
- Troubleshooting
- FileMaker Extra: Building Your Own Next and Previous Page Buttons
FileMaker and Web Services
- FileMaker and Web Services
- About Web Services
- FileMaker and XML
- Transforming XML
- XML Import: Understanding Web Services
- Working with Web Services
- Troubleshooting
- FileMaker Extra: Write Your Own Web Services
Custom Web Publishing
- Custom Web Publishing
- About Custom Web Publishing
- Custom Web Publishing Versus Instant Web Publishing
- Custom Web Publishing Versus XML Export
- Getting Your Databases Ready for Custom Web Publishing
- Publishing FileMaker Data as XML
- Using XSLT with Custom Web Publishing
- Building Web Applications with XSLT-CWP
- Other Custom Web Publishing Commands and Parameters
- About the FileMaker XSLT Extensions
- Troubleshooting
- FileMaker Extra: About the Custom Web Publishing Tools
Part V: Deploying a FileMaker Solution
Deploying and Extending FileMaker
- Deploying and Extending FileMaker
- FileMaker Deployment Options
- Single User
- Peer-to-Peer Hosting
- FileMaker Server
- Web Publishing
- ODBC/JDBC
- Citrix/Terminal Services
- Runtime Solutions
- Deploying to Handheld Devices
- Customized Deployment Options
- Troubleshooting
- FileMaker Extra: The Limits of Customization
FileMaker Server and Server Advanced
- FileMaker Server and Server Advanced
- About FileMaker Server
- Installing FileMaker Server
- Running FileMaker Server
- Using the Server Administration Tool
- Configuring and Administering FileMaker Server Using the SAT
- Managing Clients
- Managing Databases
- Administration from the Command Line
- Working with External Services
- Automatically Updating Plug-ins
- Scheduled Tasks
- Monitoring FileMaker Server
- Troubleshooting
- FileMaker Extra: Best Practices Checklist
FileMaker Mobile
- FileMaker Mobile
- FileMaker Mobile 8 Overview
- Using FileMaker Mobile on Your Handheld Device
- Troubleshooting
- FileMaker Extra: Publishing Related Data
Documenting Your FileMaker Solutions
- Documenting Your FileMaker Solutions
- Why Is Documentation Important?
- Developing Naming Conventions
- Using Comments Effectively
- Documenting the Relationships Graph
- Using the Database Design Report
- Using Third-Party Documentation Tools
- Putting the Finishing Touches on Your Documentation
- Final Thoughts on Documentation
- FileMaker Extra: Soliant Development Standards
EAN: 2147483647
Pages: 296
- Chapter V Consumer Complaint Behavior in the Online Environment
- Chapter VIII Personalization Systems and Their Deployment as Web Site Interface Design Decisions
- Chapter IX Extrinsic Plus Intrinsic Human Factors Influencing the Web Usage
- Chapter XVII Internet Markets and E-Loyalty
- Chapter XVIII Web Systems Design, Litigation, and Online Consumer Behavior
