Working with Parts
Layouts are made up of parts. Depending on your objectives, your layout may contain header and footer parts, a body part, one or more subsummary parts, and maybe even a leading or trailing grand summary. Every layout must contain at least one part.
Briefly, the purpose and some characteristics of each type of part are as listed here:
- Title Header Title headers are used when you need a header on the first page of a multipage report that differs from the header on subsequent pages. In Form view, a user can view a title header (while in Browse mode), but not in List or Table view.
- Header Objects in the header part appear at the top of each page of a multipage report (except the first page when a title header is present). A header part remains fixed onscreen in List and Table views, even when a user scrolls to see additional records. Data in fields placed in a header part can be edited; fields in a header part always display data from the currently active record.
- Leading Grand Summary Typically used on report layouts, a leading grand summary appears between the header and any subsummary or body parts. Summary fields placed in this part aggregate across the entire found set.
|
For more information about using summary fields and summary parts to create reports, see "Summarized Reports," p. 287. |
- Body The body part is used to display data from a single record. A data-entry layout often consists of nothing other than a body part. Almost every layout you create will have a body part.
- Subsummary Subsummary parts are used primarily for displaying subtotals on reports. For a subsummary to display properly, the found set must be sorted by the same field as that on which the subsummary is based, and you must be in Preview mode. Subsummaries can be placed either above or below the body part, depending on whether you want the subtotals displayed before or after the data they summarize.
- Trailing Grand Summary Similar to a leading grand summary, a trailing grand summary is typically found on report layouts and is used to display aggregate summaries. When printed, the trailing grand summary report appears directly following the body part and any trailing subsummaries.
- Footer Objects in the footer appear on every page of a multipage printout (except on the first page when a title footer is present). In List view, the footer remains fixed on the layout when a user scrolls through records.
- Title Footer A title footer part is used when you want to display a different footer on the first page of a multipage printout.
Adding and Ordering Parts
There are two ways of adding parts to a layout. The first is by clicking and dragging the Part button in the Status Area to the point where you want the new part to appear. You are prompted to select a part type when you let up the mouse. Although it is convenient, we discourage this method of adding new parts. New parts, except when added to the very bottom of the layout, always come at the expense of existing parts. That is, if you have a 50pixel header followed by a 200pixel body, and you attempt to add a subsummary between these parts, the body part shrinks by the size of the subsummary part. Moreover, fields that were in the body part may now be part of the subsummary part.
The other option for adding new parts, which we prefer in almost every circumstance, is to use the Part Setup dialog (shown in Figure 4.9), which can be found under the Layouts menu. When parts are added with this tool, it's not at the expense of any existing part; the total height of the layout increases.
Figure 4.9. You can add, edit, delete, and reorder the parts on a layout from the Part Setup dialog.
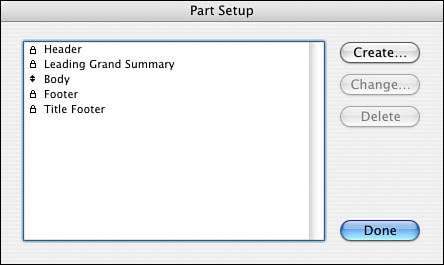
The Part Setup dialog can also be used to reorder, edit, and delete parts. The only types of parts that can be reordered are the body and subsummary parts. To reorder these, click the arrow in front of the part name and drag it to the desired position. Other part types appear with a lock in front of them, indicating that they are fixed in a certain order by definition.
You can delete a part from a layout either by selecting it from the Part Setup dialog and clicking Delete, or by clicking the part label while in Layout mode and pressing the Backspace or Delete key on your keyboard. Either way, when you delete a part, any objects contained in that part are also deleted.
Formatting a Part
You can configure a few attributes of parts directly from Layout mode itself. First, you can set a background color and/or fill pattern for a part by clicking on the part label, and then selecting a color and/or fill pattern. (Control-clicking) [right+clicking] on the part label similarly pulls up a contextual menu with access to these attributes.
You can achieve much the same effect simply by drawing a large rectangle on the layout, sending it to the back, and locking it. Setting a background color for the part is preferred, though, because the color extends to the right and downward if the user expands the window beyond the boundaries of your rectangle.
Tip
For users with monitors set to higher resolutions than your database was designed for, consider adding a footer with a background color different from your body part so that users can visually see where the layout "ends" and size their windows appropriately.
You can also change a part's size. To do this, simply click on the dividing line between two parts and drag either up or down. When making a part smaller, you can remove whitespace from the part, but you are prevented from dragging through any objects in the part. Any expansion of a part increases the overall size of the part.
Holding down (Option) [Alt] as you resize a part changes the rules slightly. First, any expansion or contraction comes at the benefit or expense of the neighboring part; the overall height of the layout remains the same (except, of course, when enlarging the last part on the layout). Also, you can "run over" objects this way; an object that was in one part may end up belonging to another part after you've resized things. An object that ends up straddling two (or more) parts belongs to the part that contains its upper-left corner.
The Size palette can also be used to see and set a part's length. This is the best way to precisely set part lengths, especially when trying to duplicate complex layouts from one file to another. Click the part label to display that part's data in the Size palette.
|
For more information about the Size palette, see "Positioning Objects on a Layout," p. 109. |
Part Definition
Beyond the size and background color of a part, some part attributes can be set only in the Part Definition dialog, shown in Figure 4.10. You can get to this dialog either from the Part Setup dialog (by clicking Create or Change), or by double-clicking on the part label itself.
Figure 4.10. The Part Definition dialog is used to specify a part's type and attributes.
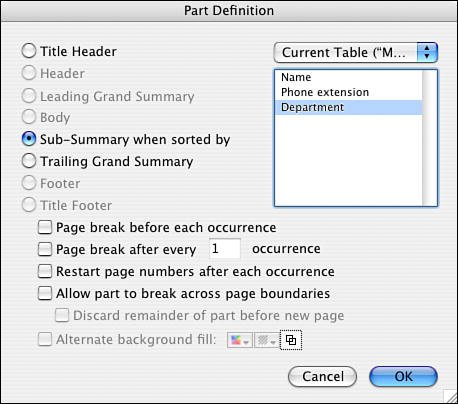
The type of part is indicated by the radio buttons on the left side of this dialog. You can change the type of a part simply by selecting a different radio button. If a type is grayed out, that means you already have a part of that type. The only part type for which you can have multiples is subsummary.
The fields on the right side of the dialog apply only to subsummary parts. When you make a subsummary part, you must specify which field will act as the break field for the summary. The break field doesn't need to actually appear in that part, but the found set must be sorted by the break field for the subsummary part to appear on a report.
|
For more information on break fields and subsummary reports, see "Summarized Reports," p. 287. |
At the bottom of the dialog are some options for configuring page breaks and page numbers. Often in subsummary reports, you'll want each new subsection to start on a new page. To do this, you would edit the part definition of the subsummary part to include the Page Break Before Each Occurrence option. As you would expect, it's actually only each occurrence after the first one that's preceded by a page break.
You can also opt to use the Alternate Background Fill feature. This option is available only on body parts. Any color and/or fill that you specify is used as the background for every other record. It alternates with any background color that has been specified for the part itself. Often, a slight shading of alternate rows on a report makes it easier to read.
Part I: Getting Started with FileMaker 8
FileMaker Overview
- FileMaker Overview
- FileMaker and Its Marketplace
- Introduction to Database Software
- FileMaker Deployment Options
- Whats New in FileMaker Pro 8
Using FileMaker Pro
- Getting Started
- Working in FileMaker Pro
- Troubleshooting
- FileMaker Extra: Becoming a FileMaker Pro Power User
Defining and Working with Fields
- Defining and Working with Fields
- Working Under the Hood
- Working with Fields
- Working with Field Types
- Assigning Field Options
- Troubleshooting
- FileMaker Extra: Indexing in FileMaker
Working with Layouts
- Working with Layouts
- Whats a Layout?
- Creating and Managing Layouts
- Working with Parts
- Working with Objects on a Layout
- Working with the Tab Control Object
- Working with Fields
- Portals
- Troubleshooting
- FileMaker Extra: Designing Cross-PlatformFriendly Layouts
Part II: Developing Solutions with FileMaker
Relational Database Design
- Relational Database Design
- Understanding Database Design
- Database Analysis
- Working with Entities and Attributes
- Understanding Relationships
- Relationship Optionality
- Understanding the Role of Keys in Database Design
- Many-to-Many Relationships: Solving the Puzzle
- The Basics of Process Analysis
- FileMaker Extra: Complex Many-to-Many Relationships
Working with Multiple Tables
- Working with Multiple Tables
- Multitable Systems in FileMaker Pro
- Creating a One-to-Many Relationship in FileMaker
- Working with Keys and Match Fields
- Understanding Table Context
- Working with Related Data
- Creating a Many-to-Many Relationship
- Relational Integrity
- Rapid Multitable Development
- Troubleshooting
- FileMaker Extra: Building a Three-Way Join
Working with Relationships
- Working with Relationships
- Relationships Graphs and ERDs
- Relationships as Queries
- Creating Self-Relationships
- Creating Ranged Relationships
- Creating Cross-Product Relationships
- Working with Data from Distant Tables
- Working with Multiple Files
- How and When to Use Multiple Files
- Troubleshooting
- FileMaker Extra: Managing the Relationships Graph
Getting Started with Calculations
- Getting Started with Calculations
- Understanding How and Where Calculations Are Used
- Exploring the Calculation Dialog Box
- Essential Functions
- Using Conditional Functions
- Aggregate Functions
- Learning About the Environment
- Troubleshooting
- FileMaker Extra: Tips for Becoming a Calculation Master
Getting Started with Scripting
- Getting Started with Scripting
- Scripts in FileMaker Pro
- Creating Scripts
- Common Scripting Topics
- Triggering Scripts
- Working with Buttons on Layouts
- Troubleshooting
- FileMaker Extra: Creating a Script Library
Getting Started with Reporting
- Getting Started with Reporting
- Deriving Meaning from Data
- Working with Lists of Data
- Summarized Reports
- Delivering Reports
- Troubleshooting
- FileMaker Extra: Incorporating Reports into the Workflow
Part III: Developer Techniques
Developing for Multiuser Deployment
- Developing for Multiuser Deployment
- Developing for Multiple Users
- Sessions in FileMaker Pro
- Concurrency
- Audit Trails in FileMaker Pro
- Launch Files
- Troubleshooting
- FileMaker Extra: Development with a Team
Implementing Security
- Approaching Security
- User-Level Internal Security
- File-Level Access Security
- Troubleshooting
- FileMaker Extra: Working with Multiple Files
Advanced Interface Techniques
- Advanced Interface Techniques
- User Interfaces in FileMaker Pro
- Navigation
- Multiwindow Interfaces
- Working with Custom Menus
- Showing/Hiding Layout Elements
- Dedicated Find Layouts
- Data Presentation
- Working with Table View
- Troubleshooting
- FileMaker Extra: User Interface Heuristics
Advanced Calculation Techniques
- Advanced Calculation Techniques
- Whats an Advanced Calculation Technique?
- Logical Functions
- Text Formatting Functions
- Array Functions
- The Filter-ing Functions
- Custom Functions
- GetNthRecord
- Troubleshooting
- FileMaker Extra: Creating a Custom Function Library
Advanced Scripting Techniques
- Advanced Scripting Techniques
- What Is Advanced Scripting?
- Script Parameters and Script Results
- Script Variables
- Window Management Techniques
- Go to Related Record
- Troubleshooting
- FileMaker Extra: Recursive Scripts
Advanced Portal Techniques
- Advanced Portal Techniques
- Portals in FileMaker Pro
- Portal Basics
- New Record Only Relationships
- Horizontal Portals
- Using Portals to Create Calendars
- Selection Portals
- Filtered Portals
- Dynamic Portal Sorting
- Troubleshooting
- FileMaker Extra: Portals and Record Locking
Debugging and Troubleshooting
- Debugging and Troubleshooting
- What Is Troubleshooting?
- Staying Out of Trouble
- Planning for Trouble
- Troubleshooting Scripts and Calculations
- Troubleshooting in Specific Areas: Performance, Context, Connectivity, and Globals
- File Maintenance and Recovery
- FileMaker Extra: Other Tools of the Trade
Converting Systems from Previous Versions of FileMaker Pro
- Converting Systems from Previous Versions of FileMaker Pro
- Migration Choices
- Converting Files
- Pre-Conversion Tasks
- Post-Conversion Tasks
- Troubleshooting
- FileMaker Extra: Converting Web-Enabled Databases
Part IV: Data Integration and Publishing
Importing Data into FileMaker Pro
- Importing Data into FileMaker Pro
- Working with External Data
- Flat-File Data Sources
- Importing Multiple Files from a Folder
- Importing Photos from a Digital Camera
- Importing from an ODBC Data Source
- Importing from an XML Data Source
- Using a Script to Import Data
- Troubleshooting
- FileMaker Extra: Exploiting the FileMaker-to-FileMaker Import
Exporting Data from FileMaker
- Exporting Data from FileMaker
- Getting Out What You Put In
- The Basic Mechanics of Exporting
- Export File Formats
- Formatting Exported Data
- Exporting Related Fields
- Exporting Grouped Data
- Exporting to Fixed-Width Formats
- Working with Large Fields and Container Fields
- Scripted Exports
- Accessing FileMaker Data Using ODBC and JDBC
- Using FileMaker Pro as an ODBC Client
- Troubleshooting
- FileMaker Extra: Accessing FileMaker Data via JDBC
Instant Web Publishing
- Instant Web Publishing
- An Overview of Instant Web Publishing
- Enabling and Configuring IWP
- Designing for IWP Deployment
- Using an IWP Solution
- Troubleshooting
- FileMaker Extra: Building Your Own Next and Previous Page Buttons
FileMaker and Web Services
- FileMaker and Web Services
- About Web Services
- FileMaker and XML
- Transforming XML
- XML Import: Understanding Web Services
- Working with Web Services
- Troubleshooting
- FileMaker Extra: Write Your Own Web Services
Custom Web Publishing
- Custom Web Publishing
- About Custom Web Publishing
- Custom Web Publishing Versus Instant Web Publishing
- Custom Web Publishing Versus XML Export
- Getting Your Databases Ready for Custom Web Publishing
- Publishing FileMaker Data as XML
- Using XSLT with Custom Web Publishing
- Building Web Applications with XSLT-CWP
- Other Custom Web Publishing Commands and Parameters
- About the FileMaker XSLT Extensions
- Troubleshooting
- FileMaker Extra: About the Custom Web Publishing Tools
Part V: Deploying a FileMaker Solution
Deploying and Extending FileMaker
- Deploying and Extending FileMaker
- FileMaker Deployment Options
- Single User
- Peer-to-Peer Hosting
- FileMaker Server
- Web Publishing
- ODBC/JDBC
- Citrix/Terminal Services
- Runtime Solutions
- Deploying to Handheld Devices
- Customized Deployment Options
- Troubleshooting
- FileMaker Extra: The Limits of Customization
FileMaker Server and Server Advanced
- FileMaker Server and Server Advanced
- About FileMaker Server
- Installing FileMaker Server
- Running FileMaker Server
- Using the Server Administration Tool
- Configuring and Administering FileMaker Server Using the SAT
- Managing Clients
- Managing Databases
- Administration from the Command Line
- Working with External Services
- Automatically Updating Plug-ins
- Scheduled Tasks
- Monitoring FileMaker Server
- Troubleshooting
- FileMaker Extra: Best Practices Checklist
FileMaker Mobile
- FileMaker Mobile
- FileMaker Mobile 8 Overview
- Using FileMaker Mobile on Your Handheld Device
- Troubleshooting
- FileMaker Extra: Publishing Related Data
Documenting Your FileMaker Solutions
- Documenting Your FileMaker Solutions
- Why Is Documentation Important?
- Developing Naming Conventions
- Using Comments Effectively
- Documenting the Relationships Graph
- Using the Database Design Report
- Using Third-Party Documentation Tools
- Putting the Finishing Touches on Your Documentation
- Final Thoughts on Documentation
- FileMaker Extra: Soliant Development Standards
EAN: 2147483647
Pages: 296
