Window Management Techniques
Among the many important features of FileMaker, the capability to have multiple windows showing data from the same table stands out as one of the most important. To aid developers with managing this feature, several window management script steps are present in ScriptMaker, including the following:
- New Window
- Select Window
- Close Window
- Move/Resize Window
- Set Window Title
There are also 11 Get functions that return data about the active window, ranging from its size and location to its name and the mode it's in. Another function that plays a role in window management is WindowNames, which returns a list containing the names of all the open windows, ordered according to the stacking order of the windows.
Note
 |
The window management script steps were introduced in FileMaker 7. In that release it was possible to get your windows mixed up if there were several windows open with the same name but based on different files. In FileMaker 8, many of the window management script steps, such as WindowNames, include an important new option to consider only windows from the current file. |
These script steps and calculation functions provide you with tremendous ability to control the user experience. The amount of window management you do may vary widely from solution to solution, but having a good grounding in the options available to you is important.
The Anatomy of a Window
When you create, move, and resize windows, you have the opportunity to specify both a location for the window and its size. The unit of measure for all window manipulation is the pixel. Figure 15.6. shows the options for the Move/Resize Window script step.
Figure 15.6. The Move/Resize Window script step enables you to specify the exact coordinates (in pixels) and size for any given window.
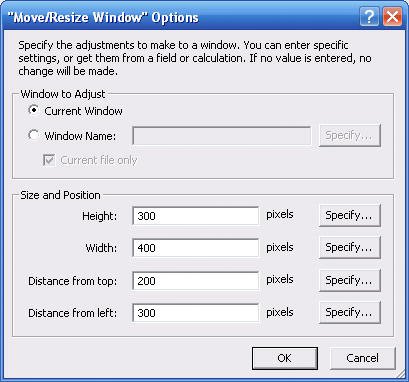
For each parameter of the Move/Resize Window script step, you can either specify a literal number or supply a calculation formula whose result determines the parameter's value. If you leave any of the parameters empty, their values are inherited from the current active window. For instance, if you merely want to move the current window (without changing its size), you don't need to specify anything for the Height and Width parameters.
Before you start creating and moving windows around the screen, however, it's important that you have a good understanding of the anatomy of a window. When you specify the Distance from Top value for a new window, for instance, is that the distance from the top of the screen, or from the top of the application window? Is it the distance to the window's title bar or to the layout itself? These are the types of questions this anatomy lesson answers.
Working from the outside inward, there are four important objects for managing windows. These are the screen, the desktop, the window, and the content area.
Screen
The screen is the backdrop against which all window actions take place. Screen resolution can, of course, differ from user to user. You can use the Get (ScreenHeight) and Get (ScreenWidth) functions to return the absolute height and width (in pixels) of the user's screen.
If multiple monitors are hooked up to a machine, these functions return the dimensions of whichever monitor contains the active window. If the active window straddles monitors, the active screen is considered to be the one that contains the majority of the window. You cannot programmatically alter the dimensions of the screen from within FileMaker Pro.
Desktop
FileMaker also has a pair of functions that return the dimensions of something called the window desktop: Get (WindowDesktopHeight) and Get (WindowDesktopWidth) . In a nutshell, these represent the dimensions of the FileMaker application window.
On a Macintosh, the top menu bar, which is 22 pixels high, is not considered part of the application window. The desktop height, therefore, is 22 pixels smaller than the screen height. The desktop and screen widths should be identical.
The desktop size is slightly more complicated on Windows because an application can be maximized to fill the screen, or it can float free in its own window space. The two desktop functions return the inside dimensions of the application window. The application title bar and the FileMaker menu bar are not considered part of the window desktop on Windows. Scrollbars on the right and bottom of the application, however, are considered part of the window desktop. If you fully maximize FileMaker on Windows XP, and if the taskbar has its default size and location at the bottom of the screen, the desktop height is 80 pixels less than the screen height. That includes 46 pixels for the application title bar and menu bar and 34 pixels for the taskbar.
Caution
Be aware that the dimensions are slightly different in Windows 2000/2003, and that many system settings can affect the exact pixel sizes for various screen elements. It's best to test on your own system.
You cannot programmatically set the dimensions of the desktop area, nor can you determine the placement of the desktop relative to the screen (which is interesting only on Windows when the application is not maximized).
Window
The next type of object to discuss is the window. This is finally where you, as the developer, get to have some control over things. You can set the size, placement, and name of windows on the screen through various script steps. The size of the active windowits outside dimensionscan be obtained with the Get (Height) and Get (Width) functions. These dimensions include both the window's frame and its content . These concepts are discussed in depth later in this section.
When you position a window on the screen, you specify, in effect, the coordinates for the upper-left corner of the window. These coordinates are not relative to the overall screen dimensions. They are mostly relative to the window desktop. We say "mostly" here because a window positioned 0 pixels from the top and 0 pixels from the left is placed at the upper-left corner within the application window. If there are no active, docked toolbars, this window's position would, in fact, be relative to the window desktop. It's the potential presence of docked toolbars (either the Standard toolbar or the Text Formatting toolbar) that muddies the waters. Each of those can move the absolute position of (0,0) either downward or to the right, depending on where the toolbar is docked. Docked in the standard position at the top of the screen, each toolbar takes up 26 pixels on Mac and 27 pixels on Windows XP. The toolbars do not affect the size of the desktop area.
Further, the presence of the status bar (not to be confused with the status area) on Windows decreases the usable application window space by an additional 18 pixels. There's no way to test for the presence or location of the toolbars or the status bar, so it's impossible to know without experimentation the maximum size a window can be without exceeding the dimensions of the application window.
Caution
On Windows, a user may choose to use normal, large, or even extra large fonts under the display properties. The status bar does not change size, but the window and application title bars both increase in height dramatically. You should be aware that the pixel sizes for various objects provided here are not true constants.
Content
Whereas the outside dimensions of a window are described by the Get (Height) and Get (Width) functions, the inside dimensions are described by the Get (ContentHeight) and Get (ContentWidth) functions. The content area is the most important to you, the developer, because it's the space your layouts inhabit.
It might be helpful to think of a window like a framed picture: Much as a picture frame surrounds a picture, a window's frame surrounds the content of the window. The content dimensions refer to the dimensions of the picture, not including the frame.
The size of the window's frame differs slightly on Mac and Windows. And because you specify window size, not content size, when creating or resizing windows, this means that to display a fixed content size, you need to use a variable window size.
On Macintosh, a window's title bar takes up 22 pixels, and its left and bottom scrollbars are each 15 pixels thick. If the status area is visible, this adds 69 pixels to the window's frame.
On Windows, if the current window is maximized, the window has no top title bar. If it's not maximized, the title bar requires 38 pixels on Windows XP, and 31 pixels on Windows 2000. The left and bottom scrollbars are each 16 pixels thick. If the window is not maximized, there's a further border on the left and right sides of the window that adds 12 more pixels to the width of the frame. Finally, the status area on Windows is the same as on a Mac69 pixels.
The content dimensions tell you only the visible content area of the active window. That is, they don't take into account content that you need to scroll to see.
Positioning a Window Relative to Another Window
One common window manipulation routine involves having a new window pop up at a position on the screen relative to another window. This technique can make for very effective user interface management. Even if users move a window to another part of their screen, your pop-up window appears in the same position relative to the window that called it.
 |
You might have difficulty when creating pop-up windows for use on Windows PCs. See "Pop-up Window Issues on a Windows PC" in the "Troubleshooting" section at the end of this chapter. |
The example discussed in this section is an expansion on the window pop-up technique discussed in the "Rich Dialog Windows" section of Chapter 13, "Advanced Interface Techniques." Refer to that section for more information on how to make the pop-up window behave like a modal dialog.
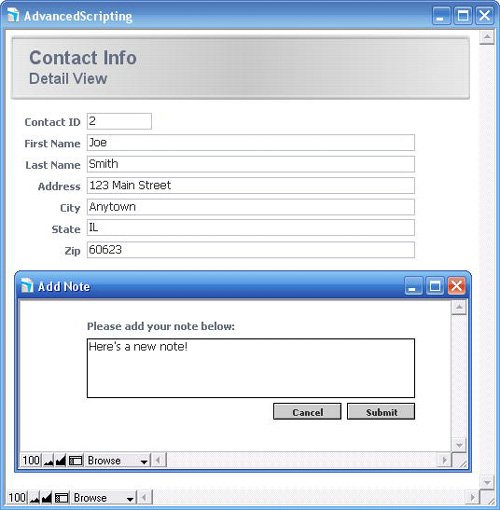
Figure 15.7 shows a layout from a basic contact management system; the portal at the bottom is used to collect notes associated with a particular contact.
Figure 15.7. A contact info layout with a portal into a Notes table becomes the anchor for a pop-up window.

Imagine that you want to create a workflow where users are not allowed to add new notes directly from the portal. Instead, you would like a pop-up window to appear in front of the portal when users click the Add Note button, regardless of where a user has positioned the contact info window. The end result of this is shown in Figure 15.8.
Figure 15.8. The Add Note window is positioned in front of the portal on the Contact Info layout, regardless of where that window has been positioned on the screen.
The trick to having the pop-up window follow the anchor window around the screen is referencing the position of the anchor window in the coordinates for the pop-up window. You still have to know the relative placement of the two windows. However, there's a systematic approach to this that can make the whole process quite simple.
Begin by creating a layout that contains the desired interface for the pop-up window. Use a rectangle (of any color) as the background for this layout. It's important that you use an actual rectangle rather than just changing the color of the layout part because the size of this rectangle determines the size of the pop-up window. Position the rectangle so that it's snug against the top and left borders of your layout. In the example shown in Figure 15.8, the background rectangle on the Add Note layout measures 463 pixels wide by 163 pixels high. Your layout should contain only a body part, and you should shrink the body up right to your background rectangle.
After the pop-up layout has been created, copy the background rectangle to your clipboard, switch over to the anchor layout (here, the Contact Info layout), and paste the rectangle onto this layout. Position it exactly where you want the pop-up window to be placed. Turn on the Object Size dialog (View, Object Size), and make a note of the top and left coordinates of the rectangle. In the example shown in Figure 15.8, these positions were 290 and 15, respectively. You can then delete the rectangle from your layout.
|
For more on using the Object Size palette, see "Positioning Objects on a Layout," p. 109. |
Caution
The values for the top and left pixel of an object returned by the Object Size dialog are relative to the page margins that have been defined for your layout. The margin settings can be set explicitly on the Printing tab of the Layout Setup dialog. If you want to know the absolute position of an object, set the top and left margins to both be 0. Or subtract the top and left margin settings from the values you noted in the Object Size dialog. Your goal is to know the position of the rectangle relative to the current window, so the margins, which aren't even visible in Browse mode, must be factored out.
In the script that generates the new window, you need to use the positions you've noted for the rectangle and the position of the current window to determine the location of the new window. Remember that you need to consider the size of the new window's frame as well, and that the frame size differs on Mac and Windows. The rectangle you placed on the anchor layout determines the size of the window's content area. The size of the window itself must be derived from this.
Taking all these factors together, the parameters you need for your new window are as listed here:
 Height: 139 + Case ( Get (SystemPlatform)) = -1 ; 37; 54)
 Width: 457 + Case ( Get (SystemPlatform)) = -1 ; 15; 27)
 Top: 305 + Get (WindowTop)
 Left: 46 + Get (WindowLeft)
You'll notice that the constants at the beginning of each of these formulas come from the size and position of the pop-up window that were noted earlier. The other constants in these formulas (the ones that were determined by checking whether the user is on a Mac or a Windows PC) are needed to translate from content size to window size. Recall from the preceding section that the size of the window's frame is different on each platform. The preceding calculations also make an assumption that the status area will be hidden in both the anchor window and the pop-up window. If that's not the case, you can easily adjust by adding and/or subtracting 69 (the width of the status area) to the width and distance from left values as necessary.
Tip
If you plan to use pop-up windows often, consider creating custom functions for these formulas. You can have them adjust appropriately, based on platform and the visibility of the status area.
The remainder of the scripts used for the Add Note routine closely resemble those discussed in the "Rich Dialog Windows" section of Chapter 13.
The Add Note script itself is as follows:
Allow User Abort [Off]
If [PatternCount (WindowNames ; "Add Note")]
 Close Window [Name: "Add Note"]
End If
Set Field [Contact::gNote; ""]
New Window [Name: "Add Note"; other paramaters as given above
Go to Layout ["Add Note" (Contact)]
Show/Hide Status Area [Lock; Hide]
Adjust Window [Resize to Fit]
Pause/Resume Script [Indefinitely]
On the Add Note layout itself, both the Cancel and the Submit buttons are specified to Resume the current script. The Cancel script simply closes the current window. The Submit button, which is defined to pass the current record's ContactID as a script parameter, runs the following script:
If [not IsEmpty (Get (ScriptParameter))]
 If [not IsEmpty (Contact::gNote)]
 Go to Layout ["ContactNotes" (ContactNotes)]
 New Record/Request
 Set Field [ContactNotes::ContactID; Get (ScriptParameter)]
 Set Field [ContactNotes::Note; Contact::gNote]
 End If
 Close Window [Current Window]
Else
 Show Custom Dialog ["Warning"; "Invalid script parameter."]
End If
There are many ways you could script the actual addition of the note record. This example navigates to a layout based on the ContactNote table. Because the user entered the new note into a global field, after the new record is created, the ContactNotes::Note field can be directly set to the value of the gNote field. However, the ContactNotes::ContactID field, which is a foreign key relating back to the Contact table, needs to be set to the ContactID of whatever the active record was at the beginning of the routine. It could simply be placed in a field with global storage, but instead, we've elected to have the Submit button pass the ContactID as a script parameter to the Submit Note script.
|
If you have issues with found sets not being retained when you create new windows, see "Creating New Windows Loses My Found Sets" in the "Troubleshooting" section at the end of this chapter. |
Go to Related Record |
Part I: Getting Started with FileMaker 8
FileMaker Overview
- FileMaker Overview
- FileMaker and Its Marketplace
- Introduction to Database Software
- FileMaker Deployment Options
- Whats New in FileMaker Pro 8
Using FileMaker Pro
- Getting Started
- Working in FileMaker Pro
- Troubleshooting
- FileMaker Extra: Becoming a FileMaker Pro Power User
Defining and Working with Fields
- Defining and Working with Fields
- Working Under the Hood
- Working with Fields
- Working with Field Types
- Assigning Field Options
- Troubleshooting
- FileMaker Extra: Indexing in FileMaker
Working with Layouts
- Working with Layouts
- Whats a Layout?
- Creating and Managing Layouts
- Working with Parts
- Working with Objects on a Layout
- Working with the Tab Control Object
- Working with Fields
- Portals
- Troubleshooting
- FileMaker Extra: Designing Cross-PlatformFriendly Layouts
Part II: Developing Solutions with FileMaker
Relational Database Design
- Relational Database Design
- Understanding Database Design
- Database Analysis
- Working with Entities and Attributes
- Understanding Relationships
- Relationship Optionality
- Understanding the Role of Keys in Database Design
- Many-to-Many Relationships: Solving the Puzzle
- The Basics of Process Analysis
- FileMaker Extra: Complex Many-to-Many Relationships
Working with Multiple Tables
- Working with Multiple Tables
- Multitable Systems in FileMaker Pro
- Creating a One-to-Many Relationship in FileMaker
- Working with Keys and Match Fields
- Understanding Table Context
- Working with Related Data
- Creating a Many-to-Many Relationship
- Relational Integrity
- Rapid Multitable Development
- Troubleshooting
- FileMaker Extra: Building a Three-Way Join
Working with Relationships
- Working with Relationships
- Relationships Graphs and ERDs
- Relationships as Queries
- Creating Self-Relationships
- Creating Ranged Relationships
- Creating Cross-Product Relationships
- Working with Data from Distant Tables
- Working with Multiple Files
- How and When to Use Multiple Files
- Troubleshooting
- FileMaker Extra: Managing the Relationships Graph
Getting Started with Calculations
- Getting Started with Calculations
- Understanding How and Where Calculations Are Used
- Exploring the Calculation Dialog Box
- Essential Functions
- Using Conditional Functions
- Aggregate Functions
- Learning About the Environment
- Troubleshooting
- FileMaker Extra: Tips for Becoming a Calculation Master
Getting Started with Scripting
- Getting Started with Scripting
- Scripts in FileMaker Pro
- Creating Scripts
- Common Scripting Topics
- Triggering Scripts
- Working with Buttons on Layouts
- Troubleshooting
- FileMaker Extra: Creating a Script Library
Getting Started with Reporting
- Getting Started with Reporting
- Deriving Meaning from Data
- Working with Lists of Data
- Summarized Reports
- Delivering Reports
- Troubleshooting
- FileMaker Extra: Incorporating Reports into the Workflow
Part III: Developer Techniques
Developing for Multiuser Deployment
- Developing for Multiuser Deployment
- Developing for Multiple Users
- Sessions in FileMaker Pro
- Concurrency
- Audit Trails in FileMaker Pro
- Launch Files
- Troubleshooting
- FileMaker Extra: Development with a Team
Implementing Security
- Approaching Security
- User-Level Internal Security
- File-Level Access Security
- Troubleshooting
- FileMaker Extra: Working with Multiple Files
Advanced Interface Techniques
- Advanced Interface Techniques
- User Interfaces in FileMaker Pro
- Navigation
- Multiwindow Interfaces
- Working with Custom Menus
- Showing/Hiding Layout Elements
- Dedicated Find Layouts
- Data Presentation
- Working with Table View
- Troubleshooting
- FileMaker Extra: User Interface Heuristics
Advanced Calculation Techniques
- Advanced Calculation Techniques
- Whats an Advanced Calculation Technique?
- Logical Functions
- Text Formatting Functions
- Array Functions
- The Filter-ing Functions
- Custom Functions
- GetNthRecord
- Troubleshooting
- FileMaker Extra: Creating a Custom Function Library
Advanced Scripting Techniques
- Advanced Scripting Techniques
- What Is Advanced Scripting?
- Script Parameters and Script Results
- Script Variables
- Window Management Techniques
- Go to Related Record
- Troubleshooting
- FileMaker Extra: Recursive Scripts
Advanced Portal Techniques
- Advanced Portal Techniques
- Portals in FileMaker Pro
- Portal Basics
- New Record Only Relationships
- Horizontal Portals
- Using Portals to Create Calendars
- Selection Portals
- Filtered Portals
- Dynamic Portal Sorting
- Troubleshooting
- FileMaker Extra: Portals and Record Locking
Debugging and Troubleshooting
- Debugging and Troubleshooting
- What Is Troubleshooting?
- Staying Out of Trouble
- Planning for Trouble
- Troubleshooting Scripts and Calculations
- Troubleshooting in Specific Areas: Performance, Context, Connectivity, and Globals
- File Maintenance and Recovery
- FileMaker Extra: Other Tools of the Trade
Converting Systems from Previous Versions of FileMaker Pro
- Converting Systems from Previous Versions of FileMaker Pro
- Migration Choices
- Converting Files
- Pre-Conversion Tasks
- Post-Conversion Tasks
- Troubleshooting
- FileMaker Extra: Converting Web-Enabled Databases
Part IV: Data Integration and Publishing
Importing Data into FileMaker Pro
- Importing Data into FileMaker Pro
- Working with External Data
- Flat-File Data Sources
- Importing Multiple Files from a Folder
- Importing Photos from a Digital Camera
- Importing from an ODBC Data Source
- Importing from an XML Data Source
- Using a Script to Import Data
- Troubleshooting
- FileMaker Extra: Exploiting the FileMaker-to-FileMaker Import
Exporting Data from FileMaker
- Exporting Data from FileMaker
- Getting Out What You Put In
- The Basic Mechanics of Exporting
- Export File Formats
- Formatting Exported Data
- Exporting Related Fields
- Exporting Grouped Data
- Exporting to Fixed-Width Formats
- Working with Large Fields and Container Fields
- Scripted Exports
- Accessing FileMaker Data Using ODBC and JDBC
- Using FileMaker Pro as an ODBC Client
- Troubleshooting
- FileMaker Extra: Accessing FileMaker Data via JDBC
Instant Web Publishing
- Instant Web Publishing
- An Overview of Instant Web Publishing
- Enabling and Configuring IWP
- Designing for IWP Deployment
- Using an IWP Solution
- Troubleshooting
- FileMaker Extra: Building Your Own Next and Previous Page Buttons
FileMaker and Web Services
- FileMaker and Web Services
- About Web Services
- FileMaker and XML
- Transforming XML
- XML Import: Understanding Web Services
- Working with Web Services
- Troubleshooting
- FileMaker Extra: Write Your Own Web Services
Custom Web Publishing
- Custom Web Publishing
- About Custom Web Publishing
- Custom Web Publishing Versus Instant Web Publishing
- Custom Web Publishing Versus XML Export
- Getting Your Databases Ready for Custom Web Publishing
- Publishing FileMaker Data as XML
- Using XSLT with Custom Web Publishing
- Building Web Applications with XSLT-CWP
- Other Custom Web Publishing Commands and Parameters
- About the FileMaker XSLT Extensions
- Troubleshooting
- FileMaker Extra: About the Custom Web Publishing Tools
Part V: Deploying a FileMaker Solution
Deploying and Extending FileMaker
- Deploying and Extending FileMaker
- FileMaker Deployment Options
- Single User
- Peer-to-Peer Hosting
- FileMaker Server
- Web Publishing
- ODBC/JDBC
- Citrix/Terminal Services
- Runtime Solutions
- Deploying to Handheld Devices
- Customized Deployment Options
- Troubleshooting
- FileMaker Extra: The Limits of Customization
FileMaker Server and Server Advanced
- FileMaker Server and Server Advanced
- About FileMaker Server
- Installing FileMaker Server
- Running FileMaker Server
- Using the Server Administration Tool
- Configuring and Administering FileMaker Server Using the SAT
- Managing Clients
- Managing Databases
- Administration from the Command Line
- Working with External Services
- Automatically Updating Plug-ins
- Scheduled Tasks
- Monitoring FileMaker Server
- Troubleshooting
- FileMaker Extra: Best Practices Checklist
FileMaker Mobile
- FileMaker Mobile
- FileMaker Mobile 8 Overview
- Using FileMaker Mobile on Your Handheld Device
- Troubleshooting
- FileMaker Extra: Publishing Related Data
Documenting Your FileMaker Solutions
- Documenting Your FileMaker Solutions
- Why Is Documentation Important?
- Developing Naming Conventions
- Using Comments Effectively
- Documenting the Relationships Graph
- Using the Database Design Report
- Using Third-Party Documentation Tools
- Putting the Finishing Touches on Your Documentation
- Final Thoughts on Documentation
- FileMaker Extra: Soliant Development Standards
EAN: 2147483647
Pages: 296
- Integration Strategies and Tactics for Information Technology Governance
- Linking the IT Balanced Scorecard to the Business Objectives at a Major Canadian Financial Group
- Measuring and Managing E-Business Initiatives Through the Balanced Scorecard
- Governance in IT Outsourcing Partnerships
- The Evolution of IT Governance at NB Power
