Working in FileMaker Pro
Synchronizing with a FileMaker Database
You will need to turn to your computer to prepare a mobile database to be synchronized with a desktop or server-based database.
Configuring a File to Be Published
Assuming that you have available a file you want to publish to your handheld device (or devices), the process of publishing is simply a matter of configuration through the use of the FileMaker Mobile 8 application.
The first step in preparing a file for publishing is turning on the extended privilege for FileMaker Mobile within the security settings for the appropriate privilege sets. You can do this from within FileMaker Mobile or from within FileMaker Pro. This then will allow any account associated with that privilege set to synchronize with your database.
|
For more information on extended privileges, see "Extended Privileges," p. 342 |
Important note: When you want to prepare a file for synchronization, you must have it on your local computer the first time you configure it. You cannot initially set a file for mobile access if it is hosted on another computer. FileMaker Mobile requires that an internal setting be established in a file; this process can happen only on a local computer. After this initial configuration is complete, you can subsequently change configuration settings while it is hosted elsewhere. Configure a file once locally with FileMaker Mobile and it will remain configurable from a networked copy of FileMaker Mobile from that point forward in perpetuity.
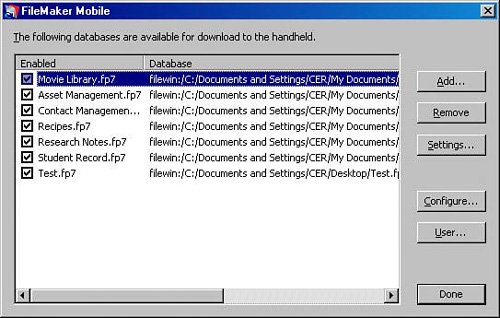
The main screen in FileMaker Mobile, shown in Figure 26.6, provides a listing of all the FileMaker Pro files that have been configured for handheld sharing and shows whether their sharing is currently enabled.
Figure 26.6. The FileMaker Mobile 8 desktop application allows for the configuration of the handheld publishing settings for FileMaker 7 or 8 files.
Adding and Removing Files
Clicking the Add button prompts you to select the desired FileMaker Pro file and then places you in the Settings dialog. The selected file may be a local file or a database hosted by FileMaker Server, but again you will need to have a file on your local computer if this is the first time you are configuring it for FileMaker Mobile access. You can also, if you choose, remove files by clicking the Remove button. Note that this only removes files from the list; any settings contained within them remain.
Permission Settings
Clicking the Settings button will display the file settings options for the selected database (see Figure 26.7). Note that you must have [Full Access] privileges in order to configure a FileMaker database for mobile synchronization.
Figure 26.7. The Mobile Settings dialog in FileMaker Mobile 8 allows you to configure (or reconfigure) a single file for handheld access.

Within the Mobile Settings dialog, you have three settings to work with:
- Sharing
- Fields
- Synchronization
Sharing allows for the designation of which users, if any, are allowed to synch their handhelds to the selected database file. You can either choose to allow all users to synchronize with a given file, or choose to enable specific privilege sets to have access. In all cases, FileMaker Mobile will be enabling the [fmmobile] extended privilege within your FileMaker file.
From this dialog you can also shut off all access for users, regardless of other settings. This is normally used to temporarily disallow synchronization during upgrades, maintenance, and the like.
Field Configuration Settings
The Specify Fields button of the Mobile Settings dialog allows you to specify which fields are to be published via FileMaker Mobile and to set their properties within the mobile database (see Figure 26.8).
Figure 26.8. The FileMaker Mobile 8 field options determine how field information will be displayed on your handheld device.
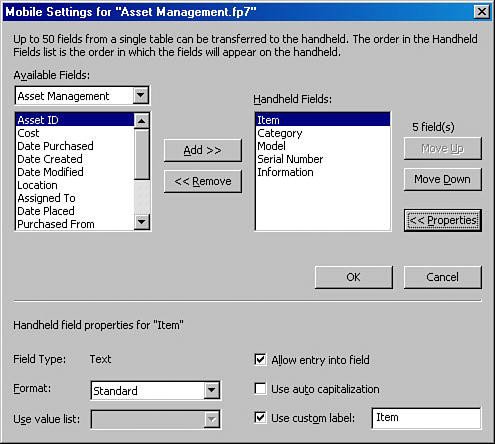
No more than 50 fields from a single table may be published as a FileMaker Mobile handheld published database. Only fields of data type Text, Number, Date, and Time are supported by FileMaker Mobile 8.
- Available Fields Must all be from the same single table. If you try to change tables, the application will clear fields added from a prior table. The FileMaker Mobile 8 handheld version does not support related tables and operations.
- Handheld Field Properties Specify how a field appears and its behavior in the mobile database. You can choose a value list to associate if you've selected a format that requires one. Note that value lists in FileMaker Mobile can only be derived from fixed custom values (as opposed to being dynamically generated from field values or related records). You can opt to disallow entry into fields, essentially making them read-only. You can also enable auto-capitalization as is the convention on handheld devices. Last, you can specify what field label to use.
It is important to keep in mind the limitations of FileMaker Mobile 8, especially that only one table and a maximum of 50 fields (of type Text, Number, Date, or Time) from that table can be published to a handheld per database file. This means that FileMaker Mobile 8 databases running on handheld devices are not relational. Methods for working around this limitation are covered in the section "FileMaker Extra: Publishing Related Data," later in this chapter.
Synchronization Settings
The Synchronization button on the Mobile Settings dialog allows you to specify the rules by which FileMaker Mobile synchronizes data between two databases (see Figure 26.9). It is important to keep in mind that synchronization is a snapshot in time and that two data sets exist thereafter and will need to be reconciled at some future date. Also note that at the moment of synchronization, certain circumstances such as record locking can cause disparity between the computer/hosted data set and the handheld data set, so special attention must be paid to synchronization options.
Figure 26.9. The FileMaker Mobile 8 synchronization options determine what direction record data will flow between handheld and host/desktop.
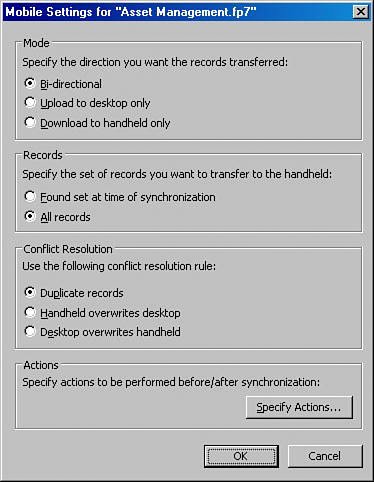
The Mode setting allows you to specify the direction in which records will be transferred at synchronization time. These options control what data you want copied where, and how to handle override logic:
- Bi-directional Records are moved from handheld to computer and from computer to handheld. This is often useful when live data is to be edited or verified at some remote location and then reconciled. Inventory control systems might utilize this form of synchronization. In the case of the same record being edited on both a handheld and the source database, the timestamp for last modification is used to resolve the conflict.
- Upload to Desktop Only Records move from handheld to computer only in a one-way transaction. In this case, the computer acts as a repository for changes made on the handheld, and the handheld data takes precedence over the desktop data. People using FileMaker Mobile 8 to manage data collection activities driven entirely from their handheld devices will often use this mode. At the end of each synchronization, the handheld version of the database will be empty (contain no records).
- Download to Handheld Only Records move from computer to handheld only, and the desktop data will override the handheld as necessary. In this case, the handheld acts as a display tool for data that is maintained on the computer or hosted version of the database. Any records that have been added to the handheld and do not also exist in the source (desktop client or hosted) database will be deleted.
The Records option allows you to specify the set of records that are to be transferred to the handheld at the time of synchronization:
- Found Set at Time of Synchronization It is important to note that the found set is not the same found set you may have present in FileMaker Pro. Instead, a script tied to the synchronization process must establish that found set. In other words, the found set referenced here must be created and is independent of the found set you, as the user, may be viewing at the time that the synchronization function is performed.
 |
For help with solving the problem of establishing a found set before synchronization, see "Found Sets and Sessions" in the "Troubleshooting" section at the end of this chapter. |
- All Records All records in the given table will be synchronized.
The Conflict Resolution setting designates what rule will be used to resolve conflicts that may occur in certain synchronization scenarios. The term conflict here is used to denote a record that has been modified both on the computer (or hosted) version and on the handheld version of the database. Of course, mode settings may override these settings when one database automatically takes precedence over another. The following are the choices available when reconciling conflicts in synchronization:
- Duplicate Records Both versions of the record will be written to both of the designated databases. This will cause two similar versions of the same record to exist and will require that the user delete or modify the extraneous record.
- Handheld Overwrites Desktop (or Server) The handheld's version of a conflicting record will be saved, and the computer's version deleted. Note that this operation creates a new record and deletes the conflicting record.
- Desktop (or Server) Overwrites Handheld The computer's version of a conflicting record will be saved, and the handheld's version deleted.
The conditions for conflict resolution are based on the time and date of the last change made to a specific record. For example, let's say that you chose the Download to Handheld mode of synchronization, and then selected the Desktop Overwrites Handheld method of conflict resolution. In the case that a record is marked as having been changed on both sides, the desktop record would overwrite the record that was changed on the handheld.
The Actions setting allows you to specify a script to run before synchronization occurs and another after it is finished. It is through these means that you can perform tasks such as establishing a specific found set for synchronization or reconciling the lack of auto-entered serial IDs.
|
For help with scripting seeChapter 9, "Getting Started with Scripting," p. 247. |
|
To learn how to deal with the case of missing serial ID values, see "Missing Index Values" in the "Troubleshooting" section at the end of this chapter. |
Configure
Clicking Configure in FileMaker Mobile 8 prompts you for the selection of a FileMaker Pro file and allows you to access its FileMaker Mobile settings in one step. It will not automatically add the file to the list of handheld published files. The Add button must be used for that. Use the Configure setting if you want to configure a file but then don't intend to use your current computer for synchronization.
Users
Clicking the User button in FileMaker Mobile 8 displays the list of registered users and their Handheld License Keys applied on the specific copy of FileMaker Mobile 8 installed on the computer with which you're working. Multiple handhelds may be used with a single install of FileMaker Mobile 8, but each must have its own user code and license key.
Each handheld device is tied to one of the licenses used with FileMaker Mobile 8. In this scenario it is possible for an organization to have people typically out of the office synchronize with a single workstation shared among others and set with their key.
|
Part I: Getting Started with FileMaker 8
FileMaker Overview
- FileMaker Overview
- FileMaker and Its Marketplace
- Introduction to Database Software
- FileMaker Deployment Options
- Whats New in FileMaker Pro 8
Using FileMaker Pro
- Getting Started
- Working in FileMaker Pro
- Troubleshooting
- FileMaker Extra: Becoming a FileMaker Pro Power User
Defining and Working with Fields
- Defining and Working with Fields
- Working Under the Hood
- Working with Fields
- Working with Field Types
- Assigning Field Options
- Troubleshooting
- FileMaker Extra: Indexing in FileMaker
Working with Layouts
- Working with Layouts
- Whats a Layout?
- Creating and Managing Layouts
- Working with Parts
- Working with Objects on a Layout
- Working with the Tab Control Object
- Working with Fields
- Portals
- Troubleshooting
- FileMaker Extra: Designing Cross-PlatformFriendly Layouts
Part II: Developing Solutions with FileMaker
Relational Database Design
- Relational Database Design
- Understanding Database Design
- Database Analysis
- Working with Entities and Attributes
- Understanding Relationships
- Relationship Optionality
- Understanding the Role of Keys in Database Design
- Many-to-Many Relationships: Solving the Puzzle
- The Basics of Process Analysis
- FileMaker Extra: Complex Many-to-Many Relationships
Working with Multiple Tables
- Working with Multiple Tables
- Multitable Systems in FileMaker Pro
- Creating a One-to-Many Relationship in FileMaker
- Working with Keys and Match Fields
- Understanding Table Context
- Working with Related Data
- Creating a Many-to-Many Relationship
- Relational Integrity
- Rapid Multitable Development
- Troubleshooting
- FileMaker Extra: Building a Three-Way Join
Working with Relationships
- Working with Relationships
- Relationships Graphs and ERDs
- Relationships as Queries
- Creating Self-Relationships
- Creating Ranged Relationships
- Creating Cross-Product Relationships
- Working with Data from Distant Tables
- Working with Multiple Files
- How and When to Use Multiple Files
- Troubleshooting
- FileMaker Extra: Managing the Relationships Graph
Getting Started with Calculations
- Getting Started with Calculations
- Understanding How and Where Calculations Are Used
- Exploring the Calculation Dialog Box
- Essential Functions
- Using Conditional Functions
- Aggregate Functions
- Learning About the Environment
- Troubleshooting
- FileMaker Extra: Tips for Becoming a Calculation Master
Getting Started with Scripting
- Getting Started with Scripting
- Scripts in FileMaker Pro
- Creating Scripts
- Common Scripting Topics
- Triggering Scripts
- Working with Buttons on Layouts
- Troubleshooting
- FileMaker Extra: Creating a Script Library
Getting Started with Reporting
- Getting Started with Reporting
- Deriving Meaning from Data
- Working with Lists of Data
- Summarized Reports
- Delivering Reports
- Troubleshooting
- FileMaker Extra: Incorporating Reports into the Workflow
Part III: Developer Techniques
Developing for Multiuser Deployment
- Developing for Multiuser Deployment
- Developing for Multiple Users
- Sessions in FileMaker Pro
- Concurrency
- Audit Trails in FileMaker Pro
- Launch Files
- Troubleshooting
- FileMaker Extra: Development with a Team
Implementing Security
- Approaching Security
- User-Level Internal Security
- File-Level Access Security
- Troubleshooting
- FileMaker Extra: Working with Multiple Files
Advanced Interface Techniques
- Advanced Interface Techniques
- User Interfaces in FileMaker Pro
- Navigation
- Multiwindow Interfaces
- Working with Custom Menus
- Showing/Hiding Layout Elements
- Dedicated Find Layouts
- Data Presentation
- Working with Table View
- Troubleshooting
- FileMaker Extra: User Interface Heuristics
Advanced Calculation Techniques
- Advanced Calculation Techniques
- Whats an Advanced Calculation Technique?
- Logical Functions
- Text Formatting Functions
- Array Functions
- The Filter-ing Functions
- Custom Functions
- GetNthRecord
- Troubleshooting
- FileMaker Extra: Creating a Custom Function Library
Advanced Scripting Techniques
- Advanced Scripting Techniques
- What Is Advanced Scripting?
- Script Parameters and Script Results
- Script Variables
- Window Management Techniques
- Go to Related Record
- Troubleshooting
- FileMaker Extra: Recursive Scripts
Advanced Portal Techniques
- Advanced Portal Techniques
- Portals in FileMaker Pro
- Portal Basics
- New Record Only Relationships
- Horizontal Portals
- Using Portals to Create Calendars
- Selection Portals
- Filtered Portals
- Dynamic Portal Sorting
- Troubleshooting
- FileMaker Extra: Portals and Record Locking
Debugging and Troubleshooting
- Debugging and Troubleshooting
- What Is Troubleshooting?
- Staying Out of Trouble
- Planning for Trouble
- Troubleshooting Scripts and Calculations
- Troubleshooting in Specific Areas: Performance, Context, Connectivity, and Globals
- File Maintenance and Recovery
- FileMaker Extra: Other Tools of the Trade
Converting Systems from Previous Versions of FileMaker Pro
- Converting Systems from Previous Versions of FileMaker Pro
- Migration Choices
- Converting Files
- Pre-Conversion Tasks
- Post-Conversion Tasks
- Troubleshooting
- FileMaker Extra: Converting Web-Enabled Databases
Part IV: Data Integration and Publishing
Importing Data into FileMaker Pro
- Importing Data into FileMaker Pro
- Working with External Data
- Flat-File Data Sources
- Importing Multiple Files from a Folder
- Importing Photos from a Digital Camera
- Importing from an ODBC Data Source
- Importing from an XML Data Source
- Using a Script to Import Data
- Troubleshooting
- FileMaker Extra: Exploiting the FileMaker-to-FileMaker Import
Exporting Data from FileMaker
- Exporting Data from FileMaker
- Getting Out What You Put In
- The Basic Mechanics of Exporting
- Export File Formats
- Formatting Exported Data
- Exporting Related Fields
- Exporting Grouped Data
- Exporting to Fixed-Width Formats
- Working with Large Fields and Container Fields
- Scripted Exports
- Accessing FileMaker Data Using ODBC and JDBC
- Using FileMaker Pro as an ODBC Client
- Troubleshooting
- FileMaker Extra: Accessing FileMaker Data via JDBC
Instant Web Publishing
- Instant Web Publishing
- An Overview of Instant Web Publishing
- Enabling and Configuring IWP
- Designing for IWP Deployment
- Using an IWP Solution
- Troubleshooting
- FileMaker Extra: Building Your Own Next and Previous Page Buttons
FileMaker and Web Services
- FileMaker and Web Services
- About Web Services
- FileMaker and XML
- Transforming XML
- XML Import: Understanding Web Services
- Working with Web Services
- Troubleshooting
- FileMaker Extra: Write Your Own Web Services
Custom Web Publishing
- Custom Web Publishing
- About Custom Web Publishing
- Custom Web Publishing Versus Instant Web Publishing
- Custom Web Publishing Versus XML Export
- Getting Your Databases Ready for Custom Web Publishing
- Publishing FileMaker Data as XML
- Using XSLT with Custom Web Publishing
- Building Web Applications with XSLT-CWP
- Other Custom Web Publishing Commands and Parameters
- About the FileMaker XSLT Extensions
- Troubleshooting
- FileMaker Extra: About the Custom Web Publishing Tools
Part V: Deploying a FileMaker Solution
Deploying and Extending FileMaker
- Deploying and Extending FileMaker
- FileMaker Deployment Options
- Single User
- Peer-to-Peer Hosting
- FileMaker Server
- Web Publishing
- ODBC/JDBC
- Citrix/Terminal Services
- Runtime Solutions
- Deploying to Handheld Devices
- Customized Deployment Options
- Troubleshooting
- FileMaker Extra: The Limits of Customization
FileMaker Server and Server Advanced
- FileMaker Server and Server Advanced
- About FileMaker Server
- Installing FileMaker Server
- Running FileMaker Server
- Using the Server Administration Tool
- Configuring and Administering FileMaker Server Using the SAT
- Managing Clients
- Managing Databases
- Administration from the Command Line
- Working with External Services
- Automatically Updating Plug-ins
- Scheduled Tasks
- Monitoring FileMaker Server
- Troubleshooting
- FileMaker Extra: Best Practices Checklist
FileMaker Mobile
- FileMaker Mobile
- FileMaker Mobile 8 Overview
- Using FileMaker Mobile on Your Handheld Device
- Troubleshooting
- FileMaker Extra: Publishing Related Data
Documenting Your FileMaker Solutions
- Documenting Your FileMaker Solutions
- Why Is Documentation Important?
- Developing Naming Conventions
- Using Comments Effectively
- Documenting the Relationships Graph
- Using the Database Design Report
- Using Third-Party Documentation Tools
- Putting the Finishing Touches on Your Documentation
- Final Thoughts on Documentation
- FileMaker Extra: Soliant Development Standards
EAN: 2147483647
Pages: 296
