User Interfaces in FileMaker Pro
Every new FileMaker Pro database essentially begins with a single, blank layout. User interface designersand, yes, you're now one by definitionoften have to approach each solution they design somewhat differently, to tailor it for the specific use in question, for the users for whom the system is ultimately intended, and in keeping with the time/budget/scope variables we all struggle with in some form or another. This chapter is not intended to present a complete user interface discourse. How to approach a user interface is a widely debated topic in both the FileMaker and the computer science worlds. On the Web, as you no doubt know, what works for one site doesn't often work for anothernor should it. We won't presume to know what the world's most perfect user interface might be.
Rather than trying to present the "what" or "why" of user interface and layout design, we're going to focus on the "how." There are some constants in FileMaker interface design: Almost every database solution ever built has some form of navigation, meaning a button-and-scriptdriven means of moving from layout to layout. Data presentationhow you view and access information in your systemvaries, and we explore some of the options there as well. We also examine how to approach working with multiple windows, and delve into FileMaker 8's new Custom Menus feature as well.
This chapter presents several topics. Each section could comfortably stand on its own; the idea here is to present you with some ideas you can apply to your solutions as you see fit. The chapter assumes a moderately advanced familiarity with FileMaker Pro, but beginners should be able to grasp the concepts quite easily, if they don't immediately understand the implementation.
User interfaces are central to most FileMaker databases. It is rare (although entirely possible) that a FileMaker database would serve only as a back-end data repository, with some other system providing a visual front end. Custom web-published databases are an obvious exception, but many FileMaker-based web systems also have administrative or data-entry functions built into native FileMaker Pro layouts and accessed with FileMaker Pro, not to mention IWP (Instant Web Publishing) that depends on layouts being created in FileMaker. Some FileMaker systems also serve as front-end extensions of larger systems through ODBC or XML connections; one of the core reasons organizations choose to use FileMaker in such cases is the rapidity and flexibility with which interfaces can be built. It's safe to say that not only is storing data fundamental to FileMaker Pro, but the presentation of data is fundamental as well.
|
For more detail on Instant Web Publishing, see Chapter 21, "Instant Web Publishing," p. 633. |
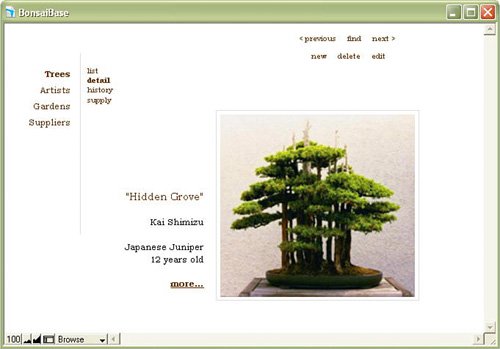
Figures 13.1, 13.2, and 13.3 present some interface examples we've come across in our travels.
Figure 13.1. This is a fairly typical example of a tabbed interface in FileMaker Pro; the tabs in this example have been created as graphic objects.
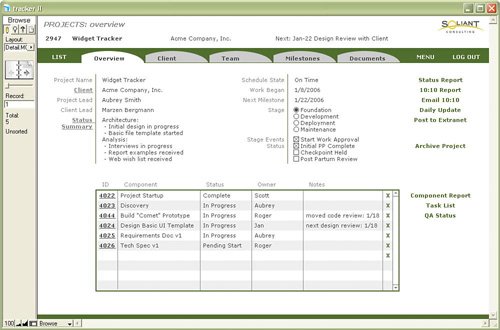
Figure 13.2. FileMaker Recruiter 2.0, produced by FileMaker, Inc., itself, is a solid example of a classic design. Notice the two tiers of navigation with the section headers at the top of the window.
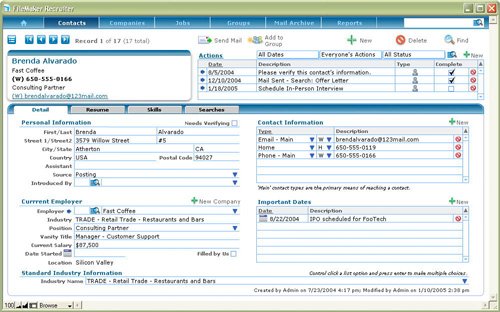
Figure 13.3. Here's a different twist on user interfacelean, with lots of whitespace and navigation in more of a web-style approach.
Primary considerations when you approach designing a user interface include how to trigger functions specific to your database solution (for example, a series of scripts that create monthly invoices), how to manage creating and deleting records, whether to build some form of interface to help with Find requests, and how a user might run a report.
Other issues will also need to be worked out: What color scheme do you want your user interface to follow? How much screen real estate do you have? What fonts will work for all the users in your system?
 |
New in FileMaker Pro 8 Advanced is the capability to customize menus. How you approach menus significantly extends the planning you'll need to do when approaching a new application. What often were interface elements that developers would have to build into custom layouts can now be managed with sensible use of menu sets. |
|
To learn how to create custom menus, see "Working with Custom Menus," later in this chapter, p. 373. |
Tip
We recommend two things when defining an interface for a new solution. First, define one. Rather than having things just evolve at random, you'll be well served by spending a few minutes up front coming up with a standard interface approach.
Second, create a prototypical layout and menu set for your system and then test it with users before building the rest of your system. Establish a common standard for where things go, how large the screen is, how portals look, where field labels sit, and how you'll use menus, and then get buy-in from the people who will ultimately live with the database day in and day out. It's far easier to spend a little time in the beginning discovering that your boss deeply loathes the color green than to go back and rework your database.
When moving forward in your system, it will be easier to duplicate your template layout than to start from scratch each time. This also saves time: After the problem of look and feel is solved, you won't need to spend more time thinking about it as you create new layouts.
FileMaker's Native User Interface
Another critical consideration for your user interface (UI) is to what degree to use FileMaker's own native elementsthe Status Area, menu commands, and Scripts menuor how to go about replacing them with your own buttons, scripts, or custom menus.
It is entirely possible to build a perfectly usable FileMaker database without adding a single button to any of your layouts. Users can rely on the Layout pop-up menu in the Status Area and, for those reports and functions that require scripts, turn to the Scripts menu, or to any special menus you may have added as custom menus. Relying heavily on FileMaker's native UI delivers some significant benefits in the time it takes you to build a database. Your users are likely already to understand at least some of the basics of working with a FileMaker database as well. This bare-bones approach can "just get it working" quite quickly. The downside, aside from simple aesthetics, is that your database may not be particularly intuitive for nondevelopers to manipulate in cases in which your data structure becomes complex.
We strongly recommend embracing FileMaker's raison d'étre: flexibility. Although it's possible to pull off some quite advanced custom-crafted user interface designs, make sure that you take on added complexity deliberately, by choice, and recognize the cost.
Tip
Be sure if you use a native approach in FileMaker to do so fully and make use of its security. You can still leave FileMaker's menu commands available to your users if you carefully think through your security setup.
You can also disable the native menu choices you don't want used, or override them with your own custom scripts, by creating custom menu sets. Refer to the section "Working with Custom Menus," later in this chapter.
|
For complete details on FileMaker security, see Chapter 12, "Implementing Security," p. 325. |
Building Your Own Interface
The alternative to a native FileMaker approach is to replace the Status Area and menu functions with your own buttons, scripts, and custom menus. The approach here gives you the most control, but also signs you up for the most work. (Notice that the Status Area seen Figure 13.2 is closed. The designers of this system replaced the functions of the Status Area with their own buttons elsewhere on the layout.)
When following such an approach, you will need to replace all the functions of the Status Area in three of the four modes (it is not possible to replicate its functions in Layout mode), and you'll likely opt to close and lock the Status Area after you've done so.
This process is identical in nature to building other interface elements: You will need to create objects to serve as buttons (images, text, or some other FileMaker layout object) and then create scripts to replicate the functions of the Status Area, such as "go to next record" or "go to previous record." One of the more challenging elements of re-creating all the functions of the Status Area can be the Omit check box control while in Find mode.
 |
To understand how to replicate the functionality of the Omit check box in Find mode, refer to "Omit Re-created" in the "Troubleshooting" section at the end of this chapter. |
|
Note also that with the capability to modify menus via FileMaker Pro 8 Advanced's Custom Menus features, FileMaker systems no longer have to be either/or propositions with regard to using all native FileMaker controls or locking them down completely. In past versions, if there was one element of the native FileMaker controls you wanted to prevent users from accessingthe Delete All Records menu item, for exampleyou had only one choice: Lock down all menus. This then meant you faced replicating a good deal of functionality to control just those items you wanted to customize. |
By using FileMaker Pro 8 Advanced, you can leave elements of native FileMaker functionality available while locking down just those you need to restrict. This mix-and-match approach is one of the best reasons to upgrade to FileMaker 8.
Interface Look and Feel
Remember that container fields, as well as graphical objects pasted onto a layout, can be turned into buttons and thus associated with a script action. This enables you to design quite complete user interface elements in the image-editing software of your choice. Buttons can be far more than simply gray rectangles, and it's quite possible to create a user experience that feels nothing like FileMaker in its native state.
We recommend that you insert all such graphical UI elements into container fields set for global storage, rather than pasting them directly on layouts. If you ever need to make a change, you need only do so in one place, rather than having to paste a modified element back onto all the layouts on which it was used and reapply its script or button behavior.
To use this container method, simply create a single repeating container field, set to global storage. Then when placing buttons on your layouts, instead of placing the graphic element itself, simply place a field with the proper dimensions and set it to show repetition X through X (say 3 through 3) to display the applicable graphic. Then attach a button behavior to that field. From this point forward in the chapter, when we speak of placing button objects on a layout, this is the method we prefer, but we will not reference it continually throughout the chapter.
Tip
Remember, when you are placing a button object on multiple layouts, first apply the script behavior to the object, and then copy and paste on all layouts with the button behavior intact.
For maximum control, it's even possible to create a kiosk experience in FileMaker Pro that takes complete control of the screen. FileMaker's menus will not appear in kiosk mode, and you can choose to close and hide the Status Area as well. For all intents and purposes, the entire look and feel of the screen will be in your hands. A kiosk typically isn't something you'd want to deploy for use on desktops: It takes over the entire screen and isn't well suited for working with other applications.
|
To learn more about creating kiosks in FileMaker Pro Advanced, see "Developing Kiosk Solutions," p. 769. |
Single File Interface Versus Distributed Interface
Aside from the approach of building an interface, its architecture should be considered as well. One of the most frequent questions we receive is whether it is better to build a solution as a single file or to create a distributed architecture across multiple files. There are a wide variety of opinions on this topic in the FileMaker community, and some experts strongly advocate one approach over the other. Our answer is less definitive: It depends.
A single file system, with all your interface layouts in one place, is generally easier to build and requires less architectural overhead. FileMaker 8's capability to reference external table occurrences makes the overhead arguably minimal in some cases, but you will need to replicate security settings, value lists, and custom functions in each file separately, and you will need to work out window management and navigation schemes to support multiple files. (Although, again, it's possible to build all of your interface in a single window that then references a separate or multiple data files, so...it depends.)
A multiple file system (possibly with interface layouts in multiple files) has the benefit of allowing multiple developers to work on each file in parallel (whereas working in Script Maker or making database schema changes can be done by only one person at a time), as well as keeping FileMaker elements organized in discrete, separate packages. A single file system tends to balloon with scripts, value lists, and layouts. In a multiple file system it's possible to isolate those elements to just the functionality or operational group necessary. As an example, you might put all your customer-related interfaces in a Customers file, and all of your finance-related interfaces in a Finance file.
|
To review working with multiple files from an architectural perspective (beyond just interface considerations), see "How and When to Use Multiple Files," p. 207. |
In our consulting practice, we implement systems with both types of architectures. Generally, smaller systems end up as single file systems, and larger systems (ones with more than 40 or so data tables) have to some degree tended to be distributed. This is a somewhat specialized observation, though: We tend to create distributed file systems to support multiple developers, which generally is not an overriding concern for many organizations.
Obviously, there might be times when you have no choice: Your database might have been converted from a version before FileMaker 7, in which case you'd need to do substantial rewriting to bring the interface elements into one file. It is often best to live with the separate files created by the conversion process, given that security settings, and so forth, have already been replicated for you during conversion.
|
To explore table architecture options, see Chapter 6, "Working with Multiple Tables," p. 157. |
|
For more information on converted files, see Chapter 18, "Converting Systems from Previous Versions of FileMaker Pro," p. 537. |
Navigation |
Part I: Getting Started with FileMaker 8
FileMaker Overview
- FileMaker Overview
- FileMaker and Its Marketplace
- Introduction to Database Software
- FileMaker Deployment Options
- Whats New in FileMaker Pro 8
Using FileMaker Pro
- Getting Started
- Working in FileMaker Pro
- Troubleshooting
- FileMaker Extra: Becoming a FileMaker Pro Power User
Defining and Working with Fields
- Defining and Working with Fields
- Working Under the Hood
- Working with Fields
- Working with Field Types
- Assigning Field Options
- Troubleshooting
- FileMaker Extra: Indexing in FileMaker
Working with Layouts
- Working with Layouts
- Whats a Layout?
- Creating and Managing Layouts
- Working with Parts
- Working with Objects on a Layout
- Working with the Tab Control Object
- Working with Fields
- Portals
- Troubleshooting
- FileMaker Extra: Designing Cross-PlatformFriendly Layouts
Part II: Developing Solutions with FileMaker
Relational Database Design
- Relational Database Design
- Understanding Database Design
- Database Analysis
- Working with Entities and Attributes
- Understanding Relationships
- Relationship Optionality
- Understanding the Role of Keys in Database Design
- Many-to-Many Relationships: Solving the Puzzle
- The Basics of Process Analysis
- FileMaker Extra: Complex Many-to-Many Relationships
Working with Multiple Tables
- Working with Multiple Tables
- Multitable Systems in FileMaker Pro
- Creating a One-to-Many Relationship in FileMaker
- Working with Keys and Match Fields
- Understanding Table Context
- Working with Related Data
- Creating a Many-to-Many Relationship
- Relational Integrity
- Rapid Multitable Development
- Troubleshooting
- FileMaker Extra: Building a Three-Way Join
Working with Relationships
- Working with Relationships
- Relationships Graphs and ERDs
- Relationships as Queries
- Creating Self-Relationships
- Creating Ranged Relationships
- Creating Cross-Product Relationships
- Working with Data from Distant Tables
- Working with Multiple Files
- How and When to Use Multiple Files
- Troubleshooting
- FileMaker Extra: Managing the Relationships Graph
Getting Started with Calculations
- Getting Started with Calculations
- Understanding How and Where Calculations Are Used
- Exploring the Calculation Dialog Box
- Essential Functions
- Using Conditional Functions
- Aggregate Functions
- Learning About the Environment
- Troubleshooting
- FileMaker Extra: Tips for Becoming a Calculation Master
Getting Started with Scripting
- Getting Started with Scripting
- Scripts in FileMaker Pro
- Creating Scripts
- Common Scripting Topics
- Triggering Scripts
- Working with Buttons on Layouts
- Troubleshooting
- FileMaker Extra: Creating a Script Library
Getting Started with Reporting
- Getting Started with Reporting
- Deriving Meaning from Data
- Working with Lists of Data
- Summarized Reports
- Delivering Reports
- Troubleshooting
- FileMaker Extra: Incorporating Reports into the Workflow
Part III: Developer Techniques
Developing for Multiuser Deployment
- Developing for Multiuser Deployment
- Developing for Multiple Users
- Sessions in FileMaker Pro
- Concurrency
- Audit Trails in FileMaker Pro
- Launch Files
- Troubleshooting
- FileMaker Extra: Development with a Team
Implementing Security
- Approaching Security
- User-Level Internal Security
- File-Level Access Security
- Troubleshooting
- FileMaker Extra: Working with Multiple Files
Advanced Interface Techniques
- Advanced Interface Techniques
- User Interfaces in FileMaker Pro
- Navigation
- Multiwindow Interfaces
- Working with Custom Menus
- Showing/Hiding Layout Elements
- Dedicated Find Layouts
- Data Presentation
- Working with Table View
- Troubleshooting
- FileMaker Extra: User Interface Heuristics
Advanced Calculation Techniques
- Advanced Calculation Techniques
- Whats an Advanced Calculation Technique?
- Logical Functions
- Text Formatting Functions
- Array Functions
- The Filter-ing Functions
- Custom Functions
- GetNthRecord
- Troubleshooting
- FileMaker Extra: Creating a Custom Function Library
Advanced Scripting Techniques
- Advanced Scripting Techniques
- What Is Advanced Scripting?
- Script Parameters and Script Results
- Script Variables
- Window Management Techniques
- Go to Related Record
- Troubleshooting
- FileMaker Extra: Recursive Scripts
Advanced Portal Techniques
- Advanced Portal Techniques
- Portals in FileMaker Pro
- Portal Basics
- New Record Only Relationships
- Horizontal Portals
- Using Portals to Create Calendars
- Selection Portals
- Filtered Portals
- Dynamic Portal Sorting
- Troubleshooting
- FileMaker Extra: Portals and Record Locking
Debugging and Troubleshooting
- Debugging and Troubleshooting
- What Is Troubleshooting?
- Staying Out of Trouble
- Planning for Trouble
- Troubleshooting Scripts and Calculations
- Troubleshooting in Specific Areas: Performance, Context, Connectivity, and Globals
- File Maintenance and Recovery
- FileMaker Extra: Other Tools of the Trade
Converting Systems from Previous Versions of FileMaker Pro
- Converting Systems from Previous Versions of FileMaker Pro
- Migration Choices
- Converting Files
- Pre-Conversion Tasks
- Post-Conversion Tasks
- Troubleshooting
- FileMaker Extra: Converting Web-Enabled Databases
Part IV: Data Integration and Publishing
Importing Data into FileMaker Pro
- Importing Data into FileMaker Pro
- Working with External Data
- Flat-File Data Sources
- Importing Multiple Files from a Folder
- Importing Photos from a Digital Camera
- Importing from an ODBC Data Source
- Importing from an XML Data Source
- Using a Script to Import Data
- Troubleshooting
- FileMaker Extra: Exploiting the FileMaker-to-FileMaker Import
Exporting Data from FileMaker
- Exporting Data from FileMaker
- Getting Out What You Put In
- The Basic Mechanics of Exporting
- Export File Formats
- Formatting Exported Data
- Exporting Related Fields
- Exporting Grouped Data
- Exporting to Fixed-Width Formats
- Working with Large Fields and Container Fields
- Scripted Exports
- Accessing FileMaker Data Using ODBC and JDBC
- Using FileMaker Pro as an ODBC Client
- Troubleshooting
- FileMaker Extra: Accessing FileMaker Data via JDBC
Instant Web Publishing
- Instant Web Publishing
- An Overview of Instant Web Publishing
- Enabling and Configuring IWP
- Designing for IWP Deployment
- Using an IWP Solution
- Troubleshooting
- FileMaker Extra: Building Your Own Next and Previous Page Buttons
FileMaker and Web Services
- FileMaker and Web Services
- About Web Services
- FileMaker and XML
- Transforming XML
- XML Import: Understanding Web Services
- Working with Web Services
- Troubleshooting
- FileMaker Extra: Write Your Own Web Services
Custom Web Publishing
- Custom Web Publishing
- About Custom Web Publishing
- Custom Web Publishing Versus Instant Web Publishing
- Custom Web Publishing Versus XML Export
- Getting Your Databases Ready for Custom Web Publishing
- Publishing FileMaker Data as XML
- Using XSLT with Custom Web Publishing
- Building Web Applications with XSLT-CWP
- Other Custom Web Publishing Commands and Parameters
- About the FileMaker XSLT Extensions
- Troubleshooting
- FileMaker Extra: About the Custom Web Publishing Tools
Part V: Deploying a FileMaker Solution
Deploying and Extending FileMaker
- Deploying and Extending FileMaker
- FileMaker Deployment Options
- Single User
- Peer-to-Peer Hosting
- FileMaker Server
- Web Publishing
- ODBC/JDBC
- Citrix/Terminal Services
- Runtime Solutions
- Deploying to Handheld Devices
- Customized Deployment Options
- Troubleshooting
- FileMaker Extra: The Limits of Customization
FileMaker Server and Server Advanced
- FileMaker Server and Server Advanced
- About FileMaker Server
- Installing FileMaker Server
- Running FileMaker Server
- Using the Server Administration Tool
- Configuring and Administering FileMaker Server Using the SAT
- Managing Clients
- Managing Databases
- Administration from the Command Line
- Working with External Services
- Automatically Updating Plug-ins
- Scheduled Tasks
- Monitoring FileMaker Server
- Troubleshooting
- FileMaker Extra: Best Practices Checklist
FileMaker Mobile
- FileMaker Mobile
- FileMaker Mobile 8 Overview
- Using FileMaker Mobile on Your Handheld Device
- Troubleshooting
- FileMaker Extra: Publishing Related Data
Documenting Your FileMaker Solutions
- Documenting Your FileMaker Solutions
- Why Is Documentation Important?
- Developing Naming Conventions
- Using Comments Effectively
- Documenting the Relationships Graph
- Using the Database Design Report
- Using Third-Party Documentation Tools
- Putting the Finishing Touches on Your Documentation
- Final Thoughts on Documentation
- FileMaker Extra: Soliant Development Standards
EAN: 2147483647
Pages: 296
