Hack 44. Authenticate Wireless Users


Step up to using WPA Enterprise with FreeRADIUS for real user authentication and wireless security.
WPA is a big step up from WEP, security-wise. WPA's Pre-Shared Key mode (called WPA Personal, if you have an Apple AirPort) is handy and easy to set up. However, it allows only one key for all users. If you want to have different passwords for different users, or if you want real authentication, you'll need to use the full 802.11x-based WPA Enterprise protocol, and that means that you'll need a RADIUS server.
If you came here from "Control Wireless Access by MAC" [Hack #43], you've already got some fundamentals on how RADIUS works and where to configure it. If you haven't yet read that hack, now would be a good time to back up.
This hack is about setting up EAP/TTLS authentication via FreeRADIUS. EAP/TTLS isn't the only flavor of authentication protocol, but it is the easiest to set up and has the lowest per-client overhead. EAP/TLS is also good, but it requires each client to have its own certificate. EAP/PEAP is comparable to EAP/TTLS and is more commonly found in large enterprise networks.
FreeRADIUS is available at http://www.freeradius.org and is also available as a package in most flavors of Linux and BSD. Solaris and Mac OS X users will want to compile from source.
3.6.1. FreeRADIUS Configuration
As in "Control Wireless Access by MAC" [Hack #43], our example system configuration for FreeRADIUS is located in /etc/raddb. Again, the first requirement is to allow your access point to talk to the RADIUS server. This setup happens in the /etc/raddb/clients.conf file. Our sample configuration looks like this:
	client 10.1.1.253 {
		secret = letmein
		shortname = travellingcircus
	}
You'll also need an SSL certificate for the server. If you have a central place on the system for all of your various server certificates, you can place it there. If not, I recommend putting the certificate and private key in /etc/raddb/certs. If you don't already have a certificate, you can use the certs.sh script in the FreeRADIUS distribution to help you generate one.
Both the private key and the certificate should be in PEM format and can even be in the same file. The permissions on the private key are important; only the RADIUS server should be able to read it. If you run your RADIUS server as a non-root user (you should), just make sure that the RADIUS user owns the file and that its permissions are set to 400.
The /etc/raddb/eap.conf file that comes with the FreeRADIUS distribution might require only a little customization, or you can use the minimal version shown here. Either way, you'll need to set the location of the private key file and the certificate file. This configuration happens in the tls section, which should be inside the eap section:
	eap {
		default_eap_type = md5
		timer_expire = 60
		ignore_unknown_eap_types = no
		cisco_accounting_username_bug = no
		md5 {
		}

		tls {
			private_key_password = blah
			private_key_file = ${raddbdir}/certs/radius.pem
			certificate_file = ${raddbdir}/certs/radius.pem
			CA_file = ${raddbdir}/certs/cacert.pem
			dh_file = ${raddbdir}/certs/dh
			random_file = ${raddbdir}/certs/random
		}
		ttls {
			default_eap_type = md5
			copy_request_to_tunnel = yes
			use_tunneled_reply = yes

		}

		peap {
			copy_request_to_tunnel = yes
			use_tunneled_reply = yes
			default_eap_type = md5

			}
		}
The key pieces here you need to modify are here:
	private_key_file = ${raddbdir}/certs/radius.pem
	certificate_file = ${raddbdir}/certs/radius.pem
If your private key has a password, you can set that also:
private_key_password = blah
Since that's pretty sensitive information, it should be protected in the same way as the private key filethat is, owned by the RADIUS user and chmod 400.
You'll also need to have a pointer to your Certificate Authority's certificate, which you can set like this:
CA_file = ${raddbdir}/certs/cacert.pem
Lastly, in the TTLS section, make sure that both of these lines are set to yes:
	copy_request_to_tunnel = yes
	use_tunneled_reply = yes
Otherwise, all of the attributes that the base station sends will not be available for use by the authentication module. In a basic setup, these settings might not be necessary. As you'll see later, the AP sends quite a lot of extra information that you can use to fine-tune permissions regarding who can access your network using which AP.
The only other configuration file that needs to be changed is /etc/raddb/radiusd.conf. In the modules section, make sure that the files module points to your users file:
	files {
			usersfile = ${confdir}/users
			compat = no

	}
Next, make sure to include eap.conf:
$INCLUDE ${confdir}/eap.conf
The authorize module should list both files and eap:
	authorize {
				files
				eap

	}
And finally, the authenticate module should list eap:
	authenticate {
			 eap
	}
That's it for setting up the configuration files. Now, you'll need to set up a user. This part isn't any different than setting up any other RADIUS user. At a minimum, you need to list a user password (User-Password) and an authentication type (Auth-Type). The Auth-Type should always be Local.
An entry in the users file looks like this:
cloyce Auth-Type := Local, User-Password == "sushi"
This says that for user cloyce, the Auth-Type is Local and the password must be sushi; otherwise, the access request will be denied.
Now that the files are all set up, it's time to start radiusd with the -X flag to get debugging output. If all goes well, you'll see output at the bottom:
	Listening on authentication *:1812
	Listening on accounting *:1813
	Ready to process requests.
3.6.2. Access Point Configuration
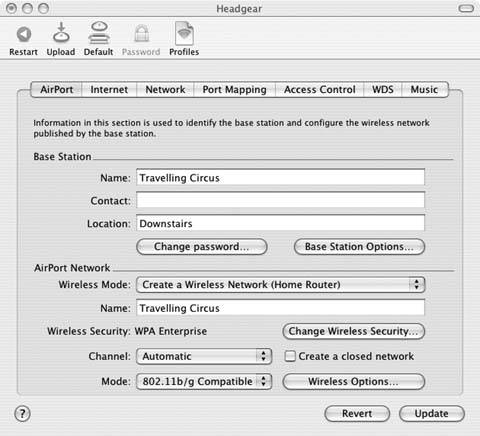
Assuming that your RADIUS server started up, it's time to configure your AP. This section covers an Apple AirPort configuration, using the AirPort Admin Utility, as shown in Figure 3-7.
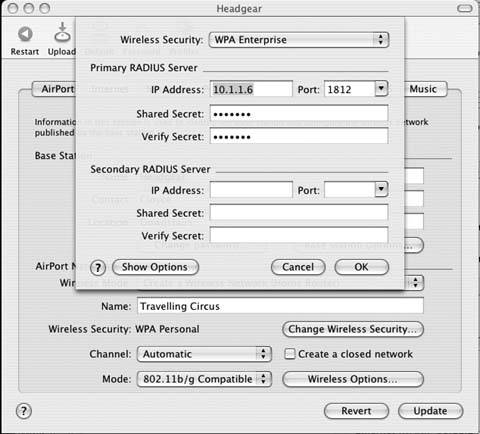
Click the Change Wireless Security… button and change the pull-down item at the top to WPA Enterprise. When that's done, the panel should change and have entries for a primary and secondary RADIUS server, as shown in Figure 3-8.
|

You must specify three pieces of information on this panel: the IP address of your RADIUS server, the port it's listening on, and the shared secret. The shared secret should match what you put in to the /etc/raddb/clients.conf file. The port number to use is the one that radiusd reported as its authentication port when you started in debug mode.
Figure 3-7. AirPort Admin Utility
Hit the Update button, wait for your AP to reboot, and then try to associate with it. Your client should prompt you for authentication of your username and password.
Here's some output from an access request that shows the attributes that the AirPort Express sends along with the username and password:
	rlm_eap_ttls: Session established. Proceeding to decode tunneled
	attributes.
	 TTLS: Got tunneled request
			User-Name = "cloyce"
			User-Password = "sushi"
			FreeRADIUS-Proxied-To = 127.0.0.1
	 TTLS: Sending tunneled request
			User-Name = "cloyce"
			User-Password = "sushi"
			FreeRADIUS-Proxied-To = 127.0.0.1
			Framed-MTU = 1466
			NAS-IP-Address = 172.16.1.1
			NAS-Identifier = "Travelling Circus"

			Service-Type = Framed-User
			NAS-Port = 255
			NAS-Port-Type = Ethernet
			NAS-Port-Id = "wl0"
			Called-Station-Id = "00-11-24-03-45-77"
			Calling-Station-Id = "00-30-65-24-e6-63"
			Connect-Info = "CONNECT Ethernet 54Mbps Half duplex"
	Processing the authorize section of radiusd.conf
Figure 3-8. WPA Enterprise with RADIUS
The AirPort Extreme sends similar attributes; if you don't have an AirPort base station, just generate a request through your access point and see what it sends to the RADIUS server. This particular snippet is from deep within the request. If you read the comments in eap.conf, you'll have seen that EAP/TTLS request is actually wrapped four times: RADIUS inside of EAP, inside of TLS, inside of Diameter, and inside of EAP. The attributes are printed each time the RADIUS server undoes another layer of wrapping. Look at the last instance to see exactly what's available to use for access control.
You can see my User-Name (cloyce) and my User-Password (sushi). Those are the only attributes that I supplied. Look at all the other stuff that the AP has added! Some of it isn't very useful, such as Framed-MTU, Service-Type, and NAS-Port. Other things, such as NAS-Identifier (the SNMP name you've assigned to the AP), Called-Station-Id (the MAC address of the AP's wireless interface), and Calling-Station-Id (the MAC address of the wireless device that I'm using to connect) can be useful. For example, if I want to make sure that I can use this AP only from my PowerBook, I just change my entry in the users file to this:
	cloyce Auth-Type := Local, User-Password == "sushi", Calling-Station-Id ==
	"00-30-65-24-e6-63"
If every user entry requires a match to a particular Calling-Station-Id, you've just effectively replicated the functionality of MAC addressbased access control, but with WPA Enterprise, you've also got authentication and encryption.
Cloyce Spradling
Bluetooth, Mobile Phones, and GPS
- Hacks 122: Introduction
- Hack 1. Set Up Bluetooth on Linux
- Hack 2. Set Up Bluetooth on Windows XP
- Hack 3. Connect Mac OS X with a Bluetooth Phone
- Hack 4. Connect Linux with a Bluetooth Phone
- Hack 5. Connect Windows XP with a Bluetooth Phone
- Hack 6. Use Your Treo as a Modem
- Hack 7. Send SMS from a PowerBook
- Hack 8. Remote Control Mac OS X with Bluetooth Phones and PDAs
- Hack 9. Remote Control Linux with a Bluetooth Phone
- Hack 10. Control XMMS with Bluetooth
- Hack 11. Liven Up Parties with a Participatory Slideshow
- Hack 12. Send SMS from Linux
- Hack 13. Remote Control Windows with Bluetooth Phones and PDAs
- Hack 14. Control Your Bluetooth Phone with FMA
- Hack 15. Control Your Computer from Your Palm
- Hack 16. Control Your Home Theater from Your Palm
- Hack 17. Choose a Cellular Data Plan
- Hack 18. Blog from Your Mobile Phone
- Hack 19. Get Google Maps on Your Mobile Phone
- Hack 20. Share Your GPS
- Hack 21. Broadcast Your GPS Position
- Hack 22. Map Wi-Fi Networks with Kismet and GPSd
Network Discovery and Monitoring
- Hacks 2339: Introduction
- Hack 23. Find All Available Wireless Networks
- Hack 24. Discover Networks with NetStumbler
- Hack 25. Detect Networks with Handheld PCs
- Hack 26. Find and Join Wireless Networks with AP Radar
- Hack 27. Detect Networks on Mac OS X
- Hack 28. Scan Passively with KisMAC
- Hack 29. Detect Networks with Kismet
- Hack 30. Monitor Wireless Links in Linux with Wavemon
- Hack 31. Analyze Traffic with Ethereal
- Hack 32. Track 802.11 Frames in Ethereal
- Hack 33. Watch Network Traffic
- Hack 34. grep Your Network
- Hack 35. Check Wi-Fi Network Performance with Qcheck
- Hack 36. Estimate Network Performance
- Hack 37. Get Real-Time Network Stats
- Hack 38. Graph Your Wireless Performance
- Hack 39. Find Radio Manufacturers by MAC
Wireless Security
- Hacks 4051: Introduction
- Hack 40. Stop Moochers from Stealing Your Wi-Fi Bandwidth
- Hack 41. Visualize a Network
- Hack 42. Secure Your Linux Network with WPA
- Hack 43. Control Wireless Access by MAC
- Hack 44. Authenticate Wireless Users
- Hack 45. Forward Ports over SSH
- Hack 46. Proxy Web Traffic over SSH
- Hack 47. Securely Connect Two Networks
- Hack 48. Generate a Tunnel Configuration Automatically
- Hack 49. Poll Wireless Clients
- Hack 50. Interrogate the Network
- Hack 51. Track Wireless Users
Hardware Hacks
- Hacks 5262: Introduction
- Hack 52. Add an External Antenna
- Hack 53. Do-It-Yourself Access Point Hardware
- Hack 54. Boot from a Compact Flash Hard Drive
- Hack 55. Increase the Range of a PowerBook
- Hack 56. Send Power over Your Ethernet
- Hack 57. The NoCat Night Light
- Hack 58. Upgrade the Linksys WET11
- Hack 59. Scan for Wireless Networks Automatically
- Hack 60. Backlight Your Zipit
- Hack 61. Unwire Your Pistol Mouse
- Hack 62. Mobilize Your WRT54G with the WiFiCar
Software Hacks
- Hacks 6382: Introduction
- Hack 63. Build Your Own Access Point with Linux
- Hack 64. Bridge Your Linux AP
- Hack 65. Protect Your Bridge with a Firewall
- Hack 66. Filter MAC with HostAP and Madwifi
- Hack 67. Upgrade Your Wireless Router
- Hack 68. Set Up an OLSR Mesh Network
- Hack 69. Extend Your Wireless Network with WDS
- Hack 70. Pebble
- Hack 71. Wall Off Your Wireless
- Hack 72. Run Your Mac as an Access Point
- Hack 73. Run Linux on the Zipit Wireless Messenger
- Hack 74. Capture Wireless Users with NoCatAuth
- Hack 75. Capture Wireless Users on a Small Scale
- Hack 76. Build an Online Community in Your Offline Neighborhood
- Hack 77. Manage Multiple AirPort Base Stations
- Hack 78. Advertise Bonjour Services in Linux
- Hack 79. Advertise Any Service with Bonjour in Mac OS X
- Hack 80. Redirect Brought to you by Bonjour Ads
- Hack 81. Use a Windows-Only Wireless Card in Linux
- Hack 82. Use Your Orinoco Card with Hermes AP
Do-It-Yourself Antennas
- Hacks 8393: Introduction
- Hack 83. Make a Deep Dish Cylindrical Parabolic Reflector
- Hack 84. Spider Omni Antenna
- Hack 85. Pringles Can Waveguide
- Hack 86. Pirouette Can Waveguide
- Hack 87. Primestar Dish with Waveguide Feed
- Hack 88. Primestar Dish with Biquad Feed
- Hack 89. Cut a Cable Omni Antenna
- Hack 90. Build a Slotted Waveguide Antenna
- Hack 91. The Passive Repeater
- Hack 92. Determine Your Antenna Gain
- Hack 93. Build Cheap, Effective Roof Mounts
Wireless Network Design
- Hacks 94100: Introduction
- Hack 94. Analyze Elevation Profiles for Better Long-Range Wireless Networking
- Hack 95. Build a Wireless Network for the Large House
- Hack 96. Establish Line of Sight
- Hack 97. Calculate the Link Budget
- Hack 98. Align Antennas at Long Distances
- Hack 99. Slow Down to Speed Up
- Hack 100. Take Advantage of Antenna Polarization
Appendix A. Wireless Standards
- Appendix A. Wireless Standards
- Section A.1. 802.11: The Mother of All IEEE Wireless Ethernet
- Section A.2. 802.11a: The Betamax of the 802.11 Family
- Section A.3. 802.11b: The De Facto Standard
- Section A.4. 802.11g: Like 802.11b, only Faster
- Section A.5. 802.16: WiMAX Long Distance Wireless Infrastructure
- Section A.6. Bluetooth: Cable Replacement for Devices
- Section A.7. 900 MHz: Low Speed, Better Coverage
- Section A.8. CDPD, 1xRTT, and GPRS: Cellular Data Networks
- Section A.9. FRS and GMRS: Super Walkie-Talkies
- Section A.10. 802.1x: Port Security for Network Communications
- Section A.11. WPA & 802.11i
- Section A.12. BSS Versus IBSS
Appendix B. Wireless Hardware Guide
EAN: 2147483647
Pages: 178
