Hack 23. Find All Available Wireless Networks


Locate all wireless networks in range without installing any additional software.
So, you've got a laptop. You've got a wireless card. The card might even be built into your laptop. You know there are wireless networks in your area. How do you find them? You might even have an external antenna connected to your wireless card, hoping to establish a longer distance connection. How do you find that network a half-mile away?
If you are connected to a wireless network, you could download a tool such as NetStumbler [Hack #24], but this requires a network connection and you don't have one yet.
All of the major operating systems have integrated software that allows you to discover wireless networks and obtain some status information about the currently connected network.
2.2.1. Windows XP
Service Pack 2 (SP2) introduced some new behavior to Windows XP for wireless networks. Since SP2 has been available for over a year now, we will assume you have upgraded your installation. This section applies to SP2 only.
If any wireless access points are detected by your wireless card, Windows XP will inform you using a pop-up above the task bar, which says, "Wireless networks detected." Clicking the pop-up or the network icon opens a window titled Wireless Network Connection, as shown in Figure 2-1.
Figure 2-1. Available wireless networks
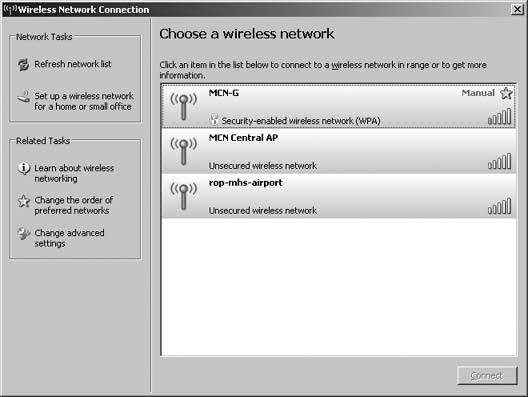
This window lists any wireless networks that are in range. In this example, there are three networks available. The window also shows you that the first wireless network requires the use of a WPA key.
To join a network, select one from the list and click Connect. If the network is unsecured, you will be asked to allow the unsecure connection. If security is enabled, you will be prompted for a WPA or WEP key and to confirm the key by retyping.
If you have difficulty connecting to any of the listed networks, click the "Change advanced settings" button to open the Wireless Networks Connection Properties window shown in Figure 2-2.
Figure 2-2. Advanced wireless network options
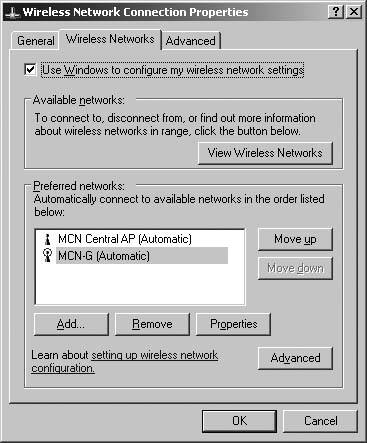
Clicking the Wireless Networks tab displays a button that will return you to the available wireless networks screen. It also shows a list of preferred networks that you can add or modify. This is important to know if your wireless access point does not broadcast the ESSID, because it saves you from repeatedly having to type in the name of the otherwise-invisible network and needing to remember its name in the first place.
At the top of this window, if the "Use Windows to configure my wireless network settings" checkbox is checked, Windows will automatically attempt to connect to any wireless networks listed in your preferred networks. If no preferred networks are available, it will provide you with a list of available wireless networks, as shown earlier in Figure 2-1.
To get status on the wireless network to which you are currently connected, right-click the network icon in the task bar and select Status. Figure 2-3 shows a typical status screen.
Figure 2-3. Wireless network status
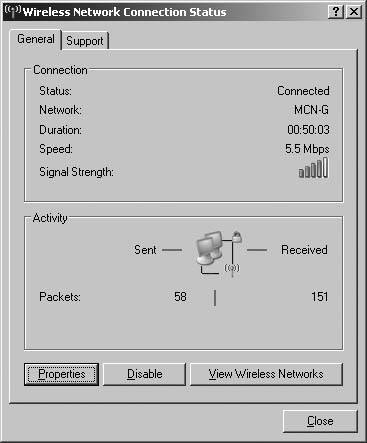
While this gives you some basic connection information, it doesn't show you actual signal strength in dB, which would be very useful for testing wireless connections. You also do not get any information on signal-to-noise ratio. Clicking on the Support tab gives you IP addressing information for this wireless card.
2.2.2. Mac OS X
For Apple notebooks with a built-in AirPort card, all wireless configuration is handled through the System Preferences (System Preferences images/U2192.jpg border=0> Network), as shown in Figure 2-4.
Figure 2-4. AirPort configuration
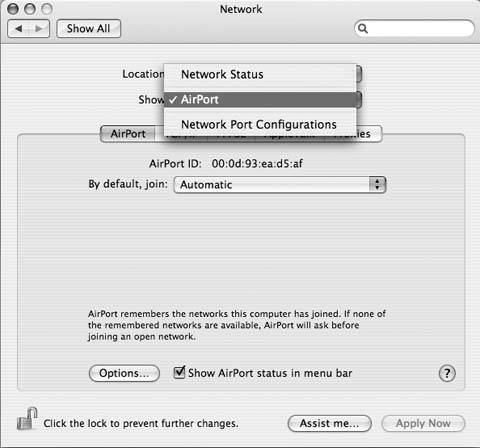
By default, you will have at least two available network cards. Click the Show pull-down menu for a choice of adapters, including Built-in Ethernet and AirPort. Select AirPort. To get to the wireless network settings, select the AirPort tab.
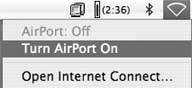
We'll come back to details of this screen later. Right now, you should be concerned with the "Show AirPort status in menu bar" setting, which should be checked. Once you check this box and close the configuration window, you'll see a new icon in the menu bar, as shown in Figure 2-5. The first thing you'll want to do is click the menu bar icon and select the option to turn on the AirPort card.
Figure 2-5. AirPort menu bar
Once the AirPort card is on, you'll be able to see a list of available networks; you can select any of these. If a password is required for the selected network, you'll be prompted for it.
To connect to a network that is not listed, choose Other…. You will be presented with the Closed Network box shown in Figure 2-6. This is how you can join networks that do not broadcast their ESSID.
Figure 2-6. Specifying the ESSID for a closed network
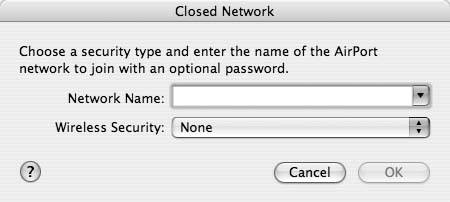
Here, you can enter the network name (ESSID) of the wireless network you want to join and the password if one is required. Mac OS X supports WEP, LEAP, WPA, and 802.1x authentication types. You can select these from the drop-down menu labeled Wireless Security.
Once you've either selected an available network or entered information for another network not listed, you'll see which network is currently connected by using the AirPort menu bar, as shown in Figure 2-7.
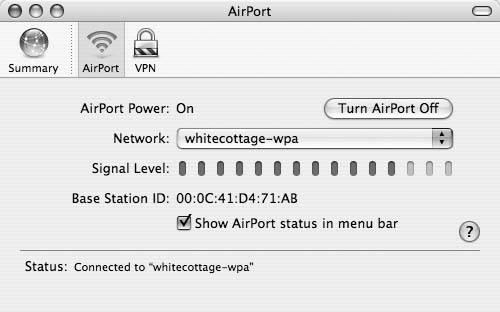
The AirPort software offers a signal strength meter, though it is rather limited in its granularity. Click the AirPort icon in the menu bar and select Open Internet Connect; you'll see a window similar to Figure 2-8.
Combined with the lack of a connector for external antennas, this limits the AirPort wireless card as a useful tool for testing wireless network connections. For more advanced signal measurement on Mac OS X, you might want to take a look at iStumbler [Hack #27] or KisMAC [Hack #28].
Figure 2-7. AirPort menu bar connections
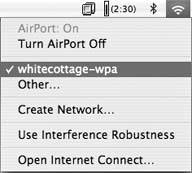
Figure 2-8. Apple's basic AirPort status
2.2.3. Linux
Using wireless networking cards in Linux can require a good deal of work, depending on your particular Linux distribution, your specific wireless card, and your hardware platform. I'm not going to cover that here. I assume here that you have PCMCIA support for your wireless card, the Wireless Extensions in your kernel, and the Wireless Tools package installed.
Not too long ago, these requirements involved compiling your own Linux kernel, compiling and installing a driver for your wireless card, and configuring the Wireless Tools by editing a number of configuration files. Along with other changes in the desktop distributions of Linux, built-in wireless support is standard with all of the major 2.6 kernel distributions. Examples in this section use Ubuntu Linux.
While wireless support has made many strides in current Linux distributions, one thing not readily available in default installations is any sort of GUI for detecting wireless networks. There are several great packages that do this, but from a fresh install, none of them are available. The best tools for the job are still the basic Wireless Tools run from the command line. These come installed by default if wireless drivers are present.
The Wireless Tools package provides four command-line tools:
iwconfig
Allows you to manipulate the basic wireless parameters
iwlist
Allows you to list addresses, frequencies, bit rates, and more
iwspy
Allows you to get per-node link quality
iwpriv
Allows you to manipulate the Wireless Extensions specific to a driver
iwlist is the tool you need at the command line to show you available wireless networks. To enable scanning, use the following command:
$ iwlist ath0 scanning
This gives you detailed information about all detected networks and is supported in the newer versions of the Wireless Extensions/Tools. You'll see output similar to this:
	ath0		Scan completed :
				Cell 01 - Address: 00:02:2D:08:82:DA
				 ESSID:"foo"
				 Mode:Master
				 Frequency:2.442 GHz (Channel 7)
				 Quality=0/94 Signal level=-95 dBm Noise level=-95 dBm
				 Encryption key:off
				 Bit Rate:1 Mb/s
				 Bit Rate:2 Mb/s
				 Bit Rate:5 Mb/s
				 Bit Rate:11 Mb/s
				 Extra:bcn_int=100
				Cell 02 - Address: 00:02:6F:20:B6:49
				 ESSID:"foo-a"
				 Mode:Master
				 Frequency:5.26 GHz (Channel 52)
				 Quality=0/94 Signal level=-95 dBm Noise level=-95 dBm
				 Encryption key:off
				 Bit Rate:6 Mb/s
				 Bit Rate:9 Mb/s
				 Bit Rate:12 Mb/s
				 Bit Rate:18 Mb/s
				 Bit Rate:24 Mb/s
				 Bit Rate:36 Mb/s
				 Bit Rate:48 Mb/s
				 Bit Rate:54 Mb/s
				 Extra:bcn_int=100
				Cell 03 - Address: 00:02:6F:20:B6:4A
				 ESSID:"foo-g"
				 Mode:Master
				 Frequency:2.462 GHz (Channel 11)
				 Quality=0/94 Signal level=-95 dBm Noise level=-95 dBm
				 Encryption key:on
				 Bit Rate:1 Mb/s
				 Bit Rate:2 Mb/s
				 Bit Rate:5 Mb/s
				 Bit Rate:6 Mb/s
				 Bit Rate:9 Mb/s
				 Bit Rate:11 Mb/s
				 Bit Rate:12 Mb/s
				 Bit Rate:18 Mb/s
				 Bit Rate:24 Mb/s
				 Bit Rate:36 Mb/s
				 Bit Rate:48 Mb/s
				 Bit Rate:54 Mb/s
				 Extra:bcn_int=100
If there are multiple access points visible from your machine, you'll receive detailed information on each one. Once you've found the access point you need to connect to, you can use iwconfig to tell your card about it.
|

Anyone who works with wireless networks in Linux will likely be looking for a more powerful link-state monitoring tool. Be sure to take a look at AP Radar [Hack #26] or Wavemon [Hack #30] if you need more functionality than the simple command-line tools provide.
Bluetooth, Mobile Phones, and GPS
- Hacks 122: Introduction
- Hack 1. Set Up Bluetooth on Linux
- Hack 2. Set Up Bluetooth on Windows XP
- Hack 3. Connect Mac OS X with a Bluetooth Phone
- Hack 4. Connect Linux with a Bluetooth Phone
- Hack 5. Connect Windows XP with a Bluetooth Phone
- Hack 6. Use Your Treo as a Modem
- Hack 7. Send SMS from a PowerBook
- Hack 8. Remote Control Mac OS X with Bluetooth Phones and PDAs
- Hack 9. Remote Control Linux with a Bluetooth Phone
- Hack 10. Control XMMS with Bluetooth
- Hack 11. Liven Up Parties with a Participatory Slideshow
- Hack 12. Send SMS from Linux
- Hack 13. Remote Control Windows with Bluetooth Phones and PDAs
- Hack 14. Control Your Bluetooth Phone with FMA
- Hack 15. Control Your Computer from Your Palm
- Hack 16. Control Your Home Theater from Your Palm
- Hack 17. Choose a Cellular Data Plan
- Hack 18. Blog from Your Mobile Phone
- Hack 19. Get Google Maps on Your Mobile Phone
- Hack 20. Share Your GPS
- Hack 21. Broadcast Your GPS Position
- Hack 22. Map Wi-Fi Networks with Kismet and GPSd
Network Discovery and Monitoring
- Hacks 2339: Introduction
- Hack 23. Find All Available Wireless Networks
- Hack 24. Discover Networks with NetStumbler
- Hack 25. Detect Networks with Handheld PCs
- Hack 26. Find and Join Wireless Networks with AP Radar
- Hack 27. Detect Networks on Mac OS X
- Hack 28. Scan Passively with KisMAC
- Hack 29. Detect Networks with Kismet
- Hack 30. Monitor Wireless Links in Linux with Wavemon
- Hack 31. Analyze Traffic with Ethereal
- Hack 32. Track 802.11 Frames in Ethereal
- Hack 33. Watch Network Traffic
- Hack 34. grep Your Network
- Hack 35. Check Wi-Fi Network Performance with Qcheck
- Hack 36. Estimate Network Performance
- Hack 37. Get Real-Time Network Stats
- Hack 38. Graph Your Wireless Performance
- Hack 39. Find Radio Manufacturers by MAC
Wireless Security
- Hacks 4051: Introduction
- Hack 40. Stop Moochers from Stealing Your Wi-Fi Bandwidth
- Hack 41. Visualize a Network
- Hack 42. Secure Your Linux Network with WPA
- Hack 43. Control Wireless Access by MAC
- Hack 44. Authenticate Wireless Users
- Hack 45. Forward Ports over SSH
- Hack 46. Proxy Web Traffic over SSH
- Hack 47. Securely Connect Two Networks
- Hack 48. Generate a Tunnel Configuration Automatically
- Hack 49. Poll Wireless Clients
- Hack 50. Interrogate the Network
- Hack 51. Track Wireless Users
Hardware Hacks
- Hacks 5262: Introduction
- Hack 52. Add an External Antenna
- Hack 53. Do-It-Yourself Access Point Hardware
- Hack 54. Boot from a Compact Flash Hard Drive
- Hack 55. Increase the Range of a PowerBook
- Hack 56. Send Power over Your Ethernet
- Hack 57. The NoCat Night Light
- Hack 58. Upgrade the Linksys WET11
- Hack 59. Scan for Wireless Networks Automatically
- Hack 60. Backlight Your Zipit
- Hack 61. Unwire Your Pistol Mouse
- Hack 62. Mobilize Your WRT54G with the WiFiCar
Software Hacks
- Hacks 6382: Introduction
- Hack 63. Build Your Own Access Point with Linux
- Hack 64. Bridge Your Linux AP
- Hack 65. Protect Your Bridge with a Firewall
- Hack 66. Filter MAC with HostAP and Madwifi
- Hack 67. Upgrade Your Wireless Router
- Hack 68. Set Up an OLSR Mesh Network
- Hack 69. Extend Your Wireless Network with WDS
- Hack 70. Pebble
- Hack 71. Wall Off Your Wireless
- Hack 72. Run Your Mac as an Access Point
- Hack 73. Run Linux on the Zipit Wireless Messenger
- Hack 74. Capture Wireless Users with NoCatAuth
- Hack 75. Capture Wireless Users on a Small Scale
- Hack 76. Build an Online Community in Your Offline Neighborhood
- Hack 77. Manage Multiple AirPort Base Stations
- Hack 78. Advertise Bonjour Services in Linux
- Hack 79. Advertise Any Service with Bonjour in Mac OS X
- Hack 80. Redirect Brought to you by Bonjour Ads
- Hack 81. Use a Windows-Only Wireless Card in Linux
- Hack 82. Use Your Orinoco Card with Hermes AP
Do-It-Yourself Antennas
- Hacks 8393: Introduction
- Hack 83. Make a Deep Dish Cylindrical Parabolic Reflector
- Hack 84. Spider Omni Antenna
- Hack 85. Pringles Can Waveguide
- Hack 86. Pirouette Can Waveguide
- Hack 87. Primestar Dish with Waveguide Feed
- Hack 88. Primestar Dish with Biquad Feed
- Hack 89. Cut a Cable Omni Antenna
- Hack 90. Build a Slotted Waveguide Antenna
- Hack 91. The Passive Repeater
- Hack 92. Determine Your Antenna Gain
- Hack 93. Build Cheap, Effective Roof Mounts
Wireless Network Design
- Hacks 94100: Introduction
- Hack 94. Analyze Elevation Profiles for Better Long-Range Wireless Networking
- Hack 95. Build a Wireless Network for the Large House
- Hack 96. Establish Line of Sight
- Hack 97. Calculate the Link Budget
- Hack 98. Align Antennas at Long Distances
- Hack 99. Slow Down to Speed Up
- Hack 100. Take Advantage of Antenna Polarization
Appendix A. Wireless Standards
- Appendix A. Wireless Standards
- Section A.1. 802.11: The Mother of All IEEE Wireless Ethernet
- Section A.2. 802.11a: The Betamax of the 802.11 Family
- Section A.3. 802.11b: The De Facto Standard
- Section A.4. 802.11g: Like 802.11b, only Faster
- Section A.5. 802.16: WiMAX Long Distance Wireless Infrastructure
- Section A.6. Bluetooth: Cable Replacement for Devices
- Section A.7. 900 MHz: Low Speed, Better Coverage
- Section A.8. CDPD, 1xRTT, and GPRS: Cellular Data Networks
- Section A.9. FRS and GMRS: Super Walkie-Talkies
- Section A.10. 802.1x: Port Security for Network Communications
- Section A.11. WPA & 802.11i
- Section A.12. BSS Versus IBSS
Appendix B. Wireless Hardware Guide
EAN: 2147483647
Pages: 178
