Hack 61. Unwire Your Pistol Mouse


Why be stuck with a short cable when you can use Bluetooth in your pistol mouse instead?
The PistolMouse FPS by MonsterGecko (http://www.monstergecko.com/products.html) is a great way to play first-person shooters. However, when you're at a LAN party and you want to wave the thing around after fragging your friends, you are rudely reminded of the short USB cord handing from the front of the unit.
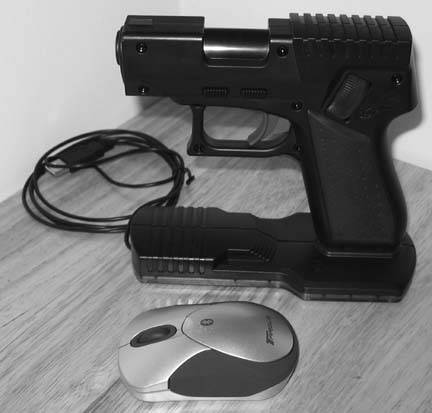
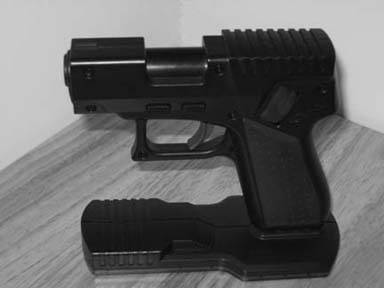
By taking the main board out of a Targus AMB01US Bluetooth Mini Mouse (http://www.targus.com/us/product_details.asp?sku=AMB01US) and replacing it with the main board of the PistolMouse FPS, you can make the MonsterGecko device wireless for use with any Bluetooth equipped system. Figure 4-29 shows the two mice, side by side.
4.11.1. Requirements
First, get everything together, so you don't have to make three trips to the local electronics store during the assembly process. Here's what you'll need:
- MonsterGecko PistolMouse FPS
- Targus AMB01US Bluetooth Mini Mouse
Figure 4-29. The PistolMouse FPS and Targus Bluetooth Mini Mouse
- 22 +/- 2 gauge stranded wire
- Heat shrink tubing for above wire
- Solder
- Liquid Solder Flux
- Desoldering tape or desoldering tool
- 2 AA Battery Holder from Radio Shack (catalog # 270-408)
- Philips screwdriver set
- Hex screwdriver set
- Soldering iron
- Multimeter for checking continuity
- Dremel tool or similar
Next, if you haven't already, test out both the PistolMouse and the Targus mouse to make sure they both function properly with the system where you plan to use them.
4.11.2. Disassembly
If you have any questions during the project process, check my Flickr photoset at http://www.flickr.com/photos/_bt/sets/494023, which contains 21 pictures of the process (I obviously couldn't include them all in this hack).
Disassemble the MiniMouse by removing the two small mouse feet stickers near the rear of the mouse. This will expose two screws. Remove these. Open the mouse and remove the battery cover. Then, remove the blue frame from the mouse, which is latched toward the front of the mouse with clips, as shown in Figure 4-30.
Figure 4-30. Removing the MiniMouse board from the frame
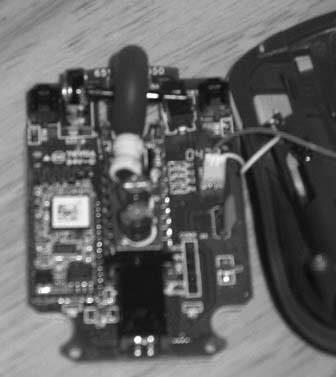
Be careful not to damage the MiniMouse main board during this process. There are two wires going to the main board, red and white, for power; just pull the plug out of the board and set aside. Remove the black housing over the LED on the back of the main board, because this is usually too large to keep in the finished device.
Disassemble the PistolMouse FPS with the Phillips screwdriver on the bottom and using a hex screwdriver on the sides. You will have to remove the red plastic grip (attached just with friction on the left side of the gun) to get to the hex screws. There are a total of 11 hex and 6 Phillips screws to remove from the PistolMouse. Be careful to keep track of any parts if they fly out during this step.
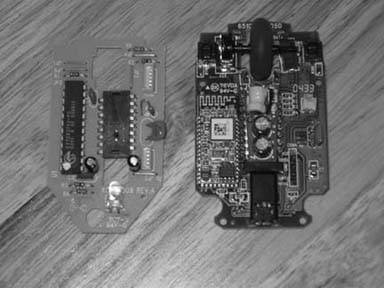
Remove the main board from the PistolMouse FPS and detach any wires and place to the side. You will need this for reference only, if at all. Figure 4-31 shows the MiniMouse board (on the right) and the much simpler Pistol-Mouse board (on the left).
Figure 4-31. Main boards from each mouse
4.11.3. Wiring
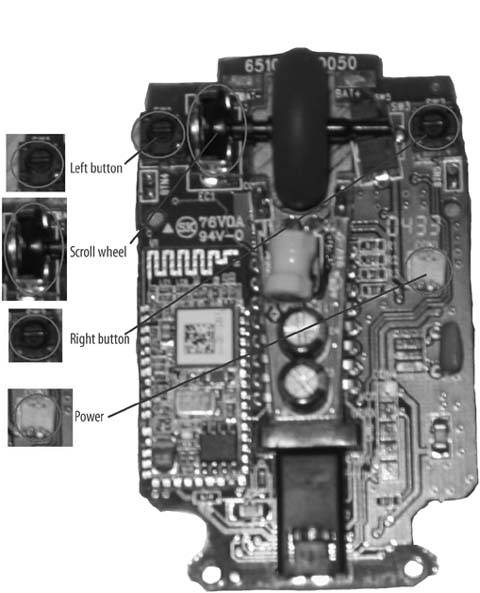
There are four sensors on the MiniMouse main board, which are highlighted in Figure 4-32. The left, right, and scroll wheel buttons, as well as the scroll wheel sensor, must all be removed. Remove these with any method you are comfortable with: either desoldering tape or a desoldering suction device. For your own reference, take note of the orientation of the scroll wheel sensor.
Figure 4-32. The four sensors that need to be removed
Now you will extend the wires from the original PistolMouse FPS to the MiniMouse main board, as shown in Figure 4-33. Use wire of more than sufficient length at this point; you can cut it short later. Use the heat shrink tubing instead of electrical tape for attractive wiring, as well as helping make it as small as possible.
Orientation for the following instructions is the front of the mouse and the rear of the mouse, as held in your hand.
Figure 4-33. Extending the wires from the PistolMouse
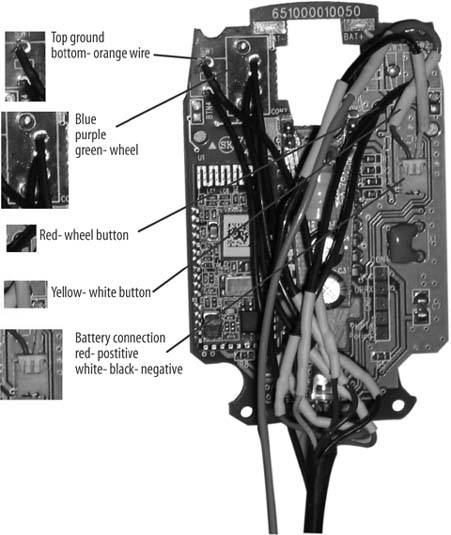
Please double-check the ground connections on your mouse before proceeding using the multimeter and the two connections for each button, in case Targus has changed the MiniMouse main board:
- The left mouse button is wired, so the front solder point is going to the brown wire (which is ground) and the rear is going to the orange wire.
- The scroll sensor uses the three solder points to the right of and between the sensor mounting points. From front to rear, use the blue, purple, then green wires.
- The wheel button uses the front solder point; the rear is ground and already connected via the left button.
- The right button uses the rear solder point, the front being the ground here.
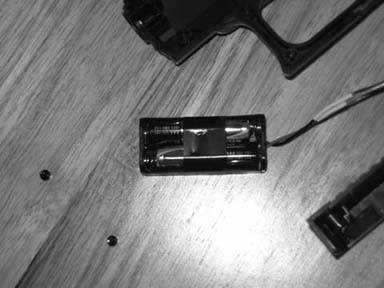
Now, add an extension of wire to the AA battery holder, as shown in Figure 4-34. This will need to go from the top of the gun all the way to the bottom front. Attach the power plug to this extension so that it can plug into the MiniMouse main board.
Figure 4-34. Wiring the AA battery holder
4.11.4. Testing and Debugging
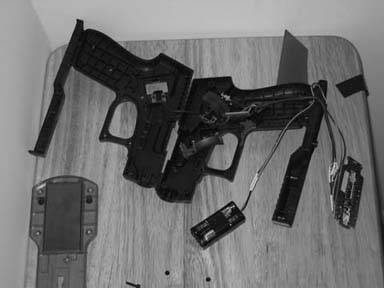
Put AA batteries in the holder and turn on the PistolMouse. As with Mini-Mouse in its original form, you might have to click the buttons a couple times to make sure the unit is on and working. Click or manually press the switches on the PistolMouse and verify that they are working on your system. At this point, you should have a disassembled working unit, like the one shown in Figure 4-35.
One problem I experienced was that I originally plugged the ground into a different point, and this gave a ghost of constant clicking on the left button. After connecting ground to the left button connector, the device worked fine. Test things like ground, to make sure they are all connected and do things like tracing the wires from where they are plugged in, to where they go to the buttons.
Figure 4-35. Disassembled PistolMouse with new components
4.11.5. Cutting
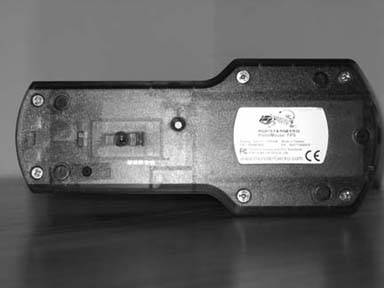
You'll need to make room in the plastic of the PistolMouse FPS for the new larger main board. Use a dremel or similar tool to remove the fins in the black plastic where the board sits. You will also have to remove red clear plastic material from the bottom. In the end, the board should sit gently on the red plastic with the lens optic in place. The optic from the original board and the new one were exactly the same in my experience, so you can use this to assist in positioning the board in place. The extra wires you now have on the board will press it down in actual use. Figure 4-36 shows the bottom of the PistolMouse with the new board and the modifications I made.
You will also have to cut two small holes in the red plastic, as shown in Figure 4-37. One will be for the on/off switch. I did this in order to be able to use the switch from the original mouse, but I still have to use a paper clip to flip the switch. Do this carefully.
For the connect switch, you will have to carefully figure out where it is under the red plastic, then drill a hole so the connect button can be installed. I used a few layers of electrical tape to make the hole walls taller so the button wouldn't come loose. Use incremental sizes of drill bits until the hole allows the button to be pushed and return to its place, but still tight enough that it won't come loose during use.
Figure 4-36. Modifications to the bottom case of the PistolMouse
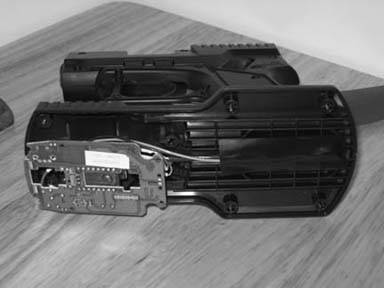
Figure 4-37. Holes for the optics and on/off switch
4.11.6. Reassembly
Once everything is working properly, it's time to reassemble the unit. Begin by putting fresh high-quality AA batteries in the holder, because they are not easy to replace. Then, put the holder above the scroll wheel in the cavity above the trigger. Run the wires for all the buttons and batteries down the front of the gun, so they don't interfere with any other buttons or screw holes. Then, screw together the two halves and replace the rubber grip.
Put a piece of tape over the wires as they exit out of the top of the gun into the bottom, and make them run along the center channel on the bottom of the black plastic. Then, align the main board and optic on the red plastic and attach the bottom plate. Screw this on and everything should be together. Turn on the unit and test and debug further if needed. Often, you'll need multiple attempts to run the wires smoothly and reassemble the bottom piece. Figure 4-38 shows the finished reassembled unit.
Figure 4-38. The finished Bluetooth PistolMouse FPS
4.11.7. Use
Use the new mouse as you would any Bluetooth device. It should work on both Macs and PCs that have Bluetooth. It should perform similar to the original PistolMouse FPS, since they both are 800dpi devices.
|

Enjoy your new wireless Pistol Mouse, and play safe.
Bryan Hurley
Bluetooth, Mobile Phones, and GPS
- Hacks 122: Introduction
- Hack 1. Set Up Bluetooth on Linux
- Hack 2. Set Up Bluetooth on Windows XP
- Hack 3. Connect Mac OS X with a Bluetooth Phone
- Hack 4. Connect Linux with a Bluetooth Phone
- Hack 5. Connect Windows XP with a Bluetooth Phone
- Hack 6. Use Your Treo as a Modem
- Hack 7. Send SMS from a PowerBook
- Hack 8. Remote Control Mac OS X with Bluetooth Phones and PDAs
- Hack 9. Remote Control Linux with a Bluetooth Phone
- Hack 10. Control XMMS with Bluetooth
- Hack 11. Liven Up Parties with a Participatory Slideshow
- Hack 12. Send SMS from Linux
- Hack 13. Remote Control Windows with Bluetooth Phones and PDAs
- Hack 14. Control Your Bluetooth Phone with FMA
- Hack 15. Control Your Computer from Your Palm
- Hack 16. Control Your Home Theater from Your Palm
- Hack 17. Choose a Cellular Data Plan
- Hack 18. Blog from Your Mobile Phone
- Hack 19. Get Google Maps on Your Mobile Phone
- Hack 20. Share Your GPS
- Hack 21. Broadcast Your GPS Position
- Hack 22. Map Wi-Fi Networks with Kismet and GPSd
Network Discovery and Monitoring
- Hacks 2339: Introduction
- Hack 23. Find All Available Wireless Networks
- Hack 24. Discover Networks with NetStumbler
- Hack 25. Detect Networks with Handheld PCs
- Hack 26. Find and Join Wireless Networks with AP Radar
- Hack 27. Detect Networks on Mac OS X
- Hack 28. Scan Passively with KisMAC
- Hack 29. Detect Networks with Kismet
- Hack 30. Monitor Wireless Links in Linux with Wavemon
- Hack 31. Analyze Traffic with Ethereal
- Hack 32. Track 802.11 Frames in Ethereal
- Hack 33. Watch Network Traffic
- Hack 34. grep Your Network
- Hack 35. Check Wi-Fi Network Performance with Qcheck
- Hack 36. Estimate Network Performance
- Hack 37. Get Real-Time Network Stats
- Hack 38. Graph Your Wireless Performance
- Hack 39. Find Radio Manufacturers by MAC
Wireless Security
- Hacks 4051: Introduction
- Hack 40. Stop Moochers from Stealing Your Wi-Fi Bandwidth
- Hack 41. Visualize a Network
- Hack 42. Secure Your Linux Network with WPA
- Hack 43. Control Wireless Access by MAC
- Hack 44. Authenticate Wireless Users
- Hack 45. Forward Ports over SSH
- Hack 46. Proxy Web Traffic over SSH
- Hack 47. Securely Connect Two Networks
- Hack 48. Generate a Tunnel Configuration Automatically
- Hack 49. Poll Wireless Clients
- Hack 50. Interrogate the Network
- Hack 51. Track Wireless Users
Hardware Hacks
- Hacks 5262: Introduction
- Hack 52. Add an External Antenna
- Hack 53. Do-It-Yourself Access Point Hardware
- Hack 54. Boot from a Compact Flash Hard Drive
- Hack 55. Increase the Range of a PowerBook
- Hack 56. Send Power over Your Ethernet
- Hack 57. The NoCat Night Light
- Hack 58. Upgrade the Linksys WET11
- Hack 59. Scan for Wireless Networks Automatically
- Hack 60. Backlight Your Zipit
- Hack 61. Unwire Your Pistol Mouse
- Hack 62. Mobilize Your WRT54G with the WiFiCar
Software Hacks
- Hacks 6382: Introduction
- Hack 63. Build Your Own Access Point with Linux
- Hack 64. Bridge Your Linux AP
- Hack 65. Protect Your Bridge with a Firewall
- Hack 66. Filter MAC with HostAP and Madwifi
- Hack 67. Upgrade Your Wireless Router
- Hack 68. Set Up an OLSR Mesh Network
- Hack 69. Extend Your Wireless Network with WDS
- Hack 70. Pebble
- Hack 71. Wall Off Your Wireless
- Hack 72. Run Your Mac as an Access Point
- Hack 73. Run Linux on the Zipit Wireless Messenger
- Hack 74. Capture Wireless Users with NoCatAuth
- Hack 75. Capture Wireless Users on a Small Scale
- Hack 76. Build an Online Community in Your Offline Neighborhood
- Hack 77. Manage Multiple AirPort Base Stations
- Hack 78. Advertise Bonjour Services in Linux
- Hack 79. Advertise Any Service with Bonjour in Mac OS X
- Hack 80. Redirect Brought to you by Bonjour Ads
- Hack 81. Use a Windows-Only Wireless Card in Linux
- Hack 82. Use Your Orinoco Card with Hermes AP
Do-It-Yourself Antennas
- Hacks 8393: Introduction
- Hack 83. Make a Deep Dish Cylindrical Parabolic Reflector
- Hack 84. Spider Omni Antenna
- Hack 85. Pringles Can Waveguide
- Hack 86. Pirouette Can Waveguide
- Hack 87. Primestar Dish with Waveguide Feed
- Hack 88. Primestar Dish with Biquad Feed
- Hack 89. Cut a Cable Omni Antenna
- Hack 90. Build a Slotted Waveguide Antenna
- Hack 91. The Passive Repeater
- Hack 92. Determine Your Antenna Gain
- Hack 93. Build Cheap, Effective Roof Mounts
Wireless Network Design
- Hacks 94100: Introduction
- Hack 94. Analyze Elevation Profiles for Better Long-Range Wireless Networking
- Hack 95. Build a Wireless Network for the Large House
- Hack 96. Establish Line of Sight
- Hack 97. Calculate the Link Budget
- Hack 98. Align Antennas at Long Distances
- Hack 99. Slow Down to Speed Up
- Hack 100. Take Advantage of Antenna Polarization
Appendix A. Wireless Standards
- Appendix A. Wireless Standards
- Section A.1. 802.11: The Mother of All IEEE Wireless Ethernet
- Section A.2. 802.11a: The Betamax of the 802.11 Family
- Section A.3. 802.11b: The De Facto Standard
- Section A.4. 802.11g: Like 802.11b, only Faster
- Section A.5. 802.16: WiMAX Long Distance Wireless Infrastructure
- Section A.6. Bluetooth: Cable Replacement for Devices
- Section A.7. 900 MHz: Low Speed, Better Coverage
- Section A.8. CDPD, 1xRTT, and GPRS: Cellular Data Networks
- Section A.9. FRS and GMRS: Super Walkie-Talkies
- Section A.10. 802.1x: Port Security for Network Communications
- Section A.11. WPA & 802.11i
- Section A.12. BSS Versus IBSS
Appendix B. Wireless Hardware Guide
EAN: 2147483647
Pages: 178
