Drawing Diagrams with Draw2D
This chapter introduces a simple rendering framework — Draw2D. With Draw2D, you can create complex figures easily. This chapter shows you how to create simple UML diagrams with Draw2D. The sample application displays the selected class in a UML diagram. By combining small figures, you can create manageable complex figures without the tedious code. Draw2D also provides excellent figure connection support. You can easily connect two figures and decorate the connection. You can generate various events with lightweight widgets in Draw2D. You can also register corresponding listeners to listen to events and then react accordingly.
Draw2D is part of the Graphical Editing Framework (GEF). This chapter discusses only Draw2D. For details of GEF, please visit http://www.eclipse.org/gef/.
Overview
As an Eclipse plug-in, Draw2D provides a lightweight widget system that is hosted on an SWT Canvas widget. Draw2D provides powerful rendering and layout capabilities. Figures, borders, and layout managers are the basic elements in Draw2D. You can combine them to create complex figures to suit various applications. In this chapter, you step through the construction of a sample application based on Draw2D. Before going further, let's take a closer look at the architecture of Draw2D.
In Draw2D, the interface IFigure represents a lightweight graphical object. A figure can be any visible object — for example, a button, a label, or an ellipse shape. In addition, a figure may contain other figures as its children. You can compose figures to create highly complex renderings. You supply figures to Draw2D and it draws those figures on an SWT Canvas widget. The LightweightSystem class plays a key role in Draw2D by linking the SWT canvas and figure objects. It draws figures on the SWT canvas and provides an event delegation mechanism. The architecture is illustrated in Figure 23-1.
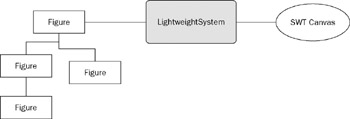
Figure 23-1
The following code creates one of the simplest Draw2D applications, as shown in Figure 23-2.
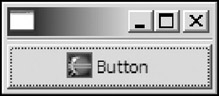
Figure 23-2
 package com.asprise.books.javaui.ch23;

 import org.eclipse.draw2d.Button;
 import org.eclipse.draw2d.LightweightSystem;
 import org.eclipse.jface.window.ApplicationWindow;
 import org.eclipse.swt.SWT;
 import org.eclipse.swt.graphics.Image;
 import org.eclipse.swt.layout.FillLayout;
 import org.eclipse.swt.widgets.Canvas;
 import org.eclipse.swt.widgets.Composite;
 import org.eclipse.swt.widgets.Control;
 import org.eclipse.swt.widgets.Shell;

 public class Draw2DSample extends ApplicationWindow {

 /**
 * @param parentShell
 */
 public Draw2DSample(Shell parentShell) {
 super(parentShell);
 }

 /* (non-Javadoc)
 * @see org.eclipse.jface.window.Window#createContents(Composite)
 */
 protected Control createContents(Composite parent) {
 Composite composite = new Composite(parent, SWT.NULL);
 composite.setLayout(new FillLayout());

 Canvas canvas = new Canvas(composite, SWT.NULL);

 LightweightSystem lws = new LightweightSystem(canvas);
 Button button = new Button("Button",
 new Image(getShell().getDisplay(), "icons/eclipse0.gif"));
 lws.setContents(button);

 return composite;
 }

 public static void main(String[] args) {
 Draw2DSample window = new Draw2DSample(null);
 window.setBlockOnOpen(true);
 window.open();
 }
 }
In previous chapters, we used the org.eclipse.swt.widgets.Button class to represent a button. In Draw2D, the org.eclipse.draw2d.Button class is used instead. The main difference between those two classes is that org.eclipse.swt.widgets.Button represents a widget that consumes native system resources, while org.eclipse.draw2d.Button represents a lightweight button and it does not require native resources. Such lightweight widgets provide graphical information for the LightweightSystem class to draw them on the canvas. Many SWT widgets have their own lightweight Draw2D counterparts, such as buttons and labels.
In the createContents method, a Canvas is created to host Draw2D figures. An instance of LightweightSystem is then created with the canvas. Then you create a button with a text label and image label using the org.eclipse.draw2d.Button class. The setContents method of the LightweightSystem class is used to pass the figure object. If you have multiple figure objects, you need to pass only the top-level figure.
Finally, the main method brings up the window and displays the button.
To compile and run the preceding code, you need to download and install the GEF plug-in from http://www.eclipse.org/gef/ and add the draw2d.jar file under $ECLIPSE_HOME/plugins/org.eclipse.draw2d_x.x.x into your Java class path.
Creating Simple UML Diagrams with Draw2D
The rest of this chapter describes the features of Draw2D and includes a sample application, as shown in Figure 23-3. The sample application displays a simple UML diagram for a class. The fields and methods of the class are displayed. The superclass of the class (if any) is drawn on the top of the class figure. An arrow is used to show the inheritance relationship between the class and its superclass.
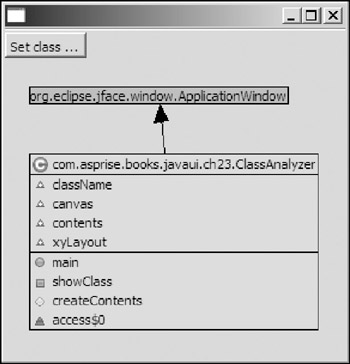
Figure 23-3
First, you need to create the figure displaying class members (referred to as a class figure). The class figure has a line border and contains three parts. The top part is the class name label. The middle part and the bottom part are two compartments that can contain figures for class fields and methods. For the class name label, you can use the org.eclipse.draw2d.Label class. For the two compartments, you need to create a custom figure class that is able to lay out child figures vertically. Here is the code for the implementation of the custom figure, which extends the Figure class:
 class Box extends Figure {
 public Box() {
 setBorder(new BoxBorder());

 ToolbarLayout toolbarLayout = new ToolbarLayout();
 toolbarLayout.setStretchMinorAxis(false);

 setLayoutManager(toolbarLayout);
 }

 private class BoxBorder extends AbstractBorder {

 /*
 * (non-Javadoc)
 *
 * @see org.eclipse.draw2d.Border#getInsets(org.eclipse.draw2d.IFigure)
 */
 public Insets getInsets(IFigure figure) {
 return new Insets(1, 0, 0, 0);
 }

 /*
 * (non-Javadoc)
 *
 * @see org.eclipse.draw2d.Border#paint(org.eclipse.draw2d.IFigure,
 * org.eclipse.draw2d.Graphics,
 * org.eclipse.draw2d.geometry.Insets)
 */
 public void paint(IFigure figure, Graphics graphics, Insets insets) {
 Rectangle rect = getPaintRectangle(figure, insets);
 graphics.drawLine(rect.getTopLeft(), rect.getTopRight());
 }

 }
 }
There are two important things to note in the preceding code. First, a custom border is created to display a thin line on the top of the box as a compartment separator. Second, the layout manager of this custom figure is set to ToolbarLayout. ToolbarLayout arranges figures in a single row or column. By default, it arranges the child figures in a column.
Now, you are ready to create the class figure with the following code:
 class ClassFigure extends Figure {
 ImageRegistry registry = new ImageRegistry();
 // image keys.
 String KEY_CLASS = "class";
 String KEY_METHOD_PUBLIC = "method_public";
 String KEY_METHOD_DEFAULT = "method_default";
 String KEY_METHOD_PROTECTED = "method_protected";
 String KEY_METHOD_PRIVATE = "method_private";
 String KEY_FIELD_PUBLIC = "field_public";
 String KEY_FIELD_DEFAULT = "field_default";
 String KEY_FIELD_PROTECTED = "field_protected";
 String KEY_FIELD_PRIVATE = "field_private";

 String[] keys =
 {
 KEY_CLASS,
 KEY_METHOD_PUBLIC,
 KEY_METHOD_DEFAULT,
 KEY_METHOD_PROTECTED,
 KEY_METHOD_PRIVATE,
 KEY_FIELD_PUBLIC,
 KEY_FIELD_DEFAULT,
 KEY_FIELD_PROTECTED,
 KEY_FIELD_PRIVATE };

 public Box fieldBox = new Box();
 public Box methodBox = new Box();

 public ClassFigure(Class cls) {
 setLayoutManager(new ToolbarLayout());
 setBorder(new LineBorder(ColorConstants.black));
 setBackgroundColor(ColorConstants.yellow);
 setOpaque(true);

 for (int i = 0; i < keys.length; i++)
 registry.put(
 keys[i],
 ImageDescriptor.createFromFile(
 null,
 "icons/java/" + keys[i] + ".gif"));

 Label title = new Label(cls.getName(), registry.get(KEY_CLASS));
 add(title);
 add(fieldBox);
 add(methodBox);

 // fields.
 Field[] fields = cls.getDeclaredFields();
 for (int i = 0; i < fields.length; i++) {
 Field field = fields[i];
 Image image = null;
 if (Modifier.isPublic(field.getModifiers())) {
 image = registry.get(KEY_FIELD_PUBLIC);
 } else if (Modifier.isProtected(field.getModifiers())) {
 image = registry.get(KEY_FIELD_PROTECTED);
 } else if (Modifier.isPrivate(field.getModifiers())) {
 image = registry.get(KEY_FIELD_PRIVATE);
 } else {
 image = registry.get(KEY_FIELD_DEFAULT);
 }
 fieldBox.add(new Label(fields[i].getName(), image));
 }

 // methods.
 Method[] methods = cls.getDeclaredMethods();
 for (int i = 0; i < methods.length; i++) {
 Method method = methods[i];
 Image image = null;
 if (Modifier.isPublic(method.getModifiers())) {
 image = registry.get(KEY_METHOD_PUBLIC);
 } else if (Modifier.isProtected(method.getModifiers())) {
 image = registry.get(KEY_METHOD_PROTECTED);
 } else if (Modifier.isPrivate(method.getModifiers())) {
 image = registry.get(KEY_METHOD_PRIVATE);
 } else {
 image = registry.get(KEY_METHOD_DEFAULT);
 }
 methodBox.add(new Label(methods[i].getName(), image));
 }

 }
 }
In the constructor of the ClassFigure class, first set the layout manager for this figure to ToolbarLayout so that child figures are displayed in a column. Then set a line border for the figure.
The background color is configured through the setBackgroundColor method. By default, a figure is transparent. You can use setOpaque to change this behavior. After setting the layout manager and border, add the three parts in order. For each field, a label is created and added to the box containing fields. Similarly, create a label for each method and add it to the box containing methods.
To create a class figure for a class, you can simply invoke the constructor with the class as the argument.
The class details are displayed in a class figure, while the superclass is displayed briefly as a label. You can use an application window to display both items on its content area (see Figure 23-4).
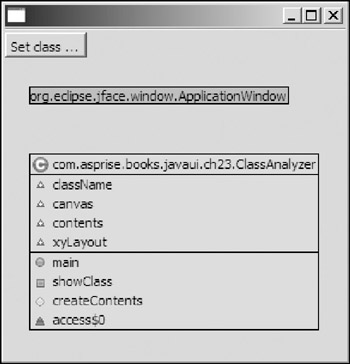
Figure 23-4
 public class ClassAnalyzer extends ApplicationWindow {
 Text className;

 Canvas canvas;
 Figure contents;
 XYLayout xyLayout;

 /**
 * @param parentShell
 */
 public ClassAnalyzer(Shell parentShell) {
 super(parentShell);
 addToolBar(SWT.NULL);
 }

 private void showClass(Class cls) {
 if (cls == null)
 return;

 // removes all existing items.
 contents.removeAll();

 // draws super class.
 Label sup = null;
 if (cls.getSuperclass() != null) {
 Class superClass = cls.getSuperclass();
 sup = new Label(superClass.getName());
 sup.setBorder(new LineBorder());
 sup.setBackgroundColor(ColorConstants.lightGreen);
 sup.setOpaque(true);
 }

 if (sup != null) {
 contents.add(sup);
 xyLayout.setConstraint(sup, new Rectangle(20, 20, -1, -1));
 }

 ClassFigure classFigure = new ClassFigure(cls);
 contents.add(classFigure);
 if (sup == null)
 xyLayout.setConstraint(classFigure, new Rectangle(20, 20, -1, -1));
 else
 xyLayout.setConstraint(
 classFigure,
 new Rectangle(20, sup.getBounds().height + 40, -1, -1));

 // resizes the shell.
 getShell().setSize(
 contents.getPreferredSize().width + 30,
 contents.getPreferredSize().height + 80);

 }

 /*
 * (non-Javadoc)
 *
 * @see org.eclipse.jface.window.Window#createContents(Composite)
 */
 protected Control createContents(Composite parent) {
 Composite composite = new Composite(parent, SWT.NULL);
 composite.setLayout(new FillLayout());

 canvas = new Canvas(composite, SWT.NULL);

 LightweightSystem lws = new LightweightSystem(canvas);
 contents = new Figure();
 xyLayout = new XYLayout();
 contents.setLayoutManager(xyLayout);

 lws.setContents(contents);

 showClass(this.getClass());

 // Creates toolbar items.
 getToolBarManager().add(new Action("Set class ...") {
 public void run() {
 InputDialog dialog =
 new InputDialog(
 getShell(),
 "",
 "Please enter the class name",
 "",
 null);
 if (dialog.open() != Dialog.OK)
 return;

 contents.removeAll();
 Class cls = null;
 try {
 cls = Class.forName(dialog.getValue());
 } catch (ClassNotFoundException e) {
 e.printStackTrace();
 }
 if (cls != null) {
 showClass(cls);
 }
 }
 });
 getToolBarManager().update(true);

 return composite;
 }

 public static void main(String[] args) {
 ClassAnalyzer window = new ClassAnalyzer(null);

 window.setBlockOnOpen(true);
 window.open();

 Display.getCurrent().dispose();
 }
 }
The createContents method creates the canvas and the toolbar item. The contents figure has XYLayout as its layout manager. XYLayout lays out the components using the layout constraints defined by every component. Constraint setting examples appear later in the chapter.
The showClass method is used to create and display both the class figure and the superclass label for a given class. It first removes all the existing items on the contents figure. If the given class has a superclass, a label with green background is shown with the superclass name as its text content, and the label defines the following constraint:
xyLayout.setConstraint(sup, new Rectangle(20, 20, -1, -1));
The setConstraint method sets the layout constraint for the figure. The constraint object should be of the type org.eclipse.draw2d.geometry.Rectangle. The constraint new Rectangle(20, 20, -1, -1) specifies that the top-left corner of the figure should be located at position (20, 20) and the figure should be displayed at its preferred size.
Finally, you resize the shell to show all the figures on the screen.
Adding Connections
A connection can be used to connect two figures. Before creating a connection, you need to establish two endpoints for it. These endpoints include the source anchors and target anchors. An anchor implements the ConnectionAnchor interface. If one of the anchors moves, the connection moves with it. In Draw2D, a connection is usually displayed as a polyline. If polylines are not enough, you can decorate connections with endpoint decorations, such as arrow tips.
In the sample application, you need to connect the class figure and superclass figure with the arrow connection, as shown in Figure 23-5.

Figure 23-5
In the showClass method, you use the following code to create the connection between the class figure and the superclass figure:
 private void showClass(Class cls) {
 // Creates the class figure and the superclass figure.
 ...

 // Adds connection.
 if (sup != null) {
 PolylineConnection connection = new PolylineConnection();
 ChopboxAnchor source = new ChopboxAnchor(classFigure);
 ChopboxAnchor target = new ChopboxAnchor(sup);
 connection.setSourceAnchor(source);
 connection.setTargetAnchor(target);

 PolygonDecoration decoration = new PolygonDecoration();
 PointList list = new PointList();
 list.addPoint(-2, -2);
 list.addPoint(0, 0);
 list.addPoint(-2, 2);
 decoration.setTemplate(list);

 connection.setTargetDecoration(decoration);
 contents.add(connection);

 }

 // resizes the shell.
 getShell().setSize(
 contents.getPreferredSize().width + 30,
 contents.getPreferredSize().height + 80);
 }
An instance of the PolylineConnection class is created first. The source anchor and target anchor are then created as ChopboxAnchors. You find the location of a ChopboxAnchor by calculating the intersection of a line drawn from the center point of its owner's box to a reference point on that box. As a result, the connection will be oriented such that it points from the center of the class figure to the superclass figure.
You use the setSourceAnchor and setTargetAnchor methods to set the source anchor and target anchor for a connection, respectively:
 public void setSourceAnchor(ConnectionAnchor anchor)
 public void setTargetAnchor(ConnectionAnchor anchor)
After the connection is created, decorate it with an arrow. The arrow is constructed as an instance of PolygonDecoration. The shape of this arrow is defined through a point list. The arrow is set as the decoration of the target anchor through the setTargetDecoration method of the PolylineConnection class.
The connection and its decoration are now ready to be used. The connection is not added to the contents figure automatically. You add the connection as an IFigure to the contents figure through the add method. Now if you run the sample application, you can see the connection displayed as expected.
Capturing Events
Chapter 4 covered how to capture events from SWT widgets. Simple widgets in Draw2D can also generate various events. You can register corresponding listeners in order to capture events from IFigures. The following are some of the event types that an IFigure is capable of generating (the corresponding listener classes appear in parentheses):
- Ancestor change event (AncestorListener): This event is fired for any change in the ancestor hierarchy of the figure.
- Figure event (FigureListener): A figure event occurs when the figure moves.
- Focus event (FocusListener): Focus events are generated when the figure loses or gains focus.
- Key event (KeyListener): A key event occurs when a key is pressed or released.
- Mouse event (MouseListener): Mouse events are generated when mouse buttons are pressed, released, or double-clicked.
- Mouse motion event (MouseMotionListener): A mouse motion event occurs when the mouse moves.
You use a mouse listener to add a feature to the sample application: When the user double-clicks the superclass figure, the application analyzes the superclass and then displays it in great detail. The following code does the job:
 private void showClass(Class cls) {
 ...
 if (cls.getSuperclass() != null) {
 final Class superClass = cls.getSuperclass();
 sup = new Label(superClass.getName());
 ...

 sup.addMouseListener(new MouseListener() {
 public void mousePressed(org.eclipse.draw2d.MouseEvent me) {
 }

 public void mouseReleased(org.eclipse.draw2d.MouseEvent me) {
 }

 public void mouseDoubleClicked(
 org.eclipse.draw2d.MouseEvent me) {
 showClass(superClass);
 }
 });
 }
 ...
 }
When the user double-clicks the superclass figure, the mouse listener is notified. As a result, the superclass is set as the current class.
Summary
Draw2D is a simple and easy-to-use widget system that uses an SWT canvas. It provides powerful rendering and layout capabilities. You can combine figures, borders, and layout managers to create complex figures.
This chapter introduced basic Draw2D features through a sample application. You learned how to create complex UML diagrams by combining small figure objects. The chapter also introduced two main layout managers: ToolbarLayout lays out figures in a single row or column, whereas XYLayout allows you to lay out components through layout constraints. With Draw2D's excellent connection support, you can connect two figures easily. Additionally, you can decorate the connection with different types of endpoints, such as arrow tips.
The last part of this chapter introduced event handling in Draw2D. Simple widgets can also generate various events. You can register corresponding listeners to specific events and then watch them react accordingly.
This chapter and previous chapters should provide you with a good foundation for using SWT/JFace. The next chapter draws on the knowledge you've gained in this book as it guides you through the steps of developing a practical application.
Part I - Fundamentals
- Overview of Java UI Toolkits and SWT/JFace
- SWT/JFace Mechanisms
- Jump Start with SWT/JFace
- SWT Event Handling, Threading, and Displays
- Basic SWT Widgets
- Layouts
Part II - Design Basics
Part III - Dynamic Controls
- Scales, Sliders, and Progress Bars
- Other Important SWT Components
- SWT Graphics and Image Handling
- Drag and Drop and the Clipboard
- Printing
- JFace Windows and Dialogs
Part IV - Application Development
EAN: 2147483647
Pages: 147
