Programming OLE in Windows
SWT is integrated tightly with the underlying system. In this chapter, you learn how to embed OLE documents and ActiveX controls in SWT widgets on Windows platforms. As an example, we embed a Microsoft Word document in an SWT application. The chapter walks you through the steps to embed an OLE document: creating the OLE container, creating an OLE site for the OLE document, activating the OLE object, and deactivating the OLE object. You also learn how to save changes made to the OLE document and execute basic commands. OLE automation gives you much more control over an OLE document or ActiveX control. This chapter shows you how to get/set property values and invoke complex methods.
Introduction
Component Object Model (COM), also known as ActiveX, is a software architecture enabling crosssoftware communication mainly for Windows platforms. With COM technology, you can mix and integrate all kinds of software parts together at runtime. The precursor to ActiveX was object linking and embedding (OLE). In 1996, Microsoft renamed some parts of OLE relating to the Internet as ActiveX, and then renamed all OLE technologies into ActiveX. In 1997, the entire framework was renamed COM. The terminology here becomes a little confusing. In this chapter, OLE documents refers to a compound document technology, as used in Microsoft Office, and general software components such as Web browsers are referred to as ActiveX controls.
In SWT, package org.eclipse.swt.ole.win32 provides a set of classes that allow you to integrate OLE documents and ActiveX controls into SWT widgets.
OleFrame
The OleFrame class, a subclass of org.eclipse.swt.widgets.Composite, represents an OLE container. OleFrame offers the following functions:
- Positioning and sizing the OLE document or ActiveX control
- Inserting menu items from the application into the OLE document's menu
- Activating and deactivating the OLE document's menu
- Positioning the OLE document's menu
- Translating accelerator keystrokes intended for the OLE document or ActiveX control
OleClientSite, OleControlSite
While OleFrame provides a UI container for an OLE document or ActiveX control, OleClientSite and OleControlSite provide sites for the embedded OLE documents and ActiveX controls, respectively.
OleClientSite handles interactions with a particular OLE document. It provides the following functions:
- Creating the in-place editor for a blank document or opening an existing document
- Laying out the editor
- Activating and deactivating the document
- Saving changes made to the document
Although OleClientSite is a subclass of the Composite class, it does not make sense to add any control to it.
Extending the OleClientSite class, OleControlSite provides a site to handle an ActiveX control within a container. It provides the following additional features over those provided by OleClientSite:
- Handling events from the ActiveX control
- Notifying of property changes from the ActiveX control
- Providing simplified access to well-known properties of the ActiveX control, such as color and font
- Exposing ambient properties of the container to the ActiveX control
In the next section you learn how to use OleClientSite and OleControlSite to embed a Microsoft Word OLE document into an SWT application.
Embedding a Microsoft Word OLE Document into an SWT Application
In this section, you learn how to embed a typical OLE document — Microsoft Word — into SWT widgets. First, an OLE document or ActiveX control container is created. You can use the container to contribute menus to the OLE document or ActiveX control's menu. The site used to manage the embedded OLE document or ActiveX control is constructed in the container. At this point, the OLE document or ActiveX control is still invisible. You need to activate it to make it visible (see Figure 22-1). When the OLE document or ActiveX control is visible, you can perform actions and make changes to it. The changes made to an OLE document can be saved to a file.
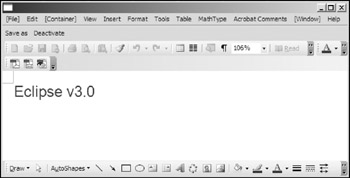
Figure 22-1
Creating the OLE Container
In SWT, OleFrame represents an OLE container. It is responsible for positioning an OLE document or ActiveX control and managing menus. The following code creates an OLE container and contributes various menus to the embedded OLE document:
 OleFrame oleFrame;

 /*
 * (non-Javadoc)
 *
 * @see
 org.eclipse.jface.window.Window#createContents(org.eclipse.swt.widgets.Composite)
 */
 protected Control createContents(Composite parent) {
 Composite composite = new Composite(parent, SWT.NULL);
 composite.setLayout(new FillLayout());

 oleFrame = new OleFrame(composite, SWT.NULL);

 if (getMenuBarManager() != null) {
 MenuItem windowMenu =
 new MenuItem(getMenuBarManager().getMenu(), SWT.CASCADE);
 windowMenu.setText("[Window]");

 MenuItem containerMenu =
 new MenuItem(getMenuBarManager().getMenu(), SWT.CASCADE);
 containerMenu.setText("[Container]");

 MenuItem fileMenu =
 new MenuItem(getMenuBarManager().getMenu(), SWT.CASCADE);
 fileMenu.setText("[File]");

 oleFrame.setWindowMenus(new MenuItem[] { windowMenu });
 oleFrame.setContainerMenus(new MenuItem[] { containerMenu });
 oleFrame.setFileMenus(new MenuItem[] { fileMenu });
 }

 ...

 // creates client site here ...

 return composite;
 }
The program main class extends the ApplicationWindow class and overrides the createContents method. After the instance of OleFrame is created, you can make various menus available to the embedded OLE document. When the embedded OLE document is activated, it displays its menu bar above the application's menu bar, if any. In Figure 22-1, the menu bar of the embedded OLE document is shown on the top. The application's toolbar is shown below the menu bar. The embedded OLE document is displayed below the application's toolbar. The following methods can be used to make various menus available to the embedded OLE document or ActiveX control's menu bar:
 public void setFileMenus(MenuItem[] fileMenus)
 public void setContainerMenus(MenuItem[] containerMenus)
 public void setWindowMenus(MenuItem[] windowMenus)
The available menus are merged into the menu bar of the embedded OLE document, as shown in Figure 22-1. One or more menus can be inserted into any of the following possible locations:
- File: Far left
- Container: Middle
- Window: Far right, just before Help
After the OLE container is created, you are ready to create a site for the OLE document.
Creating an OLE Site
You use a site to manage the embedded OLE document or ActiveX control. To embed an OLE document, you use the OleClientSite class. If you embed an OLE document, the entire corresponding application is embedded, including the content part, toolbars, menu bar, and so on. You use the OleControlSite class to embed an ActiveX control. For an ActiveX control, only the content part is shown, and you need to manage the behavior of the content through the API exposed by the ActiveX control.
You can determine whether a COM object supports the OLE document behavior by the interfaces it implements. If it implements the IOleDocument interface, the COM object supports OLE document behavior; otherwise, it does not. Similarly, all COM objects supporting ActiveX control behavior implement the IOleControl interface. If a COM object implements both interfaces, it supports OLE document as well as ActiveX control behaviors.
The Microsoft Word COM object supports both the OLE document and ActiveX control behaviors. So either OleClientSite or OleControlSite can be used. In this case, you can use the OleClientSite class to embed Microsoft Word as an OLE document:
 OleClientSite clientSite;

 protected Control createContents(Composite parent) {
 ...
 // creates the OLE container ...
 ...

 clientSite =
 new OleClientSite(oleFrame, SWT.NONE, new File("icons/test.doc"));

 // activates the OLE object here ...

 return composite;
 }
You can create an instance of OleClientSite from the OLE document's ProgramID or from a storage file. The ProgramID of an OLE document is a string that identifies the corresponding application. For example, Microsoft Word has ProgramID "Word.Document". You can find ProgramIDs for all the programs in the system registry.
The following code constructs an instance of OleClientSite for Microsoft Word from its ProgramID:
OleClientSite clientSite = new OleClientSite(oleFrame, SWT.NULL, "Word.Document");
You create the OleClientSite object from a storage file. A storage file is a structured file written in application-specific format. For example, a Word storage file contains the text content, text format and styles, and other information.
If you want to embed Microsoft Word as an ActiveX control, you can use the following code:
clientSite = new OleControlSite(oleFrame, SWT.NULL, "Word.Document");
Now the site for the OLE document is created. However, it is still invisible. You need to activate it to make it visible.
Activating the OLE Object
Activating an OLE object is often referred to as in-place activation. In-place activation allows the user to manipulate the OLE object without switching to its corresponding original application. For example, you can edit the embedded document without starting Microsoft Word.
To activate an OLE document or ActiveX control, you call the doVerb method of the OleClientSite class or the OleControlSite class:
public int doVerb(int verb)
You can specify the action code in the argument using one of the following values:
- OLE.OLEIVERB_PRIMARY: Specifies the action that occurs when the user double-clicks the OLE object. If the OLE object supports in-place activation, this verb usually activates it in place.
- OLE.OLEIVERB_SHOW: Instructs the OLE object to show itself for editing or viewing. It is called to display newly inserted objects for initial editing and to show link resources.
- OLE.OLEIVERB_OPEN: Instructs the OLE object (either supporting in-place activation or not) to open itself for editing in a window separate from that of its container. If the OLE object does not support in-place activation, this verb has the same effect as OLE.OLEIVERB_SHOW.
- OLE.OLEIVERB_HIDE: Causes the OLE object to remove its UI from view. This applies only to objects supporting in-place activation.
- OLE.OLEIVERB_UIACTIVATE: Activates the OLE object in place, along with its full set of UI tools.
- OLE.OLEIVERB_INPLACEACTIVATE: Activates the OLE object in place without displaying UI tools such as menus and toolbars. Single-clicking the OLE object causes it to negotiate the display of its UI tools with the container. If the container refuses, the OLE object remains active but without its tools displayed.
- OLE.OLEIVERB_DISCARDUNDOSTATE: Used to instruct objects to discard any undo state that they may be maintaining without deactivating the OLE object.
Here, you simply invoke the doVerb method with OLE.OLEIVERB_SHOW to activate the OLE object:
 protected Control createContents(Composite parent) {
 ...
 // creates OLE container and the client site.
 ...

 clientSite.doVerb(OLE.OLEIVERB_SHOW);

 return composite;
 }
Now the embedded Word OLE document is displayed (see Figure 22-1). If the Word document does not exist or it cannot be read, an exception will be thrown. You can add code to catch this exception.
Deactivating the OLE Object
In the preceding section, you learned about how to activate the OLE object with the doVerb method. If you place several OLE documents or ActiveX controls in an application, it is desirable to have only one OLE object in an "active" state at a time. For deactivated OLE objects, their content parts are visible but the toolbars and menus are removed.
You can use the deactivateInPlaceClient method on the OleClientSite or OleControlSite class to deactivate an OLE document or ActiveX control:
public void deactivateInPlaceClient()
In the sample application, you add a deactivation action:
 protected ToolBarManager createToolBarManager(int style) {
 ToolBarManager manager = new ToolBarManager(style);

 ...

 Action actionDeactivate = new Action("Deactivate") {
 public void run() {
 clientSite.deactivateInPlaceClient();
 }
 };

 manager.add(actionDeactivate);

 ...

 return manager;
 }
When the Deactivate toolbar item is pressed, the OLE document is deactivated, as shown in Figure 22-2.
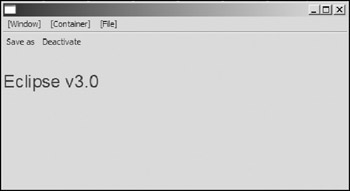
Figure 22-2
Note that the menus and toolbars belonging to the OLE document are removed. You can reactivate the OLE document by clicking its content area.
Saving Changes
If you run the sample application, you might notice that the embedded Microsoft Word document does not save changes to the file nor does it display any dialog to ask you to save changes. Your code has to handle the task of saving changes.
The changes made to OLE documents can be saved either in storage files or ordinary files. A storage file contains structured data specific to the OLE object. For example, the test.doc file that is used to create the client site is a Microsoft Word storage file. An ordinary file does not contain OLE object–specific information. For example, an XML file is an ordinary file that does not specific any OLE objects.
You use the save method of the OleClientSite class to save the current document into a file:
public boolean save(File file, boolean includeOleInfo)
You specify the target file in the first argument. If you want to save the file into an OLE storage file, you set the includeOleInfo as true; otherwise, false. This method returns true if the document is saved successfully or false otherwise.
The following code provides a "Save as" action for the user to save the changed document into a file:
 protected ToolBarManager createToolBarManager(int style) {
 ToolBarManager manager = new ToolBarManager(style);

 Action actionSaveAs = new Action("Save as") {
 public void run() {
 FileDialog dialog = new FileDialog(getShell(), SWT.SAVE);
 String path = dialog.open();
 if (path != null) {
 if (clientSite.save(new File(path), true)) {
 System.out.println("Saved to file successfully.");
 } else {
 System.err.println("Failed to save to file");
 }
 }
 }
 };

 manager.add(actionSaveAs);

 ...

 return manager;
 }
You can use the isDirty method to check whether there is any change made to the document:
public boolean isDirty()
Executing Common Commands
You can use the exec method to send a predefined set of comments to OLE documents and ActiveX controls provided that they support the IOleCommandTarget interface. Some of the well-known commands are:
- OLE.OLECMDID_OPEN: Open a file.
- OLE.OLECMDID_NEW: Create a new file.
- OLE.OLECMDID_SAVE: Save the document into the file.
- OLE.OLECMDID_SAVEAS: Save the document into another file.
- OLE.OLECMDID_PRINT: Print.
- OLE.OLECMDID_CUT: Cut the selected text.
- OLE.OLECMDID_SPELL: Perform spelling check.
- OLE.OLECMDID_ZOOM: Zoom the view.
- OLE.OLECMDID_FIND: Do a search.
You can check the status of a command on an OLE object through the queryStatus method:
public int queryStatus(int cmd)
You pass the command id as the argument. This method returns the status of the specified command as a bitwise OR'd combination of the following:
- OLE.OLECMDF_SUPPORTED
- OLE.OLECMDF_ENABLED
- OLE.OLECMDF_LATCHED
- OLE.OLECMDF_NINCHED
If a command is enabled, you can then invoke the exec method to execute the command:
public int exec(int cmdID, int options, Variant in, Variant out)
You specify the command id in the first argument. The behavior of the specified command can be configured through options. Valid values for options are: OLE.OLECMDEXECOPT_DODEFAULT, OLE.OLECMDEXECOPT_PROMPTUSER, OLE.OLECMDEXECOPT_DONTPROMPTUSER, OLE.OLECMDEXECOPT_SHOWHELP.
Parameters passed to the command can be specified in the in argument through a Variant object. The Variant class provides a general OLE mechanism for passing data of different types via a common interface. You can use the out argument to obtain the values returned from the command.
The exec method returns OLE.S_OK if the command is executed successfully.
As an example, the following code creates the spell check action using the exec method:
 protected ToolBarManager createToolBarManager(int style) {
 ...

 Action actionSpellCheck = new Action("Spell check") {
 public void run() {
 if((clientSite.queryStatus(OLE.OLECMDID_SPELL) & OLE.OLECMDF_ENABLED)
 != 0) {
 clientSite.exec(OLE.OLECMDID_SPELL,
 OLE.OLECMDEXECOPT_PROMPTUSER, null, null);
 }
 }
 };

 manager.add(actionSpellCheck);

 return manager;
 }
First, the status of the spell check command is checked. If the command is enabled, it is executed through the exec method.
The exec method can be used only to execute common commands. To access a much richer set of commands, OLE automation should be used.
OLE Automation
In the previous section, you learned how to use the exec method to execute simple commands. OLE automation provides a generic mechanism for accessing functionalities specific to a particular ActiveX control or OLE document. Only those OLE documents and ActiveX controls supporting the IDispatch interface can provide OLE automation support. OLE automation allows you to get and set properties and invoke methods of an OLE document or ActiveX control.
OLE automation can be used to simplify the user's tasks. For example, you are developing an e-mail client application. This application allows the user to compose e-mail messages in Microsoft Word and then send them out. Before sending a message, the user has to check the spelling to catch and correct any spelling errors. If the user forgets to perform the spelling check, the e-mail is sent out with possible spelling errors. With OLE automation, you can call the spelling check function of Word to perform the spelling check automatically when the user clicks the Send button. This simple feature protects the user from any embarrassing spelling errors.
Listing OLE Automation Properties and Methods
Before getting/setting property values and invoking methods, you need to know the property or method name and its semantics. You can use the following method to inspect properties and methods supported by an OLE document or ActiveX control:
 /*
 * Copyright (c) 2000, 2003 IBM Corp. All rights reserved. This file is made
 * available under the terms of the Common Public License v1.0 which
 * accompanies this distribution, and is available at
 * http://www.eclipse.org/legal/cpl-v10.html
 */

 /*
 * OLE and ActiveX example snippet: browse the typelibinfo for a program id
 *
 * For a list of all SWT example snippets see
 * http://dev.eclipse.org/viewcvs/index.cgi/%7Echeckout%7E/platform-swt-
 home/dev.html#snippets
 */
 import org.eclipse.swt.*;
 import org.eclipse.swt.internal.ole.win32.*;
 import org.eclipse.swt.ole.win32.*;
 import org.eclipse.swt.widgets.*;

 public class Main {

 public static void main(String[] args) {
 if (args.length == 0) {
 System.out.println("Usage: java Main ");
 return;
 }

 String progID = args[0];

 Shell shell = new Shell();

 OleFrame frame = new OleFrame(shell, SWT.NONE);
 OleControlSite site = null;
 OleAutomation auto = null;
 try {
 site = new OleControlSite(frame, SWT.NONE, progID);
 auto = new OleAutomation(site);
 } catch (SWTException ex) {
 System.out.println("Unable to open type library for " + progID);
 return;
 }

 TYPEATTR typeattr = auto.getTypeInfoAttributes();
 if (typeattr != null) {
 if (typeattr.cFuncs > 0)
 System.out.println("Functions for " + progID + " :
");
 for (int i = 0; i < typeattr.cFuncs; i++) {
 OleFunctionDescription data = auto.getFunctionDescription(i);
 String argList = "";
 int firstOptionalArgIndex =
 data.args.length - data.optionalArgCount;
 for (int j = 0; j < data.args.length; j++) {
 argList += "[";
 if (j >= firstOptionalArgIndex)
 argList += "optional, ";
 argList += getDirection(data.args[j].flags)
 + "] "
 + getTypeName(data.args[j].type)
 + " "
 + data.args[j].name;
 if (j < data.args.length - 1)
 argList += ", ";
 }
 System.out.println(
 getInvokeKind(data.invokeKind)
 + " (id = "
 + data.id
 + ") : "
 + "
	Signature : "
 + getTypeName(data.returnType)
 + " "
 + data.name
 + "("
 + argList
 + ")"
 + "
	Description : "
 + data.documentation
 + "
	Help File : "
 + data.helpFile
 + "
");
 }

 if (typeattr.cVars > 0)
 System.out.println("

Variables for " + progID + " :
");
 for (int i = 0; i < typeattr.cVars; i++) {
 OlePropertyDescription data = auto.getPropertyDescription(i);
 System.out.println(
 "PROPERTY (id = "
 + data.id
 + ") :"
 + "
	Name : "
 + data.name
 + "
	Type : "
 + getTypeName(data.type)
 + "
");
 }
 }

 auto.dispose();
 shell.dispose();
 }

 private static String getTypeName(int type) {
 switch (type) {
 case OLE.VT_BOOL :
 return "boolean";
 case OLE.VT_R4 :
 return "float";
 case OLE.VT_R8 :
 return "double";
 case OLE.VT_I4 :
 return "int";
 case OLE.VT_DISPATCH :
 return "IDispatch";
 case OLE.VT_UNKNOWN :
 return "IUnknown";
 case OLE.VT_I2 :
 return "short";
 case OLE.VT_BSTR :
 return "String";
 case OLE.VT_VARIANT :
 return "Variant";
 case OLE.VT_CY :
 return "Currency";
 case OLE.VT_DATE :
 return "Date";
 case OLE.VT_UI1 :
 return "unsigned char";
 case OLE.VT_UI4 :
 return "unsigned int";
 case OLE.VT_USERDEFINED :
 return "UserDefined";
 case OLE.VT_HRESULT :
 return "int";
 case OLE.VT_VOID :
 return "void";

 case OLE.VT_BYREF | OLE.VT_BOOL :
 return "boolean *";
 case OLE.VT_BYREF | OLE.VT_R4 :
 return "float *";
 case OLE.VT_BYREF | OLE.VT_R8 :
 return "double *";
 case OLE.VT_BYREF | OLE.VT_I4 :
 return "int *";
 case OLE.VT_BYREF | OLE.VT_DISPATCH :
 return "IDispatch *";
 case OLE.VT_BYREF | OLE.VT_UNKNOWN :
 return "IUnknown *";
 case OLE.VT_BYREF | OLE.VT_I2 :
 return "short *";
 case OLE.VT_BYREF | OLE.VT_BSTR :
 return "String *";
 case OLE.VT_BYREF | OLE.VT_VARIANT :
 return "Variant *";
 case OLE.VT_BYREF | OLE.VT_CY :
 return "Currency *";
 case OLE.VT_BYREF | OLE.VT_DATE :
 return "Date *";
 case OLE.VT_BYREF | OLE.VT_UI1 :
 return "unsigned char *";
 case OLE.VT_BYREF | OLE.VT_UI4 :
 return "unsigned int *";
 case OLE.VT_BYREF | OLE.VT_USERDEFINED :
 return "UserDefined *";
 }
 return "unknown " + type;
 }

 private static String getDirection(int direction) {
 String dirString = "";
 boolean comma = false;
 if ((direction & OLE.IDLFLAG_FIN) != 0) {
 dirString += "in";
 comma = true;
 }
 if ((direction & OLE.IDLFLAG_FOUT) != 0) {
 if (comma)
 dirString += ", ";
 dirString += "out";
 comma = true;
 }
 if ((direction & OLE.IDLFLAG_FLCID) != 0) {
 if (comma)
 dirString += ", ";
 dirString += "lcid";
 comma = true;
 }
 if ((direction & OLE.IDLFLAG_FRETVAL) != 0) {
 if (comma)
 dirString += ", ";
 dirString += "retval";
 }

 return dirString;
 }

 private static String getInvokeKind(int invKind) {
 switch (invKind) {
 case OLE.INVOKE_FUNC :
 return "METHOD";
 case OLE.INVOKE_PROPERTYGET :
 return "PROPERTY GET";
 case OLE.INVOKE_PROPERTYPUT :
 return "PROPERTY PUT";
 case OLE.INVOKE_PROPERTYPUTREF :
 return "PROPERTY PUT BY REF";
 }
 return "unknown " + invKind;
 }
 }
The usage of this class is:
java Main ProgramID
To find all the properties and methods available for Microsoft Word, you run java Main Word.Document. The following code lists snippets of the output:
 Functions for Word.Document :

 ...

 PROPERTY GET (id = 71) :
 Signature : boolean SpellingChecked()
 Description : null
 Help File : F:Program FilesMicrosoft OfficeOFFICE11VBAWD10.CHM

 PROPERTY PUT (id = 71) :
 Signature : void SpellingChecked([in] boolean null)
 Description : null
 Help File : F:Program FilesMicrosoft OfficeOFFICE11VBAWD10.CHM


 METHOD (id = 65535) :
 Signature : void Select()
 Description : null
 Help File : F:Program FilesMicrosoft OfficeOFFICE11VBAWD10.CHM

 ...
In the following subsections, you learn how to get/set value for the SpellingChecked property and invoke the Save method.
Getting and Setting Property Values
Before getting or setting property values, you need to create an OleAutomation object for the OLE document or ActiveX control. You can then use the OleAutomation object to get/set property values and invoke methods.
For example, the following code prints the value of the SpellingChecked property:
 OleAutomation automation = new OleAutomation(clientSite);

 // looks up the ID for property SpellingChecked.
 int[] propertyIDs = automation.getIDsOfNames(new String[]{"SpellingChecked"});
 int propertyID = propertyIDs[0];

 Variant result = automation.getProperty(propertyID);
 System.out.println("SpellingChecked: " + result.getBoolean());

 automation.dispose();
The OleAutomation object is constructed first. Then you look for the property id for SpellingChecked with the getIDsOfNames method:
public int[] getIDsOfNames(String[] names)
To get the property value, you invoke the getProperty method:
public Variant getProperty(int dispIdMember)
The getProperty method returns the property value. Because the expected variant type is Boolean, you can check the value through the getBoolean method of the Variant class.
Finally, you dispose of the OleAutomation object.
You can set the property value for SpellingChecked in a very similar way:
 OleAutomation automation = new OleAutomation(clientSite);

 // looks up the ID for property SpellingChecked.
 int[] propertyIDs = automation.getIDsOfNames(new String[]{"SpellingChecked"});
 int propertyID = propertyIDs[0];

 boolean result = automation.setProperty(propertyID, new Variant(true));
 System.out.println(result ? "Successful" : "Failed");

 automation.dispose();
This time, you use the setProperty method to set the property value for SpellingChecked:
public boolean setProperty(int dispIdMember, Variant rgvarg)
The setProperty method takes the property ID and the value object as the arguments. The property value to be set is embedded in a Variant object. This method returns true if the operation is successful, false otherwise.
Invoking Methods
OLE automation also allows you to invoke methods provided by an OLE document or ActiveX control.
Invoking a method is much like getting the value for a property. The following code invokes the Select method to select all the content objects in the Word document, as shown in Figure 22-3:
 OleAutomation automation = new OleAutomation(clientSite);

 // looks up the ID for method Select.
 int[] methodIDs = automation.getIDsOfNames(new String[]{"Select"});
 int methodID = methodIDs[0];

 Variant result = automation.invoke(methodID);
 System.out.println(result == null ? "Successful" : "Failed");

 automation.dispose();
The invoke method of the OleAutomation class is used to invoke the Select method:
public Variant invoke(int dispIdMember)
The invoke method invokes a method on the OLE object and returns the result of the method. If the OLE method finishes and returns null, the invoke method return a dummy Variant object to indicate the completion status of the OLE method. If an error occurs while executing an OLE method, the invoke method returns null.
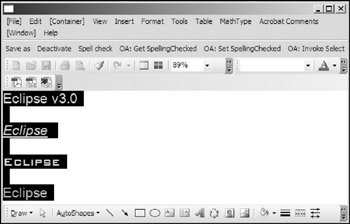
Figure 22-3
Summary
This chapter showed you how to integrate Windows applications in SWT applications through the OLE mechanism. To embed an OLE document or ActiveX control, you first create an OLE container and then construct a site within the container to manage the life cycle of the OLE object. You can activate an OLE document or ActiveX control to make it visible (in-place activation). With the help of the save method of the OleClientSite class, you can save the changes made on an OLE document or ActiveX control either to a storage file or a plain file. Simple commands such as new file and save file can be executed through the exec method of the OleClientSite class. Advanced commands can be invoked through OLE automation if the OLE document or ActiveX control supports the IDispatch interface. Furthermore, you can use OLE automation to get and set property values for the OLE document or ActiveX control. In the next chapter, you learn how to perform advanced drawing with Draw2D.
Part I - Fundamentals
- Overview of Java UI Toolkits and SWT/JFace
- SWT/JFace Mechanisms
- Jump Start with SWT/JFace
- SWT Event Handling, Threading, and Displays
- Basic SWT Widgets
- Layouts
Part II - Design Basics
Part III - Dynamic Controls
- Scales, Sliders, and Progress Bars
- Other Important SWT Components
- SWT Graphics and Image Handling
- Drag and Drop and the Clipboard
- Printing
- JFace Windows and Dialogs
Part IV - Application Development
EAN: 2147483647
Pages: 147
