SWT Graphics and Image Handling
In many applications, you need to perform custom drawing. This chapter shows you how to customize drawing and how to perform various operations on images. The first part of this chapter shows you how to perform various drawing operations with graphics context — drawing lines, arcs, shapes, images, and text, and filling shapes. SWT image handling is introduced in the second part. You learn how an image is represented in SWT. You also learn about practical image manipulation techniques.
Drawing with Graphics Contexts
In SWT, all classes that implement org.eclipse.swt.graphics.Drawable are capable of performing drawing operations. The classes include the following:
- Control
- Image
- Device (Display, Printer)
The basic steps for drawing graphics are as follows:
- Get a graphics context instance from the target drawable object.
- Perform drawing operations on the graphics context.
- Dispose of the graphics context if necessary.
Getting a Graphics Context
To perform a drawing operation on a drawable object, you need first to obtain or construct a graphics context instance from it. Class org.eclipse.swt.graphics.GC represents graphics contexts and supports various drawing capabilities. You then use the graphics context instance to perform the actual drawing operations.
Because GC objects employ native OS resources, you need to dispose of them if you created them. See Chapter 2 for details on resource management.
To get a graphics context instance, you can either obtain an existing one or create an instance.
Obtaining an Existing Graphics Context
Typically, you obtain an existing graphics context instance from a PaintEvent object. We used the following code to display the percentage value in a progress bar in Chapter 13:
 progressBar.addPaintListener(new PaintListener() {
 public void paintControl(PaintEvent e) {
 // The string to draw.
 String string = (progressBar.getSelection() * 1.0 /
 (progressBar.getMaximum()-progressBar.getMinimum()) * 100) + "%";

 Point point = progressBar.getSize();
 Font font = new Font(shell.getDisplay(),"Courier",10,SWT.BOLD);
 e.gc.setFont(font);
 e.gc.setForeground(
 shell.getDisplay().getSystemColor(SWT.COLOR_WHITE));

 FontMetrics fontMetrics = e.gc.getFontMetrics();
 int stringWidth =
 fontMetrics.getAverageCharWidth() * string.length();
 int stringHeight = fontMetrics.getHeight();

 e.gc.drawString(string, (point.x-stringWidth)/2 ,
 (point.y-stringHeight)/2, true);

 font.dispose();
 }
 });
When the progress bar is being painted, the paint listener is invoked with a PaintEvent object as the argument. A graphics context instance for the progress bar is stored in the gc field of the PaintEvent object. We then use the graphics context instance to perform actual drawing operations on the progress bar. After finishing drawing, we do not dispose of the graphics context object because it was not created by us.
After finishing drawing with an existing graphics context instance, you should not dispose of it if you did not create it.
Creating a Graphics Context Instance on a Drawable Object
If you are unable to get an existing graphics context of a drawable object, you can create one. For example, the following code draws an oval on the image on the right side of Figure 15-1.
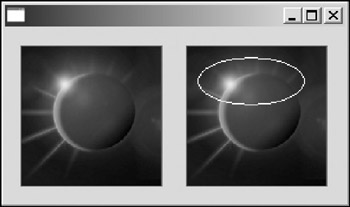
Figure 15-1
 Display display = new Display();
 Shell shell = new Shell(display);
 shell.setLayout(new GridLayout(2, true));

 Image image = new Image(display, "icons/eclipse.gif");

 // Clones the image.
 Image image2 = new Image(display, image.getImageData());

 // Draws an oval
 GC gc = new GC(image2);
 gc.setForeground(display.getSystemColor(SWT.COLOR_WHITE));
 gc.drawOval(10, 10, 90, 40);
 gc.dispose();

 CLabel label = new CLabel(shell, SWT.NULL);
 label.setImage(image);
 label.setBounds(10, 10, 130, 130);

 CLabel label2 = new CLabel(shell, SWT.NULL);
 label2.setImage(image2);
 label2.setBounds(150, 10, 130, 130);
An image (the Eclipse logo) is created from a GIF file. The other image is obtained by cloning the first image. In order to draw on the second image, we then create a GC object from it. Then we draw a white oval on the graphics context. Because this GC object is created by us, we need to dispose of it after finishing drawing. Finally, two labels are used to display both of the images. In Figure 15-1, you can clearly see there is a white oval on the second image. The method drawOval is covered in the section "Drawing Lines, Arcs, and Shapes."
Using Canvas
In previous sections, you have seen examples of drawing on controls. SWT provides a class org.eclipse.swt.widgets.Canvas designed for general graph drawing. Canvas, as the name suggests, provides a surface for you to perform arbitrary drawing operations.
As an example, the following code creates a canvas with a rounded rectangle on it (see Figure 15-2).
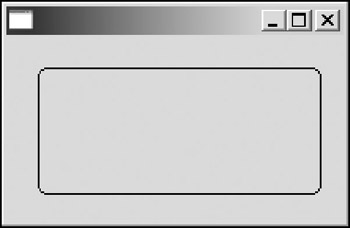
Figure 15-2
 Canvas canvas = new Canvas(shell, SWT.NULL);
 canvas.setBounds(10, 10, 200, 100);

 canvas.addPaintListener(new PaintListener() {
 public void paintControl(PaintEvent e) {
 e.gc.drawRoundRectangle(10, 10, 180, 80, 10, 10);
 }
 });
While creating a canvas, you may optionally specify one or more of its painting configuration styles:
- SWT.NO_BACKGROUND: By default, a canvas is filled with its background color before it paints itself. Sometimes, this can cause screen flickering. You can specify this style to disable background filling; however, if you do so, you are responsible for drawing every pixel of the client area. If you have an image filling the whole client area of the canvas, then it is a good idea to prevent the background from being drawn by specifying this style.
- SWT.NO_REDRAW_RESIZE: When a control is resized, it sends a paint event to request itself being redrawn. For potential performance optimization, you can specify this style to disable a canvas from sending a paint event when its size is reduced. However, not all canvases should be created with this style. For example, if you use a rectangle as the border of a canvas, this style should not be used because the border may be rendered incorrectly.
- SWT.NO_MERGE_PAINTS: Many native platforms perform UI event optimization. For example, several repaint requests may be merged into one request. By specifying this style, you disable this behavior. In most cases, you should not specify this style because it could reduce the painting performance.
Before using the preceding styles, you should fully understand them. Otherwise, they may introduce many undesired effects to your canvases. For more details, please refer to the Javadoc documentation.
Drawing Lines, Arcs, and Shapes
In SWT, graphics objects live in a plane defined by Cartesian coordinates, where the origin is at the topleft corner (0, 0), the x axis increases from left to right, and the y axis increases from top to bottom.
Drawing a line is very straightforward with the drawLine method:
public void drawLine(int x1, int y1, int x2, int y2)
You simply pass the coordinating x and y values of the two end points of the line to the method.
If you need to draw multiple connected straight lines, you can use the drawPolyLine method:
public void drawPolyline(int[] pointArray)
A polyline is a series of connected lines. A polyline can be represented by an array containing the coordinating x and y values of connecting points. Lines are drawn between each consecutive pair and no line is drawn between the first pair and the last pair in the array. For example, the following code draws a right angle, as shown in Figure 15-3.

Figure 15-3
 int[] points = new int[3 * 2];
 points[0] = 10; // The point at the top.
 points[1] = 10;

 points[2] = 10; // The point at the left bottom.
 points[3] = 100;

 points[4] = 100; // the point at the right bottom
 points[5] = 100;

 gc.drawPolyline(points);
The drawPolygon method works similarly to drawPolyline except that the line between the last point and the end point is drawn. If you replace the gc.drawPolyline method in the preceding code with gc.drawPolygon, you get a right triangle.
You draw the outline of a rectangle with the drawRectangle method:
public void drawRectangle(int x, int y, int width, int height)
You specify the coordinating x and y values of the top-left corner point and the width and height of the rectangle as the arguments to the drawRectangle method. Alternatively, you can put the four parameters into a Rectangle object and call the following method:
public void drawRectangle(Rectangle rect)
To draw an oval, you can use the drawOval method:
public void drawOval(int x, int y, int width, int height)
The resulting drawing is a circle or an ellipse fitting within the rectangle area specified by the arguments.
If you want to draw only a part of an oval (i.e., an arc), you can use the drawArc method:
 public void drawArc(int x, int y, int width, int height, int startAngle, int
 arcAngle)
The first four parameters specify the oval that the arc belongs to. The last two parameters define which part of the oval the arc occupies. The arc begins at startAngle and expands for arcAngle degrees. Angle 0 degree is at the three o'clock position and degree values increase counterclockwise.
For example, the arc shown in Figure 15-4 is created with the following code:
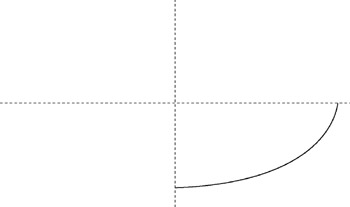
Figure 15-4
gc.drawArc(10, 10, 200, 100, 0, -90);
The GC class also provides the drawRoundRectangle method for you to draw round-cornered rectangles:
 public void drawRoundRectangle(int x, int y, int width, int height, int arcWidth,
 int arcHeight)
The first four parameters define the bound of the rectangle and the last two parameters specify the width and height of the corner arcs.
So far, you have learned about several methods for drawing lines, arcs, and shapes. Before calling the preceding method, you can set the foreground color. Additionally, you can use the following methods to set the line style and line width:
 public void setLineStyle(int lineStyle)
 public void setLineWidth(int lineWidth)
Figure 15-5 shows lines with different styles and line widths.
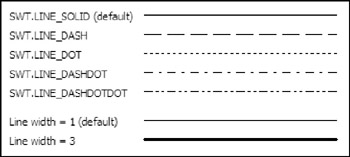
Figure 15-5
Filling Shapes
In previous sections, you have learned how to draw lines, arcs, and shapes with the drawing method of the GC class. There are corresponding filling methods in the GC class that you can use to fill various shapes:
 public void fillArc(int x, int y, int width, int height, int startAngle, int
 arcAngle)
 public void fillOval(int x, int y, int width, int height)
 public void fillPolygon(int[] pointArray)
 public void fillRectangle(int x, int y, int width, int height)
 public void fillRectangle(Rectangle rect)
 public void fillRoundRectangle(int x, int y, int width, int height, int arcWidth,
 int arcHeight)
Instead of drawing the outlines of the shapes, the preceding filling methods fill the shapes with the background color of the graphics context. Note that the bottom and right edges of the shapes are not included in filling operations. For example, fillRectangle(0, 0, 200, 100) fills the area within the rectangle [0, 0, 199, 99].
From a programming standpoint, filling shapes is very similar to drawing shapes. For example, by changing gc.drawArc(10, 10, 200, 100, 0, -90); with the following code
 e.gc.setBackground(display.getSystemColor(SWT.COLOR_DARK_GREEN));
 e.gc.fillArc(10, 10, 200, 100, 0, -90);
you get Figure 15-6 instead of Figure 15-5, as shown in the last section.
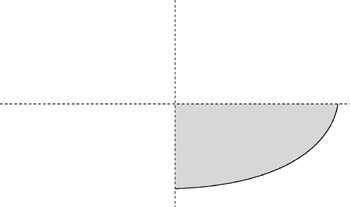
Figure 15-6
Because the default background color of the graphics context is the same as the background color of the control, the background color of the graphics context is changed before the fillArc method is called (otherwise, you won't be able to see the filled area).
Additionally, you can fill a rectangle with a color gradient using the fillGradientRectangle method:
 public void fillGradientRectangle(int x, int y, int width, int height, boolean
 vertical)
This method fills the specified rectangle with a gradient progressing from the graphics context's foreground color to its background color from left to right or top to bottom.
Drawing and Copying Images
In SWT, the class org.eclipse.swt.graphics.Image represents an image that has been prepared for display. Two methods of the GC class can be used to draw images onto the graphics context:
 public void drawImage(Image image, int x, int y)
 public void drawImage(Image image, int srcX, int srcY, int srcWidth, int srcHeight,
 int destX, int destY, int destWidth, int destHeight)
The first drawImage method draws the specified image in the graphics context at the given coordinates, while the second one provides finer control. With the second drawImage method, you can draw a part of the specified image into a rectangle on the graphics context. If the source and destination areas are of differing sizes, the image or a part of the image is resized (stretched or shrunk) to fit the destination rectangle.
For example, the following code draws the same image twice using different methods on a canvas (see Figure 15-7):
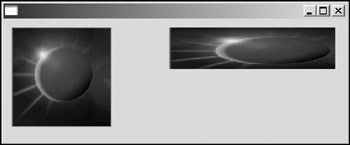
Figure 15-7
 Canvas canvas = new Canvas(shell, SWT.NULL);

 final Image image = new Image(display, "icons/eclipse.gif");

 canvas.addPaintListener(new PaintListener() {
 public void paintControl(PaintEvent e) {
 e.gc.drawImage(image, 10, 10);
 e.gc.drawImage(image, 0, 0, 100, 100, 200, 10, 200, 50);
 }
 });
The GC class provides the copyArea method for you to copy a rectangular area of the graphics context onto another position:
 public void copyArea(int srcX, int srcY, int width, int height, int destX, int
 destY)
Additionally, you can copy a rectangular area of the graphics context onto an image using the following method:
public void copyArea(Image image, int x, int y)
The following is a handy method I wrote to capture a control into an image file using the copyArea method:
 /**
 * Captures the specified control and saves the result into a file
 * in the BMP format.
 * @param control
 * @param fileName
 */
 public static void captureControl(Control control, String file) {
 GC gc = new GC(control);
 Image image = new Image(control.getDisplay(),
 control.getSize().x, control.getSize().y);

 gc.copyArea(image, 0, 0);
 ImageLoader loader = new ImageLoader();
 loader.data = new ImageData[] { image.getImageData() };
 loader.save(file, SWT.IMAGE_BMP);
 gc.dispose();
 }
See the section "Image Handling" for information on saving images.
Drawing Text
You use one of the GC drawString methods to render text:
 public void drawString(String string, int x, int y)
 public void drawString(String string, int x, int y, boolean isTransparent)
The first drawString method draws the specified string with the graphics context's font and foreground color and fills the background of the rectangular area with the graphics context's background color. The x and y coordinates of the top-left corner of the rectangular area is specified in the x and y parameters. The second method allows you to specify whether the background of the rectangular area should be filled or not. If isTransparent is set to true, the rectangular area will not be filled, otherwise, it will be filled with the graphics context's background color.
The following code renders two strings on the canvas, as shown in Figure 15-8:
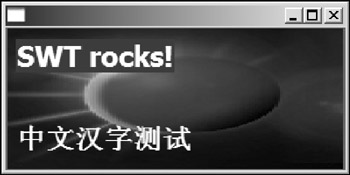
Figure 15-8
 final Canvas canvas = new Canvas(shell, SWT.NO_BACKGROUND);

 final Image image = new Image(display, "icons/eclipse.gif");
 canvas.addPaintListener(new PaintListener() {
 public void paintControl(PaintEvent e) {
 Rectangle size = image.getBounds();
 // Draws the background image.
 e.gc.drawImage(image, 0, 0, size.width, size.height, 0, 0,
 canvas.getSize().x, canvas.getSize().y);

 Font font = new Font(display, "Tahoma", 18, SWT.BOLD);
 e.gc.setFont(font);
 e.gc.setForeground(display.getSystemColor(SWT.COLOR_WHITE));
 e.gc.setBackground(display.getSystemColor(SWT.COLOR_BLUE));

 String english = "SWT rocks!";
 String chinese = "u4e2du6587u6c49u5b57u6d4bu8bd5";

 e.gc.drawString(english, 10, 10);
 e.gc.drawString(chinese, 10, 80, true);

 font.dispose();
 }
 });
You may notice that the rectangular area occupied by the English string is filled with the background color of the graphics context, whereas the Chinese string is drawn transparently without background filling. (On many operating systems, you need to install Chinese packages in order to read Chinese characters.)
The limitation of the drawString methods is that they are unable to handle layout characters such as a tab ( ) and carriage return ( ) correctly. To solve this problem, the GC class provides another set of methods to render text:
 public void drawText(String string, int x, int y)
 public void drawText(String string, int x, int y, boolean isTransparent)
 public void drawText(String string, int x, int y, int flags)
The first two methods work in the same way as their drawString counterparts except drawText methods expands text layout characters. The third drawText method allows you to have finer control over text rendering by configuring the flags parameter. The flags parameter should be a combination of the following:
- SWT.DRAW_DELIMITER: Processes line delimiters and draws multiple lines
- SWT.DRAW_TAB: Expands tabs
- SWT.DRAW_MNEMONIC: Draws mnemonic character decorations
- SWT.DRAW_TRANSPARENT: Leaves the background transparent
In some cases, it is desirable to determine the size of the rectangular area to be occupied by a string or text before it is drawn so that you can align it or center it. The GC class provides three methods for you to do so:
 public Point stringExtent(String string)
 public Point textExtent(String string)
 public Point textExtent(String string, int flags)
The following sample code draws text in the center of a canvas:
 canvas.addPaintListener(new PaintListener() {
 public void paintControl(PaintEvent e) {
 String text = "Text to be drawn in the center";
 Point textSize = e.gc.textExtent(text);
 e.gc.drawText(text,
 (canvas.getSize().x - textSize.x)/2,
 (canvas.getSize().y - textSize.y)/2);
 }
 });
Advanced Techniques
This section introduces several advanced drawing techniques, including clipping, XOR, and double buffering.
Clipping
Clipping is a technique used to limits the extent of a drawing. By default, a graphics context is clipped to the bounds of the corresponding drawable object. By modifying the clipping area of the graphics context, you can create some special graphical effects. For example, the follow code results in the clipping effect shown in Figure 15-9.

Figure 15-9
 final Canvas canvas = new Canvas(shell, SWT.NULL);
 final Image image = new Image(display, "icons/eclipse.gif");
 canvas.addPaintListener(new PaintListener() {
 public void paintControl(PaintEvent e) {
 Region region = new Region(); // A triangle region.
 region.add(new int[]{60, 10, 10, 100, 110, 100});
 e.gc.setClipping(region);

 e.gc.drawImage(image, 0, 0);
 }
 });
Once the clipping region is set, any drawing that occurs outside the region will be ignored. There are several setClipping methods in the GC class:
 public void setClipping(int x, int y, int width, int height)
 public void setClipping(Rectangle rect)
 public void setClipping(Region region)
The first two methods support a rectangle as the clipping area, whereas the third method accepts any Region object.
XOR
When you draw anything on a graphics context, the pixel values making up the drawable object are set with new values. If the graphics context mode is set to XOR, then the color of the pixels on the drawable surface is determined by XORing the color values of the source being drawn and the existing color values.
For example, Figure 15-10 shows three ovals drawn in XOR mode. The code is as follows.
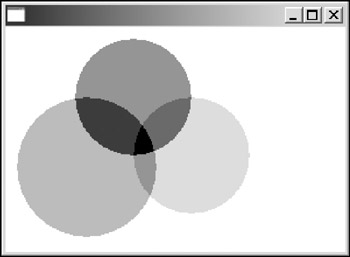
Figure 15-10
 final Canvas canvas = new Canvas(shell, SWT.NULL);
 canvas.setBackground(display.getSystemColor(SWT.COLOR_WHITE));

 canvas.addPaintListener(new PaintListener() {
 public void paintControl(PaintEvent e) {
 e.gc.setXORMode(true);

 e.gc.setBackground(display.getSystemColor(SWT.COLOR_GREEN));
 e.gc.fillOval(60, 10, 100, 100); // Top

 e.gc.setBackground(display.getSystemColor(SWT.COLOR_RED));
 e.gc.fillOval(10, 60, 120, 120); // left bottom

 e.gc.setBackground(display.getSystemColor(SWT.COLOR_BLUE));
 e.gc.fillOval(110, 60, 100, 100); // right bottom

 }
 });
Because XOR is a bitwise operation, it is hard to perceive it visually.
Double Buffering
If you experience flickering during drawing, you can use a double buffering technique to reduce it. Double buffering works in this way: Instead of drawing graphics directly to the graphics context of a canvas, you draw graphics objects on an image and then draw the image to the canvas. Because intermediate states of drawing will not appear, flicker is greatly reduced.
The following code shows a sample implementation of double buffering:
 final Canvas doubleBufferedCanvas = new Canvas(shell, SWT.NO_BACKGROUND);

 doubleBufferedCanvas.addPaintListener(new PaintListener() {
 public void paintControl(PaintEvent e) {
 // Creates new image only when absolutely necessary.
 Image image = (Image) doubleBufferedCanvas .getData("double-buffer-image");
 if (image == null
 || image.getBounds().width != canvas.getSize().x
 || image.getBounds().height != canvas.getSize().y) {
 image =
 new Image(
 display,
 canvas.getSize().x,
 canvas.getSize().y);
 doubleBufferedCanvas.setData("double-buffer-image", image);
 }

 // Initializes the graphics context of the image.
 GC imageGC = new GC(image);
 imageGC.setBackground(e.gc.getBackground());
 imageGC.setForeground(e.gc.getForeground());
 imageGC.setFont(e.gc.getFont());

 // Fills the background.
 Rectangle imageSize = image.getBounds();
 imageGC.fillRectangle(0, 0, imageSize.width + 1, imageSize.height + 1);

 // Performs actual drawing here ...
 imageGC.drawRoundRectangle(10, 10, 200, 100, 5, 5);


 // Draws the buffer image onto the canvas.
 e.gc.drawImage(image, 0, 0);

 imageGC.dispose();
 }
 });
An image is created with its size equal to the size of the canvas. The drawing operations are performed on the image. After the drawing is done, you draw the image to the canvas and dispose of the graphics context object of the buffered image.
Image Handling
This section introduces how images are represented in SWT and covers image operations such as alpha blending and scaling. It also demonstrates techniques to display GIF animations.
Image Basics
In SWT, the org.eclipse.swt.graphics.Image class represents a graphical image that is ready to be displayed on specific devices, such as monitors and printers. The easiest way to create an image is by loading it from an image file. For example, the following code loads an image and sets it to be the icon image of a shell.
 Image image = new Image(shell.getDisplay(), "icons/icon.gif");
 shell.setImage(image);
Behind the scenes, an instance of org.eclipse.swt.graphics.ImageLoader is used to load the data from the specified file. Currently, the following image file formats are supported:
- Windows bitmap (*.bmp)
- Windows icon (*.ico)
- JPEG (*.jpg, *.jpeg)
- Graphics Interchange Format (*.gif)
- Portable Network Graphics (*.png)
- Tag Image File Format (*.tif, *.tiff)
An image loader first creates a data model for the image to be loaded. The image data model is represented by the org.eclipse.swt.graphics.ImageData class and it is device-independent. After the image data model has been properly prepared, you are ready to construct the device-dependent Image instance with one of the constructors of the Image class — for example, public Image(Device device, ImageData data). SWT then employs the underlying native graphics system to render the image to a screen or a printer.
To get a copy of the image data of an image, you can call the getImageData method:
public ImageData getImageData()
You can manipulate an image data object and create new images with the modified image data object. Finally, you can save those images using the save methods of the ImageLoader class:
 public void save(OutputStream stream, int format)
 public void save(String filename, int format)
You can output the image into an output stream or a file in one of the following formats:
- SWT.IMAGE_BMP: Windows bitmap format
- SWT.IMAGE_BMP_RLE: Windows bitmap format with RLE compression
- SWT.IMAGE_GIF: GIF format
- SWT.IMAGE_ICO: Windows icon format
- SWT.IMAGE_JPEG: JPEG format
- SWT.IMAGE_PNG: PNG format
For example, the following code loads a GIF image and saves it into a file in Windows bitmap format:
 Image image = new Image(display, "icons/icon.gif");
 ImageLoader loader = new ImageLoader();
 loader.data = new ImageData[] { image.getImageData() };
 loader.save("icon.bmp", SWT.IMAGE_BMP);
In SWT, images use native resources and, therefore, must be disposed of properly. However, image model objects, i.e. instances of ImageData, are pure Java objects that can be managed by a Java runtime garbage collector, so you do not have to dispose of them by yourself. See Chapter 4 for details on SWT resource management.
Next, we are going to have a closer look at the image model ImageData.
ImageData and PaletteData
Instances of ImageData represent image model objects, which describe images in a device-independent way. An image data object stores the image width and height, and also pixel values for all coordinates. Internally, a byte array is used to record each raw pixel value. Another important property of an image is its depth, which specifies the number of bits used to represent a pixel value. For example, a black and white image has depth value 1. Zero (0) represents white and 1 represents black, and each pixel requires only 1 bit to represent. Similarly, a depth value of 16 results in 2∘16, which equals 65,536 different color values per pixel.
In order to get the actual color value for a pixel, a palette must be used to map the raw pixel value into a color value. In SWT, the class org.eclipse.swt.graphics.PaletteData is used to represent a palette. There are two kinds of palettes: direct and indexed.
Direct Palettes
In a direct palette, each pixel value comprises three components: red, green, and blue. Masks are used to get each component from a pixel value. For example, you can use the following code to get each component of a pixel value:
 int pixelValue = imageData.getPixel(50, 50);
 int redComponent = pixelValue & imageData.palette.redMask;
 int greenComponent = pixelValue & imageData.palette.greenMask;
 int blueComponent = pixelValue & imageData.palette.blueMask;
The pixel value at the specified coordinates can be obtained using the getPixel method of the ImageData class. The palette field of an ImageData instance stores palettes used to translate pixel values to colors. For a direct palette, you can get the masks by accessing its fields directly. By using bitwise AND operations, you get each individual component.
In order to display each pixel onscreen, SWT needs to create device-dependent Color instances based on the red, blue, and green components obtained previously:
Color color = new Color(display, redComponent, greenComponent, blueComponent);
Because SWT frees you from doing tedious work on image display, this chapter does not go into detail about color management. You focus on ImageData and PaletteData instead.
When you load an image from a file, the image loader creates the ImageData object with an associated PaletteData object. Here, you are going to learn how to create an image from scratch. To create an image, all you need to do is to construct a proper ImageData object. Before you can create an ImageData instance, you have to set up a palette. Suppose you want the image to have depth value of 24 (each pixel value is stored in 24 bits). First, you need to allocate storage space for each red, green, and blue component in 24 bits. One possible plan is to allocate the first 8 bits for the red component, a second 8 bits for the green component, and the last 8 bits for the blue component. So the masks for red, green, and blue components are 0xFF0000, 0x00FF00, 0x0000FF, respectively. A direct palette can be constructed easily with these three masks:
PaletteData paletteData = new PaletteData(0xFF0000, 0x00FF00, 0x0000FF);
Now, you are ready to create image data objects. After an image data instance is constructed, you can set pixel values for it. For example, the following code creates an image with a blue T on a yellow background, as shown in Figure 15-11:
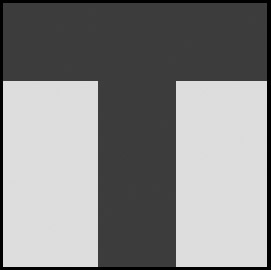
Figure 15-11
 PaletteData paletteData = new PaletteData(0xFF0000, 0x00FF00, 0x0000FF);
 ImageData imageData = new ImageData(100, 100, 24, paletteData);

 for(int i=0; i<100; i++) { // each column.
 for(int j=0; j<100; j++) { // each row.
 if(j < 30 || (i > 35 && i < 65))
 imageData.setPixel(i, j, 0xFF);
 else
 imageData.setPixel(i, j, 0xFFFF00);
 }
 }

 final Image image= new Image(display, imageData);
Indexed Palettes
In a direct palette, the pixel values are recorded directly. However, for an indexed palette, each pixel value stores a reference to an indexed color palette. For example, suppose you have two colors available on the indexed color palette: red [index=0], blue [index=1]. If a pixel has a stored value of 1, the corresponding color is blue. The following code re-creates the big T image with an indexed palette:
 PaletteData paletteData2 = new PaletteData(new RGB[] {
 new RGB(0, 0, 255), // blue
 new RGB(255, 255, 0) // yellow
 });

 ImageData imageData2 = new ImageData(100, 100, 1, paletteData2);

 for (int i = 0; i < 100; i++) { // each column.
 for (int j = 0; j < 100; j++) { // each row.
 if (j < 30 || (i > 35 && i < 65))
 imageData2.setPixel(i, j, 0);
 else
 imageData2.setPixel(i, j, 1);
 }
 }

 final Image image = new Image(display, imageData2);
An indexed palette with only two colors — blue and yellow — is created. You then create an image data object with this indexed palette. Because this palette has only two colors, the depth value is 1. When calling the setPixel method, the index of the color is used instead of the actual color value.
An indexed palette can have only 1, 2, 4, or 8 bit depths. A direct palette should be used when the bitdepth value is larger than 8.
To check whether a palette is direct or indexed, you can query the field isDirect of a PaletteData object:
public boolean isDirect
If this field is true, it is a direct palette. Otherwise, it is an indexed palette.
Regardless of palette type, you can always get the correct RGB value from a pixel value using the getRGB method of the PaletteData class:
public RGB getRGB(int pixel)
The most common usage is:
RGB color = imageData.palette.getRGB(imageData.getPixel(50, 50));
With this knowledge of ImageData and PaletteData, you are now ready to manipulate images.
Transparency and Alpha Blending
You can specify a particular color in an image to appear transparent by setting the field transparentPixel of the ImageData class.
For example, the image on the left of Figure 15-12 has no color set to be transparent, whereas the right image has the white color as the transparent color.
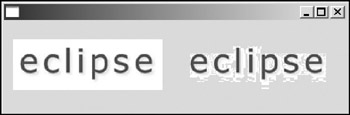
Figure 15-12
The corresponding code is as follows:
 ImageData imageData = new ImageData("icons/eclipse.jpg");

 final Image image = new Image(display, imageData);

 imageData.transparentPixel = imageData.palette.getPixel(new RGB(255, 255, 255));

 final Image image2 = new Image(display, imageData);

 final Canvas canvas = new Canvas(shell, SWT.NULL);
 canvas.addPaintListener(new PaintListener() {
 public void paintControl(PaintEvent e) {
 e.gc.drawImage(image, 10, 20);
 e.gc.drawImage(image2, 200, 20);
 }
 });
First, the image data object is created from a JPEG file. Because JPEG does not support transparency, the default value of the field transparentPixel must be -1, which means no transparent color. The image on the left is created with this image data. Note that the image simply clones the specified image data; any subsequent change on the image data will not affect the image. Then we set the transparent color of the image data to be white. The getPixel method of the PaletteData class returns the pixel value corresponding to the specified color regardless of the type of the palette. After setting the transparent color, another image is created. The two images are then displayed within a canvas.
You may notice that some "white" regions still show on the second image because those colors are not pure white. To remove such ugly regions, you need to convert off-white pixels to pure white. You iterate over each pixel to replace the off-white color with pure white, as shown here:
 RGB white = new RGB(255, 255, 255);
 for(int i=0; iRGB rgb = imageData.palette.getRGB(imageData.getPixel(i, j));

 int threshold = 220;
 if(rgb.red > threshold && rgb.green > threshold && rgb.blue > threshold)
 imageData.setPixel(i, j, imageData.palette.getPixel(white));
 }
 }

 imageData.transparentPixel = imageData.palette.getPixel(new RGB(255, 255, 255));

 final Image image2 = new Image(display, imageData);
As shown in Figure 15-13, most of the off-white regions are removed. By modifying the pixel values, you can create many kinds of graphical effects.
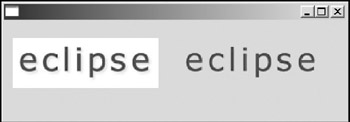
Figure 15-13
In the preceding example, we set pixels with certain colors to be completely transparent. A pixel may have a certain level of transparency between opaque and completely transparent. The value specifying the level of transparency of a pixel is called an alpha value. You can assign an alpha value for each pixel in the image. The following sample code creates a fade-in effect, as shown in Figure 15-14:
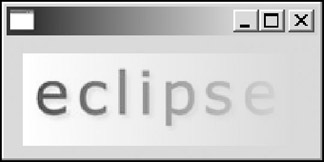
Figure 15-14
 ImageData imageData = new ImageData("icons/eclipse.jpg");

 byte[] alphaValues = new byte[imageData.height * imageData.width];
 for(int j=0; jimageData.alphaData = alphaValues;

 final Image image = new Image(display, imageData);

 canvas.addPaintListener(new PaintListener() {
 public void paintControl(PaintEvent e) {
 e.gc.drawImage(image, 10, 10);
 }
 });
We first create a byte array with a size equal to the number of pixels in the image data object. The alpha value for each pixel is then set. The valid range of an alpha value is [0, 255], with 0 representing completely transparent and 255 representing opaque. After that, we assign the byte array to the alphaData field of the image data object. An image is created with the image data and drawn on a canvas.
If you want all the pixels of an image data object to share the same alpha value, simply set the field alpha of the image data object.
Image Scaling
In the first section of this chapter, we used a GC object to resize and draw an image. Here, you learn another way to resize an image: through the scaleTo method of the ImageData class:
public ImageData scaledTo(int width, int height)
The scaleTo method stretches or shrinks the image data to the specified size and the resized image data object is returned. You can then use the returned image data object to create images. For example, the following code resizes an image into a 100 × 100 image:
 ImageData imageData = new ImageData("icons/eclipse.jpg");
 ImageData imageData2 = imageData.scaledTo(100, 100);
 Image image2 = new Image(display, imageData2);
Displaying Animation
SWT does not support native GIF animation. To display GIF animation, you have to create a thread and display each frame after a certain delay.
The following code snippet shows how to display GIF animation in SWT:
 ImageLoader imageLoader = new ImageLoader();
 final ImageData[] imageDatas = imageLoader.load("icons/eclipse-ani.gif");

 final Image image = new Image(display, imageDatas[0].width, imageDatas[0].height);
 final Canvas canvas = new Canvas(shell, SWT.NULL);

 canvas.addPaintListener(new PaintListener() {
 public void paintControl(PaintEvent e) {
 e.gc.drawImage(image, 0, 0);
 }
 });

 final GC gc = new GC(image);

 final Thread thread = new Thread() {
 int frameIndex = 0;
 public void run() {
 while (!isInterrupted()) {
 frameIndex %= imageDatas.length;
 final ImageData frameData = imageDatas[frameIndex];

 display.asyncExec(new Runnable() {
 public void run() {
 Image frame =
 new Image(display, frameData);
 gc.drawImage(frame, frameData.x, frameData.y);
 frame.dispose();
 canvas.redraw();
 }
 });

 try {
 // delay
 Thread.sleep(imageDatas[frameIndex].delayTime * 10);
 } catch (InterruptedException e) {
 return;
 }

 frameIndex += 1;
 }

 }
 };

 shell.addShellListener(new ShellAdapter() {
 public void shellClosed(ShellEvent e) {
 thread.interrupt();
 }
 });

 shell.setSize(400, 200);
 shell.open();

 thread.start();
First, the GIF file is loaded using an image loader. Each frame in the GIF animation is represented by an ImageData object. We then create an image (this image will be referred to as the canvas image), which is used to draw an animation frame onto. A canvas is used to display the canvas image. A thread is created to draw frames on the canvas image repeatedly. When a frame is drawn on the canvas image, the canvas is set to be redrawn to display the updated frame. After each frame is drawn, the thread sleeps for the delay time associated with the frame. A shell listener is used to interrupt the animation thread when the shell is closed. Finally, open the shell and start the animation thread.
Summary
In the first part of chapter, you learned how to draw lines, arcs, shapes, images, and text with graphics context. You learned about double buffering to reduce screen flicker. The second part focused on SWT images. ImageData and PaletteData are two main classes that are used to represent the image model. You saw how to manipulate an image by modifying its associated image data object. The chapter also covered such topics as transparency and GIF animation. In the next chapter, you learn how to use the drag-and-drop feature to make the UI more accessible.
Part I - Fundamentals
- Overview of Java UI Toolkits and SWT/JFace
- SWT/JFace Mechanisms
- Jump Start with SWT/JFace
- SWT Event Handling, Threading, and Displays
- Basic SWT Widgets
- Layouts
Part II - Design Basics
Part III - Dynamic Controls
- Scales, Sliders, and Progress Bars
- Other Important SWT Components
- SWT Graphics and Image Handling
- Drag and Drop and the Clipboard
- Printing
- JFace Windows and Dialogs
Part IV - Application Development
EAN: 2147483647
Pages: 147
