Remoting and Enterprise Services
Overview
One of the most exciting developments in the Microsoft .NET Framework is the fact that all languages are equal. That means that a programmer can design an attractive interface for a Windows application in C# just as easily as in Microsoft Visual Basic .NET. Similarly, Visual Basic .NET can hold its weight with multithreaded code, COM+, and the thorniest of distributed application issues.
This chapter considers some of the techniques that you'll use when designing large-scale enterprise applications. The first set of recipes (17.1 through 17.10) targets .NET Remoting, the new platform technology that allows objects to communicate across application and computer boundaries. The next set of recipes (17.11 through 17.14) considers enterprise services and the COM+ features for using transactions and object pooling. Finally, the chapter rounds up with a quick look at event logs (recipe 17.15), message queues (recipes 17.16 and 17.17), and performance counters (recipe 17.18).
| Note |
Distributed application design is often the science (and art) of compromises. Though the recipes in this chapter teach some important techniques for using various enterprise services, they are no substitute for learning the underlying theory, design patterns, and best practices that can ensure application success (and avoid common pitfalls). For more information about .NET Remoting, you can refer to the dedicated book Microsoft .NET Remoting (Microsoft Press, 2002). For a solid grounding on distributed programming, consult my own Microsoft .NET Distributed Applications (Microsoft Press, 2003). |
Make an Object Remotable
Problem
You want to create a class that can be accessed from another application or another computer on the network.
Solution
Make the class remotable by deriving from System.MarshalByRefObject, and create a component host that registers the class with the .NET Remoting infrastructure.
Discussion
Remoting allows you to make an object accessible across process and machine boundaries. To use .NET Remoting, you need the following ingredients, each of which must reside in a separate assembly:
- A remotable object.This object can be accessed from other applications and computers and must derive from the System.MarshalByRefObject.
- A component host.This application registers the remotable type with the .NET Remoting infrastructure using the RemotingConfiguration class from the System.Runtime.Remoting namespace. As long as the component host is running, remote clients can create instances of the remotable object.
- A client application.This application can create instances of the remotable class in the component host process and interact with them. The client uses the RemotingConfiguration class to register the types it wants to access remotely.
Figure 17-1 shows how these three parts interact. In this example, there is only one client. However, it's also possible for multiple clients to create instances of the remotable class at the same time. In this case, each client will have its own remotable object instance, and all the objects will reside in the application domain of the component host.
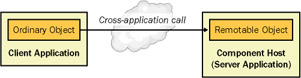
Figure 17-1: Using a remotable class.
The first step is to create the remotable class. A simple example is shown here, with a remotable class that returns a DataSet. This approach allows a remote client to retrieve database information without needing to connect directly to the server-side database. The remotable class gains the ability to be invoked remotely because it derives from MarshalByRefObject.
Public Class RemoteObject
 Inherits MarshalByRefObject

 Public Function GetCustomerDs() As DataSet
 Dim ds As New DataSet("Customers")

 ' (Fill the DataSet by performing a DataBase query.)

 Return ds
 End Function

 ' This method allows you to verify that remoting is working.
 Public Function GetLocation() As String
 Return AppDomain.CurrentDomain.FriendlyName
 End Function

End Class
This class is defined in a class library assembly named RemoteObjects.dll.
| Note |
Ideally, the remote object won't retain any state. This allows you to use single-call activation, in which object instances are created at the beginning of each method call and released at the end, much like a Web service. This ensures optimum performance and saves you from the added complexity of implementing a lease policy to configure object lifetime. |
Next you must create the component host—the server-side application that hosts all instances of the remote class. You can use any type of long-running .NET application for a component host (including Windows applications, Windows services, and Console applications). Here is the form code for a simple Windows component host. In order to use the code as written, you must import the System.Runtime.Remoting namespace.
Public Class ComponentHostForm
 Inherits System.Windows.Forms.Form

 ' (Desginer code omitted.)

 Private Sub Form_Load(ByVal sender As System.Object, _
 ByVal e As System.EventArgs) Handles MyBase.Load
 ' Register the remotable classes.
 RemotingConfiguration.Configure("SimpleServer.exe.config")

 ' (As long as this application is running, the remote objects
 ' will be accessible.)
 End Sub

End Class
The component host uses a configuration file to configure the classes it will support, the ports it will support for network communication, and the Uniform Resource Identifier (URI) that the client will use to access the object. Following is a simple configuration file that registers the RemoteObjects.RemoteObject class from the RemoteObjects.dll assembly, and provides network access through TCP/IP on the port 9080. This assembly must be in the global assembly cache (GAC) or in the same directory as the server application. The configuration file also configures the remote object to use single-call activation.
The component host never interacts with the remotable objects directly. All it does is register the appropriate types with the .NET Remoting infrastructure. After this point, clients can create object instances, and the server application can continue with other tasks. However, when the component host is closed, any remotable objects will be destroyed, and no more objects can be created.
The client application uses a similar configuration file that indicates the URL of the remote object and its type. The URL takes this form:
[Protocol]://[Server]:[PortNumber]/[ObjectURI]
Here is the complete client configuration file:
The client application uses the RemotingConfiguration.Configure method to register the objects it wants to call. Once this step is taken, the client can create the object exactly as it would create a local object. However, the object will actually be created in the component host application domain. You can verify this with the simple Windows client shown here on the following page.
Public Class ClientForm
 Inherits System.Windows.Forms.Form

 ' (Desginer code omitted.)

 Private Sub Form_Load(ByVal sender As System.Object, _
 ByVal e As System.EventArgs) Handles MyBase.Load
 ' Register the classes that will be accessed remotely.
 RemotingConfiguration.Configure("SimpleClient.exe.config")
 ' (Now any attempts to instantiate the RemoteObjects.RemoteObject
 ' class will actually create a proxy to a remote instance.)

 ' Interact with the remote object through a proxy.
 Dim Proxy As New RemoteObjects.RemoteObject()
 MessageBox.Show("Object executing in: " & Proxy.GetLocation())
 ' (This displays the name of the component host application domain,
 ' where the object executes.)

 MessageBox.Show("Retrieved DataSet: " & _
 Proxy.GetCustomerDs.DataSetName)
 End Sub

End Class
In order to instantiate a remote object, the client needs to have a reference to the assembly where the class is defined. This presents an additional deployment step, which you can avoid by using an interface that defines the supported functionality, as explained in recipe 17.5.
| Note |
In order to transmit data to and from a remote object, the types you use for parameters and return values must be serializable. All basic types (such as strings, numbers, and so on) are serializable. If you want to use custom classes to transmit data to or from a remote object, you must make sure these classes are also serializable using the Serializable attribute, as described in recipe 4.8. |
Register All the Remotable Classes in an Assembly
Problem
You want to register all the remotable classes that are defined in an assembly without having to specify them in a configuration file.
Solution
Load the assembly with the remotable classes using reflection. Loop through all its types, and use the RemotingConfiguration.RegisterWellKnownServiceType to register every remotable class.
Discussion
.NET makes it equally easy to register remotable classes through a configuration file or programmatically with code. For example, consider the example from recipe 17.1. To use programmatic registration, you would first remove the class declarations from the configuration file and leave it as shown here:
Now you can combine reflection with the RegisterWellKnownServiceType method to programmatically register all remotable objects.
Private Sub Form_Load(ByVal sender As System.Object, _
 ByVal e As System.EventArgs) Handles MyBase.Load

 ' Use the configuration file to define networking options.
 RemotingConfiguration.Configure("SimpleServer.exe.config")

 ' Create a System.Reflection.Assembly representing the assembly
 ' where remotable classes are defined.
 Dim RemoteAsm As System.Reflection.Assembly
 RemoteAsm = System.Reflection.Assembly.LoadFrom("RemoteObjects.dll")

 ' Process all the types in this namespace.
 Dim Obj As Type
 For Each Obj In RemoteAsm.GetTypes()
 ' Check if the type is remotable.
 If Obj.IsSubclassOf(GetType(MarshalByRefObject)) Then
 ' Register each type using the type name as the URI
 ' (like RemoteObject).
 RemotingConfiguration.RegisterWellKnownServiceType( _
 Obj, Obj.Name, WellKnownObjectMode.SingleCall)
 End If
 Next

End Sub
| Note |
This code determines whether or not a class is remotable by examining if it derives from MarshalByRefObject. This approach always works, but it could lead you to expose some types that you don't want to make remotable. For example, the System.Windows.Forms.Form object derives indirectly from MarshalByRefObject. That means that if your remote object library contains any forms, they will be exposed remotely. To avoid this problem, do not include remotable types in your assembly unless you want to make them publicly available. Or, identify the types you want to register with a custom attribute. You could then check for this attribute before registering a type. This technique is demonstrated in recipe 9.9. |
You can even remove the configuration file entirely and register channels programmatically. Here is the code you would need to replace the current configuration file settings. You'll also need to add a reference to the System.Runtime.Remoting.dll assembly and import the System.Runtime.Remoting.Channels and System.Runtime.Remoting.Channels.Tcp namespaces.
' Define the channel on port 9080.
Dim Channel As New TcpServerChannel(9080)

' Register the channel.
ChannelServices.RegisterChannel(Channel)
Host a Remote Object in IIS
Problem
You want to create a remotable object in IIS (perhaps so that you can use SSL or IIS authentication) instead of a dedicated component host.
Solution
Place the configuration file and assembly in a virtual directory, and modify the object URI so it ends in .rem or .soap.
Discussion
Instead of creating a dedicated component host, you can host a remotable class in Internet Information Services (IIS). This allows you to ensure that the remotable classes will always be available, and it allows you to use IIS features such as SSL encryption and Integrated Windows authentication.
In order to host a remotable class in IIS, you must first create a virtual directory. The virtual directory will contain two things: a configuration file that registers the remotable classes, and a bin directory where you must place the corresponding class library assembly (or install the assembly in the GAC).
The configuration file for hosting in IIS is quite similar to the configuration file you use with a custom component host. However, you must follow several additional rules:
- You must use the HTTP channel (although you can use the binary formatter for smaller message sizes).
- You can't specify a port number for listening. IIS listens on all the ports you have configured in the IIS Manager. Typically, this will be ports 80 and 443 (for secure SSL communication).
- The object URI must end with .rem or .soap.
- The configuration file must be named web.config, or it will be ignored.
Here's an example web.config file that registers the remote class shown in recipe 17-1:
A client can use an object hosted in IIS in the same way as an object hosted in a custom component host. However, the virtual directory name will become part of the object URI. For example, if the web.config file shown in the preceding code is hosted in the virtual directory http://localhost/RemoteObjects, the full URL will be http://localhost/RemoteObjects/RemoteObject.rem.
Fire an Event over a Remoting Channel
Problem
You need to create a client that can receive an event fired by a remote object.
Solution
Make sure you are using bidirectional channels. Create a remotable object on the client side that can receive the event from the server.
Discussion
Although the event-handling syntax doesn't change when you use .NET Remoting, it takes additional steps to create a client that can handle an event from a remote object. There are three key requirements:
- The remotable class must use client-activated or singleton activation mode (not single-call). This ensures that the object remains alive in between method calls, allowing it to fire an event to the client.
- The client must use a bidirectional channel so that it can receive connections initiated by the server.
- The EventArgs object for the event must be serializable so that it can be transmitted across application domain boundaries.
- The client must use a remotable "listener" object to receive the event. This listener will then raise a local event that can be handled by the client. The remote object cannot fire the event directly to an ordinary class because ordinary classes aren't accessible from other application domains.
- In addition, if you are using .NET 1.1, you must modify the client and server configuration files to explicitly allow full serialization.
Here's a sample remotable class that you might use to fire an event to the client. It provides a single public method—StartTask. This method starts a timer, which fires after a short delay (about 10 seconds). When the timer fires, the remotable object raises a TaskComplete event.
Public Class RemoteObject
 Inherits MarshalByRefObject

 Public Event TaskComplete(ByVal sender As Object, _
 ByVal e As TaskCompleteEventArgs)

 Private WithEvents tmrCallback As New System.Timers.Timer()

 Public Sub StartTask()
 tmrCallback.Interval = 10000
 tmrCallback.Start()
 End Sub

 Private Sub tmrCallback_Elapsed(ByVal sender As System.Object, _
 ByVal e As System.Timers.ElapsedEventArgs) Handles tmrCallback.Elapsed
 tmrCallback.Enabled = False
 RaiseEvent TaskComplete(Me, _
 New TaskCompleteEventArgs("Task completed on server"))
 End Sub

 ' Uncomment these lines to allow the object to live forever.
 ' Otherwise, it will be destroyed after five minutes (by default).
 ' Public Overrides Function InitializeLifetimeService() As Object
 ' Return Nothing
 ' End Function

End Class

 _
Public Class TaskCompleteEventArgs
 Inherits EventArgs

 Public Result As String

 Public Sub New(ByVal result As String)
 Me.Result = result
 End Sub
End Class
The next step is to define a remotable class that runs on the client and can receive this event. This class can then contact the client. The EventListener class shown in the following code provides one such example—it simply raises a second event, which the client can handle directly. As with all remotable objects, it will only be accessible remotely for five minutes, unless you explicitly modify the lifetime lease policy (as described in recipe 17.6). One approach is to simply override the InitializeLifetimeService method to allow the object to live forever, as shown here.
Public Class EventListener
 Inherits MarshalByRefObject

 Public Event TaskComplete(ByVal sender As Object, _
 ByVal e As RemoteObjects.TaskCompleteEventArgs)

 ' Handle the remote event.
 Public Sub TaskCompleted(ByVal sender As Object, _
 ByVal e As RemoteObjects.TaskCompleteEventArgs)
 ' Now raise the event to a local listener.
 RaiseEvent TaskComplete(sender, e)
 End Sub

 ' Ensures that this object will be accessible remotely as long as the
 ' client application is running.
 Public Overrides Function InitializeLifetimeService() As Object
 Return Nothing
 End Function

End Class
The event listener must be defined in a separate assembly so that it can be referenced by the client application and the remotable class, which both need to interact with it.
Now the client application can start the asynchronous task through the RemoteObject class and handle the event through the EventListener. The following form code shows a simple client that displays a message box when the event is received.
Public Class ClientForm
 Inherits System.Windows.Forms.Form

 ' (Designer code omitted.)

 ' You can define a RemoteObject as a member variable, but you
 ' must not create it until after you have called
 ' RemotingConfiguration.Configure.
 ' Otherwise, you will instantiate the object locally.
 Private RemoteObj As RemoteObjects.RemoteObject
 Private WithEvents Listener As New EventListener.EventListener()

 Private Sub Form_Load(ByVal sender As System.Object, _
 ByVal e As System.EventArgs) Handles MyBase.Load
 RemotingConfiguration.Configure("SimpleClient.exe.config")
 RemoteObj = New RemoteObjects.RemoteObject()
 End Sub

 Private Sub cmdTest_Click(ByVal sender As System.Object, _
 ByVal e As System.EventArgs) Handles cmdTest.Click
 AddHandler RemoteObj.TaskComplete, AddressOf Listener.TaskCompleted
 RemoteObj.StartTask()
 MsgBox("Task has been started.")
 End Sub

 Private Sub RemoteObj_TaskComplete(ByVal sender As Object, _
 ByVal e As RemoteObjects.TaskCompleteEventArgs) _
 Handles Listener.TaskComplete
 ' This event fires on one of the remoting listener threads.
 MessageBox.Show("Event received: " & e.Result)
 End Sub

End Class
In order for this to work, you must make sure that the client is using bidirectional channels. Thus, the channel tag in the configuration file should look like this:
On the other hand, here's an example of a client-only channel tag, which cannot receive events:
In addition, if you are using .NET 1.1 (the version of the .NET Framework that's included with Visual Studio .NET 2003), you must explicitly enable support for full serialization. Otherwise, the server will not be allowed to receive a delegate for the Listener.TaskCompleted method, and it won't be able to connect the remote event handler.
To enable full serialization support on the server, you need to modify the component host configuration file as shown here:
To enable full serialization support on the client, you need to modify the client configuration file:
These changes aren't required for applications running under .NET 1.0 because it doesn't impose this additional layer of security. The downloadable code for this recipe includes two solutions, one for each version of .NET.
| Note |
In this example, the event handler executes on one of the remoting listener threads provided by .NET, not the main application thread. That means that you might need to take additional steps to ensure thread-safety. In particular, if you need to interact with a control on a window, you should marshal your code to the correct thread, as described in recipe 7.9. |
Access a Remote Object Through an Interface
Problem
You want a client to be able to create a remote object without requiring a reference to the assembly that defines it.
Solution
Create an interface that defines the methods the client needs to access, and distribute an assembly that contains only the interface.
Discussion
One of the limitations with .NET Remoting is that the client needs a local copy of the assembly with the code for the remote object in order to determine what methods are available. This not only poses an additional distribution headache, but it also can compromise security if you don't want the client to be able to examine the code or create local instances of the classes it contains.
The solution is to create an interface that declares the supported methods. The remote object will then implement the interface. This gives you the freedom to modify the remote object without affecting the client, as long as the interface remains unchanged.
As an example, consider the following interface, which defines the two methods used for the remote class introduced in recipe 17.1.
Public Interface IRemoteObject

 Function GetCustomerDs() As DataSet
 Function GetLocation() As String

End Interface
The RemoteObject class implements this interface:
Public Class RemoteObject
 Inherits MarshalByRefObject
 Implements RemoteObjectInterfaces.IRemoteObject

 Public Function GetCustomerDs() As DataSet _
 Implements RemoteObjectInterfaces.IRemoteObject.GetCustomerDs
 Dim ds As New DataSet("Customers")
 Return ds
 End Function

 Public Function GetLocation() As String _
 Implements RemoteObjectInterfaces.IRemoteObject.GetLocation
 Return AppDomain.CurrentDomain.FriendlyName
 End Function

End Class
| Note |
Remember, in order to be able to distribute the interface independently, you must place it in a separate class library assembly. If your remote object uses any custom structures or classes to transmit data, or if it uses any custom exceptions or events, these should be defined in the same assembly. |
The component host needs no changes—it will still register the RemoteObject class directly from the RemoteObjects.dll assembly. The client, however, needs two small changes. Because the client activates the remote object through an interface, it can no longer create it directly by using the New keyword. Instead, it needs to use the System.Activator class, which provides a shared GetObject method. The GetObject method accepts two parameters: a Type object that indicates the type of class you are activating, and a URL that specifies its exact location:
Obj = Activator.GetObject( _
 GetType(RemoteObjectInterfaces.IRemoteObject), _
 "tcp://localhost:9080/RemoteObject")
This shift forces the client to hard-code information that would normally be placed in the configuration file. To overcome this limitation and retain the ability to modify the location without recompiling the client, you can store the URL in a custom application setting value in the configuration file.
value="tcp://localhost:9080/RemoteObject" />
Here's the code the client calls to create the object through its interface and access a method:
' Configure the network channel.
RemotingConfiguration.Configure("SimpleClient.exe.config")

' Register the object using the interface and a URL defined
' in the  section of the configuration file.
Dim Obj As Object
Obj = Activator.GetObject( _
 GetType(RemoteObjectInterfaces.IRemoteObject), _
 ConfigurationSettings.AppSettings("RemoteObjUrl"))

' Access the remote object through the interface.
RemoteObj = CType(Obj, RemoteObjectInterfaces.IRemoteObject)

MessageBox.Show("Object executing in: " & RemoteObj.GetLocation)
| Note |
One of the benefits of interface-based programming is that it's impossible for the client to accidentally instantiate a local copy of the remoted object. This mistake is prevented because the client no longer has access to the remote object's code. |
17 6 Control the Lifetime of a Remote Object
Problem
You want to configure how long a singleton or client-activated object lives while not in use.
Solution
Configure a lease policy by using configuration file settings, overriding the InitializeLifetimeService method, or implementing a custom lease provider.
Discussion
If an object uses single-call activation, it will be automatically destroyed at the end of each method call. This behavior changes with client-activated and singleton objects, which are given a longer lifetime dictated by a lifetime lease. With the default settings, a remote object will be automatically destroyed if it's inactive for two minutes, provided it has been in existence for at least five minutes.
The component host, client, and remote object each have the opportunity to change lifetime settings.
- The component host can specify different lease lifetime defaults in the configuration file. These settings will apply to all the objects it hosts.
- The client can call the MarshalByRefObject.GetLifetimeService method with a specific remote object to retrieve an ILease instance. The client can then call the ILease.Renew method to specify a minimum amount of time the object should be kept alive.
- The remote class can override its GetLifetimeService method to modify its initial lease settings using the provided ILease object.
You can create a simple client that periodically checks the lifetime of a remote object. Figure 17-2 shows an example of one such application, which uses a timer that continually polls the settings of the remote object's ILease. Using this application, you can watch the lifetime lease gradually tick down, you can access the object through your code (at which point its lifetime will be renewed automatically), or you can renew the object's lifetime manually, specifying that it should be given five minutes of life. (If the remote object already has at least five minutes of lifetime left, this renewal will have no effect.)
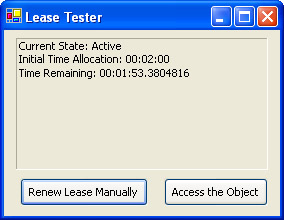
Figure 17-2: Monitoring the lifetime of a remote object.
The full client code is shown here:
Public Class ClientForm
 Inherits System.Windows.Forms.Form

 ' (Designer code omitted.)

 Private RemoteObj As RemoteObjects.RemoteObject
 Private Lease As System.Runtime.Remoting.Lifetime.ILease

 Private Sub Form_Load(ByVal sender As System.Object, _
 ByVal e As System.EventArgs) Handles MyBase.Load
 RemotingConfiguration.Configure("SimpleClient.exe.config")
 RemoteObj = New RemoteObjects.RemoteObject()

 ' Start the timer that checks the lease.
 tmrCheckLease.Interval = 1000
 tmrCheckLease.Start()

 ' Retrieve the lease with information about the remote object.
 ' This lease is actually stored in the component host application
 ' domain. To communicate with it, you use remoting and a proxy.
 Lease = RemoteObj.GetLifetimeService()
 End Sub

 Private Sub tmrCheckLease_Tick(ByVal sender As System.Object, _
 ByVal e As System.EventArgs) Handles tmrCheckLease.Tick
 ' Check the lease information.
 Try
 ' The Lease will be nothing if the remote object has
 ' overridden InitializeLifetimeService and given itself
 ' an infinite lifespan.
 If Not (Lease Is Nothing) Then
 lblLease.Text = "Current State: "
 lblLease.Text &= Lease.CurrentState.ToString() & vbNewLine
 lblLease.Text &= "Initial Time Allocation: "
 lblLease.Text &= Lease.InitialLeaseTime.ToString() & vbNewLine
 lblLease.Text &= "Time Remaining: "
 lblLease.Text &= Lease.CurrentLeaseTime.ToString()
 End If
 Catch err As RemotingException
 ' An error will occur if the object is no longer alive.
 lblLease.Text = err.ToString()
 tmrCheckLease.Stop()
 End Try
 End Sub

 Private Sub cmdRenew_Click(ByVal sender As System.Object, _
 ByVal e As System.EventArgs) Handles cmdRenew.Click
 ' Give the remote object five minutes of life.
 Lease.Renew(TimeSpan.FromMinutes(5))
 End Sub

 Private Sub cmdAccess_Click(ByVal sender As System.Object, _
 ByVal e As System.EventArgs) Handles cmdAccess.Click
 ' When this method is called, the object lifetime is automatically
 ' renewed according to the default renewal settings.
 Dim Test As String = RemoteObj.GetLocation()
 End Sub

End Class
Another way to configure lifetime is through the component host configuration file using the tag. These lease settings apply to all the remote objects created by the component host. Use a trailing M for minutes or an S to indicate seconds.
Here's an example that gives remote objects an initial lifetime of 10 minutes. When a client accesses the object, its lifetime is automatically renewed to at least three minutes.
renewOnCallTime = "3M" />
Finally, a remote object can override InitializeLifetimeService to take control of its own destiny. This is most commonly the case if you are creating a singleton object that needs to run independently (and permanently), even if clients aren't currently using it.
The following code shows the code you could add to a remote class to give it a default 10-minute lifetime and 5-minute renewal time. If you wanted the object to have an unlimited lifetime, simply return a null reference (Nothing) instead of an ILease object.
Public Overrides Function InitializeLifetimeService() As Object
 Dim Lease As ILease = MyBase.InitializeLifetimeService()

 ' Lease can only be configured if it is in an initial state.
 If Lease.CurrentState = LeaseState.Initial Then
 Lease.InitialLeaseTime = TimeSpan.FromMinutes(10)
 Lease.RenewOnCallTime = TimeSpan.FromMinutes(5)
 End If

 Return Lease

End Function
17 7 Use a Sponsor to Keep Remote Objects Alive
Problem
You want to keep a remote object alive while it's in use, but you don't want to be forced to periodically call the ILease.Renew method from your client.
Solution
Create and register a lease sponsor that will automatically renew the remote object.
Discussion
.NET Remoting introduces the ideas of lifetime leases and lease sponsors. A lease sponsor is remotable object that runs in the client's application domain. It has a single purpose—to keep the remote objects your application is using alive.
The lease sponsor doesn't interact with the remote object directly. Instead, it waits for the .NET Remoting infrastructure to initiate communication. Whenever a remote object is about to expire, .NET will contact every registered lease sponsor. These lease sponsors are given the opportunity to renew the object, keeping it alive. Once .NET finds a lease sponsor that's willing to renew the life of an object, it ends its search. This approach ensures that leasing is a very bandwidth-friendly approach to lifetime management.
You can create your own custom lease sponsor by implementing the System.Runtime.Remoting.Lifetime.ISponsor interface. However, a simpler option is just to use the prebuilt ClientSponsor class from the System.Runtime.Remoting.Lifetime namespace. This class provides a single property—RenewalTime—which indicates the lease time that will be given to the remote object on renewal. The ClientSponsor class also provides Register and Unregister methods, which you use to specify the remote objects it should sponsor.
The following code rewrites the client presented in recipe 17.6 so that it uses a lease sponsor. Now, the object will be renewed automatically, as long as the client application is running.
Private Sponsor As New System.Runtime.Remoting.Lifetime.ClientSponsor()

Private Sub Form_Load(ByVal sender As System.Object, _
 ByVal e As System.EventArgs) Handles MyBase.Load
 RemotingConfiguration.Configure("SimpleClient.exe.config")
 RemoteObj = New RemoteObjects.RemoteObject()
 Lease = RemoteObj.GetLifetimeService()

 ' Start the timer that checks the lease.
 tmrCheckLease.Interval = 1000
 tmrCheckLease.Start()

 ' Register the remote object with the lease sponsor.
 Sponsor.RenewalTime = TimeSpan.FromMinutes(5)
 Sponsor.Register(RemoteObj)
End Sub
For lease sponsors to work, you must use bidirectional channels. Otherwise, the .NET Remoting infrastructure won't be able to initiate a connection to your lease sponsor. Also, if you are using version 1.1 of the .NET Framework, you will need to add an additional section to the <channel> element of the client and component host configuration files to enable support for full serialization. Here's the modified component host configuration file, with the new lines highlighted:
Remember, you can make these changes only if you are using .NET 1.1 (as included with Visual Studio .NET 2003). These settings won't be recognized (and aren't required) for .NET 1.0 applications.
17 8 Control Versioning for Remote Objects
Problem
You want to create a component host that can host more than one version of the same object.
Solution
Install all versions of the object into the GAC, and explicitly register each version at a different URI endpoint.
Discussion
.NET Remoting does not include any intrinsic support for versioning. When a client creates a remote object, the component host automatically uses the version in the local directory or, in the case of a shared assembly, the latest version from the GAC. To support multiple versions, you have three choices:
- Create separate component host applications. Each component host will have a different version of the remote object assembly and will register its version with a different URI. This approach forces you to run multiple component host applications at once and is most practical if you are using IIS hosting (as described in recipe 17.3).
- Create an entirely new remote object assembly (instead of simply changing the version). You can then register the classes from both assemblies at different URIs, using the same component host.
- Install all versions of the remote object assembly in the GAC. You can now create a component host that maps different URIs to specific versions of the remote object assembly.
The last option is the most flexible in cases where you need to support multiple versions. For example, consider the following configuration file, which registers two versions of the RemoteObjects assembly at two different endpoints. Notice that you need to include the exact version number and public key token when using assemblies from the GAC. You can find this information by viewing the assembly in the Windows Explorer GAC plug-in (browse to C:[WindowsDir]Assembly).
The client configuration file won't change at all (aside from updating the URI, if required). The client "chooses" the version it wants to use by using the corresponding URI.
17 9 Use a One Way Method
Problem
You want a method in a remote object to perform a long task, and you don't want to force the client to wait while the method code executes.
Solution
Create a one-way method by applying the OneWay attribute from the System.Runtime.Remoting.Messaging namespace.
Discussion
With one-way methods, the client sends a request message, and the remote object responds immediately to indicate it has begun processing. This has several consequences:
- The client doesn't need to wait while the method code executes.
- The method can't return any information to the client, either through a return value or ByRef parameter.
- If the method throws an unhandled exception, it won't be propagated back to the client.
To create a one-way method, you need to apply a OneWay attribute (from the System.Runtime.Remoting.Messaging namespace) to the appropriate method. The following example shows a remote object that provides two methods, each of which causes a 10-second delay. One of the two methods uses the OneWay attribute, and therefore it won't stall the client.
Public Class RemoteObject
 Inherits MarshalByRefObject

  _
 Public Sub DoLongTask()
 ' (Start a long task, that doesn't return
 ' information to the client.)
 Delay(10)
 End Sub

 Public Sub DoLongTaskWithWait()
 ' (Start a long task, but force the client
 ' to wait while processing takes place.)
 Delay(10)
 End Sub

 Private Sub Delay(ByVal seconds As Integer)
 Dim CurrentTime As DateTime = DateTime.Now
 Do
 Loop Until DateTime.Now.Subtract(CurrentTime).TotalSeconds > seconds
 End Sub

End Class
| Note |
One-way methods aren't the only way to remove client delays. You can also modify the client to call any method asynchronously. In this case, the client will wait for the method to complete, but it will wait on another thread, so the client application can continue with other work. Asynchronous method calls are described in recipe 7.1. |
17 10 Track Multiple Clients with a Singleton
Problem
You want to allow multiple clients to communicate with each other through a single server.
Solution
Create a server-side singleton object that tracks all the currently available clients on the network. The server should store a proxy object for each client in an in-memory collection.
Discussion
When you create a remote object that uses singleton activation mode, only a single instance of it will be created. All the clients that use this remote object will access the same instance. This means that the remote object can store some information that will be shared among all users (such as a list of connected clients). It also means that you'll need to craft thread-safe code using the techniques presented in Chapter 7 because more than one client will be able to access the remote object at the same time.
| Note |
This recipe incorporates bidirectional communication (from recipe 17.4), interface-based remoting (from recipe 17.5), and one-way messages (from recipe 17.9). You might want to review these recipes before applying this one. |
One useful example is a simple coordinator object that allows clients to log on, log off, and broadcast messages. In order for this type of communication system to work, both the coordinator and the client must include a remotable object. You can define the basic interfaces for the system as follows:
' IClient simply defines the functionality needed
' to receive a message from the server.
Public Interface IClient
 Sub ReceiveMessage(ByVal message As String)
End Interface

' IServer simply defines the functionality needed
' to register users and allow any user to request
' that a message be delivered to all other users.
Public Interface IServer
 Sub AddUser(ByVal user As IClient)
 Sub RemoveUser(ByVal user As IClient)
 Sub BroadcastMessage(ByVal message As String)
End Interface
The server object tracks all the currently connected clients. It also allows any one client to broadcast a message to all clients through the BroadcastMessage method. The full code is shown here, with the required synchronization code to prevent errors from occurring if multiple threads attempt to modify the Clients collection at the same time.
Public Class Server
 Inherits MarshalByRefObject
 Implements RemoteObjectInterfaces.IServer

 Private Users As New ArrayList()

 Public Sub AddUser(ByVal user As RemoteObjectInterfaces.IClient) _
 Implements RemoteObjectInterfaces.IServer.AddUser
 SyncLock Users
 Users.Add(user)
 End SyncLock
 End Sub

 Public Sub RemoveUser(ByVal user As RemoteObjectInterfaces.IClient) _
 Implements RemoteObjectInterfaces.IServer.RemoveUser
 SyncLock Users
 Users.Remove(user)
 End SyncLock
 End Sub

 ' This is a one-way method. There is no need for the client to
 ' wait while all users are contacted with the message.
  _
 Public Sub BroadcastMessage(ByVal message As String) _
 Implements RemoteObjectInterfaces.IServer.BroadcastMessage
 ' Create a copy of the client collection. This way, the collection
 ' doesn't need to be locked while messages are being delivered.
 Dim Recipients As ArrayList
 SyncLock Users
 Recipients = Users.Clone()
 End SyncLock

 Dim Recipient As RemoteObjectInterfaces.IClient
 For Each Recipient In Recipients
 Dim ReceiveDelegate As New _
 RemoteObjectInterfaces.ReceiveMessageDelegate( _
 AddressOf Recipient.ReceiveMessage)
 ReceiveDelegate.BeginInvoke(message, Nothing, Nothing)
 Next
 End Sub

End Class
The client application includes a Client class that can receive broadcasted messages. Notice that the client does not need to register this class with the .NET Remoting infrastructure because the client will provide a proxy to the remote object by calling the AddUser method.
Public Class Client
 Inherits MarshalByRefObject
 Implements RemoteObjectInterfaces.IClient

 ' This is the local event that will alert the client application
 ' that the server sent a broadcast message.
 Public Event MessageReceived(ByVal sender As Object, _
 ByVal e As MessageEventArgs)

 ' This is a one-way method. There is no need for the server to wait
 ' while the client deals with the message it has received.
  _
 Public Sub ReceiveMessage(ByVal message As String) _
 Implements RemoteObjectInterfaces.IClient.ReceiveMessage
 RaiseEvent MessageReceived(Me, New MessageEventArgs(message))
 End Sub

End Class

Public Class MessageEventArgs
 Inherits EventArgs

 Private _Message As String

 Public Property Message() As String
 Get
 Return _Message
 End Get
 Set(ByVal Value As String)
 _Message = Value
 End Set
 End Property

 Public Sub New(ByVal message As String)
 MyBase.New()
 Me.Message = message
 End Sub

End Class
When a message is received, a local event is fired, which the client handles directly. In this case, the client simply displays a message box:
Private WithEvents Client As New Client()

Private Sub Client_MessageReceived(ByVal sender As Object, _
 ByVal e As SimpleClient.MessageEventArgs) Handles Client.MessageReceived
 MessageBox.Show("Received: " & e.Message)
End Sub
When the client first starts, it creates a local instance of the Client class, registers the remote object it wants to access, and then calls the remote AddUser method. The remote object receives a proxy to the remotable Client class, which it stores in the collection so that it can contact the client later.
Private Server As RemoteObjectInterfaces.IServer

Private Sub Form_Load(ByVal sender As System.Object, _
 ByVal e As System.EventArgs) Handles MyBase.Load
 RemotingConfiguration.Configure("SimpleClient.exe.config")

 Dim Obj As Object Obj = Activator.GetObject( _
 GetType(RemoteObjectInterfaces.IServer), _
 ConfigurationSettings.AppSettings("RemoteObjUrl"))
 Server = CType(Obj, RemoteObjectInterfaces.IServer)

 ' Register the client with the server.
 Server.AddUser(Client)
End Sub
The client can then call BroadcastMessage to send a message to all clients. Here's an example that fires a message in response to a button click:
Private Sub cmdTest_Click(ByVal sender As System.Object, _
 ByVal e As System.EventArgs) Handles cmdTest.Click
 Server.BroadcastMessage("This is a test")
End Sub
If you're writing this application using the .NET Framework 1.1, you'll need to explicitly enable full serialization, or the client reference won't be able to cross application boundaries. To make this change, you'll need to modify the tag in the client and server configuration files, as shown here:
The downloadable code includes two versions of this recipe—one for each version of the .NET Framework.
| Note |
Currently, the BroadcastMessage method does not incorporate any error-handling logic. In a production-level application, you would check for an error that might occur if the client cannot be contacted. (This might occur if the client is disconnected or shut down without calling the RemoveUser method.) In response to this error, you would remove the client from the collection and then continue contacting the remaining clients. |
17 11 Create a COM+ Serviced Component
Problem
You want to create a component that can use COM+ services such as distributed transactions and object pooling.
Solution
Derive your component from the ServicedComponent class, give your assembly a strong name, and register it in the COM+ catalog using the regsvcs.exe utility.
Discussion
To use COM+ services (as described in recipes 17.13 and 17.14), you must create your component as a class library assembly and add a reference to the System.EnterpriseServices.dll assembly. You can then add one or more classes that derive from System.EnterpriseServices.ServicedComponent. These classes do not need any additional COM-specific code. They gain the ability to use a wide range of COM+ services that you can configure using the attributes in the System.EnterpriseServices namespace.
To test a component that uses COM+ services, you must register it and create a test application. Registering a serviced component takes several steps. The recommended approach is as follows:
- Generate a key pair using the sn.exe command-line utility included with Microsoft .NET. Here's an example that saves a key pair to a file named AssemblyKey.snk:
sn -k AssemblyKey.snk
- Add an AssemblyKeyFile attribute to your class library project, identifying the file with the key pair. This ensures that when your assembly is compiled, it will have a unique strong name and can be added to the GAC.
- Compile the assembly, and place it in the GAC. You can perform this step by pasting the file into the C:[WindowsDir]Assembly directory using the Windows Explorer GAC shell extension, or you can use the GACUtil.exe command-line utility.
gacutil /i mydll.dll
- Register the component using the Regsvcs command-line utility. This creates a COM+ application entry in the COM+ catalog, using the root namespace, and adds all ServicedComponent classes to the application.
regsvcs mydll.dll
- To view your classes in the COM+ catalog, select Component Services from the Administrative Tools section of the Control Panel. The COM+ Explorer is shown in Figure 17-3.
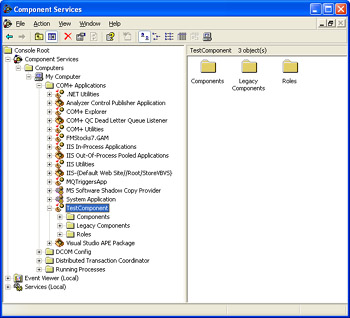
Figure 17-3: The COM+ catalog.Note The steps described in this recipe are the recommended best practice. However, you can avoid manual registration and use a .NET feature known as dynamic registration, which will register a COM+ serviced component as soon as it's instantiated by a client. Dynamic registration is completely transparent and convenient while testing. However, it can cause problems if the user running the client doesn't have administrative privileges, or if you update the component code without changing the version number.
17 12 Prevent Duplicate Entries for Serviced Components
Problem
When you update a serviced component, it's registered in the COM+ catalog with a different type library and component GUID.
Solution
Specify the version number of your assembly and GUID of your classes using attributes.
Discussion
By default, every time you register a serviced component, a new type library will be generated, and all the classes it contains will be given new GUIDs. This leads to duplicate entries in the COM+ catalog, which can cause significant confusion. Fortunately, resolving these problems is easy.
The first step is to fix the version number of your assembly. Microsoft Visual Studio .NET creates all applications with the following attribute in the AssemblyInfo.vb file:
This attribute indicates that the assembly should be given a new (incrementally updated) version number starting with 1.0 each time it's compiled. COM+ versioning requires that different versions of the same component have different type libraries. But if you are creating multiple builds during the development and testing process, you'll want to fix the version number so that the type library is not regenerated with each modification. Here's one possible example:
However, the classes in your assembly will still be assigned new GUIDs each time you register the component. To prevent this behavior, you must choose a GUID for each class and specify it using the Guid attribute from the System.Runtime.InteropServices namespace.
 _
Public Class MyServiceClass
 Inherits ServicedComponent
 ' (Code omitted.)
End Class
17 13 Create a Pooled Component
Problem
You want to use COM+ object pooling to maintain a pool of preinitialized objects.
Solution
Derive your class from ServicedComponent, add the ObjectPooling attribute, and override the CanBePooled method.
Discussion
With object pooling, a "pool" of available, instantiated objects is retained permanently. When a client creates an object, COM+ provides a preinitialized object from the pool. When a client releases an object, it isn't destroyed, but is instead returned to the object pool, where it remains ready to serve another client. Object pooling is most often used for one of two reasons in a distributed application:
- To reduce the cost of creating an expensive object.Most objects can be created quite quickly and easily. But if an object performs a significant amount of work in its constructor, object pooling can improve performance.
- To set a maximum number of allowed objects.Object pools can enforce minimums and maximums. You might want to establish a maximum if an object wraps a limited resource. That way, it will be impossible to create more objects than can be supported by the system.
To use object pooling, you must create a serviced component, as described in recipe 17.11. Then add the System.EnterpriseServices.ObjectPooling attribute to the declaration for the class you want to pool. In the attribute constructor, you can specify both the minimum size of the pool and the maximum. The minimum size specifies the number of available objects that should always be in the pool. The maximum size specifies the maximum number objects that can be created at any one time, including those that are in use and those that are available in the pool.
Consider the following example:
 _
Public Class MyClass
 ' (Code omitted.)
End Class
This class exhibits the following behavior:
- The first time a client creates an instance of MyClass, five additional MyClass objects are created and added to the pool.
- Every time a client creates a new instance of MyClass, the client receives one of the preinitialized objects in the pool. At almost the same time, a new instance will be generated and added to the pool to ensure that there are always five free objects available.
- If there are 10 instances of MyClass in use, the pool will be empty and it won't be possible to create any new instances. If a client attempts to create a new instance, a timeout error will occur.
In addition, when creating a pooled object, you must override the CanBePooled method. This method is called whenever the object is disposed, and it must return True if you want the object to be placed in the pool. Otherwise, the object will be destroyed. You can also override the Activate and Deactivate methods to configure the object immediately after it's fetched from the pool and just before it's returned to the pool.
Here's a sample component that demonstrates object pooling. It performs some time-consuming logic in the constructor when it's first created. The first time the object is created, there will be noticeable delay. On subsequent use, the object will be retrieved almost instantaneously from the pool.
 _
Public Class PooledObject
 Inherits ServicedComponent

 Private _CreatedTime As DateTime

 Public ReadOnly Property CreatedTime() As DateTime
 Get
 Return _CreatedTime
 End Get
 End Property

 Public Sub New()
 ' Simulate a time-consuming operation.
 Dim i, j As Integer
 For i = 1 To 100000
 For j = 1 To 10000
 Next
 Next

 _CreatedTime = DateTime.Now
 End Sub

 ' Allow this object to be pooled unless it is five minutes old.
 Protected Overrides Function CanBePooled() As Boolean
 If DateTime.Now.Subtract(CreatedTime).TotalMinutes < 5 Then
 Return True
 Else
 Return False
 End If
 End Function

End Class
The PooledObject class tracks the time that it was created and provides this information through a public CreatedTime property. This allows the object to decide not to return to the pool if a certain amount of time has elapsed (in this example, five minutes). In addition, it allows the client to determine when a specific instance was first created.
Here's how the client would interact with the PooledObject class:
' Create the object.
Dim Obj As New TestComponent.PooledObject()

' Check when this instance of the object was created.
MessageBox.Show("Object created at: " & Obj.CreatedTime.ToLongTimeString())

' Release the object (possibly to the pool).
Obj.Dispose()
| Note |
In Windows 2000, COM+ pooled components are created in a default application domain and shared among all clients machine-wide. In Windows XP, pooled components are limited to the application domain where they were created (therefore, pools can't be shared even between two applications on the same computer). If you want to pool objects among multiple clients, you must add an additional layer between the pooled object and the client. For example, you could create a Web service or a .NET Remoting component that runs on a server and uses pooled components. |
17 14 Use a COM+ Distributed Transaction
Problem
You want to perform multiple operations with different data sources, and you want these operations to either fail or succeed as a unit.
Solution
Derive your class from ServicedComponent, specify the type of transactional behavior you want by adding the Transaction attribute to the class declaration, and add the AutoComplete attribute to all methods.
Discussion
COM+ allows you to create classes that have set transaction requirements. When a client uses a method in a transactional class, a transaction will be started automatically, and committed when the code completes. Coding transactions in this way is easy and transparent. It also allows you to flexibly tie multiple methods together in a single transaction at runtime. However, COM+ transactions require the Distributed Transaction Coordinator (DTC) service on the computer to coordinate all transactions using a two-stage commit process. This is inherently slower than a simple database-initiated transaction. For that reason, COM+ transactions are most often used when you need to create a transaction that spans multiple data sources (such as an Oracle database and a SQL Server database).
To use distributed transactions, you must first create a serviced component, as described in recipe 17.11. Then, add the System.EnterpriseServices.Transaction attribute to the class that will run inside the transaction and specify a value from the TransactionOption enumeration. Supported values include
- RequiredThis object must run in a transaction. If the caller has already started a transaction, this object participates inside that transaction. Otherwise, a new transaction is created.
- RequiresNew This object must run in a transaction. If the caller has already started a transaction, a new and completely independent transaction is created for this object.
- Supported This object can run in a transaction and is enlisted in the caller's transaction if it exists. Otherwise, this object doesn't run in a transaction.
- NotSupported This object doesn't participate in a transaction. If the caller has a current transaction, this object can't vote on it.
- DisabledThe object doesn't have any transaction requirements. This is the default value. In .NET, this value is equivalent to NotSupported.
In a COM+ transaction, every participating object must vote to commit or abort the transaction. If any object votes to abort, the entire transaction is rolled back. Your object can vote by setting the shared ContextUtil.MyTransactionVote property. However, a simpler approach is to add the AutoComplete attribute to all methods. In this case, the transaction will be automatically committed if the code completes successfully and aborted if an unhandled exception is encountered.
The following class provides an AttemptChanges method that modifies a SQL Server database. However, before the method completes, an unhandled exception is thrown, and the entire transaction is rolled back.
 _
Public Class TransactionTest
 Inherits ServicedComponent

 Private ConnectionString As String = "Data Source=localhost;" & _
 "Integrated Security=SSPI;Initial Catalog=Northwind"

  _
 Public Sub AttemptChanges()
 ' Delete records from SQL Server.
 Dim Con As New SqlConnection(ConnectionString)
 Dim Cmd As New SqlCommand("DELETE * FROM Customers", Con)
 Try
 Con.Open()
 Cmd.ExecuteNonQuery()
 Finally
 Con.Close()
 End Try

 ' (Access another data source here.)

 ' This unhandled exception will cause all transactional
 ' operations to be rolled back.
 ' You could also set the vote manually using
 ' ContextUtil.MyTransactionVote = TransactionVote.Abort
 ' ContextUtil.DeactivateOnReturn = True
 Throw New ApplicationException("Task aborted.")
 End Sub

End Class
| Note |
If a data source supports COM+ transactions, it will automatically be enlisted in the current transaction. However, some operations (such as writing a file to disk) are inherently not transactional. That means that these operations won't be rolled back if the transaction fails. |
17 15 Write to the Windows Event Log
Problem
You need to write a log entry to the Windows event log on the current computer.
Solution
Register the event source and create the log if required. Write the message using the System.Diagnostics.EventLog class.
Discussion
The EventLog class makes it easy to write and retrieve event log entries. You create an EventLog instance that wraps a specific log—typically the all-purpose Application log or a custom log that's used by your application.
' Access the Application log.
Dim Log As New EventLog("Application")
You can also supply an additional argument to the EventLog constructor to specify a computer name. This allows you to access an event log defined on another computer on the network.
' Access the Application log.
Dim Log As New EventLog("Application", "ComputerName")
To retrieve log entries, use the EventLog.Entries property, which provides a collection of EventLogEntry instances. To write a log entry, call the EventLog.WriteEntry method, specifying a text message and optionally other information, including an event log type (error, warning information, or security audit). However, before you attempt to write a message, you should make sure the current application is registered to write in the log, and you should call the EventLog.CreateEventSource method if it's not.
Here's an example Console application that writes a single log entry into a custom log and the displays all the entries in the log:
Public Module EventLogTest

 Public Sub Main()
 ' Register the event source if needed.
 If Not EventLog.SourceExists("MyApp1") Then
 ' This registers the event source and creates the custom log,
 ' if needed.
 EventLog.CreateEventSource("MyApp1", "MyNewLog")
 End If

 ' Create a log instance.
 Dim Log As New EventLog("MyNewLog")
 Log.Source = "MyApp1"

 ' Write a message.
 Log.WriteEntry("This is a test message.", _
 EventLogEntryType.Information)

 ' Display all messages.
 Dim Entry As EventLogEntry
 For Each Entry In Log.Entries
 Console.WriteLine("Message: " & Entry.Message)
 Console.WriteLine("Written By: " & Entry.Source)
 Console.WriteLine("Written At: " & Entry.TimeWritten.ToString())
 Console.WriteLine("Type: " & Entry.EntryType.ToString())
 Console.WriteLine()
 Next

 Console.ReadLine()
 End Sub

End Module
This code will work only it if executes under an account that has permission to modify the event log. To grant this permission to an account that lacks it, you must use regedt32.exe and find the HKEY_Local_MachineSYSTEMCurrentControlSetServicesEventLog key. Then right-click the EventLog key, and select Permissions. Any account that is granted Full Control of this folder will be able to write to the event log.
17 16 Find All the Message Queues on a Computer
Problem
You need to retrieve a list of the public queues in Active Directory or the private queues on a given computer.
Solution
Use the GetPublicQueues or GetPrivateQueuesByMachine methods of the System.Messaging.MessageQueue class.
Discussion
.NET allows you to examine and administer message queues and the messages they contain using the classes in the System.Messaging namespace. You can create a MessageQueue class that wraps a specific message queue by specifying the queue path in the constructor.
' Check if a queue named MyQueue exists on the current computer.
If MessageQueue.Exists(".MyQueue") Then
 ' Show its name.
 Dim Queue As New MessageQueue(".MyQueue")
 Console.WriteLine(Queue.QueueName)
End If
In addition, you can retrieve all the queues in Active Directory using the shared MessageQueue.GetPublicQueues method, or you can retrieve the private queues on a given machine using the shared MessageQueue.GetPrivateQueuesByMachine method, in which case you must specify a computer name, or a period (.) to indicate the current computer.
The following code shows a simple Console application that enumerates all the queues on the current machine and displays the messages they contain. In order to use this code, you must add a reference to the System.Messaging.dll assembly and import the System.Messaging namespace.
Public Module GetQueues

 Public Sub Main()
 Dim Queue, Queues() As MessageQueue

 ' Get the private queues for the current machine.
 Queues = MessageQueue.GetPrivateQueuesByMachine(".")

 For Each Queue In Queues
 Console.WriteLine("Name: " & Queue.QueueName)
 Console.WriteLine("Path: " & Queue.Path)

 ' Get a snapshot of all messages (without removing them.)
 Console.WriteLine("Contains:")
 Dim Message, Messages() As Message
 Messages = Queue.GetAllMessages()
 For Each Message In Messages
 Console.WriteLine(Message.Id.ToString())
 Console.WriteLine(Message.Body.ToString())
 Next
 Console.WriteLine()
 Next

 Console.ReadLine()
 End Sub

End Module
| Note |
You can add, remove, and administer message queues using the Computer Management console. Expand the Message Queuing node under the Services And Application node. You can right-click on a queue category folder to create a new queue for your application. |
17 17 Send a Custom Message Object Through Message Queuing
Problem
You want to send a custom object to another application via a message queue.
Solution
Create a serializable class that has a zero-argument constructor and includes no read-only properties. Wrap an instance of this class in a Message object and pass the Message object to the MessageQueue.Send method.
Discussion
Message queues accept simple text messages and custom .NET objects. In order to use a custom object, it must satisfy three criteria:
- The class must have a public constructor with no arguments. .NET uses this constructor to re-create the object when the message is received.
- The class must be marked with the Serializable attribute.
- All class properties must be readable and writable. Read-only properties won't be serialized because .NET won't be able to restore the property values when re-creating the object.
Here's an example of a class that can be serialized and sent in the body of a message:
 _
Public Class OrderMessage

 Private _OrderCode As String
 Private _ClientName As String

 Public Property OrderCode()
 Get
 Return _OrderCode
 End Get
 Set(ByVal Value)
 _OrderCode = Value
 End Set
 End Property

 Public Property ClientName() As String
 Get
 Return _ClientName
 End Get
 Set(ByVal Value As String)
 _ClientName = Value
 End Set
 End Property

 Public Sub New()
 ' No actions are required in the default constructor.
 End Sub

 Public Sub New(ByVal code As String, ByVal client As String)
 OrderCode = code
 ClientName = client
 End Sub

End Class
The following example shows the full code for a simple test form that sends and receives instances of the OrderMessage object. Sending the object is effortless—you simply need to wrap it in a Message object and pass the Message object to the MessageQueue.Send method. Retrieving the message is equally easy, provided you make sure to specify the expected object types in the constructor for the XmlMessageFormatter. If you attempt to deserialize an unrecognized object (one that you have not configured through the MessageQueue.AllowedTypes property), an exception will be thrown.
Public Class QueueForm
 Inherits System.Windows.Forms.Form

 ' (Designer code omitted.)
 Private QueuePath As String = ".Private$OrderQueue"
 Private Queue As MessageQueue

 Private Sub Form_Load(ByVal sender As System.Object, _
 ByVal e As System.EventArgs) Handles MyBase.Load
 ' Create the queue if needed.
 If MessageQueue.Exists(QueuePath) Then
 Queue = New MessageQueue(QueuePath)
 Else
 Queue = MessageQueue.Create(QueuePath)
 End If

 ' Messages are formatted using XML (not binary) encoding.
 Queue.Formatter = New XmlMessageFormatter()
 End Sub

 Private Sub cmdSend_Click(ByVal sender As System.Object, _
 ByVal e As System.EventArgs) Handles cmdSend.Click
 Dim Ord As New OrderMessage(Guid.NewGuid().ToString(), "Test Client")
 Dim Msg As New Message(Ord)

 ' (Configure other Message properties here.)
 Msg.Label = "Test Order"

 Queue.Send(Msg)
 End Sub

 Private Sub cmdReceive_Click(ByVal sender As System.Object, _
 ByVal e As System.EventArgs) Handles cmdReceive.Click
 Me.Cursor = Cursors.WaitCursor

 Dim ReceivedMessage As Message

 ' Specify all the allowed object types in an array.
 Dim AllowedTypes() As Type = {GetType(OrderMessage)}
 Queue.Formatter = New XmlMessageFormatter(AllowedTypes)

 Try
 ' If no message is found after five seconds, an exception occurs.
 ' You can also explicitly retrieve all messages from the queue
 ' using the Queue.GetAllMessages method.
 ReceivedMessage = Queue.Receive(TimeSpan.FromSeconds(5))

 ' Check if it is the expected type.
 If TypeOf ReceivedMessage.Body Is OrderMessage Then
 ' Process message here.
 Dim ReceivedOrder As OrderMessage
 ReceivedOrder = CType(ReceivedMessage.Body, OrderMessage)
 MessageBox.Show("Received order: " & ReceivedOrder.OrderCode)
 End If
 Catch Err As MessageQueueException
 MessageBox.Show("No messages.")
 End Try

 Me.Cursor = Cursors.Default
 End Sub

End Class
In order to use this code as written, you must add a reference to the System.Messaging.dll assembly and import the System.Messaging namespace.
17 18 Use a Custom Performance Counter
Problem
You want to gauge the performance of an application with a custom business-specific counter.
Solution
Create the counters using the PerformanceCounterCategory and CounterCreationDataCollection classes. Increment the counters using the PerformanceCounter class.
Discussion
.NET includes performance counters that allow you to monitor the performance of the common language runtime, Microsoft ADO.NET, .NET Remoting, and Microsoft ASP.NET. In addition, you can create your own custom counters using the classes in the System.Diagnostics namespace.
Before using a custom counter, you need to create it. You can create custom counters using the Visual Studio .NET Server Explorer or programmatically in code. You also need to create a new category for your counters (unless you want to use an existing category). Once the counter category and counters have been created, you can create instances of the counter using the PerformanceCounter class and call the Increment method to add one to the counter value.
There are several different types of counters. Two of the most common are total counters (which simply keep track of the total number of times they have been incremented), and rate counters (which track the number of times they are incremented in a given unit of time). When recording totals, you can use the NumberOfItems32 and NumberOfItems64 counter types (depending on whether you want to store the counter as a 32-bit or 64-bit value). When recording rates, you can use RateOfCountsPerSecond32 and RateOfCountsPerSecond64. In addition, you can calculate the average time for an operation using AverageTimer32. These represent the five most commonly used counter types.
The Console application shown here creates a new counter category and adds a total and rate counter. The application then creates instances of each counter and increments them.
Public Module CounterTest

 Public Sub Main()
 ' Create the counters if needed
 CreateCounters()

 ' Create an instance of each counter.
 ' The instance name is "CounterTest". If you use the same
 ' counters in other applications, you could use a different
 ' instance name so as not to confuse them.
 Dim LoginCounter As New PerformanceCounter("MyApp Counters", _
 "TotalLogins", "CounterTest", False)
 Dim DBCounter As New PerformanceCounter("MyApp Counters", _
 "DatabaseOperations", "CounterTest", False)

 Console.WriteLine("Counters created.")
 Console.WriteLine("You can add them to the Performance Monitor now.")

 ' Increment both of the counters 10 times.
 ' You can monitor the effect of this code in Performance Monitor.
 Console.WriteLine("Press Enter to increment 10 times, " & _
 "or type exit to end.")
 Do Until Console.ReadLine().ToLower() = "exit"
 Dim i As Integer
 For i = 1 To 10
 LoginCounter.Increment()
 DBCounter.Increment()
 Next
 Console.WriteLine("Press Enter to increment 10 times, " & _
 "or type exit to end.")
 Loop

 ' Remove the counters.
 DBCounter.RemoveInstance()
 LoginCounter.RemoveInstance()
 End Sub

 Private Sub CreateCounters()
 If Not (PerformanceCounterCategory.Exists("MyApp Counters")) Then
 Dim Counters As New CounterCreationDataCollection()

 ' Create a simple counter that records a total value.
 Dim CountCounter As New CounterCreationData()
 CountCounter.CounterName = "TotalLogins"
 CountCounter.CounterHelp = "Total number of user logins."
 CountCounter.CounterType = PerformanceCounterType.NumberOfItems32

 ' Create a rate counter that records a per second value.
 Dim RateCounter As New CounterCreationData()
 RateCounter.CounterName = "DatabaseOperations"
 RateCounter.CounterHelp = "Number of database operations " & _
 "performed by MyApp per second"
 RateCounter.CounterType = _
 PerformanceCounterType.RateOfCountsPerSecond32

 ' Add both counters to the collection.
 Counters.Add(CountCounter)
 Counters.Add(RateCounter)

 ' Create the custom category.
 PerformanceCounterCategory.Create("MyApp Counters", _
 "Counters for MyApp", Counters)
 End If
 End Sub

End Module
You can view the results using Performance Monitor (select Performance from the Administrative Tools section of the Control Panel). The rate counter will fall off dramatically when the counter is not being incremented. The total counter will remain fixed, rising proportionately as it's incremented. The results of a simple test are shown in Figure 17-4.
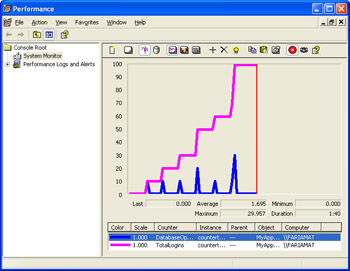
Figure 17-4: Custom performance counters in the Performance Monitor.
Chapter 18 Security and Cryptography
Introduction
- Strings and Regular Expressions
- Numbers, Dates, and Other Data Types
- Arrays and Collections
- Objects, Interfaces, and Patterns
- Files and Directories
- XML
- Multithreading
- Network Programming
- Reflection
- Windows Programming
- Windows Controls
- Printing and Drawing with GDI+
- Windows Services
- ADO.NET
- ASP.NET Web Applications
- Web Services
- Remoting and Enterprise Services
- Security and Cryptography
- Useful COM Interop
EAN: 2147483647
Pages: 376
