ASP.NET Web Applications
Overview
ASP.NET is a centerpiece of the .NET strategy—a new and unique platform for Web development that makes writing a dynamic Web page almost as easy as coding a Microsoft Windows application. However, despite that apparent similarity, ASP.NET developers frequently encounter challenges utterly unlike those faced in Windows applications. Examples include bridging the gap between requests in a stateless Web page (recipe 15.2), adding security and a login page (recipe 15.8), using validation code to prevent input errors (recipe 15.9), leveraging client-side JavaScript to extend your Web page interface (recipes 15.4 and 15.5), and using rich controls such as trees, toolbars, tab strips, and menus (recipes 15.16 and 15.17).
This chapter considers all these issues. In addition, it tackles advanced issues such as creating a dynamic interface with programmatically loaded controls (recipes 15.12 and 15.13), generating images such as pie charts on the fly (recipes 15.14 and 15.15), and using different caching techniques (recipes 15.10 and 15.11). These are some of the common techniques used when programming first-rate ASP.NET Web pages.
| Note |
Most of the Web pages in this chapter are held in one virtual directory, which is named VBCookbookWeb. To use the examples in the downloadable code, you can create the same virtual directory on your computer by following the instructions in the readme.txt file provided with the code download. Alternatively, you can add the Web pages directly to your own Web application projects, in which case they will be copied to an existing virtual directory. |
Enable Web Site Debugging
Problem
When attempting to debug a Web application with Microsoft Visual Studio .NET, you receive an "unable to start debugging on the server" error.
Solution
Ensure that Internet Information Services (IIS) is installed correctly, that IIS was installed before the Microsoft .NET Framework, and that Integrated Windows authentication is enabled for the Web application directory.
Discussion
The "unable to start debugging" error signals that Visual Studio .NET was able to compile the Web application but can't execute it in debug mode. Unfortunately, this problem can result for countless different reasons, including:
- IIS, the Windows component that hosts Web applications, is not installed or is installed incorrectly.
- The user running Visual Studio .NET is not a member of the Debugger Users group for the Web server.
- The user running Visual Studio .NET does not have permissions to debug the ASP.NET process. For example, if the ASP.NET process is running under the local system account, the user must have Administrator privileges to debug it.
- The Web server is running a version of Windows that does not support debugging, such as Microsoft Windows NT and Windows XP Home Edition. (Windows 2000, Windows XP Professional, Windows XP Server, and Windows Server 2003 are all supported.)
- The Web application does not have a web.config file, or the web.config file does not enable debugging.
- You are running Visual Studio .NET, and you have not enabled Integrated Windows authentication for the virtual directory.
The first step that you should take when diagnosing why you can't debug a Web application is to check that IIS is installed on the Web server. To do so, open http://localhost/localstart.asp in your browser. (localhost is an alias for the current computer.) If the test page does not appear, IIS is not installed or is not enabled. You can also attempt to start your Web application without debugging by selecting Debug | Start Without Debugging from the Visual Studio .NET menu. If this test is successful, IIS is correctly installed.
If you installed IIS after you installed Visual Studio .NET or the .NET Framework, you might need to "repair" the .NET Framework using the original setup CD or DVD. To start this process, type in the following command at the command line (or in the Run window) using the Visual Studio .NET DVD. (It's split into two lines below because of page constraints, but it should be entered on a single line.)
:wcudotNetFrameworkdotnetfx.exe /t:c:	emp
 /c:"msiexec.exe /fvecms c:	emp
etfx.msi"
If you are using the CD version of Visual Studio .NET, use the following command line with the Windows Component Update disc:
:dotNetFrameworkdotnetfx.exe /t:c:	emp
 /c:"msiexec.exe /fvecms c:	emp
etfx.msi"
If IIS is properly installed, the next step is to validate your Web application's web.config file. The web.config file should follow the structure shown here:
debug="true" >
By default, Visual Studio .NET adds the compilation tag to the automatically generated web.config file with the debug setting set to true.
The next step is to verify the IIS configuration. Problems will occur if you fail to create the required virtual application directory or if you try to run a Web application after you've removed or modified the virtual directory. To correct these problems, modify the virtual directory settings in IIS Manager by selecting Control Panel | Administrative Tools | Internet Information Services from the Start menu. Verify that the virtual application directory exists and that it is configured as a Web application. (You can see virtual directory settings by right-clicking on the directory and choosing Properties.) For example, in the screen shot shown in Figure 15-1, the virtual directory exists but is not configured as a Web application. To resolve this problem, you simply need to click the Create button in the Application Settings section.
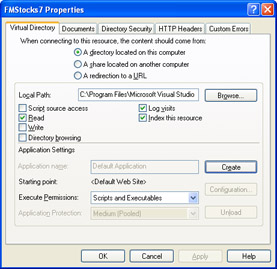
Figure 15-1: A virtual directory that is not a Web application.
One other IIS configuration problem that can occur in Visual Studio .NET is a failure to authenticate. Visual Studio .NET attempts to access the local Web server using Integrated Windows authentication, even if you have anonymous authentication enabled for the virtual directory. This means that your virtual directory must allow both anonymous and Integrated Windows authentication. To allow both authentication methods, follow these steps:
- In IIS Manager, right-click the virtual directory for your application, and choose Properties. (Alternatively, you can configure authentication for all directories if you right-click the Web Sites folder and choose Properties.)
- Select the Directory Security tab.
- In the Anonymous access and authentication control section, click the Edit button.
- In the Authentication Methods dialog box, under Authenticated access, select Integrated Windows authentication, as shown in Figure 15-2.
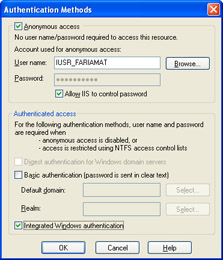
Figure 15-2: Enabling Integrated Windows authentication for debugging. - Click OK to apply your changes.
| Note |
Microsoft describes these steps and some other troubleshooting steps for remote servers in a white paper at http://msdn.microsoft.com/library/default.asp?url=/library/en-us/vsdebug/html/vxtbshttpservererrors.asp. |
15 2 Store Information Between Requests
Problem
You want to store some user-specific information in between page postbacks.
Solution
Use view state, query string arguments, session state, or a cookie, depending on your needs.
Discussion
ASP.NET is a stateless programming model. Every time a postback is triggered, your code loads into memory, executes, and is released from memory. If you want to keep track of information after your code has finished processing, you must use some form of state management.
ASP.NET provides several ways to store information, or state, in between requests. The type of state you use determines how long the information will live, where it will be stored, and how secure it will be. Table 15-1 lists the various state options provided by ASP.NET. This table doesn't include the Cache object, which provides temporary storage and is described in recipe 15.11. You can also use other custom approaches, like hidden fields or a back-end database.
|
Type of State |
Allowed Data |
Storage Location |
Lifetime |
Security |
|---|---|---|---|---|
|
View State |
All serializable .NET data types |
A hidden field in the current Web page |
Lost when the user navigates to another page. |
By default, it is insecure. However, you can use page directives to enforce encryption and hashing to prevent data tampering. |
|
Query String |
String data only |
The browser's URL string |
Lost when the user enters a new URL or closes the browser. However, can be stored in a bookmark. |
Clearly visible and easy for the user to modify. |
|
Session State |
All serializable .NET data types |
Server memory |
Times out after a pre-defined period (usually 20 minutes, but this period can be altered globally or programmatically). |
Secure because data is never transmitted to the client. |
|
Custom Cookies |
String data only |
The client's computer (in memory or a small text file, depending on its lifetime settings) |
Set by the programmer. Can be used in multiple pages and can persist between visits. |
Insecure, and can be modified by the user. |
|
Application State |
All serializable .NET data types |
Server memory |
The lifetime of the application (typically, until the server is rebooted). Unlike other methods, application data is global to all users. |
Secure because data is never transmitted to the client. |
Figure 15-3 shows a test page that allows you to store information in four different ways. A label control indicates the information that was found on the last postback.
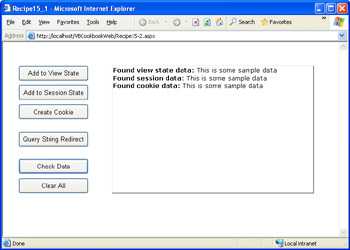
Figure 15-3: Storing state in several ways.
The button event handlers show how you can persist data in several different ways. In each case, the sample data is a string of text. The syntax for different data-storing methods is similar. Data is typically set or retrieved using string lookup with a collection.
Private Sub cmdViewState_Click(ByVal sender As System.Object, _
 ByVal e As System.EventArgs) Handles cmdViewState.Click
 Dim TestData As String = "This is some sample data"
 ViewState("TestData") = TestData
End Sub

Private Sub cmdSessionState_Click(ByVal sender As System.Object, _
 ByVal e As System.EventArgs) Handles cmdSessionState.Click
 Dim TestData As String = "This is some sample data"
 Session("TestData") = TestData

 ' (You can configure other Session object properties to
 ' programmatically change session timeout or abandon a session).
End Sub

Private Sub cmdQueryString_Click(ByVal sender As System.Object, _
 ByVal e As System.EventArgs) Handles cmdQueryString.Click
 Dim TestData As String = "This is some sample data"
 TestData = Server.UrlEncode(TestData)

 ' Query string data must be submitted in a URL,
 ' so a page redirect is required.
 ' This also has the effect of resetting the page and
 ' abandoning the view state information.
 ' Thus, the query string is commonly used to send data
 ' from one page to another
 Response.Redirect("Recipe15-2.aspx?TestData=" & TestData)
End Sub

Private Sub cmdAddCookie_Click(ByVal sender As System.Object, _
 ByVal e As System.EventArgs) Handles cmdAddCookie.Click
 Dim TestData As String = "This is some sample data"

 ' Check if the cookie already exists (named Recipe15-2).
 ' The cookie can store multiple strings, with different keys.
 If Request.Cookies("Recipe15-2") Is Nothing Then

 ' Create the cookie.
 Dim Cookie As New HttpCookie("Recipe15-2")
 Cookie("TestData") = TestData

 ' (You can modify additional Cookie properties to change
 ' the expiry date.)

 ' Attach the cookie to the response.
 ' It will be submitted with all future requests to this site
 ' until it expires.
 Response.Cookies.Add(Cookie)
 End If
End Sub
Every time the page is loaded or posted back, the Page.Load event fires. The event-handling code then checks for any stored data and updates a label control with information about what it has found.
Private Sub Page_Load(ByVal sender As System.Object, _
 ByVal e As System.EventArgs) Handles MyBase.Load

 ' This is the information that will be displayed in the label.
 Dim Message As String

 ' Check for information in view state.
 Dim Data As String
 Data = CType(ViewState("TestData"), String)
 If Not Data Is Nothing Then
 Message &= "Found view state data: " & Data & "
"
 End If

 ' Check for information in session state.
 Data = CType(Session("TestData"), String)
 If Not Data Is Nothing Then
 Message &= "Found session data: " & Data & "
"
 End If

 ' Check for information in the query string.
 Data = Request.QueryString("TestData")
 If Not Data Is Nothing Then
 Data = Server.UrlDecode(Data)
 Message &= "Found query string data: " & Data & "
"
 End If

 ' Check for information in a custom cookie.
 Dim Cookie As HttpCookie = Request.Cookies("Recipe15-2")
 If Not Cookie Is Nothing Then
 Data = Cookie("TestData")
 Message &= "Found cookie data: " & Data & "
"
 End If

 ' Update the display.
 lblDataFound.Text = Message

End Sub
To use this page (which is included with the online samples), click one of the buttons to store data and then click the Check Data button to trigger a second postback (at which point the label will be updated with the results). You'll notice that different types of state management behave differently—for example, the only way to submit values in the query string is to redirect the user to a new page, at which point any information in view state will be automatically lost.
The event handler for the Clear button demonstrates how to remove information from the various types of state.
Private Sub cmdClear_Click(ByVal sender As System.Object, _
 ByVal e As System.EventArgs) Handles cmdClear.Click

 ViewState("TestData") = Nothing
 Session("TestData") = Nothing
 ' (You can also use Session.Abandon to clear all session information.)

 ' To clear a cookie you must replace it with
 ' a cookie that has an expiration date that has already passed.
 Dim Cookie As New HttpCookie("Recipe15-2")
 Cookie.Expires = DateTime.Now.AddDays(-1)
 Response.Cookies.Add(Cookie)

 ' To remove the query string information you must redirect the user.
 ' (This also has the side effect of clearing all view state data.)
 Response.Redirect("Recipe15-2.aspx")

End Sub
15 3 Add Line Breaks to a Label Control
Problem
You want to insert line breaks in the text of a Web control such as the Label control.
Solution
Add HTML markup to the string. For example, you can use
to denote paragraphs or
to divide a line.
Discussion
You can't use the carriage return character (or the System.Environment.Newline constant) to insert a line break in the text of a Web control. Instead, you must use HTML tags. For example, the following code snippet creates three lines of text:
lblMessage.Text = "This is line one.
"
lblMessage.Text &= "This is line two.
"
lblMessage.Text &= "This is line three."
Figure 15-4 shows the use of multiple lines in a Web control.
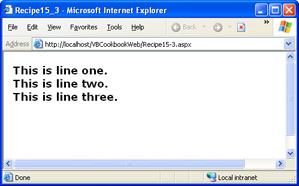
Figure 15-4: Multiple lines in a label.
15 4 Use JavaScript to Handle Key Presses, Mouse Movements, and More
Problem
You want to add client-side JavaScript code to a Web form.
Solution
Use the Page.RegisterClientScriptBlock method to add JavaScript functions to a page, and add control attributes that call the functions.
Discussion
ASP.NET includes a rich programming model. Unfortunately, once a page is rendered to HTML, you can't execute any more .NET code without first triggering a postback to the server. This limitation greatly reduces the effectiveness of validation code and other niceties that can lead to a more professional Web page.
Although .NET does not include any object interface for creating JavaScript, you can define a block of JavaScript code in a .NET string variable and instruct ASP.NET to insert it into the rendered Web form, where it can be used. You can then instruct a control to call a function in this block, without triggering a postback, when certain client-side JavaScript events occur. Events that are often useful include:
- onFocusOccurs when a control receives focus
- onBlurOccurs when focus leaves a control
- onClickOccurs when the user clicks on a control
- onChangeOccurs when the user changes value of certain controls
- onMouseOverOccurs when the user moves the mouse pointer over a control
The following example (shown in Figure 15-5) registers a JavaScript function that simply shows a message box and then connects the onMouseOver event of a text box to the function, all when the page first loads.

Figure 15-5: A JavaScript onMouseOver.
Private Sub Page_Load(ByVal sender As System.Object, _
 ByVal e As System.EventArgs) Handles MyBase.Load

 ' Define the JavaScript function.
 Dim Script As String = _
 ""

 ' Insert the function into the page (it will appear just after
 ' the
tag. ' Note that each script block is associated with a string name. ' This allows multiple controls to register the same script block, ' while ensuring it will only be rendered in the final page once. If Not Page.IsClientScripBlockRegistered("ScriptHello") Then Page.RegisterClientScriptBlock("ScriptHello", Script) End If ' Add the onMouseOver attribute to a text box. TextBox1.Attributes.Add("onMouseOver", "ShowHello()") End Sub
The text box tag will be rendered like this:
onMouseOver="ShowHello()"

 ... />
| Note |
It's important to understand the security implications of JavaScript code. All JavaScript code is rendered directly in the HTML of the page. Therefore, you should assume that the user can examine it, and you should never include any secret algorithms or information in your code. Furthermore, you should use JavaScript validation code as a nicety, not as a way to prevent invalid actions because users might be able to disable or circumvent JavaScript in their browsers. |
You can find numerous sites on the Internet that provide JavaScript tutorials and sample code. In addition, a full JavaScript reference is provided by Netscape at http://developer.netscape.com/docs/manuals/index.html?content=javascript.html.
Programmatically Set Control Focus
Problem
You want to specify that a specific control should be given focus when the page is rendered and sent to the user.
Solution
Create a JavaScript statement that sets the focus, and add it to the page using the Page.RegisterStartupScript method.
Discussion
The ASP.NET Web controls do not provide any way to programmatically set the focus. They do provide a TabIndex property that allows you to set the tab order, but this property only applies to Microsoft Internet Explorer and cannot be used to programmatically set the focus to the control of your choice. To overcome this limitation, you need to add a little snippet of JavaScript code.
The following subroutine generalizes this task. It accepts a reference to any control object, retrieves the associated client ID (which is the ID JavaScript code must use to refer to the control), and then builds and registers the startup script for setting the focus.
Private Sub SetFocus(ByVal ctrl As Control)

 ' Define a JavaScript statement that will move focus to
 ' the desired control.
 Dim SetFocus As String = ""

 ' Add the JavaScript code to the page.
 ctrl.Page.RegisterStartupScript("SetFocus", SetFocus)

End Sub
If you add this subroutine to a Web form, you can call SetFocus as needed. Here's an example that sets the focus when the page first loads:
Private Sub Page_Load(ByVal sender As System.Object, _
 ByVal e As System.EventArgs) Handles MyBase.Load

 If Not Me.IsPostBack Then
 ' Move to a specific text box the first time the page loads.
 SetFocus(TextBox3)
 End If

End Sub
Upload a File
Problem
You need to create a page that allows the user to upload a file.
Solution
Use the ASP.NET HtmlFileInput control.
Discussion
Because ASP.NET executes on the server, there is no way to access any of the resources on the client computer, including files. However, you can use the HtmlFileInput control to allow a user to upload a file. This control renders itself as the HTML element, which is displayed as a Browse button and a text box that contains a filename. The user clicks the Browse button and chooses a file. This step takes place automatically and requires no custom code. The user must then click another button (which you must create) to start the actual upload process.
Before you can create a working file upload page, you need to take these steps:
- You must set the encoding type of the form to "multipart/form-data". To make this change, find the tag in your .aspx file and modify it as shown here:
enctype="multipart/form-data" runat="server">
- You need to add the HtmlInputFile control. In Visual Studio .NET, you'll find this control under the HTML tab of the Toolbox, with the name File Field. Once you've added this control, you must right-click on it and choose Run As Server Control, which creates the required tag.
- You must add another button that actually starts the file transfer using the specified file by calling the HtmlInputFile.PostedFile.SaveAs method.
Figure 15-6 shows a sample page that allows file uploading. It includes an HtmlInputFile control and an Upload button with the following event handler:
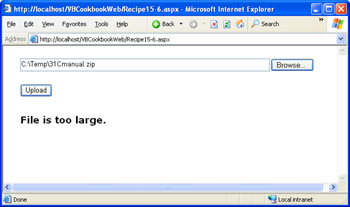
Figure 15-6: An upload test page.
Private Sub cmdUpload_Click(ByVal sender As System.Object, _
 ByVal e As System.EventArgs) Handles cmdUpload.Click

 If FileInput.PostedFile.FileName = "" Then
 ' No file was submitted.
 lblInfo.Text = "No file specified."

 Else
 Try
 If FileInput.PostedFile.ContentLength > 1048576 Then
 ' Forbid files larger than one megabyte.
 lblInfo.Text = "File is too large."
 Else

 ' The saved file will retain its original filename.
 Dim FileName As String = _
 Path.GetFileName(FileInput.PostedFile.FileName)

 ' The ASP.NET process must have rights for the location where
 ' it is attempting to save the file, or an "access denied"
 ' exception will occur.
 FileInput.PostedFile.SaveAs(FileName)
 lblInfo.Text = "File " & FileName & " uploaded."
 End If

 Catch Err As Exception
 lblInfo.Text = Err.Message
 End Try
 End If

End Sub
The code can check various properties of the submitted file, including its size, before saving it, which allows you to prevent a denial of service attack that tricks an ASP.NET application into filling the hard disk with large files. However, this code doesn't prevent a user from submitting the file in the first place, which can still slow down the server and be used to launch a different type of denial of service attack—one that works by tying up all free ASP.NET worker threads. To prevent this type of attack, use the tag in the web.config file to specify a maximum file size. Specify the maximum, in kilobytes, using the maxRequestLength attribute.
If you don't specify a maximum length, the default value of 4096 (4 megabytes) will apply. If the user attempts to submit a file that is too large, an exception will be thrown immediately when the page is posted back.
| Note |
There is another way to send files from a client to a Web server: use ASP.NET Web services, as described in recipe 16.8 in the next chapter. You simply need to develop a Windows application that allows the user to choose a file and then contacts a Web service to transmit the information. |
Use Custom Error Pages
Problem
You want to show a custom error page when an unhandled exception or HTTP error occurs.
Solution
Specify a custom error page using the element in the web.config file for the application.
Discussion
Custom error pages allow you to specify a page that will be returned to the user if an unhandled .NET exception occurs in your page code. Custom error pages aren't a replacement for good error handling; they just allow your application to maintain its professional appearance in the event of an unexpected error. Custom error pages can also be used to catch HTTP errors (for example, if the user requests a page that does not exist) and return descriptive error pages.
You can define custom errors at the virtual directory level by adding the element to the web.config file. You have two options when using custom error pages. First, you can define a single error page that will respond to all error conditions, as shown here:
Second, you can create error pages targeted at specific types of HTTP errors. In this case, you must add an subelement to the element. Each element identifies the HTTP error code and the redirect page. The following example redirects requests for files that don't exist (HTTP error code 404):
You can find (and customize) the default IIS error pages in the [WindowsDir]HelpiisHelpcommon directory.
| Note |
Custom error pages that you define in the web.config file only come into effect if ASP.NET is handling the request. In other words, if you request the nonexistent page nopage.aspx, you'll be redirected according to the web.config error settings because the .aspx file extension is registered to the ASP.NET service. However, if you request the nonexistent page nopage.html, ASP.NET will not process the request and the default error settings specified in IIS will be used. |
Use Forms Authentication
Problem
You want to prevent users from accessing certain pages unless they have first authenticated themselves with a custom login page.
Solution
Implement forms authentication. You must create the login page, but ASP.NET keeps track of a user's authentication status.
Discussion
Forms authentication is a flexible security model that allows you to prevent unauthenticated users from accessing certain pages. You write the code that performs the authentication, and ASP.NET uses a cookie to identify authenticated users. Users without the cookie are redirected to a login page when they try to access a secured page.
To implement forms authentication, you must take these steps:
- Configure forms authentication using the tag in the application's web.config file.
- Restrict anonymous users from a specific page or directory using web.config settings.
- Create the login page, and add your authentication logic, which leverages the FormsAuthentication class from the System.Web.Security namespace.
The first step is to configure the web.config in the root application directory to enable forms authentication, as shown in the following code. You also need to specify your custom login page (where unauthenticated users will be redirected) and a timeout, after which the cookie will be removed. The authentication cookie is automatically renewed with each Web request.
Next you need to add an authorization rule denying anonymous users. The easiest way to secure pages is to create a subdirectory with its own web.config file. The web.config file should refuse access to anonymous users, as shown here:
Now ASP.NET will automatically forward unauthenticated requests for pages in this subdirectory to the custom login page. You need to create this page. (Figure 15-7 shows an example.) Your logic can authenticate the user using anything from a hard-coded password (suitable for simple tests) or a server-side database. Once the user has been successfully authenticated, call the shared FormsAuthentication.RedirectFromLoginPage method with the username. This method simultaneously sets the forms authentication cookie and redirects the user to the originally requested page.
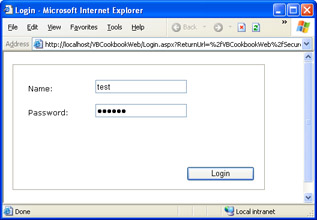
Figure 15-7: A custom login page.
Here's a rudimentary example that simply looks for a specific password when the user clicks a login button:
Private Sub cmdLogin_Click(ByVal sender As System.Object, _
 ByVal e As System.EventArgs) Handles cmdLogin.Click

 If txtPassword.Text.ToLower() = "secret" Then
 FormsAuthentication.RedirectFromLoginPage(txtName.Text, False)
 Else
 lblStatus.Text = "Try again."
 End If

End Sub
To test this page with the online samples, request the Recipe15-8.aspx page, which is placed in a secured directory.
Validate User Input
Problem
You want to examine controls for invalid input before continuing.
Solution
Use one of the five validator controls included with ASP.NET.
Discussion
Web applications are frequently subject to input errors because all the information is entered on the client side. Unlike in Windows applications, you can't rely on events such as KeyPress to check input as it is entered. The only way to remedy these problems is to add your own JavaScript code for this purpose (as described in recipe 15.4) or use the validator controls.
The validator controls serve two purposes: they check control values for input errors, and they display messages describing these errors. In addition, validator controls emit Dynamic HTML (DHTML) code for up-level browsers that allows them to catch entry errors on the client side without requiring a postback.
ASP.NET provides five different validator controls, as listed in Table 15-2. Each validation control can be bound to a single input control. In addition, you can apply more than one validation control to the same input control to provide multiple types of validation. For example, if you use RangeValidator, CompareValidator, or RegularExpressionValidator, validation will automatically succeed if the input control is empty because there is no value to validate. If this is not the behavior that you want, you should add an additional RequiredFieldValidator to the control.
Every validator provides a basic set of properties, including ControlToValidate (which identifies the control that will be validated), ErrorMessage, ForeColor, and Display. The last three configure how the error message will be shown in the page.
|
Control Class |
Description |
|---|---|
|
RequiredFieldValidator |
Validation succeeds as long as the input control does not contain an empty string. |
|
RangeValidator |
Validation succeeds if the input control contains a value within a specific numeric, alphabetic, or date range. You specify this information using the MaximumValue, MinimumValue, and Type properties. |
|
CompareValidator |
Validation succeeds if the input control contains a value that matches the value in another, specified input control. You specify this information using the ControlToCompare, Operator, Type, and ValueToCompare properties. |
|
RegularExpressionValidator |
Validation succeeds if the value in an input control matches a specified regular expression. You specify the regular expression using the ValidationExpression property. Recipe 1.17 provides several useful regular expressions for common types of data. |
|
CustomValidator |
Validation is performed by your own custom .NET code. You must handle the ServerValidate event to perform the validation at the server. In addition, you can use the ClientValidationFunction property to specify a JavaScript function that will be used for client-side validation on up-level browsers. |
To add validation in Visual Studio .NET, you can add the required validator controls at design time, connect them to the appropriate input controls with the ControlToValidate property, and then set the appropriate text in the ErrorMessage property. Figure 15-8 shows a sample form that uses all five validation controls.
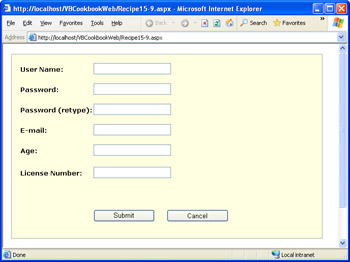
Figure 15-8: A form with several validators.
Here are the control tags from the .aspx file that show the settings of each validator:
The only event handling code you need to add is for the custom validator, which checks that a value is divisible by five.
Private Sub vldCode_ServerValidate(ByVal source As System.Object, _
 ByVal e As System.Web.UI.WebControls.ServerValidateEventArgs) _
 Handles vldCode.ServerValidate

 ' Check if the first three digits are divisible by five.
 If Val(Left(e.Value, 3)) Mod 5 = 0 Then
 e.IsValid = True
 Else
 e.IsValid = False
 End If

End Sub
The page can be validated in two ways. If you are using an up-level browser and have configured the EnableClientScript property of your validator controls to True, the validation will be performed dynamically as the user moves from field to field. No postback is necessary. If EnableClientScript is False or the browser does not support DHTML and JavaScript, the validation will not be performed until the user clicks a button that has its CausesValidation property set to True. At this point, the entire page will be validated. Your code must check the state of the page and abort any additional action if validation has failed.
Private Sub cmdSubmit_Click(ByVal sender As System.Object, _
 ByVal e As System.EventArgs) Handles cmdSubmit.Click

 If Page.IsValid = False Then
 ' Do nothing. The returned page will show all the error information.
 Else
 ' The page is valid. You can continue with the expected action.
 ' For example, you might save values in the database,
 ' navigate to a new page, and so on.
 Response.Redirect("newpage.aspx")
 End If

End Sub
Be aware that this code will never run if you're using client-side validation on a supported browser. In this case, the user will be prevented from posting back the page until all input errors are resolved. However, you can't assume that the user will be using an up-level browser (or that the validation code hasn't somehow been circumvented), so you should always check whether the page is valid in your code before continuing. Figure 15-9 shows the same page after validation has failed.
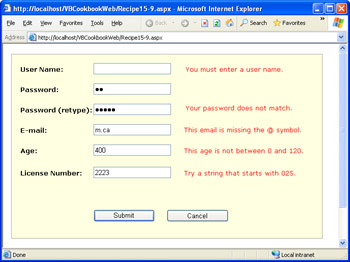
Figure 15-9: A failed validation attempt.
Use Page or Fragment Caching
Problem
You want to increase performance by caching completely rendered pages.
Solution
Add the OutputCache directive to a page or a user control, and specify how long the page should be kept in the cache.
Discussion
A modest use of caching can reduce bottlenecks such as database access and dramatically increase a Web site's overall performance. Caching has the greatest effect in a highly trafficked site. For example, consider what happens if you cache a page that displays the results of a database query. If you cache this page for one minute and ten requests are received for the page over that one-minute period, you'll reduce the database overhead by a factor of 10.
Implementing caching is easy. You simply add an OutputCache directive to the Web page. This directive must be added to the .aspx markup file, not to the .vb code-behind file. Here's an example that caches a page for 20 seconds:
<%@ OutputCache Duration="20" VaryByParam="None" %>
And here's an example that caches a page for 20 seconds but maintains separate cached copies depending on the value of query string arguments:
<%@ OutputCache Duration="20" VaryByParam="*" %>
You can test caching by using a page that displays the server date and time. You'll notice that subsequent requests for such a page will not cause it to be regenerated. Thus, the old time will be shown until the page expires.
Output caching is not effective in these situations:
- Your page needs to customize itself according to user-specific settings, such as user authentication information (the built-in User object) or state (the Session object). In this case, it doesn't make sense to reuse the same page for all users.
- Your page includes controls that post back and raise server-side events.
- Your page needs to perform another action (such as write to a log, enter some information in a database, or change an application variable). A cached page reuses the fully rendered HTML; all page code is bypassed.
- Your page includes data that must be generated with up-to-the-minute accuracy. This might be the case for a stock lookup, but it probably won't be the case for a product catalog.
In these cases, you might still be able to use a more flexible form of caching. You can use data caching, as described in recipe 15.11, to store a specific object. Or, you can use fragment caching to cache a portion of a page. To use fragment caching, create a user control that includes all the content that can be cached, and add the OutputCache directive to the user control. You can now use the user control in a Web page. The Web page code will still run, but the embedded user control can be cached.
Store Arbitrary Data in the ASP NET Cache
Problem
You want to use caching, but you can't cache an entire page because it includes some code that must run or some content that must be generated dynamically.
Solution
Use the built-in Cache object to store most .NET data types.
Discussion
The Cache object allows you to store almost any .NET object using a string key, with the expiration policy you define. ASP.NET maintains the cache automatically, evicting objects when they expire or when memory becomes scarce.
There are two types of expiration policies that you can use when storing data in the cache. Absolute expiration invalidates cached items after a fixed period of time, much like output caching. Absolute expiration is the best approach if you need to store information that needs to be periodically refreshed (such as a product catalog).
' Store ObjectToCache under the key "Catalog" for 10 minutes.
' TimeSpan.Zero indicates that we won't use sliding expiration.
Cache.Insert("Catalog", ObjectToCache, Nothing, _
 DateTime.Now.AddMinutes(10), TimeSpan.Zero)
ASP.NET also supports a sliding expiration policy, which removes objects after a period of disuse. In this case, every time the object is accessed, its lifetime is reset. Sliding expiration works well when you have information that is always valid but is not always being used (such as historical data). This information doesn't need to be refreshed, but it shouldn't be kept in the cache if it isn't being used.
' Store ObjectToCache under the key "Catalog" as long as it is being used
' at least once every ten minutes.
' DateTime.MaxValue indicates that we won't use absolute expiration.
Cache.Insert("Catalog", ObjectToCache, Nothing, _
 DateTime.MaxValue, TimeSpan.FromMinutes(10))
When adding objects to the cache, the best design pattern is to create a separate function that can re-create the object as needed. For example, if you are storing a DataSet, create a function that checks the cache and requeries the database only if the DataSet cannot be found. The function below demonstrates this pattern. Be aware that when retrieving an item from the cache, you must always check first whether the item exists and then cast it to the desired type.
Private Function GetProductsDataSet() As DataSet

 ' Check for cached item.
 If Cache("Products") Is Nothing Then
 ' Show a debug message.
 lblInfo.Text &= "Creating DataSet...
"

 ' Re-create the item.
 Dim Products As New DataSet("ProductInfo")

 ' (You would now use a database query to fill the DataSet.)

 ' Store the item in the cache (for 30 seconds).
 Cache.Insert("Products", Products, Nothing, _
 DateTime.Now.AddSeconds(30), TimeSpan.Zero)

 ' Return the item.
 Return Products

 Else
 ' Show a debug message.
 lblInfo.Text &= "Retreived DataSet from cache.
"

 ' Retrieve the item.
 Return CType(Cache("Products"), DataSet)
 End If

End Function
The GetProductsDataSet method is called every time the page is loaded. The DataSet is retrieved from the cache as long as you post back within the 30-second period. Once this period has expired, the DataSet must be re-created.
Private Sub Page_Load(ByVal sender As System.Object, _
 ByVal e As System.EventArgs) Handles MyBase.Load

 If Me.IsPostBack = True Then
 lblInfo.Text &= "Page posted back.
"
 Else
 lblInfo.Text &= "Page created.
"
 End If

 ' Retreive the DataSet from the cache or database,
 ' as required.
 Dim Products As DataSet = GetProductsDataSet()

 ' Display the name of the DataSet (to prove it has been successfully
 ' retrieved or reconstructed).
 lblInfo.Text &= "Using: " & Products.DataSetName & "

"

End Sub
The results of this simple test page are shown in Figure 15-10.
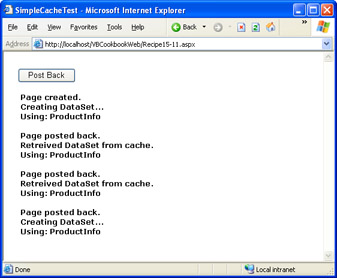
Figure 15-10: Storing a DataSet in the cache.
Add Controls to a Web Form Dynamically
Problem
You want to add a Web control to a Web page at run time and handle its events.
Solution
Create a control object, add it to the Controls collection of a container control, and use the AddHandler statement to connect any event handlers. You must create the control after every postback.
Discussion
You can use a similar technique to add Web controls to a Web page as you would use to add Windows controls to a form, but there are some differences, including:
- Dynamically added controls will exist only until the next postback. If you need them, you must re-create them when the page is returned. This requirement does not prevent you from handling their events, however.
- Dynamically added controls are not as easy to position. Typically, you will use literal controls containing HTML code (such as the line break
) to separate more than one dynamically created control. - Dynamically created controls should be placed in a container control (such as a Panel or a LiteralControl) rather than directly on the page itself, which makes it easier to position them.
- If you want to interact with the control later, you should give it a unique ID. You can use this ID to retrieve the control from the Controls collection of its container.
The best place to generate new controls is in the Page.Load event handler, which ensures that the control will be created each time the page is served. In addition, if you are adding an input control that uses view state, the view state information will be restored to the control after the Page.Load event fires. That means a dynamically generated text box will retain its text over multiple postbacks, just like a text box that is defined in the .aspx file. Similarly, because the Page.Load event always fires before any other events take place, you can re-create a control that raises server-side events and its event-handling code will be triggered immediately after the Page.Load event. For example, this technique allows you to dynamically generate a button that can respond to user clicks.
The following example demonstrates all these concepts. It generates three dynamic server controls (two buttons and a text box) and positions them using literal controls that act as separators. The buttons are connected to distinct event handlers. The text box is given a unique identifier so that its text can be retrieved later, in response to the button clicks. Figure 15-11 shows the page in action.
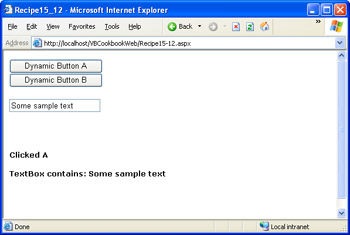
Figure 15-11: Dynamically generated controls.
The full code is shown here:
Public Class DynamicControlTest
 Inherits System.Web.UI.Page

 ' (Designer code omitted.)

 Private Sub Page_Load(ByVal sender As System.Object, _
 ByVal e As System.EventArgs) Handles MyBase.Load
 ' Create a dynamic button.
 Dim DynamicButton As New Button()
 DynamicButton.Text = "Dynamic Button A"

 ' Connect an event handler.
 AddHandler DynamicButton.Click, AddressOf cmdDynamicA_Click

 ' Add the button to a Panel.
 pnl.Controls.Add(DynamicButton)

 ' Add a line break separator.
 pnl.Controls.Add(New LiteralControl("
"))

 ' Create a second dynamic button.
 DynamicButton = New Button()
 DynamicButton.Text = "Dynamic Button B"
 AddHandler DynamicButton.Click, AddressOf cmdDynamicB_Click
 pnl.Controls.Add(DynamicButton)

 ' Add a line break separator.
 pnl.Controls.Add(New LiteralControl("

"))

 ' Create a dynamic text box.
 Dim DynamicText As New TextBox()
 pnl.Controls.Add(DynamicText)

 ' Assign a unique ID so the text box can be retrieved
 ' from the collection later.
 DynamicText.ID = "DynamicText"
 End Sub

 Private Sub cmdDynamicA_Click(ByVal sender As System.Object, _
 ByVal e As System.EventArgs)
 lblMessage.Text = "Clicked A"
 GetText()
 End Sub

 Private Sub cmdDynamicB_Click(ByVal sender As System.Object, _
 ByVal e As System.EventArgs)
 lblMessage.Text = "Clicked B"
 GetText()
 End Sub

 Private Sub GetText()
 lblMessage.Text &= "

"
 Dim ctrl As Control
 For Each ctrl In pnl.Controls
 If ctrl.ID = "DynamicText" Then
 lblMessage.Text &= "TextBox contains: " & _
 CType(ctrl, TextBox).Text
 End If
 Next
 End Sub

End Class
If you need to dynamically create complex layouts that include some prebuilt control "groups," you might prefer to use user controls and load them dynamically into a page. This technique is demonstrated in recipe 15.13.
Load User Controls Programmatically
Problem
You want to dynamically build the user interface of a page out of one or more user controls.
Solution
Use the Page.LoadControl method to load the control object from its .ascx file, and add it to the Controls collection of a container control.
Discussion
User controls are self-contained groups of controls. Like Web forms, user controls consist of a layout portion that defines the contained controls (.ascx file), and a code-behind portion with the event-handling logic (.vb file). User controls allow you to reuse common interface elements on multiple pages and build complex interfaces out of smaller building blocks. One useful characteristic of user controls is that they can be loaded programmatically, which allows you to create a highly configurable interface that you can tailor dynamically according to the user.
The next example demonstrates a dynamically loaded user control. The first step is to create the user control in Visual Studio .NET. In our example, we'll use a user control with one label. The code-behind class for the user control allows the host page to retrieve or change the text of a label through a user control property.
Public MustInherit Class CustomerUserControl
 Inherits System.Web.UI.UserControl

 ' (Designer code omitted.)

 Public Property LabelText() As String
 Get
 Return lblMessage.Text
 End Get
 Set(ByVal Value As String)
 lblMessage.Text = Value
 End Set
 End Property

End Class
The Web form loads this user control in the Page.Load event handler. The user control is placed in a Panel control container. The LoadControl method returns a generic Control object, which the code casts to the appropriate user control class.
Public Class UserControlHost
 Inherits System.Web.UI.Page

 ' (Designer code omitted.)

 Private Sub Page_Load(ByVal sender As System.Object, _
 ByVal e As System.EventArgs) Handles MyBase.Load

 Dim ctrl As Control = Page.LoadControl("CustomerUserControl1.ascx")
 Dim CustomCtrl As CustomerUserControl = CType(ctrl, CustomUserControl)
 CustomCtrl.LabelText = "A dynamic user control!"

 pnl.Controls.Add(ctrl)

 End Sub

End Class
When using Visual Studio .NET, the user control class is always available because classes are compiled into a single .dll assembly. If the user control is not a part of the project, however, you will not have the required user control class and you will not be able to access any of the user control's properties or methods. To remedy this problem, you can define a base class or an interface that defines the basic functionality you need to be able to access in any of your custom user controls.
| Note |
For an excellent full-scale demonstration of this technique, download the IBuySpy portal case study from www.ibuyspy.com. It demonstrates a highly customizable layout that is built entirely out of dynamically loaded user controls. |
Dynamically Generate an Image
Problem
You want to render dynamic graphics (perhaps to build the output for a chart or graph control).
Solution
Build the graphic using GDI+ and an in-memory Bitmap object, and then save it to the page output stream.
Discussion
You can draw dynamic graphics using the same GDI+ code in a Web application that you would use in a Windows application. The only difference is how you render the final graphic.
Dynamically generating an image imposes more of an overhead than using basic ASP.NET server controls. Therefore, these techniques are typically used only when you need to generate dynamic content. The following example creates the output for a pie chart based on the supplied data. The pie chart data is created as a series of NumericDataItem objects. Each data item constitutes a slice of the pie, with a caption and a numeric value.
The NumericDataItem class is shown in the following code. It's marked as serializable so that it can be stored in page view state if required.
 _
Public Class NumericDataItem
 Private _DataValue As Single
 Private _Caption As String

 Public Property DataValue() As Single
 Get
 Return _DataValue
 End Get
 Set(ByVal Value As Single)
 _DataValue = Value
 End Set
 End Property

 Public Property Caption() As String
 Get
 Return _Caption
 End Get
 Set(ByVal Value As String)
 _Caption = Value
 End Set
 End Property

 Public Sub New(ByVal caption As String, ByVal dataValue As Single)
 Me.Caption = caption
 Me.DataValue = dataValue
 End Sub

 Public Overrides Function ToString() As String
 Return Caption & " (" & DataValue.ToString() & ")"
 End Function

End Class
When the page is loaded, the data is created. Then the data is evaluated and used to draw a pie chart with the GDI+ drawing functions. The page code is shown here:
Public Class DynamicDrawingTest
 Inherits System.Web.UI.Page

 ' (Designer code omitted.)

 Private Sub Page_Load(ByVal sender As System.Object, _
 ByVal e As System.EventArgs) Handles MyBase.Load
 ' Create the data you want to chart.
 Dim ChartData As New ArrayList()

 ChartData.Add(New NumericDataItem("Col 1", 100))
 ChartData.Add(New NumericDataItem("Col 2", 75))
 ChartData.Add(New NumericDataItem("Col 3", 130))

 ' Create an in-memory bitmap where you will draw the image.
 ' The Bitmap is 300 pixels wide and 200 pixels high.
 Dim Image As New Bitmap(300, 200)

 ' Get the graphics context for the bitmap.
 Dim g As Graphics = Graphics.FromImage(Image)

 ' Set the background color and rendering quality.
 g.Clear(Color.White)
 g.SmoothingMode = Drawing.Drawing2D.SmoothingMode.AntiAlias

 ' Write some text to the image.
 g.DrawString("Sample Chart", _
 New Font("Verdana", 18, FontStyle.Bold), _
 Brushes.Black, New PointF(5, 5))

 ' Calculate the total of all data values.
 Dim Item As NumericDataItem
 Dim Total As Single
 For Each Item In ChartData
 Total += Item.DataValue
 Next

 ' Draw the pie slices.
 Dim CurrentAngle, TotalAngle As Double
 Dim i As Integer
 For Each Item In ChartData
 CurrentAngle = Item.DataValue / Total * 360
 g.FillPie(New SolidBrush(GetNextColor(i)), 10, 40, 150, 150, _
 CInt(TotalAngle), CInt(CurrentAngle))
 TotalAngle += CurrentAngle
 i += 1
 Next

 ' Create a legend for the chart.
 Dim ColorBoxPoint As PointF = New PointF(200, 83)
 Dim TextPoint As PointF = New PointF(222, 80)

 i = 0
 For Each Item In ChartData
 g.FillRectangle(New SolidBrush(GetNextColor(i)), _
 ColorBoxPoint.X, ColorBoxPoint.Y, 20, 10)
 g.DrawString(Item.Caption, New Font("Tahoma", 10), _
 Brushes.Black, TextPoint)

 ColorBoxPoint.Y += 15
 TextPoint.Y += 15
 i += 1
 Next

 ' Render the image to the HTML output stream.
 Image.Save(Response.OutputStream, _
 System.Drawing.Imaging.ImageFormat.Gif)
 End Sub

 Private Function GetNextColor(ByVal index As Integer) As Color
 ' Support six different colors. This could be enhanced.
 If index > 5 Then
 index = index Mod 5
 End If

 Select Case index
 Case 0
 Return Color.Red
 Case 1
 Return Color.Blue
 Case 2
 Return Color.Yellow
 Case 3
 Return Color.Green
 Case 4
 Return Color.Orange
 Case 5
 Return Color.Purple
 End Select
 End Function

End Class
The fully rendered chart is shown in Figure 15-12.
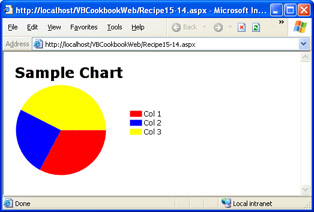
Figure 15-12: A dynamically generated image.
| Note |
When you save an image to the response stream, you replace any other output. Therefore, you can't use this technique with a page that also includes Web controls or static HTML content. If you want to use a page that combines dynamically generated images and Web controls, you need to wrap the dynamically generated image in a control. This technique is demonstrated in recipe 15.15. |
Dynamically Generate an Image on Part of a Page
Problem
You want to create a page that combines a dynamically generated image and ordinary Web controls.
Solution
Put the code that generates the dynamic image in a separate page, and create an tag that references the page.
Discussion
The easiest way to use dynamically generated images with ASP.NET is to write them directly to the response stream. This means that a page that uses a dynamically generated image can't also use Web controls. One way to circumvent this problem is to create a full-blown custom Web control. Another, simpler option is to use an ordinary HTML tag that references the form that generates the dynamic image.
Figure 15-13 shows one example. On the left are several Web controls that allow the user to specify the pie chart data. The pie chart itself is generated dynamically and presented in the image box on the right. In this case, the pie chart is an Image Web control. The Image.ImageUrl property is set to DynamicChart.aspx, which is the form with the GDI+ drawing logic.
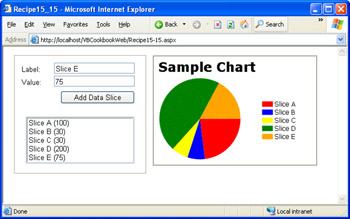
Figure 15-13: A Web form with Web controls and dynamic graphics.
The trick in this example is transferring the pie chart data from the main Web form to the dynamic image rendering form. There's no elegant way to solve this problem. You can use query string arguments, although they are easily tampered with and only support string information. Or you can use session state, as in this example. This approach works seamlessly, although it requires some server memory.
The following code creates the main Web form, which allows the user to define the pie chart data:
Public Class MainPage
 Inherits System.Web.UI.Page

 ' (Designer code omitted.)

 ' The data that will be used to create the pie chart.
 Private PieSlices As New ArrayList()

 Private Sub Page_Load(ByVal sender As System.Object, _
 ByVal e As System.EventArgs) Handles MyBase.Load
 ' Retrieve the pie slices that are defined so far.
 If Not Session("ChartData") Is Nothing Then
 PieSlices = CType(Session("ChartData"), ArrayList)
 End If
 End Sub

 Private Sub cmdAdd_Click(ByVal sender As System.Object, _
 ByVal e As System.EventArgs) Handles cmdAdd.Click
 ' Create a new pie slice.
 Dim PieSlice As New NumericDataItem(txtLabel.Text, _
 CType(Val(txtValue.Text), Single))
 PieSlices.Add(PieSlice)

 ' Bind the list box to the new data.
 lstPieSlices.DataSource = PieSlices
 lstPieSlices.DataBind()
 End Sub

 Private Sub Page_PreRender(ByVal sender As Object, _
 ByVal e As System.EventArgs) Handles MyBase.PreRender
 ' Before rendering the page, store the current collection
 ' of pie slices.
 Session("ChartData") = PieSlices
 End Sub

End Class
The code that renders the dynamic image in the DynamicChart.aspx page is adapted from the code in recipe 15-14 and is outlined here:
Private Sub Page_Load(ByVal sender As System.Object, _
 ByVal e As System.EventArgs) Handles MyBase.Load

 ' Create an in-memory bitmap where you will draw the image.
 Dim Image As New Bitmap(300, 200)
 Dim g As Graphics = Graphics.FromImage(Image)

 ' Set the background color and rendering quality.
 g.Clear(Color.White)
 g.SmoothingMode = Drawing.Drawing2D.SmoothingMode.AntiAlias

 ' Retrieve data.
 Dim ChartData As ArrayList
 If Session("ChartData") Is Nothing Then
 ' Display a blank image.
 Image.Save(Response.OutputStream, _
 System.Drawing.Imaging.ImageFormat.Gif)
 Return
 Else
 ChartData = CType(Session("ChartData"), ArrayList)
 End If

 ' (Remainder of drawing code omitted).

End Sub
Use the Internet Explorer Controls
Problem
You want to use TreeView, Toolbar, and TabStrip controls in a Web page.
Solution
Download the Internet Explorer controls, which include Web equivalents for four common Windows controls.
Discussion
The Internet Explorer controls include the following controls:
- TabStrip and MultiPage, which allow you to create a tabbed interface inside a single Web page
- Toolbar, which allows you to create a bar of text and image buttons
- TreeView, which allows you to display a hierarchical tree of items
The HTML generated by the Internet Explorer controls renders in all commonly used browsers. However, if the client is using Internet Explorer 5.5 or later, the controls will also use DHTML for a rich user experience. You can download the Internet Explorer controls from http://msdn.microsoft.com/downloads/samples/internet/ASP_DOT_NET_ServerControls/WebControls/. You can see the Internet Explorer Web control documentation at http://msdn.microsoft.com/workshop/WebControls/webcontrols_entry.asp.
The Internet Explorer Web controls include the C# source code for all controls. To use the controls, you must first run the build.bat batch file in the install directory (typically C:Program FilesIE Web Controls). This compiles an assembly named Microsoft.Web.UI.WebControls.dll in the build subdirectory of the install directory. The easiest way to use this assembly is to add the Internet Explorer controls to your Toolbox. To do so, right-click the Toolbox and select Customize Toolbox (or Add/Remove Toolbox Items in Visual Studio .NET 2003). Select the .NET Framework Components tab, click Browse, and select the Microsoft.Web.UI.WebControls.dll assembly from the appropriate directory. The controls will be selected automatically, as shown in Figure 15-14. Click OK to add them to the Toolbox. When you drop them onto a Web page, the required assembly will be referenced automatically.
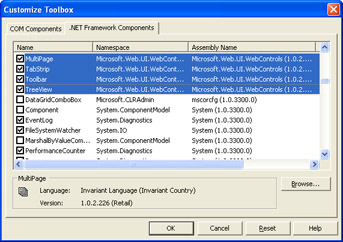
Figure 15-14: Adding the Internet Explorer controls to the Toolbox.
| Note |
The Internet Explorer controls are not officially supported by Microsoft. This means there is no guarantee that these controls will work with every release of the .NET Framework (although they do work with both versions 1.0 and 1.1), or that these controls won't be discontinued (possibly with some of the functionality being integrated into a future version of ASP.NET). |
The TabStrip and MultiPage controls are the simplest of the four Internet Explorer controls. The TabStrip control is simply a row or column of tab buttons. The MultiPage control is a container that groups other controls into separate "pages" and displays a single page at a time.
To add tabs to a TabStrip control, you use the Items property. As with most of the Internet Explorer controls, you can configure this collection at design time using the Visual Studio .NET designer support included with the control. To add content to the MultiPage control, you must modify the .aspx layout manually. (You can do so in Visual Studio .NET using the HTML page view.) Each page is defined with a tag, and each can contain any other HTML content or ASP.NET controls.
Here's an example that defines three pages and places a separate line of text on each page:
This is page one


This is page two


This is page three
Usually, you will use the TabStrip and MultiPage controls in conjunction so that the TabStrip control is used to navigate among pages in the MultiPage control. Binding these controls together is easy: you simply need to set the TabStrip.TargetID property with the ID of the corresponding MultiPage control, and navigation will be performed automatically. Figure 15-15 shows the result.
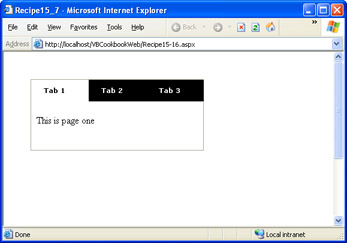
Figure 15-15: Linked TabStrip and MultiPage controls.
The Toolbar control also includes rich designer support that you can access through the Items property. The Toolbar control can hold various items, including buttons, separators, drop-down lists, text boxes, and more. A sample Toolbar control is shown in Figure 15-16.
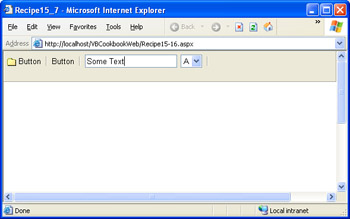
Figure 15-16: A Toolbar control.
You can respond to the Toolbar.ButtonClick event when a button is clicked. In this case, the sender will not be the Toolbar control, but the button in the Toolbar control that was clicked. You can identify the button using the ID property, as shown here:
Private Sub Toolbar1_ButtonClick(ByVal sender As Object, _
 ByVal e As System.EventArgs) Handles Toolbar1.ButtonClick

 ' Find the button that was clicked.
 Dim Button As ToolbarButton
 Button = CType(sender, ToolbarButton)
 lblMessage.Text = "You clicked: " & Button.ID

End Sub
Finally, the TreeView control is one of the most interesting of the Internet Explorer controls. It mimics the behavior of the Windows TreeView control, providing a hierarchical tree of nodes that can include text and images. Before populating the TreeView control, you can configure a set of node styles, which allows you to specify the images that will be used for each type of node. To configure node styles, modify the TreeNodeType property at design time.
Here's the .aspx code needed to define a TreeView control with a single node style that displays the image of a folder next to the node text:
Once you've set up the node styles, you can populate the TreeView control programmatically. The following example fills the TreeView control with a list of years and months:
Private Sub Page_Load(ByVal sender As System.Object, _
 ByVal e As System.EventArgs) Handles MyBase.Load

 ' Create the object needed to get month names.
 Dim Info As System.Globalization.DateTimeFormatInfo
 Info = System.Globalization.DateTimeFormatInfo.CurrentInfo()

 ' Populate the TreeView.
 Dim YearNum, MonthNum As Integer
 For YearNum = 1999 To 2004
 Dim YearNode As New TreeNode()
 YearNode.Text = YearNum.ToString()
 TreeView1.Nodes.Add(YearNode)
 For MonthNum = 1 To 12
 Dim MonthNode As New TreeNode()
 MonthNode.Text = Info.GetMonthName(MonthNum)
 YearNode.Nodes.Add(MonthNode)
 Next
 Next

End Sub
The resulting TreeView control is shown in Figure 15-17.
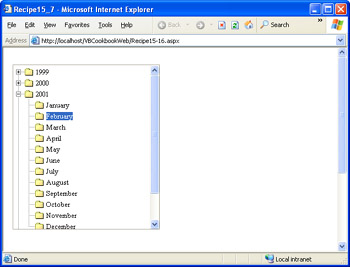
Figure 15-17: A TreeView control.
You can read the currently selected node from the TreeView.SelectedNodeIndex property. In addition, you can react to the Collapse, Expand, and SelectedIndexChange events.
Use a Dynamic Menu Control
Problem
You want to add a menu control to your Web pages.
Solution
Download a separate component, such as RadMenu from Telerik or the SlideMenu from obout.
Discussion
The .NET Framework does not include any type of menu control. However, the Web is full of diverse examples of graphically rich menus built out of cascading style sheets and DHTML. Most controls are commercial and require some sort of licensing fee. However, there are at least two fully functional menu controls that can be downloaded for free, as shown in Figure 15-18.
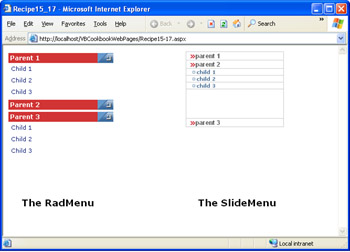
Figure 15-18: Two freely downloadable menu controls.
Both of these menus are designed as navigational aids that allow a user to move between multiple pages. As such, you don't directly handle a menu click event. Instead, you need to specify the URL where the user should be directed. If you want multiple menu items to trigger different actions on the same target page, you can pass query string arguments.
The RadMenu control from Telerik creates a menu that stacks numerous collapsible menu panes one after the other at the side of a Web page. You can download the Telerik RadMenu control from www.telerik.com. After installing the control, you can add the radmenu.dll assembly to the Visual Studio .NET Toolbox and then drop it on any form. The actual menu content must be entered into an XML file, which specifies the menu text, and assigns each menu entry a hyperlink. The following code is the XML used for the menu shown in Figure 15-18. The menu is bound to the control by setting the RadMenu.MenuFile property.
The SlideMenu control from obout provides a similar collapsible menu with a different graphical appearance. You can download the control from www.obout.com and install the assembly to the virtual directory for the appropriate application. The SlideMenu does not include any control classes, so you can't add it to the Toolbox. Instead, you must add a reference to the appropriate assembly (obout_SlideMenu_NET.dll) and then create the menu programmatically. To display the menu on the page, you need to retrieve the HTML from the HTML property and assign it to another control (typically a Label control). Here's the code that creates the slide menu shown in Figure 15-18:
Private Sub Page_Load(ByVal sender As System.Object, _
 ByVal e As System.EventArgs) Handles MyBase.Load

 ' Create the menu.
 Dim Menu As New obout_SlideMenu_NET.Menu()
 Menu.Width = 185
 Menu.SubHeight = 95
 Menu.Speed_Step = 15

 ' Set menu images.
 Menu.Image_Child = "square_blue.gif"
 Menu.Image_ChildOver = "square_blue.gif"
 Menu.Image_ChildSelected = "square_blue.gif"
 Menu.Image_Parent = "arrow_red.gif"
 Menu.Image_ParentOver = "arrow_blue.gif"

 ' Create the menu items.
 Menu.AddParent("parent 1", Nothing, Nothing)
 Menu.AddParent("parent 2", Nothing, Nothing)
 Menu.AddChild("child 1", "somepage.aspx")
 Menu.AddChild("child 2", "somepage.aspx")
 Menu.AddChild("child 3", "somepage.aspx")
 Menu.AddParent("parent 3", Nothing, Nothing)

 ' Display the menu by copying its HTML to a control on the page.
 lblMenu.Text = Menu.HTML()

End Sub
You can download many .NET menu controls from the Microsoft ASP.NET Control Gallery at http://www.asp.net/ControlGallery, which includes free menu controls and free trials for commercial controls.
Introduction
- Strings and Regular Expressions
- Numbers, Dates, and Other Data Types
- Arrays and Collections
- Objects, Interfaces, and Patterns
- Files and Directories
- XML
- Multithreading
- Network Programming
- Reflection
- Windows Programming
- Windows Controls
- Printing and Drawing with GDI+
- Windows Services
- ADO.NET
- ASP.NET Web Applications
- Web Services
- Remoting and Enterprise Services
- Security and Cryptography
- Useful COM Interop
EAN: 2147483647
Pages: 376
