Jump Start with SWT/JFace
Jump Start with SWT JFace
Overview
In this chapter, you learn about:
- Downloading and installing SWT/JFace
- Setting up your IDEs to develop applications with SWT/JFace
- Writing your first SWT programs
- Using JFace to simplify UI programming
- Deploying your applications to multiple platforms using Java Web Start
After completing this chapter, you should able to write, run, and deploy SWT/JFace-based Java programs.
Preparation
Before you start programming with SWT/JFace, you have to download SWT/JFace packages and configure your Java IDEs.
Downloading and Installing SWT JFace
Both SWT and JFace are included in the Eclipse distributions. From Eclipse version 2.1, SWT binary and source code can be downloaded separately from the Eclipse distribution. However, there are no separate JFace distributions.
If you plan to use SWT only, all you need to do is download the latest SWT binary and source code. If JFace is required, you can do one of the following:
- Retrieve the code for JFace from the CVS of the Eclipse project and build it yourself
- Download the complete Eclipse SDK
The latter method is much easier than the former one. You will use the latter method here.
- Download the latest release or stable build of Eclipse SDK from http://www.eclipse.org/downloads. There are different distributions for various platforms, and you need to choose the corresponding distribution file to the platform you are running.
- Decompress the release file. On Windows, you can use WinZip or Windows' built-in unzip utility to unzip the file; on Linux/Unix, try to run unzip eclipse-SDK-3.0xxx.zip. A folder named eclipse will be created. The complete Eclipse SDK is contained in this folder.
Later in this book, this folder is referred to as $ECLIPSE_HOME. When you meet $ECLIPSE_HOME, always replace it with your actual installation folder.
- Check your Java runtime environment (JRE) version. On the download page of the Eclipse SDK, the minimum JRE is specified. Check your current JRE version by typing the following command: java -version. If there is no JRE installed in your system or you are using an unsupported version of JRE, you must download and install the latest JRE.
- Finally, test your installation by executing the file $ECLIPSE_HOME/eclipse[.exe]. On Windows, you can simply double-click the file. On Linux/Unix, type the file's complete file path to run it. You should see a flash window followed by the Eclipse IDE workbench.
| Note |
This book focuses on two major platforms: Windows and Linux. You can easily apply the knowledge to other platforms. |
Configuring Your IDEs
SWT/JFace does not depend on the Eclipse workbench, so you do not have to use Eclipse as your Java IDE. Here, you learn how to configure your IDEs to develop SWT/JFace-based programs.
Configure Eclipse
To configure Eclipse, follow these steps:
- Create a project if you do not have one yet. To create a project, open the Eclipse workbench and select File→New→Project from the menu. You can specify project settings in the new project wizard; be sure to create a Java Project.
- Add SWT jars to your classpath. Right-click a Java Project, and select Properties. Select Java Build Path from the left panel of the Properties dialog. On the right panel, select the Libraries tab. Click Add External JARs to add SWT JAR files. To use SWT only, you need to add all the JAR files under the directory:
$ECLIPSE_HOME/
 +-- plugins/
 +-- org.eclipse.swt.NATIVE_WINDOW_SYSTEM.x.x.x/
 +-- ws/
 +-- NATIVE_WINDOW_SYSTEM/
in which NATIVE_WINDOW_SYSTEM should be replaced by the name of the underlying native window system and x.x.x represents the version number.
For example, on Windows, there is only one JAR file, swt.jar, under the directory $ECLIPSE_HOME pluginsorg.eclipse.swt.win32_3.0.0wswin32. However, on Linux, there are three files (Eclipse SDK, stable build 3.0M6) under directory $ECLIPSE_HOME/ plugins/org.eclipse.swt.gtk_3.0.0/ws/gtk: swt.jar, swt-mozilla.jar, and swt-pi.jar. As mentioned in previous chapters, SWT provides different sets of widget classes for each platform — thus the file swt.jar in the Windows distribution is completely different from its counterpart in other distributions. You should not use swt.jar in the Windows distribution on Linux because it will not work at all.
Now you have a clear understanding of which JAR files should be included. Adding those JAR files to the project's classpath is very straightforward. Click the Add External JARs button, and select the target JAR file. Then press OK; the JAR file appears in the build path as shown in Figure 3-1. Alternatively, you can use the Add Variable option.
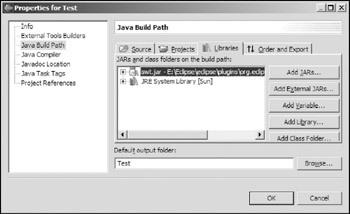
Figure 3-1To have more user-friendly content assist, you could attach the source code for the JAR files you added. The source files are located at the following directory:
 $ECLIPSE_HOME/plugins/org.eclipse.platform.source.OPERATING_SYSTEM
 .NATIVE_WINDOW_SYSTEM.ARCHITECTURE.x.x.x/src/org.eclipse.swt
 .NATIVE_WINDOW_SYSTEM.x.x.x/ws/NATIVE_WINDOW_SYSTEM
On Windows, the SWT source directory is:
 $ECLIPSE_HOMEpluginsorg.eclipse.platform.source.win32.win32.x86_3.0.0srcorg.
 eclipse.swt.win32_3.0.0wswin32
On Linux, it is:
$ECLIPSE_HOMEpluginsorg.eclipse.platform.source.linux.gtk.x86_3.0.0srcorg.
eclipse.swt.gtk_3.0.0wsgtk
On the Libraries tab, click the plus sign to the right of a JAR file and select Source Attachment; then click Edit to locate its corresponding source file.
- Add JFace JAR files to your classpath if you need to use JFace besides SWT. The following are two main JAR files of JFace that you should add to your classpath:
 $ECLIPSE_HOME/plugins/org.eclipse.jface_x.x.x/jface.jar
 $ECLIPSE_HOME/plugins/org.eclipse.jface.text_x.x.x/jfacetext.jar
If you do not need to use any classes in the package org.eclipse.jface.text and its subpackages, the second one can be omitted.
JFace is used heavily in Eclipse workbench UI. A few classes are required by jface.jar in the following JAR files:
 $ECLIPSE_HOME/plugins/org.eclipse.text_x.x.x/text.jar
 $ECLIPSE_HOME/plugins/org.eclipse.core.runtime_x.x.x/runtime.jar
 $ECLIPSE_HOME/plugins/org.eclipse.core.boot_x.x.x/boot.jar
 $ECLIPSE_HOME/plugins/org.apache.xerces_x.x.x/xercesImpl.jar
Let's call them "auxiliary JFace packages." You need to add them to your classpath also.
- Click OK to save your classpath setting and close the Properties dialog.
In addition to Eclipse, you can develop SWT/JFace-based programs on other IDEs.
Configure JBuilder
Setting up the classpath in JBuilder is very similar to doing it in Eclipse:
- Create a project if you do not have one yet. To create a project, open the JBuilder IDE (JBuilder version: Enterprise 10.0) and select File→New Project from the menu. You can specify project settings in the new project wizard.
- Add SWT/JFace JAR files to the classpath of the project. The JAR files required are given in the last section. Right-click the project, and select Properties from the menu. On the tree in the left panel, select Paths. Select the Required Libraries tab at the bottom of the Paths panel. Click the Add button and a dialog pops up. Click New to create a new library set. In the new library wizard, specify the name for the library, such as SWT-JFace, and then click Add to add each of the JAR files required. Click OK to add the newly created library to the project, as shown in Figure 3-2.
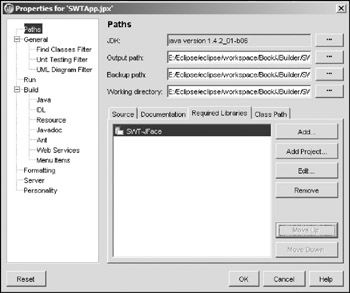
Figure 3-2 - Click OK in the Properties dialog to save your classpath setting and close the Properties dialog.
Your First SWT Program
You have already set up your IDEs, and now you can develop your first SWT program.
Coding Your First SWT Program Hello World
The following code is probably the simplest SWT program. When it is executed, a window with the title "Hello, world!" pops up, as shown in Figure 3-3.
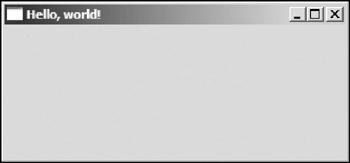
Figure 3-3
 package com.asprise.swt.example.ch03;
 import org.eclipse.swt.widgets.Display;
 import org.eclipse.swt.widgets.Shell;
 public class HelloWorld {
 public static void main(String[] args) {
 Display display = new Display();
 Shell shell = new Shell(display);

 shell.setText("Hello, world!");

 shell.open();
 // Set up the event loop.
 while (!shell.isDisposed()) {
 if (!display.readAndDispatch()) {
 // If no more entries in the event queue
 display.sleep();
 }
 }
 display.dispose();
 }
 }
At the beginning of the main method, a Display object and a Shell object are created. The Display object is responsible for managing the connection between SWT and the underlying native window system. One of its primary functions is to implement the SWT event loop in terms of the platform event model. For almost all the SWT applications, only a single Display instance is required. The Shell object represents the window shown in Figure 3-3. The Shell object is linked to the Display object in the constructor. Once this linkage exists, you can get the Display from the Shell anytime with the getDisplay() method.
After the shell is created, set the window title by calling its setText method. Then open the shell by calling the open method, and a window appears immediately when this line is executed. Finally, set up an event loop to listen and react to events. When the user closes the window, the shell is disposed of and the event loop is broken. The program exits right after the disposal of the Display object.
If you do not have any experience with native UI programming, you may be confused about the event loop. It simply reads and dispatches events. Details on the SWT event handling mechanism are covered thoroughly in Chapter 4.
Running Your First SWT Program
As you saw in previous chapters, SWT employs JNI mechanisms to communicate with the underlying native window systems. Before you run your SWT programs, make sure your JRE can find those native libraries that SWT depends on. Otherwise, you may encounter the following exception:
 java.lang.UnsatisfiedLinkError: no swt-win32-3024 in java.library.path
 at java.lang.ClassLoader.loadLibrary(ClassLoader.java:1403)
 at java.lang.Runtime.loadLibrary0(Runtime.java:788)
 at java.lang.System.loadLibrary(System.java:832)
 at org.eclipse.swt.internal.Library.loadLibrary(Library.java:100)
 at org.eclipse.swt.internal.win32.OS.(OS.java:46)
 at org.eclipse.swt.widgets.Display.internal_new_GC(Display.java:1411)
 at org.eclipse.swt.graphics.Device.init(Device.java:541)
 at org.eclipse.swt.widgets.Display.init(Display.java:1436)
 at org.eclipse.swt.graphics.Device.(Device.java:96)
 at org.eclipse.swt.widgets.Display.(Display.java:306)
 at org.eclipse.swt.widgets.Display.(Display.java:302)
 at com.asprise.swt.example.ch03.HelloWorld.main(HelloWorld.java:21)
 Exception in thread "main"
To avoid such exceptions, add the directory containing the required native libraries to your Java library path.
The native library required by SWT is located at the following directory (this directory will be referred to as $SWT_NATIVE_LIBRARY_PATH):
 $ECLIPSE_HOME/
 +-- plugins/
 +-- org.eclipse.swt.NATIVE_WINDOW_SYSTEM.x.x.x/
 +-- os/
 +-- OPERATING_SYSTEM/

 +-- ARCHITECTURE/
where NATIVE_WINDOW_SYSTEM, OPERATING_SYSTEM, and ARCHITECTURE represent the name of the underlying native window system, the name of the underlying operating system, and the name of the hardware architecture, respectively.
The native library directory for Windows (Windows on x86) is:
$ECLIPSE_HOMEpluginsorg.eclipse.swt.win32_x.x.xoswin32x86
and its Linux counterpart (Linux on x86) is:
$ECLIPSE_HOME/plugins/org.eclipse.swt.gtk_x.x.x/os/linux/x86
You need to add the following virtual machine (VM) argument when you run SWT/JFace-based programs:
-Djava.library.path=$SWT_NATIVE_LIBRARY_PATH
If you need to run SWT programs from the Eclipse workbench, you can add the argument in the Run dialog, as shown in Figure 3-4.
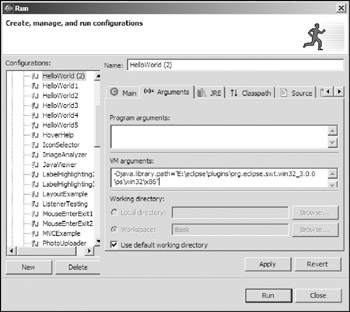
Figure 3-4
You can configure other IDEs in the same way.
There are many other ways to add the SWT native library path to your Java library path. The most convenient approach is probably adding the SWT native library path to your platform-specific variables.
On Windows: Adding the SWT native library path to the PATH variable. Right-click the My Computer icon and select Properties from the menu, and the System Properties dialog appears. Select the Advanced tab and click the Environment Variables button to append the SWT native library path to the PATH variable.
On Linux: Adding the SWT native library path to the $LD_LIBRARY_PATH variable. Execute the following commands:
[Bash Shell] > export LD_LIBRARY_PATH=YOUR_SWT_NATIVE_LIB_PATH
[C Shell] > setenv LD_LIBRARY_PATH YOUR_SWT_NATIVE_LIB_PATH
You can append these commands to the startup files of the corresponding shells to set the variable automatically on each subsequent login. If you take this approach, you do not have to specify the SWT native library path whenever you run an SWT/JFace-based application.
Creating a Bigger Application Temperature Converter
The Hello World program does nothing but print the window title. Let's create some practical application with SWT. Here, you are going to create a temperature converter that can convert temperature readings in Fahrenheit into their Celsius equivalents and vice versa. The GUI of this application is shown in Figure 3-5. When a user types a temperature reading in the Fahrenheit text field, its equivalent Celsius value will be displayed in the Celsius text field. The same mechanism applies to Celsius-to-Fahrenheit conversion.
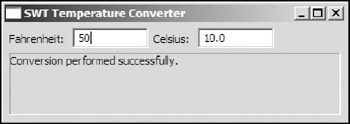
Figure 3-5
First, declare the class and all widget controls to be used:
 ...

 import org.eclipse.swt.widgets.Button;
 import org.eclipse.swt.widgets.Display;
 import org.eclipse.swt.widgets.Label;
 import org.eclipse.swt.widgets.Shell;
 import org.eclipse.swt.widgets.Text;
 /**
 *
 */
 public class TemperatureConverter {
 Display display = new Display();
 Shell shell = new Shell(display);

 Label fahrenheitLabel;
 Label celsiusLabel;
 Label messageLabel;

 Text fahrenheitValue;
 Text celsiusValue;
SWT classes such as Button and Label share the same names with their AWT counterparts. One of the common mistakes is using AWT components in SWT programs. So make sure you import widgets from SWT/JFace packages instead of AWT packages.
For this application, you put all the GUI construction code in the constructor:
 public TemperatureConverter() {
 shell.setText("Temperature Converter");
 shell.setLayout(new RowLayout());
 fahrenheitLabel = new Label(shell, SWT.NULL);
 fahrenheitLabel.setText("Fahrenheit: ");

 fahrenheitValue = new Text(shell, SWT.SINGLE | SWT.BORDER);

 celsiusLabel = new Label(shell, SWT.NULL);
 celsiusLabel.setText("Celsius: ");

 celsiusValue = new Text(shell, SWT.SINGLE | SWT.BORDER);

 messageLabel = new Label(shell, SWT.BORDER);
 GridData gridData = new GridData(GridData.FILL_BOTH);
 gridData.horizontalSpan = 4;
 messageLabel.setLayoutData(gridData);

 ModifyListener listener = new ModifyListener() {
 public void modifyText(ModifyEvent e) {
 valueChanged((Text)e.widget);
 }
 };

 fahrenheitValue.addModifyListener(listener);
 celsiusValue.addModifyListener(listener);
 shell.pack();
 shell.open();
 while (!shell.isDisposed()) {
 if (!display.readAndDispatch()) {
 display.sleep();
 }
 }
 display.dispose();
 }
At the beginning of the constructor, you set the title of the shell and its layout. A layout defines a positioning algorithm applying to the children of a composite whenever it's resized. Here, you set a RowLayout instance as the shell's layout. The RowLayout class is a layout placing all the child widgets either in horizontal rows or vertical columns with the composite. Chapter 6 is dedicated to SWT layouts.
After the layout of the shell has been set, you can add all the widgets that you need. To do that, you simply put the shell as the first argument in constructors of those widgets. The style of a widget can usually be specified in the second argument. A label is added to the shell to display status information.
To enable the application and react to the user's input, you need to use event listeners to listen to interested events and react accordingly. In this application, you need to listen to text modification events generated from both text fields. A ModifyListener is created and registered to both text fields to listen to modification events. When the user modifies the content of any of the text fields, the function modifyText in the listener will be called with a ModifyEvent object. Then the function makes a call to the custom function valueChanged.
Finally, you open the shell and set up the event loop.
The following code lists the method valueChanged:
 /**
 * Performs conversion when one of the text fields changes.
 *
 * @param text
 * the event source
 */
 public void valueChanged(Text text) {
 if (!text.isFocusControl())
 return;
 if (text == fahrenheitValue) {
 try {
 double fValue = Double.parseDouble(text.getText());
 double cValue = (fValue - 32) / 1.8;
 celsiusValue.setText(Double.toString(cValue));
 messageLabel.setText("Conversion performed successfully.");
 } catch (NumberFormatException e) {
 celsiusValue.setText("");
 messageLabel.setText("Invalid number format: " +
 text.getText());
 }
 } else {
 try {
 double cValue = Double.parseDouble(text.getText());
 double fValue = cValue * 1.8 + 32;
 fahrenheitValue.setText(Double.toString(fValue));
 messageLabel.setText("Conversion performed successfully.");
 } catch (NumberFormatException e) {
 fahrenheitValue.setText("");
 messageLabel.setText("Invalid number format: " +
 text.getText());
 }
 }
 }
The valueChanged method is quite easy to understand. It first detects which text field is the event source. If the event source is the Fahrenheit text field, it tries to perform Fahrenheit-to-Celsius conversion and the calculated value will be put into the Celsius text field; otherwise, it performs Celsius-to-Fahrenheit conversion and puts the calculated value into the Fahrenheit text field.
When a Text's setText is called programmatically, the Text generates a ModifyEvent. The current focus control check at the beginning of the valueChanged method helps to prevent the event handling deadlock.
To launch the application, simply using the following main method:
public static void main(String[] args) {
 new TemperatureConverter();
}
Rewriting the Temperature Converter with JFace
In the previous section, you created your first few SWT-based programs. Now rewrite the temperature converter application using JFace to see how JFace can make your life easier.
First, review the code (TemperatureConverterJFace.java):
 import org.eclipse.jface.action.StatusLineManager;
 import org.eclipse.jface.window.ApplicationWindow;
 ...
 public class TemperatureConverterJFace extends ApplicationWindow {
 Label fahrenheitLabel;
 Label celsiusLabel;
 Text fahrenheitValue;
 Text celsiusValue;

 public TemperatureConverterJFace() {
 super(null);

 addStatusLine();
 }
The first thing you may notice is that the TemperatureConverterJFace class is inherited from the org.eclipse.jface.window.ApplicationWindow class. An ApplicationWindow instance is a high-level "main window," which has built-in support for an optional menu bar, an optional toolbar, and an optional status line. It also wraps the event loop inside itself. In the constructor of the TemperatureConverterJFace class, a null parent is passed to the super class's constructor, indicating that this window is a top-level window. The addStatusLines method adds a status line to the window for the purpose of displaying messages.
In order to add temperature conversion widgets to the window, you need to override the createContents method:
 /* (non-Javadoc)
 * @see org.eclipse.jface.window.Window#createContents(Composite)
 */
 protected Control createContents(Composite parent) {
 getShell().setText("JFace Temperature Converter");

 Composite converterComposite = new Composite(parent, SWT.NULL);

 converterComposite.setLayout(new GridLayout(4, false));
 fahrenheitLabel = new Label(converterComposite, SWT.NULL);
 fahrenheitLabel.setText("Fahrenheit: ");
 fahrenheitValue = new Text(converterComposite, SWT.SINGLE | SWT.BORDER);
 celsiusLabel = new Label(converterComposite, SWT.NULL);
 celsiusLabel.setText("Celsius: ");
 celsiusValue = new Text(converterComposite, SWT.SINGLE | SWT.BORDER);
 ModifyListener listener = new ModifyListener() {
 public void modifyText(ModifyEvent e) {
 valueChanged((Text) e.widget);
 }
 };
 fahrenheitValue.addModifyListener(listener);
 celsiusValue.addModifyListener(listener);

 return converterComposite;
 }
The preceding GUI-building code is very similar to that used in the SWT version of the temperature converter. The method createContents(Composite parent) will be called after all other widgets (optional menus, toolbars, status line, and so on) have been created and before the window is opened. The parent argument passed is the shell instance representing the window. The expected return type for this method is Control. If you need to add multiple widgets, you should create a top-level composite containing all the widgets and return the composite, as shown in the preceding code.
The event listener registration procedure is the same as that using SWT. There are some minor changes in the valueChanged method:
 /**
 * Performs conversion when one of the text fields changes.
 *
 * @param text
 * the event source
 */
 public void valueChanged(Text text) {
 if (!text.isFocusControl())
 return;
 if (text == fahrenheitValue) {
 try {
 double fValue = Double.parseDouble(text.getText());
 double cValue = (fValue - 32) / 1.8;
 celsiusValue.setText(Double.toString(cValue));
 setStatus("Conversion performed successfully.");
 } catch (NumberFormatException e) {
 celsiusValue.setText("");
 setStatus("Invalid number format: " + text.getText());
 }
 } else {
 try {
 double cValue = Double.parseDouble(text.getText());
 double fValue = cValue * 1.8 + 32;
 fahrenheitValue.setText(Double.toString(fValue));
 setStatus("Conversion performed successfully.");
 } catch (NumberFormatException e) {
 fahrenheitValue.setText("");
 setStatus("Invalid number format: " + text.getText());
 }
 }
 }
The setStatus method in ApplicationWindow is used to set the message to be displayed on the status line. In the SWT version, you create a Label object and use its setText method; here, the ApplicationWindow manages this for you.
The GUI of this JFace implementation (as shown in Figure 3-6) is more appealing than that of the SWT implementation, especially the status line part.
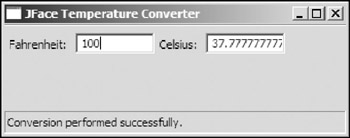
Figure 3-6
Besides the status line, ApplicationWindow can help you to simplify other common tasks such as menu creation and toolbar creation, which is covered in later chapters.
SWT JFace Software Deployment with Java Web Start
You have completed your SWT/JFace applications; now it's time for you to deploy those applications to the end users. Here, you learn how to use Java Web Start to deploy your applications to multiple platforms.
Introduction to Java Web Start
The Java Web Start technology provides a robust and flexible deployment solution for Java applications. With Java Web Start, you can deploy your applications through the Web easily. When a user clicks a link to a special Java Network Launch Protocol (JNLP) file, this brings up the Java Web Start software, which then automatically detects the current running environment and downloads, caches, and runs the given Java application.
To download Java Web Start software and to find more details on the topic, please visit Sun's Java Web Start home page at http://java.sun.com/products/javawebstart.
To deploy your SWT/JFace-based applications with Java Web Start, simply follow four steps:
- Identify files to be deployed.
- Package and sign files.
- Write the JNLP script.
- Upload the files to your Web server and test.
Let's deploy the JFace implementation of the temperature converter to Windows (Windows 98, NT, ME, XP) and Linux step by step.
Identifying Files to be Deployed
The files to be deployed include the TemperatureConverterJFace class file and the required SWT/JFace packages and SWT native libraries, as shown in the following table.
|
File Type |
Target Platforms |
||||
|---|---|---|---|---|---|
|
Windows |
Linux |
||||
|
Application code |
TemperatureConverterJFace.class |
||||
|
Main JFace library |
$ECLIPSE_HOME/plugins/org.eclipse.jface_x.x.x/jface.jar |
||||
|
Auxiliary JFace libraries |
ECLIPSE_HOME/plugins/org.eclipse.core.runtime_x.x.x/ runtime.jar |
||||
|
SWT library |
$ECLIPSE_HOME pluginsorg.eclipse.swt.win32_3.0.0wswin32*.jar |
dollar;ECLIPSE_HOME/plugins/org.eclipse.swt.gtk_3.0.0/ws/gtk/*.jar |
|||
|
SWT native library |
$ECLIPSE_HOMEpluginsorg.eclipse.swt.win32_x.x.xoswin32x86*.dll |
$ECLIPSE_HOME/plugins/org.eclipse.swt.gtk_ x.x.x/os/linux/x86/*.os |
|||
|
|||||
Note that in the preceding table, not all the auxiliary JFace packages are included. Some of the auxiliary packages are not required by this simple application; you can omit them to reduce the total size of the deployment files. If you are not sure whether an auxiliary package is required or not, you should include it to avoid possible ClassNotFound exceptions.
Packaging and Signing Files
According to the Java Web Start Specification, applications with unsigned JAR files are restricted to run in a secure sandbox, which prevents them from calling native libraries. Because the temperature converter application depends on the SWT native libraries, you have to sign all the files to remove this restriction.
The Java Web Start Specification requires that all applications be delivered as a set of JAR files, so you have to package non-JAR files into a set of JAR files. Because the Java libraries of SWT/JFace are already in the JAR format, there are only two kinds of files you need to pack up into JAR files:
- Your application code (Java classes, property files, and resource files): Most IDEs export these into JAR files or you can use the jar command. For the temperature converter application, you need to pack the class file into a JAR file (tc.jar):
jar cf tc.jar CLASS_OUTPUT_DIRECTORY
- Native libraries: Similarly, you can put all the required native libraries into one or more JARs:
 [Windows] jar cf swt-native-lib-win32.jar
 $ECLIPSE_WIN32_HOMEpluginsorg.eclipse.swt.win32_x.x.xoswin32x86*.dll
 [Linux] jar cf swt-native-lib-linux.jar
 $ECLIPSE_LINUX_HOME/plugins/org.eclipse.swt.gtk_x.x.x/os/linux/x86/*.os
You need to download and unzip both Windows and Linux releases of Eclipse SDK regardless of the type of operating system you're running. In the preceding commands, $ECLIPSE_WIN32_HOME and $ECLIPSE_LINUX_HOME represent the home directories of the Eclipse SDK Windows release and the Linux release, respectively.
Now all the files to be deployed are packed, as shown in the following table.
|
File Type |
Target Platforms |
|
|---|---|---|
|
Windows |
Linux |
|
|
Application code |
ct.jar |
|
|
Main JFace library |
$ECLIPSE_HOME/plugins/org.eclipse.jface_x.x.x/jface.jar |
|
|
Auxiliary JFace libraries |
$ECLIPSE_HOME/plugins/org.eclipse.core.runtime_x.x.x/runtime.jar |
|
|
SWT library |
$ECLIPSE_HOMEpluginsorg.eclipse.swt.win32_3.0.0wswin32*.jar |
$ECLIPSE_HOME/plugins/org.eclipse.swt.gtk_3.0.0/ws/gtk/*.jar |
|
SWT native library |
swt-native-lib-win32.jar |
swt-native-lib-linux.jar |
Now, you can digitally sign the JAR files. Signing files lets people know that you are the genuine distributor of the files. You need a public key, a private key, and a certificate to sign files. If you do not have them yet, you can use the following command to create a dummy set of public key, private key, and certificate using Sun's keytool:
 keytool -genkey -alias dummy -validity 10000 -keypass dummypass -storepass
 dummypass -keystore dummy.keystore -dname "CN=Dummy, OU=Dummy, O=D, L=CA,
 S=CA, C=US"
The preceding command creates a public key, a private key, and a self-signed certificate in the file dummy.keystore. However, I recommend that you obtain a certificate from a certificate authority and that you use it in production.
Now, you can sign each JAR file using the jarsigner tool:
jarsigner -keystore dummy.keystore -storepass dummypass -keypass dummypass
$JAR_FILE dummy
Writing the JNLP Script
Now, all the files are ready to be deployed. You can arrange the files into the following structure:
 javaui [Dir]
 +-- tc [Dir]
 +-- boot.jar
 +-- jface.jar
 +-- runtime.jar
 +-- tc.jar
 +-- linux [Dir]
 +-- swt.jar (Linux version of SWT library)
 +-- swt-pi.jar
 +-- swt-native-lib-win32.jar (SWT native libraries for Linux)
 +-- win32 [Dir]
 +-- swt.jar (Windows version of SWT library)

 +-- swt-native-lib-win32.jar (SWT native libraries for Windows)
Let's write a JNLP script that will be used to inform the Java Web Start software on the client machines about the temperature converter application. Such details such as the title and vendor of the application, required resources, and main class are included in the JNLP script as follows:
 spec="1.0+"
 codebase="http://www.asprise.com/javaui/tc"
 href="tc.jnlp">
 Temperature Converter
 Jack Li Guojie

 A simple temperature converter
 A simple temperature converter implemented in
 JFace
The top-level element in a JNLP file is . In the preceding code, specify the following attributes:
- spec: The JNLP specification version
- codebase: The base for all relative URLs specified in the href attribute
- href: The URL pointing to the JNLP file itself
The information element is used to provide information about the application, such as its title, description, and icon.
Next, request the Java Web Start software to grant the application all the permissions:
Then, tell the Java Web Start software which files are needed to run the application:
The first resources element, which has no attributes specified, specifies all the shared code across all kinds of platforms. The second resources element specifies extra files required on the Windows platform. Similarly, the last resources element indicates extra files required on the Linux platform. The Java Web Start software uses this information to determine the file set to be downloaded.
Finally, you need to tell the Java Web Start software your main class to start the application:
Now, you are ready to upload all the files to your Web server.
Uploading and Running
First, you need to configure your Web server to recognize JNLP files by adding the following MIME type to the Web server's configuration files:
application/x-java-jnlp-file JNLP
You can let the user point directly to the absolute path of the JNLP file or you can use a launch HTML file. The latter is more user-friendly. You can create a launch page that's as simple as the following:
Click <a href="tc.jnlp">here</a> to launch Temperature Converter.
Save this HTML file as index.html and put it with the JNLP file tc.jnlp under the directory javaui/tc. Upload the whole javaui directory to your Web server.
Now you can visit the launch page at www.asprise.com/javaui/tc/index.html. Click the link to launch the JNLP file. The Java Web Start software downloads and parses the JNLP file for information and resources about the application. After all the information is obtained, it starts to download required files, as shown in Figure 3-7.
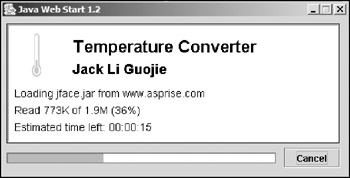
Figure 3-7
After all the required resources are downloaded, the Java Web Start software tries to start the application. First a warning message complaining that the certificate cannot be authenticated (because you used a dummy certificate) appears, as shown in Figure 3-8. Click Start to start the application.
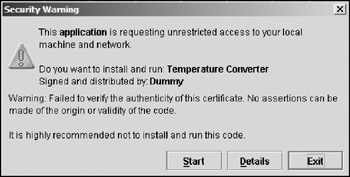
Figure 3-8
The Windows application runs properly, as shown in Figure 3-8. Figure 3-9 shows the application deployed on Linux.
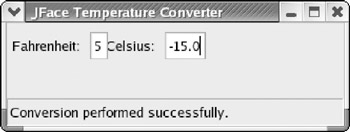
Figure 3-9
Summary
This chapter helped you to jump start programming with SWT/JFace. First, you need to download and install the SWT/JFace library. After obtaining the library, you need to configure your favorite Java IDE (Eclipse, JBuilder, and so on) to add SWT/JFace library jars into Java path. Then you can start coding your SWT/JFace-based programs. Creating SWT-based programs is very straightforward; you can use a Display object to open a window (represented by the Shell class). Alternatively, you can develop JFacebased programs. Because JFace handles many common UI tasks, the code length is likely to be reduced. After you write and test your programs, you are ready to deploy them. The Java Web Start technology is becoming more and more popular. The last part of this chapter guides you to deploy your programs to multiple platforms using Java Web Start.
An event loop always exists in an SWT program. The next chapter demystifies the event loop and explains SWT event handling mechanisms.
Part I - Fundamentals
- Overview of Java UI Toolkits and SWT/JFace
- SWT/JFace Mechanisms
- Jump Start with SWT/JFace
- SWT Event Handling, Threading, and Displays
- Basic SWT Widgets
- Layouts
Part II - Design Basics
Part III - Dynamic Controls
- Scales, Sliders, and Progress Bars
- Other Important SWT Components
- SWT Graphics and Image Handling
- Drag and Drop and the Clipboard
- Printing
- JFace Windows and Dialogs
Part IV - Application Development
EAN: 2147483647
Pages: 147
