JFace Windows and Dialogs
In this chapter, you learn how to use the JFace window framework (org.eclipse.jface.window) to simplify window creation and management tasks. This chapter also discusses JFace dialogs. JFace provides various dialogs in package org.eclipse.jface.dialogs that enable you to communicate with the user easily. For example, you can use an input dialog to get input from the user and a progress monitor dialog to display the progress of a lengthy operation to the user.
JFace Windows
In almost every UI application, you need to create and manage one or more windows. In previous chapters, you learned that in order to create a window, you need to create a shell first and then add the menu, toolbar, and other controls to the shell. Finally, you set up the event loop and show the shell. This creation procedure is quite tedious. Fortunately, with the org.eclipse.jface.window package, such window creation and management tasks are greatly simplified. With the JFace window framework, you are freed from performing low-level shell manipulation. For example, instead of coding the event loop, you simply set the block on an open property of a JFace window to run the event loop for the window.
This section first introduces several important classes in the org.eclipse.jface.window package. Then it shows you how to create an application window easily by extending the ApplicationWindow class. With ApplicationWindow, you can run a lengthy operation and display the progress status easily. Finally, management of multiple windows with WindowsManager is briefly discussed.
org eclipse jface window Window
The org.eclipse.jface.window.Window class is the superclass of all JFace application window and dialog classes. To create a JFace window, you simply follow these basic steps:
- Create an instance of a concrete subclass of the Window class.
- Configure the window if necessary, e.g., set the icon image for the window. (Optional)
- Call the create method to create the shell and widget tree. (Optional)
- Open the shell by invoking the open method (the widget tree will be created if it has not been created).
For example, the following code opens a window, as shown in Figure 18-1.
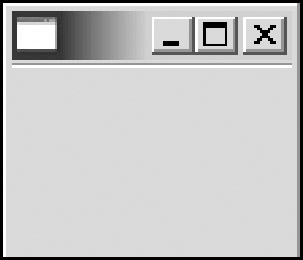
Figure 18-1
 public static void main(String[] args) {
 Window window = new ApplicationWindow(null);
 window.setBlockOnOpen(true);
 int returnStatus = window.open();
 }
Application Windows
The org.eclipse.jface.window.ApplicationWindow class represents a high level "main window," and it has built-in support for an optional menu bar, an optional toolbar, an optional cool bar and an optional status line.
Only one constructor is in the ApplicationWindow class:
public ApplicationWindow(Shell parentShell)
You can pass the parent shell as the argument. If the window is a top-level window, you simply pass null to the constructor.
Before opening the window, you can set the block on open behavior through the setBlockOnOpen method, which is inherited from the Window class:
public void setBlockOnOpen(boolean shouldBlock)
If the block on open property is set to true, an event loop is run internally so that the open method of the Window class will not return until the window is closed. For top-level windows and dialogs, you should set this property to true. By default, a window does not block on open.
To open a window, you need to invoke the open method of the Window class:
public int open()
The open method returns an integer code, which indicates the user's action if the window is a dialog.
You use the close method to close a window:
public boolean close()
The close method disposes of the shell.
JFace does not hide the underlying shell control. You can use the getShell method of the Window class to get the wrapped shell instance:
public Shell getShell()
The ApplicationWindow class is designed to be subclassed. In particular, you need to override one or more of the following methods to customize it:
- protected Control createContents(Composite parent): If this method is not overridden, by default, a blank Composite control is placed on the shell. You place the widget tree creation code in this method. The returned control will be remembered and returned when the getControl method is called.
- protected MenuManager createMenuManager(): You override the createMenuManager to create a menu manager for this application window.
- protected StatusLineManager createStatusLineManager(): If a status line is desired, you override this method to create one.
- protected ToolBarManager createToolBarManager(int style): You override the createToolBarManager to supply a toolbar manager for this application window.
- protected CoolBarManager createCoolBarManager(int style): A cool bar manager can be supplied by overriding this method.
The createContents method is invoked when the window is about to be created. However, the last four methods in the preceding list will not be called unless their corresponding add methods are invoked. For example, you need to invoke the addMenuBar method to configure this application window to have a menu bar. The complete mapping is described in the following table.
|
Item |
The Configuration Method |
The Supplier Method |
|---|---|---|
|
The menu bar |
addMenuBar() |
createMenuManager() |
|
The toolbar |
addToolBar(int style) |
createToolBarManager(int style) |
|
The cool bar |
addCoolBar(int style) |
createCoolBarManager(int style) |
|
The status line |
addStatusLine() |
createStatusLineManager() |
To add an item to the window, you have to override its supplier method and invoke the configuration method.
To become familiar with the ApplicationWindow class, let's create a simple file viewer, as shown in Figure 18-2.
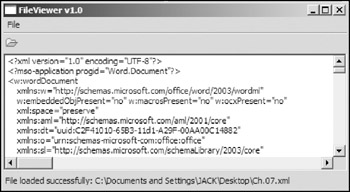
Figure 18-2
When the user clicks the toolbar item or the menu item, a file dialog opens. If a file is selected in the dialog, its content is displayed in the text area.
A class named FileViewer is created to extend the ApplicationWindow class:
 public class FileViewer extends ApplicationWindow {

 // The text control used to display the file content.
 Text text;
 public FileViewer(Shell parentShell) {
 super(parentShell);
 addMenuBar();
 addStatusLine();
 addToolBar(SWT.FLAT);
 }

 /* (non-Javadoc)
 * @see org.eclipse.jface.window.Window#createContents(Composite)
 */
 protected Control createContents(Composite parent) {
 getShell().setText("FileViewer v1.0");
 setStatus("Ready");

 text = new Text(parent,
 SWT.MULTI | SWT.BORDER | SWT.H_SCROLL | SWT.V_SCROLL);
 text.setSize(300, 200);
 return text;
 }

 Action actionOpenFile = new Action("Open",
 ImageDescriptor.createFromFile(null, "icons/open.gif")) {
 public void run() {
 FileDialog dialog = new FileDialog(getShell(), SWT.OPEN);
 final String file = dialog.open();
 if(file != null) {
 try {
 String content = readFileAsAString(new File(file));
 text.setText(content);
 setStatus("File loaded successfully: " + file);
 } catch (IOException e) {
 e.printStackTrace();
 setStatus("Failed to load file: " + file);
 }
 }
 }
 };

 /* (non-Javadoc)
 * @see org.eclipse.jface.window.ApplicationWindow#createMenuManager()
 */
 protected MenuManager createMenuManager() {
 MenuManager menuManager = new MenuManager("");

 MenuManager fileMenuManager = new MenuManager("&File");
 fileMenuManager.add(actionOpenFile);

 menuManager.add(fileMenuManager);

 return menuManager;
 }

 /* (non-Javadoc)
 * @see org.eclipse.jface.window.ApplicationWindow#createStatusLineManager()
 */
 protected StatusLineManager createStatusLineManager() {
 return super.createStatusLineManager();
 }

 /* (non-Javadoc)
 * @see org.eclipse.jface.window.ApplicationWindow#createToolBarManager(int)
 */
 protected ToolBarManager createToolBarManager(int style) {
 ToolBarManager toolBarManager = new ToolBarManager(style);
 toolBarManager.add(actionOpenFile);

 return toolBarManager;
 }

 public static void main(String[] args) {
 ApplicationWindow viewer = new FileViewer(null);
 viewer.setBlockOnOpen(true);
 viewer.open();
 }

 /**
 * Reads the content of a file into a String.
 * @param file file to be read
 * @return
 * @throws IOException
 */
 public static String readFileAsAString(File file) throws IOException {
 ...

 }

 }
The text control is created in the createContents method. The passed argument to this method is the shell wrapped by the application window and the shell has its special layout. You should not replace the shell's layout. An action object is created to represent the file selection and loading process. Then a menu bar and a toolbar are created in the createMenuManager method and the createToolBarManager method, respectively. The action has been added to both the menu bar and the toolbar. Additionally, a status line is created to display the status at the bottom of the window. To add a special item such as a menu bar or toolbar, you have to invoke the corresponding configuration (add) method. In the constructor of the FileViewer class, you invoke the corresponding configuration methods for the menu bar, the toolbar, and the status line.
The main method creates an instance of the FileViewer class, sets block on the open property, and opens the window.
For more details on menu managers and toolbar managers, please refer to Chapter 9.
Running Time Consuming Operations with Application Windows
Time-consuming procedures, such as file transferring and network downloading, should not be run in the main (UI) thread. (In Chapter 4, you learned how to use separate threads to perform such operations.) By implementing the IRunnableContext interface, the ApplicationWindow class supports running long-running operations in the main thread or a separate thread, and showing the progress in the status line. Additionally, the user may terminate the operation optionally.
The steps to execute a lengthy operation with an ApplicationWindow are as follows:
- Creating an IRunnableWithProgress object with an IProgressMonitor instance to reflect progress
- In the run method, calling beginTask at the start of the lengthy operation
- Double each element of work, calling worked() on the monitor with an integer to reflect the number of units just completed
- Calling done() on the monitor when you're finished
Let's extend the file viewer application by adding a feature that counts the number of lines. First, you create an IRunnableWithProgress instance to represent the number of lines in the counting procedure:
 String content;
 String lineDelimiter;

 IRunnableWithProgress runnableWithProgress = new IRunnableWithProgress() {
 public void run(IProgressMonitor monitor)
 throws InvocationTargetException, InterruptedException {
 System.out.println("Running from thread: " +
 Thread.currentThread().getName());

 getShell().getDisplay().syncExec(new Runnable() {
 public void run() {
 content = text.getText();
 lineDelimiter = text.getLineDelimiter();
 }
 });

 monitor.beginTask("Counting total number of lines", content.length());
 int lines = 1;
 for(int i=0; iif(monitor.isCanceled()) {
 // checks whether the operation has been cancelled.
 monitor.done();
 System.out.println("Action cancelled");
 return;
 }

 // Checks the existence of the line delimiter.
 if(i + lineDelimiter.length() < content.length()) {
 if(lineDelimiter.equals(
 content.substring(i, i+lineDelimiter.length()))) {
 lines ++;
 }
 }

 monitor.worked(1);

 // sleeps for 1ms on purpose so that you see the progress clearly.
 Thread.sleep(1);
 }

 monitor.done();
 System.out.println("Total number of lines: " + lines);
 }
 };
The only method declared in the IRunnableWithProgress interface is the run method. The IProgressMonitor passed as the argument is used to report operation progress. It is likely that the operation is run in a thread different from the main UI thread so the syncExec method is used to access the text control.
The methods in the IProgressMonitor interface that are invoked in the preceding code are as follows:
- public void beginTask(String name, int totalWork): This method notifies the progress monitor that the main task is starting. You specify the name of the task and the total work units as the arguments.
- public void worked(int work): If certain units of work have been performed, you can use the worked method to notify the progress monitor. The passed argument represents an installment, as opposed to the cumulative amount.
- public void done(): Invoke the done method when the operation is completed.
- public boolean isCanceled(): Use this method to check whether the user cancels the current operation.
- public void setCanceled(boolean value): To cancel or resume the operation, you can use the setCanceled method.
In the preceding code, if the user cancels the operation, the run method returns immediately. Otherwise, after the total number of lines has been calculated, the number of lines is printed.
The run method of the ApplicationWindow class can be used to execute the IRunnableWithProgress object:
 public void run(boolean fork, boolean cancelable, IRunnableWithProgress runnable)
 throws InvocationTargetException, InterruptedException
To run the operation in a separate thread, set the fork argument to true. If the operation can be canceled by the user, you need to set the cancelable to true so that a cancel button will be displayed next to the progress bar.
To level the user, invoke the run method, wrap it in an action object, and add the action to the menu bar and the toolbar:
 Action actionCount = new Action("Count", ImageDescriptor.createFromFile(null,
 "icons/run.gif")) {
 public void run() {
 try {
 FileViewer.this.run(true, true, runnableWithProgress);
 } catch (InvocationTargetException e) {
 e.printStackTrace();
 } catch (InterruptedException e) {
 e.printStackTrace();
 }
 }
 };

 ...

 MenuManager toolsMenuManager = new MenuManager("&Tools");
 toolsMenuManager.add(actionCount);
 menuManager.add(toolsMenuManager);

 ...

 toolBarManager.add(actionCount);
 ...
When the counting action is invoked, the UI appears, as shown as Figure 18-3.
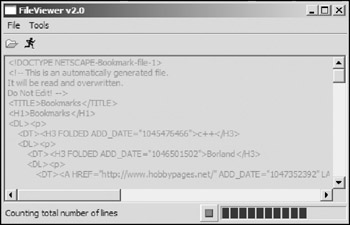
Figure 18-3
The operation progress is displayed on a progress bar. The cancel button sits on the right of the progress bar. The user can press the cancel button to cancel the operation. While running the operation, the application window is disabled — you cannot close the window, and the text control on the window is disabled, too.
Multiple Windows Management with WindowManagers
A window manager is used to remember a group of windows (application windows, dialogs, and so on). A window manager can also contain other window managers. This kind of organization enables you to close all the windows managed (or more accurately, remembered) by a window manager and its sub-window managers.
The two constructors in the WindowManager class are as follows:
public WindowManager() public WindowManager(WindowManager parent)
The first constructor creates a top-level window manager, and the second one creates a window manager with another window manager as its parent.
To add a window into a window manager, use the add method:
public void add(Window window)
Use the remove method to remove a window from a window manager:
public final void remove(Window window)
If a window is disposed, it is automatically removed from its window manager.
To close all the windows managed by a window manager and all of its descendent managers, you use the close method of the WindowManager class:
public boolean close()
JFace Dialogs
In Chapter 12, you learned about SWT built-in dialogs, such as FileDialog, MessageBox, and so on. You also learned how to create your own custom dialogs. Before creating your own dialog type, you might like to check whether there is a suitable one in the org.eclipse.jface.dialogs package. There are a number of dialogs in the org.eclipse.jface.dialogs package from which to choose.
The steps to create a dialog are very similar to those to create a window:
- Create an instance of a concrete subclass of the org.eclipse.jface.dialogs.Dialog class.
- Open the dialog (in modal state) by invoking the open method.
The following sections show you how to use various JFace dialogs.
Using MessageDialogs
A message dialog is used to show a message to the user. The only constructor of the MessageDialog class is:
 public MessageDialog(Shell parentShell,
 String dialogTitle, Image dialogTitleImage, String dialogMessage, int
 dialogImageType, String[] dialogButtonLabels, int defaultIndex)
You specify the parent shell of this dialog in the parentShell parameter. You can set the dialog title and dialog title image in the dialogTitle and dialogTitleImage parameters, respectively. The message shown on the dialog can be set through the dialogMessage parameter. Optionally, you may configure the image displayed along with the message on the dialog with the dialogImageType parameter. The following is the list of valid values for the dialogImageType parameter:
- MessageDialog.NONE: You set the dialog image type to NONE to indicate that no image should be displayed on the dialog.
- MessageDialog.ERROR: If you are displaying an error message, you should set the dialog image type to ERROR so that an error icon will be displayed on the dialog.
- MessageDialog.INFORMATION: Setting the dialog image type to INFORMATION results in an information icon (such as the letter i in a circle) displayed on the dialog.
- MessageDialog.QUESTION: If you are asking the user a question, you may set the dialog image type to QUESTION to display a question icon on the dialog.
- MessageDialog.WARNING: To display a warning sign, you set the dialog image type to WARNING.
Below the message and optional dialog image, you can display an array of buttons. You specify the labels for the buttons in the dialogButtonLabels parameter. To make a button the default button, you need to specify its index as the value of the defaultIndex parameter.
For example, to display the dialog shown in Figure 18-4, you need to create a MessageDialog with the following code:
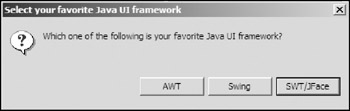
Figure 18-4
 MessageDialog dialog =
 new MessageDialog(
 getShell(),
 "Select your favorite Java UI framework",
 null,
 "Which one of the following is your favorite Java UI framework?",
 MessageDialog.QUESTION,
 new String[] { "AWT", "Swing", "SWT/JFace" },
 2);

 int answer = dialog.open();

 switch (answer) {
 case -1: // if the user closes the dialog without clicking any button.
 System.out.println("No selection");
 break;

 case 0 :
 System.out.println("Your selection is: AWT");
 break;
 case 1 :
 System.out.println("Your selection is: Swing");
 break;
 case 2 :
 System.out.println("Your selection is: SWT/JFace");
 break;

 }
Three buttons corresponding to three Java UI frameworks are displayed at the bottom of the dialog. The third button is set to be the default button. When the user clicks any button, the open method returns the index of the button clicked. If the user disposes of the dialog by pressing the Esc key or hitting the close trim, the value -1 is returned by the open method.
The constructor of the MessageDialog class is very powerful; however, it is quite annoying to display a simple message to inform the user with the following tedious code:
 MessageDialog dialog =
 new MessageDialog(
 getShell(),
 "Message",
 null,
 "This is a message",
 MessageDialog.INFORMATION,
 new String[] { "OK" },
 0);
 dialog.open();
Fortunately, the MessageDialog class provides several class methods to handle situations like that. For example, with the openInformation method, displaying the same message is simple:
MessageDialog.openInformation(getShell(), "Message", "This is a message");
The following table provides a complete list of such utility methods.
|
Message Type |
Method |
Remarks |
|---|---|---|
|
Information |
MessageDialog.openInformation |
This method displays a dialog showing the information message. |
|
Question |
MessageDialog.openQuestion |
This method creates and opens a dialog with two buttons: YES and NO. If the YES button is pressed, Boolean value true is returned, false otherwise. |
|
Warning |
MessageDialog.openWarning |
This method displays a dialog showing the warning message. |
|
Error |
MessageDialog.openError |
This method displays a dialog showing the error message. |
|
Confirm |
MessageDialog.openConfirm |
Two buttons, OK and Cancel, are displayed on the dialog. The open method returns true if the OK button is clicked, false otherwise. |
Using InputDialogs
An input dialog uses a text field to solicit an input string from the user.
The constructor of the InputDialog is as follows:
 public InputDialog(Shell parentShell, String dialogTitle, String dialogMessage,
 String initialValue, IInputValidator validator)
The dialog's parent shell, title, and message can be specified in the first three arguments. You have the option to supply the initial value for the text field through the initialValue argument. To allow only a valid string input, you can set a validator for the last argument.
For example, the following code creates the dialog shown in Figure 18-5:

Figure 18-5
 IInputValidator validator = new IInputValidator() {
 public String isValid(String newText) {
 if(newText.equalsIgnoreCase("SWT/JFace") ||
 newText.equalsIgnoreCase("AWT") ||
 newText.equalsIgnoreCase("Swing"))
 return null;
 else
 return "The allowed values are: SWT/JFace, AWT, Swing";
 }
 };

 InputDialog dialog = new InputDialog(getShell(), "Question", "What's your favorite
 Java UI framework?", "SWT/JFace", validator);

 if(dialog.open() == Window.OK) {
 System.out.println("Your favorite Java UI framework is: " + dialog.getValue());
 }else{
 System.out.println("Action cancelled");
 }
An input validator implementing the IInputValidator interface is created first. The isValid method is used to validate the input string. If the input string is valid, the isValid method returns null, or the error message otherwise. This error message will be displayed under the text field on the dialog.
The dialog is created with the validator. If the user clicks OK, the open method returns the value Window.OK and the input string can be obtained through the getValue method of the InputDialog class.
Using ProgressMonitorDialogs
A progress monitor dialog can be used to execute a long-running operation and display the progress. In the first part of this chapter, you saw how to use application windows to execute time-consuming operations. Alternatively, you can use a ProgressMonitorDialog to perform the execution.
The steps to create and use a progress monitor dialog are as follows:
- Create an instance of the PrgressMonitorDialog class with its constructor ProgressMonitorDialog(Shell parent).
- Execute the task with the run method: run(boolean fork, boolean cancelable, IRunnableWithProgress runnable).
The following code creates a progress monitor dialog (see Figure 18-6) and executes a simple number counting task:
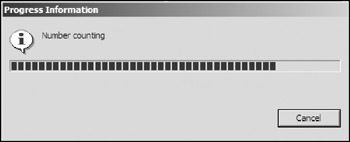
Figure 18-6
 IRunnableWithProgress runnableWithProgress = new IRunnableWithProgress() {
 public void run(IProgressMonitor monitor)
 throws InvocationTargetException, InterruptedException {
 monitor.beginTask("Number counting", 10);
 for(int i=0; i<10; i++) {
 if(monitor.isCanceled()) {
 monitor.done();
 return;
 }

 System.out.println("Count number: " + i);
 monitor.worked(1);
 Thread.sleep(500); // 0.5s.
 }
 monitor.done();
 }
 };

 ProgressMonitorDialog dialog = new ProgressMonitorDialog(getShell());
 try {
 dialog.run(true, true, runnableWithProgress);
 } catch (InvocationTargetException e) {
 e.printStackTrace();
 } catch (InterruptedException e) {
 e.printStackTrace();
 }
The user may click the Cancel button to cancel the operation. When the operation is complete, the dialog closes automatically.
Summary
This chapter introduced you to the JFace windows framework and JFace dialogs. You can use the ApplicationWindow class to simplify the task of creating and managing windows. If you need to manage multiple windows, you can use the WindowManager class to help you group windows and close all the windows with a single call. Dialogs are special windows that are used for narrow-focused communication with the user. JFace provides several dialogs that you can use to create various dialogs with minimal code. The next chapter covers JFace wizards. These wizards are very useful for guiding the user through the steps to complete complex tasks.
Part I - Fundamentals
- Overview of Java UI Toolkits and SWT/JFace
- SWT/JFace Mechanisms
- Jump Start with SWT/JFace
- SWT Event Handling, Threading, and Displays
- Basic SWT Widgets
- Layouts
Part II - Design Basics
Part III - Dynamic Controls
- Scales, Sliders, and Progress Bars
- Other Important SWT Components
- SWT Graphics and Image Handling
- Drag and Drop and the Clipboard
- Printing
- JFace Windows and Dialogs
Part IV - Application Development
EAN: 2147483647
Pages: 147
