Form Presentation and Validation with Struts
Overview
In the previous chapter, all of our Struts examples were built around very simple screens, which were populated with data retrieved from the JavaEdge application. However, most web applications require a high degree of interaction, with end users often submitting the data via HTML forms.
This chapter is going to look at how to simplify the construction of HTML forms and form handling code, using the Struts development framework. We are going to discuss, from both a conceptual and implementation point of view, how the Struts framework can provide a configurable and consistent mechanism for building web forms. This chapter is going to cover the following topics:
- Validating HTML form data using the ActionForm class:
- How the validate() method of the ActionForm class is used to validate data against the user
- Error handling when a validation rule is violated
- Pre-populating an HTML form with data
- Configuring Struts for processing HTML form data
- Simplifying the development of HTML form pages using the Struts HTML tag libraries
Problems with Form Validation
Most web development teams do not have a consistent strategy for collecting the data from the end user, validating it, and returning any error messages that need to be displayed. They use a hodge-podge of different means of collecting and processing the user's data. Two commonly used mechanisms include embedding JavaScript in the HTML or JSP page rendering the form, and mixing the validation logic for the screen with the business logic in the business tier of the application. This inconsistency in the form processing often results in:
- Customers, whether they are internal (such as employees) or external (such as purchasers), have a disjointed experience while using the web-based applications of the organization. Each application requires the customer to have a different set of skills and an understanding of how the application works and how to respond to errors. In larger applications, this inconsistency can exist even between different pages in the same application.
- Validation logic is strewn through the different layers of the application. This increases the amount of time required to perform application maintenance. The maintenance developer, who is rarely the same as the code developer, often has to hunt for the location of the validation logic and know multiple development languages (JavaScript for validation rules enforced in the browser, Java for validation logic in the middle tier, and a stored procedure language for validation logic in the database).
- Validation logic is used differently across different browsers. JavaScript, though "standardized", is implemented differently across browsers. Developers of a web browser take great liberties in the way in which they implement the JavaScript European Computer Manufacturers Association (ECMA) standard. Often, they provide their own browser-specific extensions, which make cross-browser viewing (and portability) of the application difficult.
- The application code is difficult to reuse. With validation logic strewn throughout the tiers of an application, it is difficult to pick up that validation code and reuse it in another application. The developer has to take care of the dependencies that are present before reusing the validation code, because there is no clean separation between the validation and business logic.
All the problems identified above are the symptoms of the Validation Confusion antipattern. Recollecting the discussion in Chapter 1, the Validation Confusion antipattern occurs due to one of the following reasons:
- No clear distinction between the validation logic of the form data and the business logic that processes the user's request
- Lack of a pluggable interface, which allows the developer to easily modify the validation logic for a particular screen
- No standardized mechanism for identifying validation violations and notifying them to the end user
Fortunately, the Struts framework provides a rich set of software services for building and managing the form data. These services allow a developer to handle the form validation in a consistent fashion. Much of the logic normally associated with capturing and presenting the errors becomes the responsibility of the Struts framework and not the application developer.
Using Struts for Form Validation
To build an HTML form in Struts we need to have the following pieces in place:
- A Struts ActionForm class, which is used to hold the data collected from the end user and perform any validations on that data. This class provides a simple-to-use "wrapper", which eliminates the need for developers to pull the submitted data out of the HttpServletRequest object associated with the end user's request.
- A Struts Action class to carry out the user's request. In the process of carrying out the user's request, any business rules that should be enforced will be executed and any database insert, updates, or deletes will be performed.
- A JSP page, which uses the Struts HTML tag libraries to render the form elements that are going to appear on the page.
Tying all of these pieces together is the struts-config.xml file. This file will have entries in it for defining the Struts ActionForm classes used in the application, which ActionForm classes are going to be used with which action, and whether an ActionForm class is going enforce the validation against the submitted data. Each Struts action processing the form data must have its corresponding tag modified, to indicate which ActionForm class will be used by the action.
Let's discuss what happens when the user submits the data in an HTML form. The diagram below shows what happens when the user submits the form data to a Struts-based application.
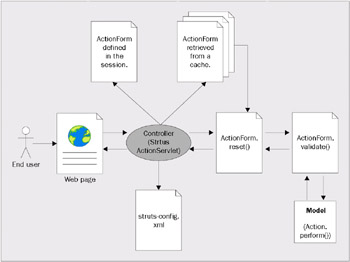
- The ActionServlet examines the struts-config.xml file, to determine if an ActionForm class has been defined to validate the user's request. An ActionForm simplifies the form processing, but it is not required to access the form data submitted by the end user. An Action class can still access the submitted form data, by calling the getParameter() method in the request object passed into its perform() method. However, this bypasses all of the validation and error handling support in Struts.
- If the action does not have an ActionForm class defined for it, the ActionServlet will check an internal cache to see if the ActionForm exists in the user's session or request. (Whether or not the ActionForm for the action class is supposed to live in the session or the request is controlled by an entry in the struts-config.xml file. Configuration of the struts-config.xml file is discussed in the section called The struts-config.xml File.)
- If the ActionForm class has been defined to exist in the user's session, the ActionServlet will check if an ActionForm instance already exists in the session. If it exists, the ActionServlet will pull the ActionForm out of the session and populate its properties with values from the request. If it does not exist in the session, the ActionServlet will create a new instance of the ActionForm class, populate it with the data from the request, and put it in the session.
- If the ActionForm class has been defined to exist in the user's request, the ActionServlet will check its internal cache to see if an appropriate ActionForm class already exists. If an instance is available in the cache, the ActionServlet will take it out of the cache and call its reset() method. The reset() method puts the ActionForm class instance in a default state before populating it with the form data submitted by the end user. The reset() method is called only if the ActionForm is to be put in the user's request. If the ActionForm instance is stored in the user's session, the reset() method will not be invoked.
Whether or not the ActionServlet places the ActionForm class in the user's request or session is determined by the scope attribute in the tag. We will be exploring the tag in greater detail in the section called The struts-config.xml File.
- Once the reset() method has been called, the validate() method of ActionForm is invoked. The validate() method will enforce the validation rules on the form data submitted by the end user. If the data successfully passes all validations, the ActionServlet will invoke the perform() method, in the Action class, responsible for processing the user's request. If a validation error occurs, the ActionServlet will redirect the user back to the screen where the data was submitted. The user will then have to correct the validation violations before they can continue. We will be covering how Struts is notified of a validation error in the section called Validating the Form Data.
Once the user's data has successfully passed all the form validation, the perform() method will be invoked in the Action class associated with the action. Remember that the Java class that carries out the end user's request, is defined via the type attribute in the element. We suggest you to refer to Chapter 2, to understand how to configure a Struts action, before continuing.
Implementing Form Validation with Struts
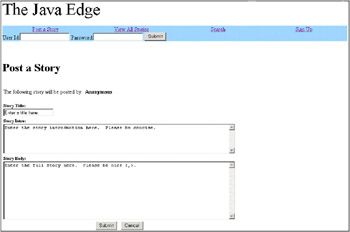
Let's begin the discussion of form handling by Struts, by looking at how an HTML form is processed by Struts when a user submits it. We are going to use the Post a Story page from the JavaEdge application (discussed in Chapter 3) as our example.
This page can be accessed by either clicking the Post a Story link in the menu bar at the top of every JavaEdge page or pointing our browser to http://localhost:8080/javaedge/execute/postStorySetup. The Post a Story page is used by a JavaEdge user to submit a story that the other users visiting this page can read.
If you have successfully reached this page, you will see the following screen:
Let's begin by looking at how to setup our struts-config.xml class to use ActionForm objects.
The struts config xml File
To use an ActionForm class to validate the data collected from a user form, the struts-config.xml file for the application must be modified. These modifications include:
- Adding a tag, which will define each of the ActionForm classes used in the application
- Modifying the tag processing the user's request, to indicate that before the user's request is processed, it must be validated by an ActionForm class
The > tag holds one or more tags within it. This tag appears at the top of the struts-config.xml file. Each tag corresponds to only one ActionForm class in the application. For the JavaEdge application, the tag looks as shown below:
 ...
  //more form-bean definitions.
The element has two attributes. They are:
- name
A unique name for the form bean being defined. Later on, this name will be used to associate this form bean with an element. This attribute is a required field.
- type
The fully-qualified class name of the ActionForm class that the form bean represents. This attribute is also a required field.
The actually has a third optional attribute called className. This attribute allows you to plug in a new base ActionForm class. For most purposes, the default ActionFormBean defined in the tag of the ActionServlet will suffice.
Once a has been defined, we can use it in an element to perform validation of the form data. To add the validation to a , we must supply four additional attributes in an element. These attributes are:
|
Attribute Name |
Attribute Description |
|---|---|
|
name |
Maps to the name of the that will be used to process the user's data. |
|
scope |
Defines whether or not the ActionForm class will be created in the user's request or session context. The scope attribute can be used only when the name attribute is defined in the tag. If the name attribute is present, the scope attribute is an optional tag. The default value for the scope attribute is request. |
|
validate |
A Boolean attribute that indicates whether or not the submitted form data will be validated. If it's true, the validate() method in the ActionForm class and the perform() method in the Action class will be invoked. If it's false, then the validate() method will not be invoked, but the perform() method in the Action class defined in the tag will be executed. The validate attribute is used only when the name attribute has been defined in the tag. The default value for the validate attribute is true. |
|
input |
Used to define where the user should be redirected, if a validation error occurs. Usually, the user is redirected back to the JSP page where the data was submitted. It is not required if the name attribute is not present. |
The /postStory action, processing the data entered by the user in the postAStory.jsp page, is shown below:
Struts ActionForm Class
The Struts ActionForm class is used to hold the entire form data submitted by the end user. It is a helper class that is used by the ActionServlet to hold the form data, which it has pulled from the end user's request object. The application developer can then use the ActionForm to access the form through get() and set() method calls.
The ActionForm class not only provides a convenient wrapper for the request data but also validates the data submitted by the user. However, an Action class is not required to have an ActionForm class. An Action class can still access the form data, submitted by the end user, by calling the getParameter() method in the request object passed into its perform() method.
To build an ActionForm class, the developer needs to extend the base Struts ActionForm class and override two methods in it, reset() and validate(). Just to review, the reset() method is overridden by the developer when an ActionForm class for an action is to be stored in the user's request context. The reset() method clears the individual attributes, in the ActionForm class, to ensure that the ActionForm class is properly initialized before it is populated with the user's form data. The validate() method is overridden by the developer. This method will contain all of the validation logic used in validating the data entered by the end user.
In addition, the application developer needs to define all the form elements that are going to be collected by the ActionForm class as private attributes in the class. For each defined attribute, there must be corresponding get() and set() methods that follow the standard JavaBean naming conventions.
| Important |
You must implement a get() and set() method for each form element captured off the screen. These get() and set() method should follow the standard JavaBean naming conventions. The first letter of the word after the get()/set() should be capitalized along with the first letter of each word in the method, thereafter. All other letters in the method name should be in a lower case. The Struts framework uses Java reflection to read the data from and write data to the ActionForm class. An exception will be raised if the get() or set() method is not present for a piece of data submitted. |
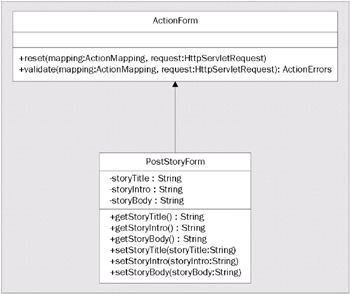
For the Post a Story page, we are going to write a Struts ActionForm class called PostStoryForm.java. This class will hold the story title, the story introduction, and the body of the story. In addition, it will contain the validation code for the data being submitted by the user. The class diagram shown below illustrates the class relationships, methods, and attributes for the Struts ActionForm class and the PostStoryForm class:
It is very easy to fall into the mindset that there must be one ActionForm class for each HTML form from which the data is collected. In small-to-medium size applications, there is nothing wrong in using a single ActionForm placed in the user's session. All the forms in the application will use this ActionForm to hold the data collected from the user.
This simplifies the collection of the data because your application has only one ActionForm instance that you have to work with. By using a single ActionForm class and placing it in the user's session, you can very easily implement a wizard-based application that will remember each piece of user information entered. As the user steps back and forth through the wizard, the data can easily be retrieved from the single ActionForm class.
The problem with using a single ActionForm class in the user's session is that the application will not scale as well. Remember, the objects placed in the user's session have a reference held until the session times out and the objects are garbage-collected. Do not place ActionForm objects in the session merely as a convenience. The other problem with this method occurs if the users are carrying out a long-lived transaction. If the users lose their connection or close their browser, any of the data entered till then will be lost. To ensure that as much of the user's data is captured and persisted as possible, break the application into smaller transactions. Use an ActionForm class for each application screen and persist the data in the ActionForm class as soon as the users submit their data. Place the ActionForm class into the request so that server resources are not unnecessarily used.
The code for the PostStoryForm class is shown below. However, the reset() and validate() methods for this class are not displayed. They will be discussed in the sections called Using the reset() Method and Validating the Form Data, respectively.
 package com.wrox.javaedge.struts.poststory;

 import org.apache.struts.action.Action;
 import org.apache.struts.action.ActionMapping;
 import org.apache.struts.action.ActionForm;
 import org.apache.struts.action.ActionForward;
 import org.apache.struts.action.ActionErrors;
 import org.apache.struts.action.ActionError;
 import org.apache.struts.action.ActionServlet;
 import org.apache.struts.util.MessageResources;
 import com.wrox.javaedge.common.VulgarityFilter;

 import javax.servlet.http.HttpServletRequest;
 import javax.servlet.http.HttpServletResponse;
 import javax.servlet.http.HttpSession;

 public class PostStoryForm extends ActionForm {

 String storyTitle = ""; //defined as empty string
 String storyIntro = "";
 String storyBody = "";

 /**
 * Validates all data posted from the Post Story page.
 */
 public ActionErrors validate(ActionMapping mapping,
 HttpServletRequest request) {
 ...
 }

 /**
 * Used to clear out the values stored in a PostStoryForm class's
 * attributes.
 */
 public void reset(ActionMapping mapping, HttpServletRequest request) {
 ...
 }

 /** Getter for property storyTitle.
 * @return Value of property storyTitle.
 */
 public java.lang.String getStoryTitle() {
 return storyTitle;
 }

 /** Setter for property storyTitle.
 * @param storyTitle New value of property storyTitle.
 */
 public void setStoryTitle(java.lang.String storyTitle) {
 this.storyTitle = storyTitle;
 }

 /** Getter for property storyIntro.
 * @return Value of property storyIntro.
 */
 public java.lang.String getStoryIntro() {
 return storyIntro;
 }

 /** Setter for property storyIntro.
 * @param storyIntro New value of property storyIntro.
 */
 public void setStoryIntro(java.lang.String storyIntro) {
 this.storyIntro = storyIntro;
 }

 /** Getter for property storyBody.
 * @return Value of property storyBody.
 */
 public java.lang.String getStoryBody() {
 return storyBody;
 }

 /** Setter for property storyBody.
 * @param storyBody New value of property storyBody.
 */
 public void setStoryBody(java.lang.String storyBody) {
 this.storyBody = storyBody;
 }
 }
Using the reset() Method
The reset() method is used to ensure that an ActionForm class is always put in a "clean" state, before the ActionServlet populates it with the form data submitted in the user's request. In the struts-config.xml, the developer can choose to place an ActionForm for a specific Struts action either in the user's session or request.
If the developer declares that the ActionForm is to be placed in the session, the reset() method will not be invoked. The ActionServlet will bypass the reset() method, populate the properties in the ActionForm with the data from the user's request, and then call the validate() method of the ActionForm.
The reset() method is invoked only if the developer has declared that the ActionForm class should be stored in the request. This method is necessary because Struts maintains a cache for each of the declared ActionForm classes. A single instance of an ActionForm class can be shared by multiple users for different requests at different times. Hence, the developer must implement the reset() method to ensure that the end user never gets some other user's data.
| Important |
You do not have to override the reset() method while building an ActionForm. However, if you declare an ActionForm class to be stored in the request, and not the session, it is always a good idea to implement a reset() method to clear the contents of the ActionForm class properties. |
Implementing the reset() method for the PostStoryForm, will set all its properties to an empty string. The reset() method for the PostStoryForm class is shown below:
 public void reset(ActionMapping mapping,
 HttpServletRequest request) {
 storyTitle = "";
 storyIntro = "";
 storyBody = "";
 }
Pre populating an ActionForm with Data
So far, we have talked about using the reset() method to ensure that the contents of an ActionForm class are cleared, before the ActionServlet places data in it from the user request. However, an ActionForm class can also be used to pre-populate an HTML form with data. The data populating the form might be text information retrieved from a properties file or a database.
To pre-populate an HTML form with data, we need to have the following Struts elements in place:
- A Struts pre-setup action, which will be called before a user is redirected to a JSP page, displaying an HTML form pre-populated with the data. The concept of pre- and post-setup actions is discussed in Chapter 2.
- An ActionForm class whose reset() method will pre-populate the form fields with data retrieved from the ApplicationResources.properties file. The ApplicationResources.properties file is discussed in Chapter 2.
- A JSP page, which uses the Struts HTML tag libraries to retrieve the data from the ActionForm class.
For example, we can pre-populate the HTML form for the Post a Story page with some simple instructions on what data is supposed to go in each field. For this example, we are going to use the following files:
- PostStoryForm.java
- PostStorySetupAction.java
- postStoryContent.jsp
We are only going to look at the PostStoryForm and the PostStorySetupAction Java classes. The postStoryContent.jsp file will use the Struts HTML tag library to read the values out of the PostStoryForm object stored in the request and display them in each field. The postStoryContent.jsp and Struts HTML tag library is discussed in the section called The Struts HTML Tag Library.
PostStoryForm.java
Writing the reset() method for a PostStoryForm to pre-populate the ActionForm with the instructions for each field in the form is a straightforward task:
 public void reset(ActionMapping mapping,
 HttpServletRequest request) {
 ActionServlet servlet = this.getServlet();
 MessageResources messageResources = servlet.getResources();

 storyTitle =
 messageResources.getMessage("javaedge.poststory.title.instructions");
 storyIntro =
 messageResources.getMessage("javaedge.poststory.intro.instructions");
 storyBody =
 messageResources.getMessage("javaedge.poststory.body.instructions");
 }
The reset() method above reads values from the ApplicationResources.properties file and uses them to populate the properties of the PostStoryForm object.
The Struts development framework provides an easy-to-use wrapper class, called MessageResources, for directly accessing the data in the ApplicationResources.properties file. To retrieve an instance of the MessageResources class, you first need to get a reference to the ActionServlet that is currently processing the ActionForm object. Fortunately, the ActionForm class provides a getServlet() method that will retrieve an instance of the ActionServlet:
ActionServlet servlet = this.getServlet();
Once an instance of the ActionServlet is retrieved, a call to its getResources()method will retrieve a MessageResources object that wraps all the values stored in the ApplicationResources.properties file:
MessageResources messageResources = servlet.getResources();
After getting an instance of a MessageResources object, you can pass the message key of the item that you want to retrieve to the getMessage(). The getMessage()method will retrieve the desired value:
messageResources.getMessage("javaedge.poststory.title.instructions");
If the key passed to the getMessage() method cannot be found, a value of null will be returned. The following are the name-value pairs from the ApplicationResources.properties file used to pre-populate the PostStoryForm:
 javaedge.poststory.title.instructions=Enter a title here.
 javaedge.poststory.intro.instructions=Enter the story introduction here. Please
 be concise.
 javaedge.poststory.body.instructions=Enter the full story here. Please be nice.
The PostStoryForm.reset() method is a very simple example of how to pre-populate a form with the data contained in an ActionForm class. In reality, many applications retrieve their data from an underlying relational database rather than from a properties file. How the reset() method on the PostStoryForm is invoked, is yet to be explored. Let's take a look at the PostStorySetupAction.java and see how we can trigger the reset()method.
PostStorySetupAction.java
Triggering the PostStoryForm.reset() method does not require any coding in the PostStorySetupAction.java file. All that the PostStorySetupAction class is going to do is to forward the user's request to the postStoryContent.jsp. So what role does the PostStorySetupAction.java play, if its perform() method just forwards the user on to a JSP page? How is the reset() method in the PostStoryForm class called?
If we set a Struts tag in the struts-config.xml file to use an ActionForm and tell the ActionServlet to put the PostStoryForm in the user's request, the reset() method in the PostStoryForm class will be invoked.
When a user clicks on the Post a Story link in the JavaEdge header, they are asking the ActionServlet to invoke the /postStorySetup action. This action is configured to use the ActionForm class of PostStoryForm. The PostStoryForm is going to be put in the user's request context by the ActionServlet.
Since the ActionForm class for the /postStorySetup action is the PostStoryForm class and the PostStoryForm class is going to be placed into the user's request context, the reset() method in the PostStoryForm class will be invoked. The reset() method is going to initialize each of the attributes in the PostStoryForm class to hold a set of simple instructions pulled from the ApplicationResources.properties file.
After the reset() method has been invoked the ActionServlet will place any submitted form data in the PostStoryForm instance. Since the user has not actually submitted any data, the PostStoryForm class will still hold all of the values read from the ApplicationResources.properties file. The ActionServlet will then invoke the perform() method in the PostStorySetupAction class, which will forward the user to the postStoryContent.jsp page. This page will display a form, pre-populated with instructions.
In summary, to pre-populate the form, we need to perform the following two steps:
- Write a Struts Action class called PostStorySetupAction.java. The perform() method of this class will pass the user on to postStoryContent.jsp.
- Set up an action called /postStorySetup in the struts-config.xml file. This action will use the PostStoryForm class.
The code for PostStorySetupAction.java is shown below:
 package com.wrox.javaedge.struts.poststory;

 import org.apache.struts.action.Action;
 import org.apache.struts.action.ActionMapping;
 import org.apache.struts.action.ActionForm;
 import org.apache.struts.action.ActionForward;
 import javax.servlet.http.HttpServletRequest;
 import javax.servlet.http.HttpServletResponse;
 import javax.servlet.http.HttpSession;
 public class PostStorySetupAction extends Action {
 public ActionForward perform(ActionMapping mapping,
 ActionForm form,
 HttpServletRequest request,
 HttpServletResponse response){
 return (mapping.findForward("poststory.success"));
 }
 }
The perform() method just forwards the user to the postStoryContent.jsp page, by returning an ActionForward mapped to this page:
return (mapping.findForward("poststory.success"));
The poststory.success mapping corresponds to the element, defined for the following tag of /postStorySetup:
The name attribute shown above tells the ActionServlet to use an instance of PostStoryForm, whenever the user invokes the /postStorySetup action:
name="postStoryForm"
Remember, the value of the name attribute must refer to a tag defined at the beginning of the struts-config.xml file.
The scope attribute tells the ActionServlet to place the PostStoryForm as an attribute in the HttpServletRequest object:
scope="request"
Setting the validate attribute to false, in the above tag, will cause the ActionServlet not to invoke the validate() method of the PostStoryForm. This means the reset() method in the PostStoryForm object is going to be invoked and placed in the user's request, but no data validation will take place.
Since no data validation takes place, the perform() method of PostStorySetupAction will be invoked. Remember, the Action class that carries out the end user's request is defined via the type attribute:
type="com.wrox.javaedge.struts.poststory.PostStorySetupAction"
Another Technique for Pre population
There is another technique for pre-populating an ActionForm with data. It is discussed here because implementing your Struts application using this technique can cause long-term maintenance headaches.
In the PostStorySetupAction.java, you could implement the perform() method so that it creates an instance of PostStoryForm and invokes its reset() method directly. After the reset() method is invoked, the PostStoryForm can then be set as an attribute in the request object passed in the perform() method. The following code demonstrates this technique:
 public class PostStorySetupAction extends Action {
 public ActionForward perform(ActionMapping mapping,
 ActionForm form,
 HttpServletRequest request,
 HttpServletResponse response){

 PostStoryForm postStoryForm = new PostStoryForm();
 postStoryForm.setServlet(this.getServlet());
 postStoryForm.reset(mapping, request);
 request.setAttribute("postStoryForm", postStoryForm);
 return (mapping.findForward("poststory.success"));
 }
 }
This technique does not require you to provide any additional configuration information in the tag. The above code carries out all the actions that the ActionServlet would carry out.
However, using this approach has two long-term architectural consequences. First, the above approach has tightly coupled the PostStoryForm class to the PostStorySetupAction class. In the future, if the development team wants the /postStorySetup to use something other than the PostStoryForm class for the pre-population or form validation, it must rewrite the perform() method. This becomes a tedious task, if the PostStoryForm class is present throughout multiple applications and a developer needs to switch it with another ActionForm class. If the developer had used the first technique and associated the PostStoryForm and PostStorySetup by declaring their usage in the struts-config.xml, a few small changes to the file could have easily switched the ActionForm class populating the postStoryContent.jsp page.
The second problem is that it takes control of the ActionForm away from the ActionServlet. The responsibility for managing the ActionForm shifts from the ActionServlet to the application developer. If the Struts development team changes how the ActionForm class is processed by the ActionServlet, the developers run the risk of having their application code break when they try to upgrade to the next release of Struts.
| Important |
If you have to work on the application framework, consider redesigning the task you are trying to execute. Stepping outside the application framework, as in the example shown above, can lead to long-term maintenance and upgrade issues. The Struts architecture tries to remain very declarative and controlling the application flow programmatically breaks one of the fundamental tenants of Struts. |
Validating the Form Data
As discussed earlier, a common mistake in web application development is for there to be no clear distinction between business logic and validation logic. The ActionForm class helps the developers to solve this problem, by allowing them to enforce lightweight validation rules against the data entered by a user. By encapsulating these validation rules in the ActionForm class, the developer can clearly separate the validation rules from the business logic that actually carries out the request. The business logic is placed in the corresponding Action class for the end user's request.
A web developer can override the validate() method and provide their own validation rules for the submitted data, while writing their own ActionForm class. If the developer does not override the validate() method, none of the data submitted will have any validation logic run against it.
The validate() method for the PostStoryForm class is going to enforce three validation rules:
- The users must enter a story title, story introduction, and story body. If they leave any field blank, they will receive an error message indicating that they must enter the data.
- The users are not allowed to put vulgarity in their application. The validate() method will check the data entered by the user for any inappropriate words.
- Each field in the Post a Story page is not allowed to exceed a certain length, otherwise, the user will get an error message.
It is important to note that, in all cases, the users will not be allowed to continue until they correct the validation violation(s).
The validate() method for the PostStoryForm class is as shown below:
 public ActionErrors validate(ActionMapping mapping,
 HttpServletRequest request) {
 ActionErrors errors = new ActionErrors();

 checkForEmpty("Story Title", "error.storytitle.empty",
 getStoryTitle(), errors);
 checkForEmpty("Story Intro", "error.storyintro.empty",
 getStoryIntro(), errors);
 checkForEmpty("Story Body", "error.storybody.empty",
 getStoryBody(), errors);

 checkForVulgarities("Story Title", "error.storytitle.vulgarity",
 getStoryTitle(), errors);
 checkForVulgarities("Story Intro", "error.storyintro.vulgarity",
 getStoryIntro(), errors);
 checkForVulgarities("Story Body", "error.storybody.vulgarity",
 getStoryBody(), errors);

 checkForLength("Story Title", "error.storytitle.length", getStoryTitle(),
 100, errors);
 checkForLength("Story Intro", "error.storyintro.length", getStoryIntro(),
 2048, errors);
 checkForLength("Story Body", "error.storybody.length", getStoryBody(),
 2048, errors);
 return errors;
 }
The first step in the validate() method is to instantiate an instance, called errors, of the ActionErrors class:
ActionErrors errors = new ActionErrors();
The ActionErrors class is a Struts class that holds one or more instances of an ActionError class. An ActionError class represents a single violation of one of the validation rules being enforced in the ActionForm class. If a form element submitted by an end user violates a validation rule, an ActionError will be added to the to the errors object.
When the validate() method completes, the errors object will be returned to the ActionServlet:
return errors;
If the errors object is null or contains no ActionErrors, the ActionServlet will allow the business logic to be carried out, based on the end user's request. This is done by invoking the perform() method in the Action class associated with the request.
Let's look at the checkForVulgarities() method, to see how an ActionError class is actually created when a validation rule is violated. The checkForEmpty() and checkForLength() methods will not be discussed in detail, but the code for these methods is shown below:
 /**
 * Ensures that the field being checked is not null
 */
 private void checkForEmpty(String fieldName, String fieldKey, String value,
 ActionErrors errors) {
 if (value.trim().length() == 0) {
 ActionError error = new ActionError("error.poststory.field.null",
 fieldName);
 errors.add(fieldKey, error);
 }
 }

 /**
 * Ensures that the field in question does not exceed a maximum length
 */
 private void checkForLength(String fieldName, String fieldKey, String value,
 int maxLength, ActionErrors errors){
 if (value.length() > maxLength){
 ActionError error = new ActionError("error.poststory.field.length",
 fieldName);
 errors.add(fieldKey, error);
 }
 }
Creating an ActionError
The checkForVulgarities() method is as shown below:
 /**
 * Ensures that the field being checked does not violate our vulgarity list
 */
 private void checkForVulgarities(String fieldName, String fieldKey,
 String value, ActionErrors errors) {

 VulgarityFilter filter = VulgarityFilter.getInstance();

 if (filter.isOffensive(value)){
 ActionError error = new ActionError("error.poststory.field.vulgar",
 fieldName);
 errors.add(fieldKey, error);
 }
 }
The first line in this method retrieves an instance of the VulgarityFilter into a variable called filter:
VulgarityFilter filter = VulgarityFilter.getInstance();
The VulgarityFilter class is implemented using a singleton design pattern and wraps a collection of words that are considered to be offensive. The code for the class is shown below:
 package com.wrox.javaedge.common;

 public class VulgarityFilter {

 private static VulgarityFilter filter = null;

 private static String[] badWords = {"Stupid", "Idiot", "Moron", "Dummy",
 "Flippin", "Ninny"};
 static {
 filter = new VulgarityFilter();
 }

 public static VulgarityFilter getInstance(){
 return filter;
 }

 public boolean isOffensive(String valueToCheck){
 String currentWord = "";

 for (int x = 0; x <= badWords.length - 1; x++){
 if (valueToCheck.toLowerCase().indexOf(badWords[x].toLowerCase())
 != -1) {
 return true;
 }
 }

 return false;
 }
 }
The VulgarityFilter class has a single method called isOffensive(), which checks if the text passed in is offensive. A value of true returned by this method indicates the user has entered data that contains offensive text:
if (filter.isOffensive(value))
When a vulgarity is found, a new ActionError is created and added to the errors object passed to the checkForVulgarity() method:
 ActionError error = new ActionError("error.poststory.field.vulgar",
 fieldname);
 errors.add(fieldKey, error);
There are five constructors that can be used to instantiate an ActionError class. The first parameter of each of these constructors is a lookup key, which Struts uses to find the text of the error message displayed to the end user. Struts will look for all error messages in the ApplicationResources.properties file associated with the application. The error messages for the Post a Story page are shown below:
 error.poststory.field.null=The following field: {0} is a required field. Please
 provide a value for {0}.

 error.poststory.field.vulgar=You have put a vulgarity in your {0} field. Please
 refer to our <a href="/javaedge/policy.html">terms of use policy.</a>

 error.poststory.field.length=Your {0} field is too long.
When the user violates the vulgarity validation rule and the checkForVulgarity() method creates an ActionError, the lookup key error.poststory.field.vulgar will be used to return the following error message:
 The following field: {0} is a required field. Please provide a value for
 {0}.
The error message can contain at most four distinct parameter values. The parameter values are referenced by using the notation: {number}, where the number is between zero and three. In the above example, only one parameter is inserted into the error message. A summary of the five constructors in the ActionError class is given below:
|
ActionError Constructor |
Description |
|---|---|
|
ActionError(String lookupKey) |
Retrieves the error message from the ApplicationResources.properties file. |
|
ActionError(String lookupKey, String param0) |
Retrieves the error message from the ApplicationResources.properties file and passes in one parameter. |
|
ActionError(String lookupKey, String param0, String param1) |
Retrieves the error message from the ApplicationResources.properties file and passes in two parameters. |
|
ActionError(String lookupKey, String param0, String param1, String param2) |
Retrieves the error message from the ApplicationResources.properties file and passes in three parameters. |
|
ActionError(String lookupKey, String param0, String param1, String param2, String param3) |
Retrieves the error message from the ApplicationResources.properties file and passes in four parameters. |
After the error object has been created, it is later added to the errors object by calling the add() method in errors:
errors.add(fieldKey, error);
The add() method takes two parameters:
- A key that uniquely identifies the added error within the ActionErrors class. This key must be unique and can be used to look up a specific error in the ActionErrors class.
- An ActionError object containing the error message.
Viewing the Errors
The Struts ActionServlet checks if there are any errors in the returned ActionErrors object and determines if a validation error was returned by the validate() method. If there are any ActionError objects in the returned ActionErrors instance, it means that the validation errors were found. If the value returned from the validate() method is null or contains no ActionError objects, no validation errors were found.
If the Struts ActionServlet finds that there are errors present in the ActionError object, it will redirect the user to the path set in the input attribute for the action. Most of the time, the value in this input tag is the JSP page where the data was entered. The ActionForm object holding the user's data will still be in the request. Thus, any data entered by the user in the form will appear pre-populated in the form. How does Struts present the user with all the errors raised in the validate() method? It does this using the tag. This tag is found in the Struts HTML custom JSP tag library. (There are several other form-related custom tags in the HTML tag library. We will be discussing the full HTML tag library in the section called The Struts HTML Tag Library). There are two ways of using this tag:
- To write each error message, stored within the ActionErrors class, to the JSP out PrintWriter class
- To retrieve a specific error message from the ActionErrors class and place it next to the specific fields
Writing All Error Messages to the JSP Page
To perform the first action, you must import the Struts HTML tag library and place the tag where you want the errors to appear. For instance, in the postStoryContent.jsp, we use this tag in the following manner:
 <%@ page language="java" %>
 <%@ taglib uri="/WEB-INF/struts-html.tld" prefix="html" %>
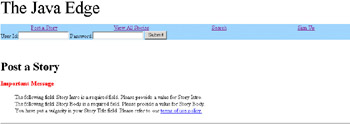
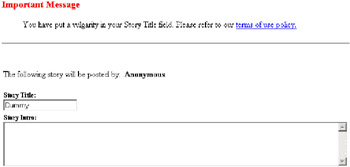
This code will write all the errors messages in the ActionErrors class returned by validate() method of the PostStoryForm immediately below the header of the page. The following example shows the type of error messages that can be presented to the end-user:
 You have put a vulgarity in your Story Title field. Please refer to our <a href="/javaedge/policy.html">terms of use policy.</a>

 The following field: Story Intro is a required field. Please provide a value for
 Story Intro.

 The following field: Story Body is a required field. Please provide a value for
 Story Body.
It is extremely important to note that the tag will write the error text exactly as it has been defined in the ApplicationResources.properties file. This means that the developer must provide HTML tags to format the appearance of the error message. This also includes putting any
tags for the appropriate line breaks between the error messages. The tag allows the application developer to define a header and footer for a collection of error messages. Headers and footers are defined by including an errors.header property and errors.footer property in the ApplicationResources.properties file. These two properties can contain text (and HTML code) that will appear immediately before and after the errors written by the tag. The following snippet shows these properties for the JavaEdge application:
errors.header=
Important Message
- errors.footer=
Even if you do not want to use the errors.header and errors.footer properties to generate an error header and footer, you must still define them in the ApplicationResources.properties with no values. For example:
 errors.header=
 errors.footer=
If you do not include these properties, you will get a null value appearing before and after your list of errors.
The tag provides a very simple and consistent error handling mechanism. Front-end screen developers only need to know that they have to put an tag in their JSP form pages to display any validation errors. The job of the server-side developers is simplified because they can easily validate the form data submitted by the end user and communicate any errors back to the user by populating an ActionErrors object.
Keeping in mind all the discussion that we had so far, when the end users violate a validation rule on the Post a Story page they will see the following output:
Retrieving a Single Error Message
The tag by itself is somewhat inflexible, because you have to present all the validation errors caused by the end user at a single spot on the screen. Many application developers like to break the validation errors apart and put them next to the field that contains the invalid data.
Fortunately, the tag allows you to pull a single error message from an ActionErrors object. It has an attribute called property. This attribute will let you retrieve an error message, using the key value that was used while adding the error message to the ActionErrors object. For example, when a user enters a word that violates the vulgarity filter, we add that validation error to the errors object by calling:
errors.add(fieldKey, error);
The fieldKey variable passed to the errors.add() method is the name we have chosen to represent that particular error. For example, if the user typed the word dummy into the story title field, this would violate the vulgarity validation rule and a new ActionError class would be instantiated. The new ActionError would be added to the errors class and would have a fieldKey value of error.storytitle.vulgarity.
If you wanted to put that specific error message directly above the Story Title field label, you could rewrite the postStoryContent.jsp with the following code:
By using the tag in the manner shown above, you can cause the postStoryContent.jsp to generate an error message that may look like the one shown below:
| Important |
You must remember that if you are going to scatter the individual validation errors throughout the screen, you need to make sure you set the errors.header and errors.footer properties, in ApplicationResources.properties, to no value. Otherwise, every error message rendered in the page will include the contents of the errors.headers and errors.footer properties. |
Error Handling and Pre-population
After discussing how HTML errors are handled in Struts, you might be a little bit confused. Why does the form show up with all of the fields pre-populated with the data that the user just entered? Why doesn't the reset() method in the ActionForm class reset all the values?
The reason is simple. When the validate() method is invoked and if there are validation errors, the ActionServlet is going to look at the value of the input attribute in the tag. The input attribute almost invariably points back to the JSP where the user entered the data. Remember, the reset() method gets called only when an action is invoked. Redirecting the user back to a JSP page will not invoke the reset() method. If the JSP page to which the user is redirected uses the Struts HTML tag library and an ActionForm in the user's request or session, it will pull the data out of the ActionForm and pre-populate the form elements with that data. Thus, when a validation error occurs the user sees the validation errors and a pre-populated form.
If you want to force the reset of all the elements in a form, after the validation occurs, you need to point the input attribute in the element to an action (usually a SetupAction of some kind).
The Struts HTML Tag Library
As we have seen earlier in this chapter, Struts provides the ActionForm and the Action classes as the means of validating and processing the data submitted by the end user. The Struts development framework also provides a JSP tag library, called the HTML tag library, which significantly simplifies the development of HTML-based forms. The HTML tag library allows the developer to write JSP pages that tightly integrate with an ActionForm class.
The Struts HTML tag library can be used to generate HTML form controls and read data out of an ActionForm class in the user's session or request. It also helps developers avoid writing significant amounts of scriptlet code to pull the user data out of JavaBeans (that is, the ActionForm objects) in the user's request and/or session. When combined with the other Struts tag libraries, as discussed in Chapter 2, a developer can write very dynamic and data-driven web pages without ever having to write a single line of JSP scriptlet code.
The Struts HTML tag library contains a wide variety of tags for generating HTML form controls. We are not going to cover every tag in the Struts HTML tag library. Instead, we are going to go through the most commonly used tags and explore their usage. For a full list of the different tags available in the Struts HTML tag library, you can visit http://jakarta.apache.org/struts. The tags discussed in this chapter include:
|
Tag Name |
Tag Description |
|
|---|---|---|
|
Renders an HTML tag |
||
|
Renders a submit button |
||
|
Renders a cancel button |
||
|
Renders a text field |
||
|
Renders a textarea field |
||
|
Renders an HTML tag for creating drop-down boxes |
||
|
Renders an HTML |
control that represents a single box in a dropdown | |
|
Renders an HTML checkbox |
||
|
Renders an HTML radio control |
Let's begin the discussion of the Struts HTML tag library by looking at the postStoryContent.jsp page:
 <%@ page language="java" %>
 <%@ taglib uri="/WEB-INF/struts-bean.tld" prefix="bean" %>
 <%@ taglib uri="/WEB-INF/struts-html.tld" prefix="html" %>
 <%@ taglib uri="/WEB-INF/struts-logic.tld" prefix="logic" %>
 <%@ taglib uri="/WEB-INF/struts-template.tld" prefix="template" %>
| Anonymous |
|
Setting Up a Struts HTML Form
Before using the individual Struts HTML tag within a JSP page, three steps must be undertaken:
- Import the Struts HTML Tag Library Definitions (TLDs)
- Define an tag, within the page, that will map to an tag defined in the struts-config.xml file
- Define an button to allow the user to submit the entered data
The Struts HTML TLD is imported as shown below:
<%@ taglib uri="/WEB-INF/struts-html.tld" prefix="html" %>
Next, we use the Struts HTML tags. Just as in a static HTML page, we need to define a tag that will encapsulate all the HTML form controls on the page. This is done by using the tag.
...
The tag has a number of different attributes associated with it. However, we will not be discussing every attribute in detail. Some of the attributes are given below:
|
Attribute Name |
Attribute Description |
|---|---|
|
action |
Maps to the tag that will carry out the user's request when the form data is submitted. This is a required field. |
|
method |
Determines whether the form will be sent as a GET or POST. This is not a mandatory field and if it is not specified, Struts will generate the tag to use a POST method. |
|
Name |
The name of the JavaBean that will be used to pre-populate the form controls. The tag will check if this bean is present in the user's session or request. The scope attribute below defines whether to look into the user's session or request. If no JavaBean is found in the context defined in the scope attribute, the tag will create a new instance of the bean and place it into the scope defined by the scope attribute. The class type of the created JavaBean is determined by the type attribute below. |
|
scope |
Determines whether the bean should look in the user's session or request for the JavaBean named in the name attribute above. The value for this attribute can be either "session" or "request". |
|
type |
Fully qualified Java class name for the JavaBean being used to populate the form. |
|
onsubmit |
Lets the developer define a JavaScript onSubmit() event handler for the generated form. |
|
onreset |
Lets the developer define a JavaScript onReset() event handler for the generated form. |
|
Focus |
Name of the field that will have focus when the form is rendered. |
The most important of these attributes is the action attribute. It maps to an element defined in the struts-config.xml file. If no name, scope, or type attribute is specified in the tag, the ActionForm that will be used to populate the form its fully qualified Java name, and the scope in which it resides will be pulled from the tag in struts-config.xml file.
In the tag used in the postStoryContent.jsp, all the ActionForm information would be retrieved by the ActionServlet, by looking at the name attribute in the tag of postStory action in the struts-config.xml file:
Since the value of name (postStoryForm) is defined as a element in the struts-config.xml, the ActionServlet can figure out its fully qualified Java class name and instantiate an instance of that class.
| Important |
It is a good practice to use the action attribute rather than the name, scope, and type attributes, to define the JavaBean that will populate the form. Using this attribute gives you more flexibility, by allowing you to change the ActionForm class in one location (struts-config.xml) rather than searching multiple JSP pages. |
Let's look at the HTML generated by the tag shown earlier:
The name attribute generated tells the ActionServlet of Struts that the postStoryForm bean, defined in the tag of the struts-config.xml, is going to be used to hold all the data posted by the user. The default method of the form (since we did not define one in the tag) is going to be a POST method. The action attribute contains the URL to which the form data is going to be submitted. Since the action of the tag was postStory, the generated the action attribute (for the corresponding tag) is /javaedge/execute/postStory.
The last step in setting up an HTML form is using the Struts tag to generate an HTML submit button:
In addition to the tag, the Struts tag library has HTML tags for creating cancel buttons. When an tag is used an HTML button will be rendered that, when clicked, will cause the ActionServlet to bypass the validate() method in the ActionForm that is associated with the form.
Even though the validate() method is bypassed, the perform() method for the Action class (in this case PostStory.java) linked with the form will be invoked. This means that, if you want to use an button in your page, the perform() method must to detect when the cancel button is invoked and act accordingly. For instance, let's say the following tag was added to the postStoryContent.jsp file:
The validate() method in the PostStoryForm class would not be called. However, the perform() method on the PostStory class would be invoked. The perform() method taken from the PostStory class could be written in the following manner:
 public ActionForward perform(ActionMapping mapping,
 ActionForm form,
 HttpServletRequest request,
 HttpServletResponse response){
 if (this.isCancelled(request)){
 System.out.println("*****The user pressed cancel!!!");
 return (mapping.findForward("poststory.success"));
 }

 //Add the story data to the database.
 ...
 return (mapping.findForward("poststory.success"));
 }
If you did not want the code in the perform() method to be executed, you will have to use a method called isCancelled() to detect if the user pressed a cancel button. The isCancelled() method is inherited from the base Struts Action class. This method looks for a parameter in the user's request, called org.apache.struts.taglib.html.CANCEL. If it finds this parameter, it will return true indicating to the developer (writing the perform() method code) that the user clicked the cancel button.
The parameter name, org.apache.struts.taglib.html.CANCEL, maps to the name attribute in the tag generated by the button. The HTML button generated by the tag shown earlier looks like:
Unlike the tag, the property attribute on the tag is rarely set.
| Important |
If you set the property attribute in the button, it will override the default value generated and you will not be able to use the isCancelled() method to determine if the user wants to cancel the action. |
Using Text and TextArea Input Fields
The postStoryContent.jsp files use text and textarea tags to collect the data from the end user. The and tags are used to generate the text and textarea tags, respectively. For instance, the postContent.jsp page uses the tag to generate an HTML text tag by using:
The tag has a number of attributes, but the most important are name and property. The name attribute defines the name of the ActionForm bean that the input field is going to map to. The property attribute defines the property in the ActionForm bean that is going to map to this input field. There are two things that you should keep in mind while working with the property attribute:
- The property attribute will map to a get() and set() method in the ActionForm bean. This means that value must match the standard JavaBean naming conventions. For instance, the value storyTitle is going to be used by the ActionServlet to call the getStoryTitle() and setStoryTitle() methods in the ActionForm.
- The value in a property attribute can be nested by using a "." notation. Let's assume that the ActionForm method had a property called member that mapped to a MemberVO object containing the user data. The developer could set the value of the property attribute to be "member.firstName". This would translate into a call to the getMember().getFirstName() and getMember().setFirstName() methods of PostStoryForm class.
| Important |
If you refer to the Struts documentation on the Jakarta web site, you will notice that almost every Struts HTML tag has a name attribute in it. This attribute is the name of the JavaBean to and from which the HTML tag will read and write data. You do not have to supply a name attribute for the HTML form attributes we are describing in the following sections. If you do not supply a name attribute and if the control is inside an tag, the control will automatically use the ActionForm associated with the tag. |
The input tag behaves in a similar fashion to the tag. The tag uses the column and row attributes to define the width and length of the textarea the user can type in:
The above tag will generate an tag called storyInto that will be 80 columns wide and five rows long.
Drop down Lists, Checkboxes, and Radio Buttons
Most HTML forms are more than just a collection of the simple text field controls. They use drop-down lists, checkboxes, and radio buttons to collect a wide variety of information. While the postStoryContent.jsp file did not contain any of these controls, it is important to understand how the Struts framework renders these controls using the HTML tag library. Let's begin the discussion by the looking at the drop-down list.
Drop-down List
A drop-down list HTML control provides a list of options that a user can select from. However, the user sees only the item that has been selected. All of the other items are hidden until the user clicks on the drop-down box. On clicking the box, the rest of the options will be displayed and the user will be able to make a new choice.
Since the Post a Story page does not have a drop-down box, we will have to step away from it briefly. Using the Struts HTML tag library, there are two ways of rending a drop-down box:
- Use an tag and build a static list of options by hard-coding a static list of tags in the code
- Use an tag and dynamically build the list by reading the data from a Java collection object using the tag
The tag renders a tag in HTML. The tag renders a single option for placement in the drop-down list. If you want to display a drop-down list containing a list of name prefixes, you would write the following code in your JSP file: Please select a prefix Mr. Ms. Mrs. Dr. The above code snippet would generate the following HTML:
Please select a prefixMr.Ms.Mrs.Dr.
The tag has one important attribute, the property attribute. It is the name of the ActionForm method that will store the item selected from the drop-down list. The tag must always be contained within an tag. The value attribute in the tag specifies the value that will be sent in the user's request for the selected item from the drop-down list, when they hit the "submit" button.
The and tag work well while generating a drop-down list that does not change. However, if you want to create a drop-down list based on the data that is dynamic, such as the data pulled from a database, you need to the use the tag. The allows you to generate an
list from a Java Collection object.
Let's assume that in a SetupAction class we created a Vector object and populated it with the prefix codes. We then put that code in the request object as shown below:
 Vector prefixes = new Vector();
 prefixes.add("NS");
 prefixes.add("Mr.");
 prefixes.add("Ms.");
 prefixes.add("Mrs.");
 prefixes.add("Dr.");
 request.setAttribute("prefixes", prefixes);
We could then render this collection into a drop-down list using the following code:
CheckBoxes
Setting up a checkbox to appear on an HTML form is easy to do. It just requires the use of a checkbox flag. To create a checkbox on a form, the following syntax can be used:
The property attribute for the checkbox matches the name of the property in the ActionForm for which the checkbox is going to get and set data. The value attribute is the value that will be sent in the HTTP request if the user checks the checkbox. If no value is specified, then the default value will always be on.
One important thing to remember is that when a checkbox is not checked, no value will be passed in the HTTP request. This also means that the value that was already set in the property in the ActionForm associated with the checkbox will not change. You have to check the request to see if the checkbox is present in the request. If it is not, you have to set the ActionForm property to a false or off value:
 if (request.getAttribute("someBeanProperty") == null) {
 this.setSomeBeanProperty(false);
 }
This is important because otherwise if the submitted data has a validation error and the ActionServlet returns the user to the screen, where they entered data, any checkboxes that had been moved from a checked to an unchecked state would still show up on the screen as checked.
So in your validate() method in the ActionForm you must check the request object to see if the checkbox parameter was passed as a request attribute. If it was not, you must set the corresponding property in the ActionForm to be false. This has to be done before you start doing any validation of the form data, or else you will end up with your form data inconsistently handling the checkbox information passed to it. This also means that if you want to pre-populate a form with checkboxes set in an off status, the reset() method of the ActionForm, being used to populate the page must set the properties in the ActionForm that map to the checkboxes to a false value.
Radio Buttons
To render a radio button in a form, we use the tag. This tag has two core attributes: property and value. These two attributes are similar in behavior to the tag. The property attribute defines the name of the property in the ActionForm that the radio button maps to. The value attribute is the value that will be sent, if the radio button is selected when the user submits the form.
To group a set of radio button controls together, so that only one of a group of radio buttons can be set, can be accomplished by setting each radio button's property attribute to point the same ActionForm property.
If we wanted to use a radio button, instead of the drop-down list to show a selection of prefixes to the user, we could write the following code:
- Mr.
- Ms.
- Mrs.
- Dr.
The HTML generated by the above code would look as shown below:
- Mr.
- Ms.
- Mrs.
- Dr.
Dynamic Forms and Validation
The current stable release of Struts, v1.0.2, provides powerful development metaphors for capturing, processing, and validating the form data submitted by an end user. In medium-to-large projects, implementing an individual ActionForm class for each screen in the application can turn into a significant amount of work. The developers will find that they are writing a large number of ActionForm classes to capture the data, but are basically providing the same types of validation rules against the data.
The next release of the Strut framework, v1.1b (b standing for beta), offers two new features that promise significant reduction in the amount of work associated with building the form classes. These two new features are:
- Dynamic Forms
- The Validator Framework
Let's take a look at these new features and see how they can be used to build our previous example, the Post a Story page. Note that since this is a beta version of Struts, the features and their implementations described here might differ slightly when version 1.1 of the framework is released.
Dynamic Forms
As we discussed earlier in the chapter, to use Struts form processing capabilities, developers need to explicitly extend the Struts ActionForm class. They need to implement getter or setter methods for each of the form fields they wanted to capture in the class and override the reset() and validate() method inherited from the ActionForm class.
Struts v1.1b now gives the development team the ability to declaratively define an ActionForm class without writing a single line of code. To do this, we need to first define a class in the struts-config.xml. The following code shows the entry that is used to define the ActionForm (postStoryForm) class in the Post a Story page:
Just like the standard non-dynamic Struts ActionForm class, we need to define the dynamic ActionForm class as a entry in the struts-config.xml. However, while defining a dynamic ActionForm, we do not provide our own ActionForm class in the type attribute of the tag. Instead, we use the org.apache.struts.Action.DynaActionForm in the type attribute:
Using the DynaActionForm class tells Struts that we will be using a dynamic ActionForm. Once we have defined the , we need to define the individual properties in it. This is equivalent to writing a get()/set() method in a non-dynamic ActionForm class:
Just like the non-dynamic example shown earlier in the chapter, our dynamic ActionForm (postStoryForm) definition has three properties: storyIntro, storyBody, and storyTitle. Each of these properties has a corresponding tag.
A <form-property> tag has three attributes:
|
Attribute Name |
Attribute Description |
|---|---|
|
name |
The name of the property and the value that will be referenced by the Struts HTML tag libraries, while accessing and setting the form data. This is a mandatory attribute. |
|
type |
Fully-qualified Java class name of the attribute being set. This is a mandatory attribute. |
|
initial |
The initial value that the attribute will be populated with when the reset() method for the ActionForm class is invoked. Since, this is a dynamic form, the developer does not have to override the reset() method on the form. |
Defining the and its corresponding tags is sufficient to tell Struts to use a dynamic ActionForm class. The postStoryContent.jsp page, which pulls the data from the postStoryForm form bean, does not have to be modified. It does not care whether we are using a non-dynamic or dynamic ActionForm.
Pulling the data from a dynamic form bean in the Struts Action class is done a little differently than in a non-dynamic form bean. The following code shows the rewritten PostStoryForm class (that is, the Action class), pulling the data from the dynamic postStoryForm form bean defined above:
 package com.wrox.javaedge.struts.poststory;

 import java.util.Vector;

 import javax.servlet.http.HttpServletRequest;
 import javax.servlet.http.HttpServletResponse;
 import javax.servlet.http.HttpSession;

 import org.apache.struts.action.Action;
 import org.apache.struts.action.ActionForm;
 import org.apache.struts.action.ActionForward;
 import org.apache.struts.action.ActionMapping;
 import org.apache.struts.action.DynaActionForm;

 import com.wrox.javaedge.common.ApplicationException;
 import com.wrox.javaedge.member.MemberVO;
 import com.wrox.javaedge.story.StoryManagerBD;
 import com.wrox.javaedge.story.StoryVO;
 import com.wrox.javaedge.story.dao.StoryDAO;

 public class PostStory extends Action {
 public ActionForward perform(ActionMapping mapping,
 ActionForm form,
 HttpServletRequest request,
 HttpServletResponse response){
 if (this.isCancelled(request)) {
 return (mapping.findForward("poststory.success"));
 }

 DynaActionForm postStoryForm = (DynaActionForm) form;

 HttpSession session = request.getSession();

 MemberVO memberVO = (MemberVO) session.getAttribute("memberVO");

 try{
 StoryVO storyVO = new StoryVO();
 storyVO.setStoryIntro((String)postStoryForm.get("storyIntro"));
 storyVO.setStoryTitle((String)postStoryForm.get("storyTitle"));
 storyVO.setStoryBody((String)postStoryForm.get("storyBody"));
 storyVO.setStoryAuthor(memberVO);
 storyVO.setSubmissionDate(new
 java.sql.Date(System.currentTimeMillis()));
 storyVO.setComments(new Vector());

 StoryManagerBD storyManager = new StoryManagerBD();
 storyManager.addStory(storyVO);
 } catch (Exception e) {
 System.err.println("An application exception has been raised in
 PostStory.perform(): " + e.toString());
 return (mapping.findForward("system.failure"));
 }

 return (mapping.findForward("poststory.success"));
 }
 }
The difference between the above PostStory class and the PostStoryForm class shown earlier is subtle. First, the above PostStory class no longer casts the ActionForm being passed into the perform() method in the PostStoryForm class shown earlier in the chapter. Instead, it casts the incoming ActionForm parameter to be of type DynaActionForm:
DynaActionForm postStoryForm = (DynaActionForm) form;
Then, while retrieving the data from the form, it does not call an individual getXXX() method for each property in the ActionForm. Instead, it invokes the get() method in the class by passing in the name of the property it wants to retrieve:
 storyVO.setStoryIntro((String)postStoryForm.get("storyIntro"));
 storyVO.setStoryTitle((String)postStoryForm.get("storyTitle"));
 storyVO.setStoryBody((String)postStoryForm.get("storyBody"));
The code then casts the individual properties retrieved to the Java data types that were defined in the tag in the struts-config.xml file.
The dynamic form bean is a powerful feature of Struts v1.1b. It allows you to easily implement and change the form beans without having to write a single line of code. This new feature keeps very much in line with the philosophy of Struts which is to let the framework do as much of the work as possible, while allowing the developer to focus on building the business code rather than the infrastructure code.
However, the real power of dynamic form beans comes into play when they are combined with another new Struts v1.1.b feature, the Validator framework.
The Validator Framework
After building several Struts-based applications, you will often find that you are performing the same types of validation over and over again. Some common validations include the following checks:
- If the user has entered all required fields
- If the data is within a minimum or maximum size
- If the data entered is of the right type
Struts release v1.1b now provides a framework that allows you to reuse a set of common validation routines without having to write the code. This framework, called the Validator framework, allows you to write your own validation routines that can be plugged in and used across all of your own form bean classes. We are not going to discuss this framework in depth. For the purposes of this chapter, we will look at how to use it to mimic the validate() method of the PostStoryForm class shown earlier. Specifically, we are going to use a dynamic form bean to collect the form data and apply the following validation rules:
- Check if the story title, story body, and story introduction fields, in the Post a Story page, are filled in by the end user
- Check that each field entered by the user does not exceed a certain character length
The third validation, checking for vulgarity, will not be implemented here. Writing your own validation rules requires much more explanation. For the details on extending the validation framework with your own validation rules, please refer to the Struts documentation (http://www.jakarta.apache.org/struts).
Let's begin our discussion by looking at how the Validator framework is set up and configured.
Validator Framework Setup
The Validator framework requires a modification in the struts-config.xml file and the addition of two new configuration files: validator-rules.xml and validation.xml. Struts v1.1b allows new functionality to be added to the framework via a plug-in. The Validator framework is one such plug-in. We are not going to discuss the Struts v1.1b framework in any detail. For further information on the plug-in architecture, please refer to the Struts v1.1b documentation (http://jakarta.apache.org/struts/userGuide).
To make Struts aware of the Validator framework, we need to add the following entry (that is, ) at the end of the JavaEdge struts-config.xml file:
This defines the fully-qualified Java class that represents the plug-in point between Struts and the third-party software. The tag is used to set a plug-in specific property. In the above example, the pathnames property contains a comma-separated list telling the Validator framework where to find the validator-rules.xml file and the validation.xml file.
The validator-rules.xml file contains individual rule entries for the pre-defined validation rules that come as part of the Validator framework. A partial listing of the validation rules defined in the validator-rules.xml is shown below:
|
Rule Name |
Rule Description |
|---|---|
|
required |
Checks if the field has been filled in by the end user. |
|
minlength |
Ensures that the value entered is of a minimum length. |
|
maxlength |
Ensures that the value entered is of a maximum length. |
|
range |
Validates that the field entered by the user falls into a certain range. |
|
mask |
Validates that the field entered is of a particular format. |
|
byte |
Validates that the field entered is of type byte. |
|
short |
Validates that the field entered is of type short. |
|
integer |
Validates that the field entered is of type integer. |
|
long |
Validates that the field entered is of type long. |
|
float |
Validates that the field entered is of type float. |
|
double |
Validates that the field entered is of type double. |
|
date |
Validates that the field entered is of type date. |
|
|
Validates that the field entered is a properly formatted e-mail address. |
The validation.xml file contains the mappings to each form bean in that application that is going to use the Validator framework. It maps each field of the form bean to the validation rule that is going to be invoked against it. We will be going through some of the validation.xml details in the following section.
Implementing the Required Field Validation
In the Post a Story page, the story title, story introduction, and story body are all required fields. To use the Validator framework to enforce these rules, we must create a file called validation.xml. The following code shows the validation.xml file that is used to enforce the validation of the required fields:
The tag is the root element for the validation.xml file. It represents a collection of forms for the application. A tag can contain one or more
tags. A tag represents a particular form bean in the application:
The name attribute in the tag is the name of the form bean defined in the struts-config.xml file. Each tag has one or more tags associated with it.
The tag represents a single element of the that is going to be validated by the Validator framework. It has two attributes in it. These attributes are:
- property
The name of the field that is going to be validated. This must match the name of a field defined in the in the struts-config.xml. This is a mandatory attribute.
- depends
This lists, from left to right, all of the validation rules that are going to be invoked on the field. These rules will be fired in the order in which they are listed. In our example above, we are only applying the required rule against the field. This is a mandatory attribute.
A tag can contain one or more tags. The tag is used by the Validator framework to determine which message should be displayed to the end user, when a rule is violated:
A tag has three attributes:
- name
The name of the rule with which the message is associated. In our above example, the value of name points to the required rule.
- key
The key for the message in the Struts resource bundle (that is, ApplicationResources.properties) file. In our above example, the value of error.poststory.field.null would be pulled from the ApplicationResources.properties file as:
The following field: {0} is a required field. Please provide a value for {0}.The key attribute is a required attribute in the tag.
- resource
Tells the Validator framework that it should use the resource bundle to look up an error message, based on the value of the key attribute. If the value of resource is set to true, the resource bundle is used. If it is set to false, the default Struts resource bundle will not be used and the value in the key attribute will be taken as a literal string. The default value of the resource attribute is true.
A tag can also contain argument tags called , , , , and . These tags are used to pass arguments into the tags. The allows a developer to pass in the values to a message defined in the Struts resource bundle. The postStoryForm validation has one argument being passed into each of the messages in the field.
For example, the storyTitle uses the following tag. It indicate that whenever a validation error occurs in the storyValidation field of the postStoryForm, the following key will be used to look up a value from the ApplicationResources.properties file and perform a string substitution on the message:
So, if the users did not enter a value into the storyTitle field, they would get the following error message:
 The following field: Story Title is a required field. Please provide a value for
 Story Title.
The tags have three attributes:
- name:
Defines the name of the validation rule with which this argument is associated. For example, if we wanted only the first argument of the message to be available when the required rule is invoked for the storyTitle field, we would write the tag as follows:
If the name is not provided, this argument will be available to every validation rule that fires off a validation exception for that particular field.
- key:
The key for the message in the Struts resource bundle (that is, ApplicationResources.properties) file.
- resource:
Tells the Validator framework that it should use the resource bundle to look up an argument based on the value in the key attribute. If the value of resource is set to true, the resource bundle is used. If it is set to false, the default Struts resource bundle will not be used and the value of the key attribute will be taken as a literal string value. The default value of the resource attribute is true.
Once we have defined all the form and field mappings in the validation.xml file, we need to make one last change to validate our dynamic form bean against the rules we have defined. Any dynamic form bean using the Validator framework must have its entry modified in the struts-config.xml file. In this entry, the type attribute for the form bean must be set to use the org.apache.struts.validator.DynaValidatorForm class:
Now, let's look at setting up a slightly more complicated rule, the maxlength validation rule.
The maxlength Validation Rule
The next rule that we are going to implement, for our rewritten Post a Story page, puts some maximum size limit on the data entered by the user in each field. It is the maxlength validation rule.
The following code shows the revised validation.xml file, containing the new definitions of the rules:
 maxlength
 100


 maxlength
 2048


 maxlength
 100000
To set up each field with the maxlength validation rule, we need to add the rule to the value of the depends attribute in each tag. For the storyTitle field, this would look like:
The rules are always invoked from left to right. In the above validation.xml file, the required validation rule will be invoked before the maxlength rule.
For the two rules associated with each field, we need to add tags that will reflect the different messages for each rule. In the storyTitle, we have two tags with the name attribute of each being the same as one of the names defined in the depends attribute:
In addition, each message has two arguments passed to it. Thus, there are and tags defined in each tag. For the storyTitle field, it is as shown below:
The first argument, , is going to be shared across all the messages being thrown by the validation field. To do this, we do not define the name attribute in the tag. However, the second argument, is going to be available only to the maxlength validation rule. We indicate this by setting the name attribute in the tag to maxlength.
We need to define the constraints for the validation rule to take effect. For instance, for the maxlength validation rule, we need to specify the acceptable maximum length of the field being validated. This value can be set by using the tag. The maxlength validation rule takes a single parameter, maxlength, as an input value:
 maxlength
 100000
The tag contains two elements, and . The element holds the name of the input parameter being passed into the validation rule. The element holds the value that is to be set for that variable.
The table below lists all of the validation rules that accept the input parameters:
|
Rule Name |
Parameters |
Parameter Description |
|---|---|---|
|
minlength |
Min |
Integer value representing the minimum size of the field. |
|
maxlength |
Max |
Integer value representing the maximum size of the field. |
|
Range |
Min, max |
Integer value representing the minimum and maximum size for the field. |
|
Mask |
Mask |
Regular expression indicating the mask to be applied to the field. |
|
Date |
Datepattern |
Date pattern that is to be applied against the field to determine whether or not the user has entered a proper date. |
In the tag you would have noticed the unusual syntax of the key attribute. The key attribute is set to the value ${var:maxlength}. This value will pull the value defined for the tag whose is equal to maxlength. However, the value of this variable will be pulled only if the resource attribute in the tag is set to false.
Some Final Thoughts
Discussing how to use the Struts development framework is out of the scope of this book. The next release of Struts promises to offer many new features and enhancements, which will make the form processing and validation extremely automated. The section Dynamic Forms and Validation of this chapter has discussed these new features very briefly, particularly the Validator framework.
There are some other important topics on the Validator framework such as:
- Retrofitting the Validator framework into earlier versions of Struts
- Extending the Validator framework to include custom validation rules
The discussion on these topics is out of the scope of this book. For more information on these topics, you can visit the Struts web site (http://jakarta.apache.org/struts).
Summary
This chapter focused on how to use Struts to collect and process the data submitted in an HTML form. The following four pieces must be present to use the Struts-based form processing:
- ActionForm class
- Action class
- JSP page that uses the Struts HTML tag library to generate the HTML fields used to collect the user information
- name attribute in an tag in the struts-config.xml file
The ActionForm class acts as a wrapper class for the form data submitted by the user. The ActionServlet will use the ActionForm class defined for an action to pull the submitted form data out of the user's HTTP request. Each piece of data sent from a form will correspond to a get()or set() method that will be used to retrieve and populate the ActionForm. The ActionForm class has two methods that can be overridden by the developer, reset() and validate(). The reset() method is used to clear the properties in ActionForm to ensure that they are always in a predetermined state. To pre-populate a form with data, you can use the reset() method.
The validate() method in the ActionForm class will contain any validation rules that need to be applied against the submitted data. This method should contain only the lightweight validation rules that check the constraints on the data. If any validation errors are found, an ActionError class will be added to the ActionErrors class, which is passed back by the validate() method. If the ActionServlet finds that the ActionErrors contains errors, it will redirect the users back to the JSP page where they submitted the data. The validation errors will then be displayed using the tag.
The Action class is used to process the user's request. Its perform() method holds all the business logic used to process the user's request. We did not discuss the Action class in detail in this chapter. We are going to explore the handling business logic in the next chapter.
To map the data submitted in the HTML form to the ActionForm class, you need to use a JSP page that uses the Struts HTML tag library. The Struts HTML tag library contains a number of tags used for the rendering HTML input tags. Some of the tags that were covered in this chapter include:
- Tags used for building the base HTML form:
- : Used to render a tag
- : Renders a submit button
- : Renders a cancel button
- Tags used for entering information:
- : Renders a text field
- : Renders a textarea field
- : Renders a drop-down box
- : Renders one selection in a drop-down box
- : Renders a checkbox control
- <html:radio>: Renders a radio button control
These three pieces (ActionForm class, Action class, and JSP page) together are all associated with an tag in the struts-config.xml file. Each ActionForm used in the application must be declared as a tag. Once it is declared, the ActionForm can be associated with an tag. The name attribute of the tag tells the ActionServlet class processing a user request that there is an ActionForm class that will be used to collect the data. If the tag contains a validate attribute set to true, the ActionServlet will invoke the validate() method in the ActionForm class.
Finally, the chapter discussed some of the new form processing features in Struts v1.1b, in short. This chapter gave an overview of the following:
- Building dynamic forms using the DynaActionForm feature. We looked at how dynamic forms were configured and how an Action class uses the dynamic forms to retrieve the data submitted by the end user.
- Leveraging the Validator framework to automate many of the common form validations. We looked at setting up Struts to use the Validator framework. We also looked at how to implement two inbuilt Validator rules:
- required: Checks if a field is filled in or not
- maxlength: Determines whether or not the field length is exceeded
In the next chapter, we are going to look at how to build the business logic in Struts. The Struts development framework, with the help of the Action class, provides a clean mechanism for encapsulating the business logic. However, if you are not careful, you can limit the long-term reusability of your application code. The next chapter demonstrates the use of the several core design patterns, which when coupled with the Struts provide optimal code reusability.
Chapter 4 Managing Business Logic with Struts
Introduction
- The Challenges of Web Application Development
- Creating a Struts-based MVC Application
- Form Presentation and Validation with Struts
- Managing Business Logic with Struts
- Building a Data Access Tier with ObjectRelationalBridge
- Templates and Velocity
- Creating a Search Engine with Lucene
- Building the JavaEdge Application with Ant and Anthill
EAN: 2147483647
Pages: 83
