Creating a Struts-based MVC Application
Overview
| Important |
This is a reminder that all source code and support for this book can now be found at http://www.apress.com, even though references within the chapters may point to http://www.wrox.com. |
Building a web-based application can be one of the most challenging tasks for a development team. Web-based applications often encompass functionality and data pulled from multiple IT systems. Usually, these systems are built on a wide variety of heterogeneous software and hardware platforms. Hence, the question that the team always faces is how to build web applications that are extensible and maintainable, even as they get more complex.
Most development teams attack the complexity by breaking the application into small manageable parts, which can be communicated via a well-defined interface. Generally, this is done by breaking the application logic into three basic tiers: the presentation tier, business logic tier, and data access tier. By layering the code into these three tiers, the developers isolate any changes made in one tier from the other application tiers. However, simply grouping the application logic into three categories is not enough for medium to large projects. When coordinating a web-based project of any significant size, the application architect for the project must ensure that all the developers write their individual pieces to a standard framework that their code will "plug" into. If they do not, the code base for the application will be in absolute chaos, because multiple developers will implement their own pieces using their own development style and design.
The solution is to use a generalized development framework, which has specific plug-in points for each of the major pieces of the application. However, building an application development framework from the ground up entails a significant amount of work. It also commits the development team to build and support the framework. Framework support forces the development team to exhaust those resources that could otherwise be used for building applications.
The next three chapters of this book will introduce the reader to a readily available alternative for building their own web application development framework, the Apache Jakarta Group's Struts development framework. These chapters do not cover every minute detail associated with the Struts development framework; instead, they guide readers on how to use Struts to build the JavaEdge appication, described in Chapter 1.
This chapter is going to focus on installing the Struts framework, configuring it, and building the first screen in the JavaEdge application. We cover the following topics in this chapter:
- A brief history of the Struts development framework
- A Struts-based application walkthrough
- Setting up your first Struts project, including the physical layout of the project, and an explanation of all the important Struts configuration files
- Configuring a Struts application. Some of the specific configuration issues that will be dealt with here are:
- Configuring the Struts ActionServlet
- Configuring Struts "actions" in the struts-config.xml file
- Best practices for Struts configuration.
In addition to our brief Struts configuration tutorial, we are going to discuss how Struts can be used to build a flexible and dynamic user interface. We will touch briefly some, but not all, of the customer JSP tag libraries available to the Struts developer. Some of the tag libraries that will be covered in this chapter include:
- Manipulating JavaBeans, by using the Struts bean tag library
- Making JSP pages dynamic by leveraging the conditional and iterating power of the Struts logic tag library
Let's begin our discussion with some of the common problems faced while building an application.
The JavaEdge Application Architecture
The JavaEdge application that we are going to develop, is a very simple WebLog (that is, a Blog) that allows the end users to post their stories and comment on the other stories. We have already discussed the requirements of the JavaEdge application in Chapter 1 in the section called The JavaEdge Application. The application is going to be written completely in Java. In addition, all the technologies used to build this application will be based on technology made available by the Apache Group's Jakarta project.
In this section, we'll focus on some of the architectural requirements needed to make this application extensible and maintainable. This application is built by multiple developers. To enforce consistency and promote code reuse, we will use an application development framework that provides plug-in points for the developers to add their individual screens and elements.
The framework used should alleviate the need for the individual JavaEdge developer to implement the infrastructure code that is normally associated with building an application. Specifically, the development framework should provide:
- A set of standard interfaces for plugging the business logic into the application. A developer should be able to add and modify new pieces of functionalities using the framework, while keeping the overall application intact (that is, a small change in the business logic should not require major updates in any part of the application).
- A consistent mechanism for performing tasks, such as end-user data validation, screen navigation, and invocation of the business logic. None of these tasks should be hardcoded into the application source code. Instead, they should be implemented in a declarative fashion that allows easy reconfiguration of the application.
- A set of utility classes or custom JSP tag libraries, which will simplify the process in which the developer builds new applications and screens. Commonly repeated development tasks, such as manipulating the data in a JavaBean, should be the responsibility of the framework and not the individual developer.
The chosen development framework must provide the scaffolding in which the application is to be built. Without this scaffolding, AntiPatterns like the Tier Leakage and Hardwired AntiPatterns will manifest themselves. (These two AntiPatterns were introduced in Chapter 1.) We will demonstrate how Struts can be used to refactor these AntiPatterns in this chapter. Now, let's start the discussion on the architectural design of the JavaEdge application.
The Design
The development team decided to use a Model-View-Controller (MVC) pattern, as the basis for the application architecture. The three core components of the MVC pattern, also know as a Model-2 JSP pattern by Sun Microsystems, are shown below:
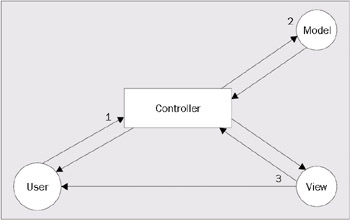
The numbers shown in the diagram represent the flow in which a user's request is processed. When a user makes a request to an MVC-based application, it is always intercepted by the controller (Step 1). The controller acts as a traffic cop, examining the user's request and then invoking the business logic necessary to carry out the requested action.
The business logic for a user request is encapsulated in the model (Step 2). The model executes the business logic and returns the execution control back to the controller. Any data to be displayed to the end user will be returned by the model via a standard interface.
The controller will then look up, via some metadata repository, how the data returned from the model is to be displayed to the end user. The code responsible for formatting the data to be displayed to the end user, is called the view (Step 3). View contains only the presentation logic and no business logic. When the view completes formatting the output data returned from the model, it will return execution control to the controller. The controller, in turn, will return control to the end user who made the call.
The MVC pattern is a powerful model for building applications. The code for each screen in the application consists of a model and a view. Neither of these components has explicit knowledge of the other's existence. These two pieces are decoupled via the controller, which acts as intermediary between these two components. The controller assembles, at run time, the required business logic and the view associated with a particular user request. This clean decoupling of the business and presentation logic allows the development team to build a pluggable architecture. As a result, new functionality and methods to format end-user data can easily be written, while minimizing the chance of any changes disrupting the rest of the application.
New functionality can be introduced into the application by writing a model and view and then registering these items to the controller of the application. Let's assume that you have a web application whose view components are JSP pages generating HTML. If you want to rewrite this application to generate PDF files rather than the HTML for the user's requests, you would only need to modify the view of the application. The changes you make to the view implementation will not have an impact on the other pieces of the application.
In a Java-based web application, the technology used to implement an MVC framework might look as shown below:
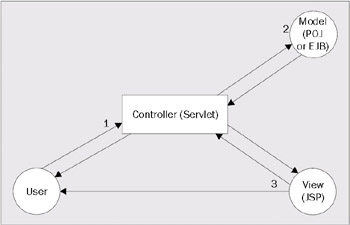
An MVC-based framework offers a very flexible mechanism for building web-based applications. However, building a robust MVC framework infrastructure requires a significant amount of time and energy from your development team. It would be better if you could leverage an already existing implementation of an MVC framework. Fortunately, the Struts development framework is a full-blown implementation of the MVC pattern.
In the next section, we are going to walk through the major components of the Struts architecture. While Struts has a wide variety of functionalities available in it, it is still in its most basic form an implementation of a Model-View-Controller pattern.
Using Struts to Implement the MVC Pattern
The Struts development framework (and many of the other open source tools used in this book) is developed and managed by the Apache Software Foundation's (ASF) Jakarta group. The ASF has its roots in the Apache Group. The Apache Group was a loose confederation of open source developers, who in 1995, came together and wrote the Apache Web Server. (The Apache Web Server is the most popular web server in use and runs over half of the web applications throughout the world.) Realizing that the group needed a more formalized and legal status, for protecting their open source intellectual property rights, the Apache Group reorganized as a non-profit corporation – the Apache Software Foundation – in 1999. The Jakarta group is a subgroup within the ASF, which is responsible for managing Java open source projects that the ASF is currently sponsoring.
The Struts development framework was initially designed by Craig R. McClanahan. Craig is a prolific open source developer, who is also one of the lead developers for another well-known Jakarta project, the Tomcat servlet container. He wrote the Struts framework to provide a solid underpinning for quickly developing JSP-based web applications. He donated the initial release of the Struts framework to the ASF, in May 2002.
All of the examples in this book are based on Struts release 1.0.2, which is the latest stable release. It is available for download from http://jakarta.apache.org/struts. There is currently a new release of Struts in beta testing, Release 1.1b. By the time this book is published, Release 1.1 will have been released, which supports all of the Struts features discussed in this book. When relevant, new features and functionality from Release 1.1b will be highlighted and discussed.
With this brief history of Struts, let's walk through how a Struts-based application works.
Walking Through Struts
Earlier in this chapter, we discussed the basics of the MVC pattern, on which the Struts development framework is based. Now, let's explore the workflow that occurs when an end user makes a request to a Struts-based application. The diagram overleaf illustrates this workflow:
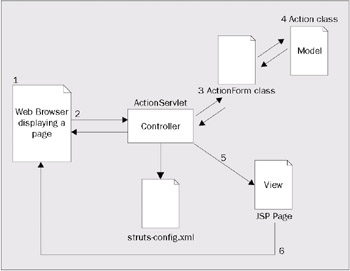
We are going to start our discussion with the end user looking at a web page (Step 1). This web page, be it a static HTML page or a JavaServer Page, contains a variety of actions that the user may ask the application to undertake. These actions may include clicking on a hyperlink or image that takes them to another page or submitting an online form that is to be processed by the application. All actions that are to be processed by the Struts framework will have a unique URL mapping (that is, /execute/*) or file extension (that is, *.do). This URL mapping or file extension is used by the servlet container to map all the requests over to the Struts ActionServlet.
The Struts ActionServlet acts as the controller for the Struts MVC implementation. The ActionServlet will take the incoming user request (Step 2) and map it to an action mapping defined in the struts-config.xml file. The struts-config.xml file contains all of the configuration information needed by the Struts framework to process an end- user's request. An is an XML tag defined in the struts-config.xml file that tells the ActionServlet the following information:
- The Action class that is going to carry out the end user's request. An Action class is a Struts class that is extended by the application developer. Its primary responsibility is to contain all of the logic necessary to process an end user's request.
- An ActionForm class that will validate any form data that is submitted by the end user. It is extended by the developer. It is important to note that not every action in a Struts application requires an ActionForm class. An ActionForm class is necessary only when the data posted by an end user needs to be validated. An ActionForm class is also used by the Action class to retrieve the form data submitted by the end-user. An ActionForm class will have get() and set() methods to retrieve each of the pieces of the form data. It will be discussed in greater detail in Chapter 3.
- Where the users are to be forwarded after their request has been processed by the Action class. There can be multiple outcomes from an end user's request. Thus, an action mapping can contain multiple forward paths. A forward path, which is denoted by the tag, is used by the Struts ActionServlet to direct the user to another JSP page or to another action mapping in the struts-config.xml file.
Once the controller has collected all of the above information from the element for the request, it will process the end user's request. If the element indicates that the end user is posting the form data that needs to be validated, the ActionServlet will direct the request to the defined ActionForm class (Step 3).
An ActionForm class contains a method called validate(). (The configuration code examples, given later in this chapter, may help you to understand this discussion better.) The validate() method is overridden by the application developer and holds all of the validation logic that will be applied against the data submitted by the end user. If the validation logic is successfully applied, the user's request will be forwarded by the ActionServlet to the Action class for processing. If the user's data is not valid, an error collection called ActionErrors is populated by the developer and returned to the page where the data was submitted.
If the data has been successfully validated by the ActionForm class or the does not define an ActionForm class, the ActionServlet will forward the user's data to the Action class defined by the action mapping (Step 4). The Action class has three public methods and several protected ones. For the purpose of our discussion, we will consider only the perform() method of the Action class. This method, which is overridden by the application developer, contains the entire business logic necessary for carrying out the end-user request.
Once the Action has completed processing the request, it will indicate to the ActionServlet where the user is to be forwarded. It does this by providing a key value that is used by the ActionServlet to look up from the action mapping. The actual code used to carry out a forward will be shown in the section called Configuring the homePageSetup Action Element. Most of the times, the user will be forwarded to a JSP page that will display the results of their request (Step 5). The JSP page will render the data returned from the model as an HTML page that is displayed to the end user. (Step 6)
In summary, a typical web screen, based on the Struts development framework, will consist of:
- One or more actions. Each action in the web page will map to exactly one element defined in the struts-config.xml file. An action that is invoked by an end user will be embedded in an HTML or JSP page, as a hyperlink or as an action attribute inside a tag. We will see some examples of this in the section called Template Tags.
- An element that will define the ActionForm class, if any, that will be used to validate the form data submitted by the end user. It will also define which Action class will be used to process the end user's request.
- An ActionForm class that can use one or more forwards, defined in the element, to tell the ActionServlet which JSP page should be used to render a response to the end user's request. Remember, multiple forwards can be defined within a single element.
Now that we have completed a conceptual overview of how a single web page in a Struts application is processed, let's look at how a single page from the JavaEdge Blog is written and plugged into the Struts framework.
Getting Started The JavaEdge Source Tree
Before diving into the basics of Struts configuration, we need to enumerate the different pieces of the JavaEdge application's source tree. The JavaEdge Blog is laid out in the following directory structure:
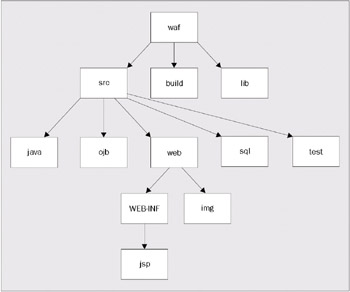
The root directory for the project called waf. There are several key directories underneath it, as discussed below:
- src: Contains the entire JavaEdge source code of the application. This directory has several subdirectories including:
- java: All Java source files for the application.
- ojb: All ObjectRelationalBridge configuration files. These files are discussed in greater detail in Chapter 5.
- web: Contains the entire source code of the application that is going to be put in the WEB-INF directory. Files in this directory include any image file used in the application along with any JSP files.
- sql: Contains all of the MySQL-compliant SQL scripts for creating and pre-populating the WAF database used by the JavaEdge application.
- build: Contains the Ant build scripts used to compile, test, and deploy the application. The Ant tool is discussed in detail, in Chapter 8.
- lib: Contains the JAR files for the various open source projects used to build the JavaEdge application.
The JavaEdge application is built, tested, and deployed with the following software:
- Tomcat-4.1.12
Tomcat is an implementation of the Sun Microsystems' Servlet and JSP specification. It is considered by Sun Microsystems to be the reference implementation for its specifications. The JavaEdge application is built and deployed around Tomcat. In Chapter 5, the open source application server bundle, JBoss 3.0.4/Tomcat 4.1.12, is used to run the application. Tomcat is available for download at http://jakarta.apache.org/tomcat. JBoss is an open source J2EE application server produced by the JBoss Group. It can be downloaded at http://jboss.org.
- MySQL
MySQL is chosen, because it is one of the most popular open source databases available today. It is highly scalable and extremely easy to install and configure. It is available for download at http://mysql.com.
- Ant
Versions 1.5 of the Apache Software Foundation's Ant build utility. It can be downloaded at http://jakarta.apache.org.
- Lucene
A Java-based Open Source search engine. It can be downloaded at http://jakarta.apache.org. It is discussed in detail in Chapter 7.
- Velocity
An alternative JOS development framework from the Jakarta Apache Group. Both Lucene and Velocity are discussed in greater detail in Chapter 6.
- Lucene
| Important |
All of the source code used in this book can be downloaded from Wrox web site (http://wrox.com/books/1861007817.htm). We will not be discussing how to configure any of the development tools listed above in this chapter. For the information on how to configure these tools, to run the code examples in this book, please refer to the readme.txt file packaged with the source code. |
We will start the JavaEdge Struts configuration, by configuring our application to recognize the Struts ActionServlet.
Configuring the ActionServlet
Any application that is going to use Struts must be configured to recognize and use the Struts ActionServlet. Configuring the ActionServlet in the web.xml file involves setting up two XML tag elements:
- A tag, which defines the name of the corresponding servlet Java class and any initial configuration parameters that are passed to the servlet when it is loaded
- A tag, which defines how the end user requests are going to be mapped to the Struts ActionServlet
The tag that is used to configure the ActionServlet for the JavaEdge application is shown below:
 MemberFilter
 com.wrox.javaedge.common.MemberFilter


 MemberFilter
 /execute/*


 action
 org.apache.struts.action.ActionServlet

 application
 ApplicationResources


 config
 /WEB-INF/struts-config.xml


 debug
 2


 detail
 0


 validate
 true


 validating
 true

 2


 action
 /execute/*


 default.jsp


 /WEB-INF/struts-bean.tld
 /WEB-INF/struts-bean.tld


 /WEB-INF/struts-html.tld
 /WEB-INF/struts-html.tld


 /WEB-INF/struts-logic.tld
 /WEB-INF/struts-logic.tld


 /WEB-INF/struts-template.tld
 /WEB-INF/struts-template.tld
Anyone who is familiar with Java Servlet configuration will realize that there is nothing particularly sophisticated going on here. The and tags define a filter, written by the JavaEdge team, that checks if the user has logged into the application. If the user has not logged in yet, they will automatically be logged in as an anonymous user. This filter is called every time the Struts ActionServlet is invoked. The tag defines all the information needed to use the Struts ActionServlet in the JavaEdge application. The provides a name for the servlet. The tag indicates the fully qualified Java class name of the Struts ActionServlet.
The Struts ActionServlet is highly configurable. The parameters shown in the above configuration are just some of the initialization parameters that can be used to control the behavior of the ActionServlet. More details about the parameters are provided in the table overleaf:
|
Parameter Name |
Parameter Value |
|---|---|
|
application |
Name of the application resource bundle. Setting this attribute to ApplicationResources will tell the Struts ActionServlet to use the ApplicationResources.properties file. |
|
config |
Name and location of the Struts XML configuration file (called struts-config.xml). The struts-config.xml file is a general configuration file for the Struts framework and is used by several classes within Struts. The directory path stored here is the relative path based on the base URL of the application. |
|
debug |
The debugging level provided by the ActionServlet. Setting this parameter to 0 turns off all debugging in the ActionServlet. Setting this initialization parameter to 1 or 2 will give out different levels of debugging information, 2 being the highest level of debugging offered by the ActionServlet. |
|
tempDir |
Directory where any temporary files are stored, when files are uploaded to the ActionServlet class. |
|
MaxFileSize |
Maximum file size of an uploaded file. The file size specified is a number followed by a K for kilobytes, M for megabytes, or G for gigabytes. |
|
validating |
Determines whether the struts-config.xml file is validated against the struts-config.dtd. By default, this value is assumed to be true. It is highly recommended that you do not change this value. |
| Note |
This is only a partial listing of the parameters for the Struts ActionServlet. For a full listing, please refer to the Struts Users Guide: http://jakarta.apache.org/struts/doc-1.0.2/userGuide. |
Once the element has been configured in the web.xml file, we need to define how the user requests are going to be mapped to the ActionServlet. This is done by defining a tag in the web.xml file. The mapping can be done in one of two ways:
- URL prefix mapping
- Extension mapping
In URL prefix mapping, the servlet container examines the URL coming in and maps it to a servlet. The for the JavaEdge application is shown below:
 ...

 action
 /execute/*
This servlet mapping indicates to the servlet container that any request coming into the JavaEdge application that has a URL pattern of /execute/* should be directed to the ActionServlet (defined by the shown above) running under the JavaEdge application. For example, if we wanted to bring up the home page for the JavaEdge application we would point our browser to http://localhost:8080/JavaEdge/execute/homePageSetup, where JavaEdge is the application name, execute is the URL prefix, and homePageSetup is the Struts action.
| Important |
It is important to note that all URLs shown in our code examples are case-sensitive and must be entered exactly as they appear. |
The servlet container, upon getting this request, would go through the following steps:
- Determine the name of the application. The user's request indicates that they are making a request for the JavaEdge application. The servlet container will then look in the web.xml file associated with the JavaEdge application.
- The servlet container will find the servlet that it should invoke. For this, it looks up for a tag that matches a URL pattern called execute. In the JavaEdge web.xml file, this tag maps to the ActionServlet (that is, the Struts ActionServlet).
- The user's request is then forwarded to the ActionServlet running under the JavaEdge application. The homePageSetup, in the above URL, is the action the user would like the Struts framework to carry out. Remember, an action in Struts maps to an element in the struts-config.xml file. (Note that we will be going through how to setup an element in the section called Configuring the homePageSetup Action Element). This element defines the Java classes and JSP pages that will process the user's request.
The second way to map the user's request to the ActionServlet is to use extension mapping. In this method, the servlet container will take all URLs that map to a specified extension and send them to the ActionServlet for processing. In the example below, all of the URLs that end with a *.st extension will map to the Struts ActionServlet:
 action
 *.st
If we used extension mapping to map the user's requests to the ActionServlet, the URL to get the JavaEdge home page would be http://localhost:8080/JavaEdge/homePageSetup.st, where JavaEdge is the application name, homePageSetup is the Struts action, and .st is the extension.
For the JavaEdge application, being built in the next four chapters, we will be using the URL prefix method (this is the best practice for setting up and pre-populating the screens).
Configuring the homePageSetup Action Element
As the servlet configuration is completed for the JavaEdge application, let's focus on setting up and implementing our first Struts action, the homePageSetup action. This action sends the user to the JavaEdge home page. However, before the user actually sees the page, the action will retrieve the latest postings from the JavaEdge database. These postings will then be made available to the JSP page, called homepage.jsp. This page displays the latest ten stories in a summarized format and allows the user to log in to JavaEdge and view their personal account information. In addition, the JavaEdge reader is given a link to see the full story and any comments made by the other JavaEdge readers.
To set up the homePageSetup action, the following steps must be undertaken:
- A Struts element must be added in the struts-config.xml file.
- An Action class must be written to process the user's request.
- A JSP page, in this case the homePage.jsp, must be written to render the end user's request.
It is important to note that Struts follows all of Sun Microsystems' guidelines for building and deploying a web-based applications. The installation instructions, shown here, can be used to configure and deploy Struts-based application in any J2EE-compliant application server or servlet container.
Setting up your first struts-config.xml file is a straightforward process. This file can be located in the WEB-INF directory of the JavaEdge project, downloaded from Wrox web site (http://wrox.com/books/1861007817.htm). The location of the struts-config.xml file is also specified in the config attribute, in the web.xml entry of the ActionServlet.
The struts-config.xml file has a root element, called :
...
All actions, for the JavaEdge application, are contained in a tag called . Each action has its own tag. To set up the homeSetupAction, we would add the following information to the struts-config.xml file:
An action has a number of different attributes that can be set. In this chapter, we will only be concerned with the path, type, and unknown attributes of the element. The other element attributes are discussed in the Chapter 3. Let's now discuss the above-mentioned attributes briefly.
- path
Holds the action name. When an end user request is made to the ActionServlet, it will search all of the actions defined in the struts-config.xml and try to make a match, based on the value of the path attribute.
Important Note that all values in the path attribute for an action must start with a forward slash ("/"), to map to the attribute. If you fail to put this in your path attribute, Struts will not find your action.
- If the ActionServlet finds a match, it will use the information in the rest of the element, to determine how to fulfill the user's request. In the above example, if the users point their web browsers to http://localhost:8080/JavaEdge/homePageSetup, the ActionServlet will locate the action by finding the element's path attribute that matches /homePageSetup. It is important to note that all path names are case-sensitive.
- type
Holds the fully qualified name of the Action class. If the user invokes the URL shown in the above bullet, the ActionServlet will instantiate an Action class of type com.wrox.javaedge.struts.homepage.HomePageSetupAction. This class will contain all of the logic to look up the latest ten stories, which are going to be displayed to the end user.
- unknown
Can be used by only one element in the entire struts-config.xml file. When set to true, this tag tells the ActionServlet to use this element as the default behavior, whenever it cannot find a path attribute that matches the end user's requested action. This prevents the user from entering a wrong URL and, as a result, getting an error screen. Since the JavaEdge home page is the starting point for the entire application, we set the homePageSetup action as the default action for all unmatched requests. If more than one tag has its unknown attribute set to true, the first one encountered in the struts-config.xml will be used and all others will be ignored. If the unknown attribute is not specified in the tag, the Struts ActionServlet will take it as false. The false value simply means that Struts will not treat the action as the default action.
An tag can contain one or more tags. A tag is used to indicate where the users are to be directed after their request has been processed. It consists of two attributes, name and path. The name attribute is the name of the forward. The path attribute holds a relative URL, to which the user is directed by the ActionServlet after the action has is completed. The value of the name attribute of the tag is a completely arbitrary name. However, this attribute is going to be used heavily by the Action class defined in the tag. Later in this chapter, when we demonstrate the HomePageSetupAction class, we will find out how an Action class uses the tags for handling the screen navigation. When multiple tags exist in a single action, the Action class carrying out the processing can indicate to the ActionServlet that the user can be sent to multiple locations.
Sometimes, you might have to reuse the same across multiple tags. For example, in the JavaEdge application, if an exception is raised in the data-access tier, it is caught and rewrapped as a DataAccessException. The DataAccessException allows all exceptions raised in the data access tier, to be handled uniformly by all of the Action classes in the JavaEdge application. (Refer to Chapter 4 for the exception handling). When a DataAccessException is caught in an Action class, the JavaEdge application will forward the end user to a properly formatted error page. Rather than repeating the same tag in each Struts action defined in the application, you can define it to be global. This is done by adding a tag, at the beginning of the struts-config.xml file:
....
The tag has one attribute called type, which defines the ActionForward class that forwards the user to another location. Struts is an extremely pluggable framework, and it is possible for a development team to override the base functionality of the Struts ActionForward class, with their own implementation. If your development team is not going to override the base ActionForward functionality, the type attribute should always be set to org.apache.struts.action.ActionForward. After the tag is added to the struts-config.xml file, any Action class in the JavaEdge application can redirect a user to systemError.jsp, by indicating to the ActionServlet that the user's destination is the system.error forward.
Now let's discuss the corresponding Action class of the homePageSetup, that is, HomePageSetupAction.java.
Building HomePageSetupAction.java
The HomePageSetupAction class, which is located in src/java/com/wrox/javaedge/struts/homepage/HomePageSetupAction.java file, is used to retrieve the top postings made by JavaEdge users. The code for this Action class is shown below:
 package com.wrox.javaedge.struts.homepage;

 import org.apache.struts.action.Action;
 import org.apache.struts.action.ActionMapping;
 import org.apache.struts.action.ActionForm;
 import org.apache.struts.action.ActionForward;
 import javax.servlet.http.HttpServletRequest;
 import javax.servlet.http.HttpServletResponse;
 import javax.servlet.http.HttpSession;
 import org.apache.struts.action.ActionErrors;
 import org.apache.struts.action.ActionError;
 import com.wrox.javaedge.story.*;
 import com.wrox.javaedge.story.dao.*;
 import com.wrox.javaedge.common.*;
 import java.util.*;

 /**
 * Retrieves the ten latest posting on JavaEdge.
 */

 public class HomePageSetupAction extends Action {

 /**
 * The perform() method comes from the base Struts Action class. We
 * override this method and put the logic to carry out the user's
 * request in the overriding method.
 * @param mapping An ActionMapping class that will be used by the Action
 * class to tell the ActionServlet where to send the end user.
 *
 *
 * @param form The ActionForm class that will contain any data submitted
 * by the end user via a form.
 * @param request A standard Servlet HttpServletRequest class.
 * @param response A standard Servlet HttpServletResponse class.
 * @return An ActionForward class that will be returned to the
 * ActionServlet indicating where the user is to go next.
 */

 public ActionForward perform(ActionMapping mapping,
 ActionForm form,
 HttpServletRequest request,
 HttpServletResponse response) {
 try {
 /**
 * Create a Story Data Access Object and use it to retrieve
 * all of the top stories.
 */

 StoryDAO storyDAO = new StoryDAO();
 Collection topStories = storyDAO.findTopStory();

 //Put the collection containing the top stories into the request

 request.setAttribute("topStories", topStories);
 } catch(DataAccessException e) {
 System.out.println("Data access exception raised in
 HomePageSetupAction.perform()");
 e.printStackTrace();
 return (mapping.findForward("system.error"));
 }

 return (mapping.findForward("homepage.success"));
 }
 }
Before we begin the discussion the HomePageSetupAction class, let's have a look at the Command design pattern.
The Power of the Command Pattern
The Action class is an extremely powerful development metaphor, because it is implemented using a Command design pattern. According to the Gang of Four (Erich Gamma, Richard Helm, Ralph Johnson, and John Vlissides) a Command pattern:
| Note |
"Encapsulates a request as an object, thereby letting you parameterize clients with different requests…" –Design Patterns, Elements of Reusable Object-Oriented Software, page.233 |
A Command pattern lets the developer encapsulate a set of behaviors in an object, and provides a standard interface for executing that behavior. Other objects can also invoke the behavior, but they have no exposure to how the behavior is implemented. This pattern is implemented with a concrete class, abstract class, or interface. This parent class contains a single method (usually named perform() or execute()) that carries out some kind of action. The actual behavior for the requested action is implemented in a child class (which, in our example, is HomePageSetupAction), extending the Command class. The Struts Action class is the parent class in the Command pattern implementation. The diagram below illustrates the relationship between the Action and HomePageSetupAction classes:
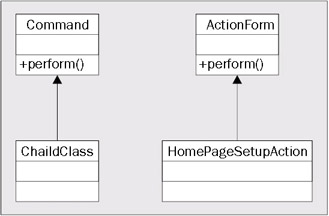
The use of the Command design pattern is one of reasons why Struts is so flexible. The ActionServlet does not care how a user request is to be executed. It only knows that it has a class that descends from the ActionForm and will have a perform() method. When the end user makes a request, the ActionServlet just executes the perform() method in the class that has been defined in the struts-config.xml. If the development team wants to change the way in which an end user request is processed, it can do it in two ways: either directly modify the logic in the Action class or write a new Action class and modify the struts-config.xml file to point to the new Action class. The ActionServlet never knows that this changed has occurred. Later in this section, we will discuss how Struts' flexible architecture can be used to solve the Hardwired AntiPattern. With this discussion on the Command pattern, let's go back to the HomePageSetupAction class.
The first step, in writing the HomeSetupAction class, is to extend the Struts Action class.
public class HomePageSetupAction extends Action
Next, the perform() method for the class needs to be overidden. (In the Action class source code, there are several perform() methods that can be overridden. Some of these are deprecated. Other methods allow you to make request to Struts from a non-HTTP based call. For the purpose of this book, we will only by dealing with HTTP-based perform() methods.)
| Important |
Note that if you are using Struts 1.1 then the preform() method has been deprecated, so you should use execute() instead. |
 public ActionForward perform(ActionMapping mapping,
 ActionForm form,
 HttpServletRequest request,
 HttpServletResponse response){
 ...
 }
The perform()/execute() method signature takes four parameters:
- ActionMapping
Finds an ActionForward from the struts-config.xml and returns it to the ActionServlet. This ActionForward class contains all the information needed by the ActionServlet to forward the end users to the next page in the application.
- ActionForm
A helper class that is used to hold any form data submitted by the end user. The ActionForm class is not being used in our HomePageSetupAction class shown earlier. This class will be discussed in greater detail in Chapter 3 and Chapter 4.
- HttpServletRequest
A standard HttpServletRequest object passed around within the servlet.
- HttpServletResponse
A standard HttpServletResponse object passed around within the servlet.
Now let's look at the actual implementation of the perform() method.
 StoryDAO storyDAO = new StoryDAO();
 Collection topStories = storyDAO.findTopStories();
The first step, carried out by the perform() method, is to instantiate a StoryDAO object and use it to retrieve a Collection object of StoryVO. Each StoryVO object contained within the collection topStories represents a single row of the data retrieved from the story table in the JavaEdge database. The StoryDAO is an implementation of a J2EE Data Access Object (DAO) pattern. This pattern hides all the implementation details of how the data is retrieved and manipulated from the database.
| Note |
The term "J2EE patterns" is a bit of a misnomer. The Data Access Object pattern and Value Object pattern – also known as a Communication Object pattern –were used in other languages before Java. However, they were called J2EE patterns when the patterns were explained in the book Core J2EE Design Patterns: Best Practices and Design Strategies, Prentice Hall (ISBN: 0-13-064884-1). |
The StoryVO object is an implementation of a J2EE Value Object (VO) pattern. A Value Object pattern wraps the data being passed between the different tiers in a simple Java class containing get()or set() methods to access the data. The physical details of the data are abstracted away from the application consuming the data. The DAO and VO design patterns, along with the JavaEdge database tables, will be discussed in greater detail in Chapter 5.
After the storyDAO.findTopStories() method is executed, the topStories object will be placed as an attribute of the request object:
request.setAttribute("topStories", topStories);
The Collection is being placed in the request. As a result, when the ActionServlet forwards this to the homepage.jsp page (as defined in the struts-config.xml file), the homePage.jsp will be able to walk through each item in the topStories Collection and display the data in it to the end-user.
Once the story data has been retrieved, an ActionForward will be generated by calling the findForward() method, in the mapping object passed into the perform() method:
return (mapping.findForward("homepage.success"));
If a DataAccessException is raised, while executing the call to the storyDAO.findTopStories()method, the exception will be caught and processed:
 try {
 ...
 } catch(DataAccessException e) {
 System.out.println("Data access exception raised in " +
 "HomePageSetupAction.perform()");
 e.printStackTrace();
 return (mapping.findForward("system.error"));
 }
You will notice that, when the DataAccessException is caught, the user is redirected to the global forward system.error.
We have finished configuring the struts-config.xml file and built an Action class to pre-populate the JavaEdge's home screen with story data. Before we look at the JSP file, homePage.jsp, let's discuss how to refactor the Hardwired AntiPattern.
Refactoring the Hardwired AntiPattern
The declarative architecture of the Struts development framework provides a powerful tool for avoiding or refactoring a Hardwired antipattern. (Refer to Chapter 1, for the discussion of Hardwired and other antipatterns.)
All activities performed by the user, in a Struts-based application should be captured within an tag defined in the struts-config.xml file. Using an tag gives the developer flexibility in the way in which the screen navigation and application of business rules are carried.
According to the author's experience, while building a Struts application, elements defined within the application fall into three general categories:
- Setup Actions
Used to perform any activities that take place before the user sees a screen. In the JavaEdge Home Page example, we used the /HomePageSetup action to retrieve the top stories from the JavaEdge database and place them in an attribute in the HttpServletRequest object.
- Form Actions
Actions that will process the data collected from the end user.
- Tear-Down Actions
Can be invoked after a user's request has been processed. Usually, it carries out any cleanup action, needed after the user's request has been processed.
These three types of actions, are purely conceptual. There is no way in the Struts tag, to indicate that the action being defined is a Setup, Form, or Tear-Down action. However, this classification is very useful for your own Struts applications. A Setup action allows you to easily enforce "pre-condition" logic before sending a user to a form. This logic ensures that, before the user even sees the page, certain conditions are met. Setup actions are particularly useful when you have to pre-populate a page with data. In Chapters 3 and Chapter 4, when we discuss how to collect the user data in Struts, we will find several examples of a Setup action used to pre-populate a form. In addition putting a Setup action before a page gives you more flexibility in maneuvering the user around. This Setup action can examine the current application state of the end users, based on which it can navigate them to any number of other Struts actions or JSP pages.
A Form action is invoked when the user submits the data entered in an HTML form. It might insert a record into a database or just perform some simple data formatting on the data entered by the user.
A Tear-Down action is used to enforce "post-condition" logic. This logic ensures that after the user's request has been processed, the data needed by the application is still in a valid state. Tear-Down actions might also be used to release any resources, previously acquired by the end-user.
As you become more comfortable with Struts, you will prefer chaining together the different actions. You will use the Setup action enforce pre-conditions that must exist when the user makes the initial request. The Setup action usually retrieves some data from a database and puts it in one of the different JSP page contexts (that is, page, request, session, or application context). It then forwards the user to a JSP page that will display the retrieved data. If the JSP page contains a form, the user will be forwarded to a Form action that will process the user's request. The Form action will then forward the user to a Tear Down action that will enforce any post-condition rules. If all post-conditions rules are met, the Tear Down action will forward to the next JSP page the user is going to visit.
It's important to note that by using the strategies defined above, you can change application behavior by reconfiguring the struts-config.xml file. This is a better approach than to go constantly into the application source code and modify the existing business logic.
With this discussion on the Hardwired antipattern, let's have a look at homepage.jsp, which renders the HTML page that the user will see after the request has been processed.
Constructing the Presentation Tier
Now we are going to look at how many of the Struts custom JSP tag libraries can be used to simplify the development of the presentation tier. With careful design and use of these tag libraries, you can literally write JSP pages without ever writing a single Java scriptlet. The Struts development framework has four sets of custom tag libraries:
- Template tags
- Bean tags
- Logic tags
- HTML tags
We will not be discussing the Struts HTML tag libraries in this chapter. Instead, we will discuss these tags in Chapter 3.
Before we begin our discussion of the individual tag libraries, the web.xml file for the JavaEdge application has to be modified, to include the following Tag Library Definitions (TLDs):
 ...

 /WEB-INF/struts-bean.tld
 /WEB-INF/struts-bean.tld


 /WEB-INF/struts-html.tld
 /WEB-INF/struts-html.tld


 /WEB-INF/struts-logic.tld
 /WEB-INF/struts-logic.tld


 /WEB-INF/struts-template.tld
 /WEB-INF/struts-template.tld
With these TLDs added to the web.xml file, we now begin our discussion by looking at the Struts tags.
Template Tags
The template tag libraries are used to break a JSP screen into small manageable pieces, which can easily be customized and plugged into the application. All of the screens in the JavaEdge application are going to be broken into four distinct parts:
- A title that will appear at the top of the web browser window.
- A header section containing various links for navigating around the JavaEdge application.
This section will be displayed at the top of every screen.
- A content section, where screen-specific content will be placed.
- A footer section, which will contain a blue bar going across the bottom of the page.
The first step, in setting up the JavaEdge application to use the templates, is to actually define a template that will be used for the pages. The JavaEdge template is defined in a file named template.jsp. The code for this file is shown below:
<%@ taglib uri='/WEB-INF/struts-template.tld' prefix='template' %>
The template above sets up an HTML page with four different template plug-in points. Each plug-in is going to allow the individual screen implementing the template to define its own content for that particular plug-in point. These plug-in points can be identified by the tags, embedded throughout the template.jsp file. The homePage.jsp file implements the above template, by using the Struts template tags and :
 <%@ page language="java" %>
 <%@ taglib uri="/WEB-INF/struts-bean.tld" prefix="bean" %>
 <%@ taglib uri="/WEB-INF/struts-html.tld" prefix="html" %>
 <%@ taglib uri="/WEB-INF/struts-logic.tld" prefix="logic" %>
 <%@ taglib uri="/WEB-INF/struts-template.tld" prefix="template" %>
The tag is used to indicate the template that will be used to build the page. In the homePage.jsp file, we are telling the tag to use the template.jsp file. The JSP files that are plugged into the template can be set as the absolute paths based on the application's root (that is, /WEB-INF/jsp) or the paths relative to the where the template.jsp file is located. Since all of the JSP files for the JavaEdge application, are located in one directory, we have chosen not to fully define a relative URL in the individual JSP files. Once we have indicated where the template is located, we can begin plugging in the content we want to display to the end user.
The content is going to be plugged into the template through the use of the tag. This tag allows the developer to plug either a literal string value or the contents of a file into the template. To use a literal string value, the direct attribute of the tag must be set to true. For example, in the homePage.jsp file above:
The above call will cause the following HTML code to be generated, when the user is directed to the homePage.jsp by the ActionServlet.
Today's Top Stories
To use the contents of a file in the template, we use the tag without the direct attribute or with the direct attribute set to false. In homePage.jsp, the following code will load the contents of the file homePageContent.jsp and process any JSP code or custom tags from that file appropriately:
To summarize, the template tag library has three tags:
|
Tag Name |
Tag Description |
|---|---|
|
Defines the template that will be used in the JSP page. |
|
|
Allows the developer to load the contents of a file or define a literal string, which will be plugged into the template. If the developers want to use a literal string in the template, they must have the direct attribute for this tag set to true. |
|
|
Defines plug-in point within the template where content can be loaded. |
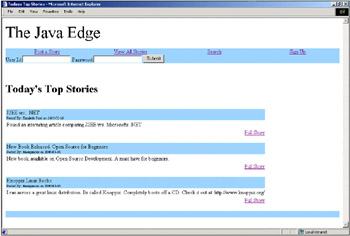
Now, if you have configured the JavaEdge application based on the download instructions on the Wrox web site (http://wrox.com/books/1861007817.htm), you should be able to bring up the JavaEdge home page (Remember the URL to bring up this page is http://localhost:8080/JavaEdge/execute/homePageSetup. Later on, in the chapter, we will discuss ways to redirect the user to /homePageSetup action, when they first come to the JavaEdge application.). The JavaEdge home page should look like:
We are now going to show all the header, content, and footer code that is used throughout the JavaEdge application. We are not going to immediately explain what the code does, because this explanation will be explained as we discuss the other Struts tag libraries.
The Screen Header: header.jsp
The header.jsp file generates the menu bar above each of the JavaEdge application pages:
 <%@ page language="java" %>
 <%@ taglib uri="/WEB-INF/struts-bean.tld" prefix="bean" %>
 <%@ taglib uri="/WEB-INF/struts-html.tld" prefix="html" %>
 <%@ taglib uri="/WEB-INF/struts-logic.tld" prefix="logic" %>
 <%@ taglib uri="/WEB-INF/struts-template.tld" prefix="template" %>
The Home Page Content: homePageContent.jsp
The homePageContent.jsp will generate the output that will be displayed in the middle of the application screen. The HTML generated in this middle section is going to be the majority of the JavaEdge application; the end user will interact with:
 <%@ page language="java" %>
 <%@ taglib uri="/WEB-INF/struts-bean.tld" prefix="bean" %>
 <%@ taglib uri="/WEB-INF/struts-html.tld" prefix="html" %>
 <%@ taglib uri="/WEB-INF/struts-logic.tld" prefix="logic" %>
 <%@ taglib uri="/WEB-INF/struts-template.tld" prefix="template" %>
The Screen Footer: footer.jsp
The footer.jsp file generates the blue footer bar at the end of each JavaEdge screen:
 <%@ page language="java" %>
 <%@ taglib uri="/WEB-INF/struts-bean.tld" prefix="bean" %>
 <%@ taglib uri="/WEB-INF/struts-html.tld" prefix="html" %>
 <%@ taglib uri="/WEB-INF/struts-logic.tld" prefix="logic" %>
 <%@ taglib uri="/WEB-INF/struts-template.tld" prefix="template" %>
Bean Tags
Well-designed JSP pages use JavaBeans to separate the presentation logic, in the application, from the data that is going to be displayed on the screen. A JavaBean is a regular class that can contain the data and logic. In our home page example, the HomePageSetupAction class retrieves a set of StoryVO classes into a collection and puts them into the session. The StoryVO class is a JavaBean that encapsulates all of the data, for a single story, posted in the Java Edge database. Each data element, stored within a StoryVO object, has a get() and set() method for each property. The code for the StoryVO class is shown below:
 package com.wrox.javaedge.story;

 import java.util.Vector;

 import com.wrox.javaedge.common.ValueObject;
 import com.wrox.javaedge.member.MemberVO;

 /**
 * Holds Story data retrieved from the JavaEdge database.
 * @todo Need to finish documenting this class
 */

 public class StoryVO extends ValueObject {
 private Long storyId;
 private String storyTitle;
 private String storyIntro;
 private byte[] storyBody;
 private java.sql.Date submissionDate;
 private Long memberId;
 private MemberVO storyAuthor;
 public Vector comments = new Vector(); // of type StoryCommentVO

 public Long getStoryId() {
 return storyId;
 }

 public void setStoryId(Long storyId) {
 this.storyId = storyId;
 }

 public String getStoryTitle() {
 return storyTitle;
 }

 public void setStoryTitle(String storyTitle) {
 this.storyTitle = storyTitle;
 }

 public String getStoryIntro() {
 return storyIntro;
 }

 public void setStoryIntro(String storyIntro) {
 this.storyIntro = storyIntro;
 }

 public String getStoryBody() {
 return new String(storyBody);
 }

 public void setStoryBody(String storyBody) {
 this.storyBody = storyBody.getBytes();
 }

 public java.sql.Date getSubmissionDate() {
 return submissionDate;
 }

 public void setSubmissionDate(java.sql.Date submissionDate) {
 this.submissionDate = submissionDate;
 }

 public Vector getComments() {
 return comments;
 }

 public void setComments(Vector comments) {
 this.comments=comments;
 }

 public MemberVO getStoryAuthor() {
 return storyAuthor;
 }

 public void setStoryAuthor(MemberVO storyAuthor) {
 this.storyAuthor = storyAuthor;
 }

 } // end StoryVO
The JSP specification defines a number of tags that give the developer the ability to manipulate the contents of a JavaBean.
The Struts bean tag library offers a significant amount of functionality beyond that offered by the standard tag libraries. The functionality provided by the bean tag library can be broken into two broad categories of functionality:
- Generating output from existing screen data.
- Creating new JavaBeans. These new JavaBeans can hold the data specified by the developer or retrieved from web artifacts, such as the cookie or a value stored in an HTTP header.
We are going to begin with the most common use of the Struts bean tag, the retrieval and display of data from a JavaBean.
Bean Output
There are two bean tags available for generating output in the Struts bean library. They are:
The tag retrieves a value from a JavaBean and writes it to the web page being generated. Examples of this tag can be found throughout the homePageContent.jsp file. For example, the following code will retrieve the value of the property (storyTitle) from a bean, called story, stored in the page context:
To achieve the same result via a Java scriptlet would require the following code:
 <%
 StoryVO story = (StoryVO) pageContext.getAttribute("story");

 if (story!=null){
 out.write(story.getStoryTitle());
 }
 %>
The tag supports the concept of the nested property values. For instance, the StoryVO class has a property called storyAuthor. This property holds an instance of a MemberVO object. The MemberVO class contains the data about the user who posted the original story. The homePageContent.jsp page retrieves the values from a MemberVO object, by using a nested notation in the tag. For instance, to retrieve the first name of the user who posted one of the stories to be displayed, the following syntax is used:
In the above example, the write tag is retrieving the storyAuthor by calling story.getStoryAuthor() and then the firstName property by calling storyAuthor.getFirstName()
The tag has the following attributes that can be configured:
|
Attribute Name |
Attribute Description |
|---|---|
|
name |
The name of the JavaBean to be retrieved. |
|
scope |
The scope, in which to look for the JavaBean. Valid values include page, request, and session. If this attribute is not set, the tag will start searching for the bean at the page level and continue until it finds the bean. |
|
property |
The name of the property to be retrieved from the JavaBean. The tag uses the reflection to call the appropriate get() method of the JavaBean, from which you are retrieving the data. Therefore, your JavaBean has to follow the standard JavaBean naming conventions (that is, a get prefix followed by the first letter of the method name capitalized). |
|
filter |
Determines whether or not characters that are significant in HTML, should be replaced with their & counterparts. For example, if the data retrieved from a call to StoryVO.getTitle() contained an & symbol, setting the filter attribute to true would cause the tag to write the character as &. The default value for this attribute is true. |
|
ignore |
When set to true, this attribute tells the not to throw a runtime exception, if the bean name cannot be located in the scope specified. The will simply generate an empty string to be displayed in the page. (If scope is not specified, the same rules apply here, as specified above.) |
The second type of tag for generating output is the Struts tag. The tag is used to separate the static content from the JSP page in which it resides. All the contents are stored in a properties file, independent of the application. The properties file consists of a name-value pair, where each piece of the text that is to be externalized is associated with a key. The tag will use this key to look up a particular piece of text from the properties file.
To tell the name of the properties file to the ActionServlet, you need to make sure that the application parameter is set in the web.xml file. The properties file, called ApplicationResources.properties, is placed in the classes directory underneath the WEB-INF directory of the deployed application. In the JavaEdge source tree, the ApplicationResources.properties file is located in working directory/waf/src/web/WEB-INF/classes (where the working directory is the one in which you are editing and compiling the application source).
For the purpose of the JavaEdge application, an tag must be configured as shown below:
 ...

 application
 ApplicationResources
The static content for the JavaEdge application has not been completely externalized using the functionality. Only the header.jsp file has been externalized. The following example, taken directly from header.jsp, will return the complete URL for the JavaEdge login page:
When this tag call is processed, it will retrieve the value for the javaedge.header.logout key from the ApplicationResources.properties file. All of the name-value pairs from the ApplicationResources.properties file used in the header.jsp are shown below:
 javaedge.header.title=The Java Edge
 javaedge.header.logout=<a href="/JavaEdge/execute/LogoutSetup">Logout</a>
 javaedge.header.myaccount=<a href="/JavaEdge/execute/MyAccountSetup">My
 Account</a>
 javaedge.header.postastory=<a href="/JavaEdge/execute/postStorySetup">Post a
 Story</a>
 javaedge.header.viewallstories=<a href="/JavaEdge/execute/ViewAllSetup">View All
 Stories</a>
 javaedge.header.signup=<a href="/JavaEdge/execute/signUpSetup">Sign Up</a>
 javaedge.header.search=<a href="/JavaEdge/execute/SearchSetup">Search</a>
If the tag cannot find this key in the ApplicationResources.properties file, the tag will throw a runtime exception.
The tag has the following attributes:
|
Attribute Name |
Attribute Description |
|---|---|
|
key |
Key, in the properties file, for which the tag is going to look. |
|
arg0 |
Parameter value that can be passed into the text string retrieved from the properties file. For instance, if a property had the value: |
|
arg1 |
Second parameter value that can be passed to the text string retrieved from the properties file. |
|
arg2 |
Third parameter value that can be passed to the text string retrieved from the properties file. |
|
arg3 |
Fourth parameter value that can be passed to the text string retrieved from the properties file. |
|
arg4 |
Fifth parameter value that can be passed to the text string retrieved from the properties file. |
|
bundle |
The name of the bean in which the MessageResources object containing the application messages is stored. |
|
locale |
The name of the bean in which our Locale object is stored. |
Let's have an interesting discussion on the Tight Skins antipattern, before moving on to bean creation.
The Tight Skins Antipattern
Recollecting our discussion in Chapter 1, the Tight Skins antipattern occurs when the development team does not have a presentation tier whose look and feel can be easily customized. The Tight Skins antipattern is formed, when the development team embeds the static content in the JSP pages. Any changes to the static content result in having to hunt through all of the pages in the application and making the required changes.
As we saw above, the tag can be used to centralize all the static content, in an application, to a single file called ApplicationResources.properties. However, the real strength of this tag is that it makes it very easy to write internationalized applications that can support multiple languages. The JavaEdge header toolbar is written to support only English. However, if you want the JavaEdge's header toolbar to support French, you need to follow the following steps:
- Create a new file, called ApplicationResources_fr.properties.
Note The _fr extension to the ApplicationResources.properties file is not just a naming convention followed here. These extensions are part of the ISO-3166 standard. For a complete list of all of the country codes supported by this standard, please visit http://www.ics.uci.edu/pub/ietf/http/related/iso639.txt.
- Copy all of the name-value pairs from the JavaEdge's application into the new ApplicationResources_fr.properties file. Translate all of the static contents in these name-value pairs to French. Also, if the JavaEdge application is going to support only French, you may rename the file from ApplicationResources_fr.properties to ApplicationResources.properties and replace the existing ApplicationResources.properties file. However, if you want to support English and French at the same time, you to need to tell the Struts which java.util.Locale is to be used for the user. A Locale object is part of the standard Java SDK and is used to hold the information about a region. For more details on the Locale object, please refer the Sun JDK documentation (available at http://java.sun.com).
- To support both English and French concurrently, you could ask the users the language in which they want to see the site, when they are registering for a JavaEdge account. Their language preference could be stored in the JavaEdge database. If the user chooses French as their language preference, then anytime that user logs into the JavaEdge application, the following code could be executed in any Action class to switch the language preference from English over to French:
 HttpSession session = request.getSession();
 session.setAttribute(org.apache.struts.action.Action.LOCALE_KEY,
 new java.util.Locale(LOCALE.FRENCH, LOCALE.FRENCH) );
Struts stores a Locale object, in the session, as the attribute key org.apache.struts.action.Action.LOCALE_KEY. Putting a new Locale object (which is instantiated with the values for French) will cause Struts to reference the ApplicationResources_fr.properties file, for the time for which the user's session is valid. (Or at least, until a new Locale object, containing another region's information is placed in the user's session.)
Bean Creation
Struts offers a number of helper tags (bean creation tags), for creating the JavaBeans to be used within a JSP page. With these tags, a number of tasks can be carried out within the JSP page, without the need to write Java scriptlet code. These tasks include:
- Retrieve a value from a cookie and create a new JavaBean to hold the cookie's contents
- Retrieve an HTTP parameter and store its value in a new JavaBean
- Retrieve a configuration element of Struts (such as a forward, mapping, or form Bean) and store its information in a JavaBean
- Retrieve an object from the JSP page context (that is, the application, request, response, or session objects)
- Define a new JavaBean from scratch and place a value in it
- Copy the contents of a single property from an existing JavaBean into a new JavaBean
The table below gives a brief summary of the different creation tags available:
|
Bean Name |
Bean Description |
|---|---|
|
Creates a new JavaBean to hold the contents of the specified cookie. To retrieve a cookie named shoppingCart into a bean, we use the following syntax: |
|
|
Creates a new JavaBean to hold the contents of a parameter retrieved from the HttpServletRequest object. To retrieve a request parameter, called sendEmail, from the HttpServletRequest we use the following code: |
|
|
Creates a new JavaBean to hold the contents of a Struts configuration object. |
|
|
Creates a new JavaBean to hold an object retrieved from the JSP page context. The following example will retrieve the session object from the HttpServletRequest object and place it as a JavaBean called hSession. |
|
|
Creates a JavaBean to hold the content returned from a call to another URL. The following example will take the content retrieved from a call to /test.jsp page and place it in a JavaBean called testInclude: |
|
|
Retrieves the data from a file located in a Web Application Resource (WAR) file. This data can be retrieved as a string or InputStream object by the tag. The following code will create a new JavaBean, called webXmlBean, which will hold the contents of the web.xml file as a string: |
|
|
Creates a new JavaBean and populates it with an item retrieved from the HTTP header. |
|
|
Creates a new JavaBean and populates it with a string value defined by the developer. The tag given below creates a JavaBean called hello, that will hold the ever popular phrase, Hello World. This bean will be placed in a session of the application. |
We have not used any of the bean creation tags in the JavaEdge application. There is simply no need to use them for any of the pages in the application. Also, in the author's opinion, most of the bean creation tags can be used in an Action class using Java code. According to the author's experience, the overuse of the bean creation tags can clutter up the presentation code and make it difficult to follow.
For full details on the bean creation tags you can visit the following URLs: http://jakarta.apache.org/struts/doc-1.0.2/struts-bean.html#define (which lists all of the bean tags and provides an explanation of all their attributes) and http://jakarta.apache.org/struts/doc-1.0.2/api/org/apache/struts/taglib/bean/package-summary.html (which shows several working examples for each of the tags).
Logic Tags
The logic tag library gives the developer the ability to add conditional and iterative control to the JSP page, without having to write Java scriptlets. These tags can be broken into three basic categories:
- Tags for controlling iteration.
- Tags for determining, whether a property in an existing JavaBean is equal to, not equal to, greater than, or less than another value. In addition, there are logic tags that can determine whether or not a JavaBean is present within a particular JSP page context (that is, page, request, session, or application scope).
- Tags for moving (that is, redirecting or forwarding) a user to another page in the application.
Iteration Tags
The logic tag library has a single tag, called , which can be used to cycle through a Collection object in the JSP page context. Recollect that in the HomePageSetupAction class, a collection of StoryVO objects is placed into the request. This collection holds the latest ten stories posted to the JavaEdge site. In the homePageContent.jsp page, we cycle through each of the StoryVO objects in the request, by using the tag:
...
In the above code snippet, the tag looks up the topStories collection in the request object of the JSP page. The name attribute defines the name of the collection. The scope attribute defines the scope, in which the tag is going to search for the JavaBean. The type attribute defines the Java class that is going to be pulled out of the collection. In this case, it is StoryVO. The id attribute holds the name of the JavaBean, which holds a reference to the StoryVO pulled out of the collection. When referencing an individual bean in the tag, we will use the tag. The name attribute of the tag must match the id attribute defined in the .
Keep in mind the following points, while using the tag:
- Multiple types of collections can be supported by the tag. These types include:
- Vector
- ArrayList
- Arrays of objects
- Java Enumeration objects
- Java Iterator objects
- The tag supports the use of only the arrays of objects. It does not support arrays containing primitive data values.
- If your collection can contain null values, the tag will still go through the actions defined in the loop. It is the developer's responsibility to check if the a null value is present by using the or tags. (These tags will be covered in the next section, Conditional Tags.)
Conditional Tags
The Struts development framework also provides a number of tags to perform basic conditional logic. Using these tags, a JSP developer can perform a number of conditional checks on the common servlet container properties. These conditional tags can check for the presence of the value of a piece of data stored as one of the following types:
- Cookie
- HTTP Header
- HttpServletRequest Parameter
- JavaBean
- A property on a JavaBean
For instance, in the header.jsp, the Struts conditional and tags are used to determine which menu items are available for a JavaEdge end user. If the user has been successfully authenticated, there will be a JavaBean, called memberVO, present in the user's session. (The code that actually authenticates the user and places a memberVO class in session is located in the LoginAction.java class. If you are interested in seeing the code please review it in this class.) This JavaBean contains all of the user's personal information and preferences. Let's look at a code snippet from the header.jsp:
In the JSP above code, a column containing a link to the login URL will be rendered only if the JavaEdge user has not yet logged into the application. The checks the user's session to see if there is a valid memberVO object present in the session. The tag in the above code checks if there is a memberVO object in the user's session. If there is one, a column will be rendered containing a link to the logout page.
The and tags are extremely useful, but, in terms of applying the conditional logic, are extremely blunt instruments. Fortunately, Struts provides us with a number of other conditional logic tags.
Suppose that the user authentication scheme was changed and the JavaEdge application set a flag indicating that the user was authenticated, by placing a value of true or false in a cookie called userloggedin. You could rewrite the above code snippet, as follows, to use the and tags:
We can even use the and tag to check a property in a JavaBean. For instance, we could rewrite the authentication piece of the JavaEdge application to set an attribute (called authenticated) in the memberVO object to a hold a string value of true or false. We could then check the property in the memberVO JavaBean using the following code:
When applying the conditional logic tags against a property on a JavaBean, keep two things in mind:
- The scope that you are looking for the JavaBean. If you do not define a scope attribute, all of the contexts in the JSP will be searched. If you define this attribute and the value you are looking for is not there, a runtime exception will be thrown by the Java tag.
- Chaining the property values of a JavaBean using a "." notation. You can find examples of the"." notation in the section called Bean Output, in this chapter.
There are some other conditional logic tags available. These include:
- :
Checks if the value retrieved from a JavaBean property, HttpServletRequest parameter, or HTTP header is greater than the value stored in the value attribute of the tag.
- :
Checks if the value retrieved from a JavaBean property, HttpServletRequest parameter, or HTTP header value is less than the value stored in the value attribute of the tag.
- :
Checks if the value retrieved from a JavaBean property, HttpServletRequest parameter, or HTTP header value is greater than or equal to the value stored in value attribute of the tag.
- :
Checks if the value retrieved from a JavaBean property, HttpServletRequest parameter, or HTTP header value is less than or equal to the value stored in the value attribute of the tag.
The logic tags shown above will try to convert the value they are retrieving to a float or double and perform a numeric comparison. If the retrieved value cannot be converted to a float or double, these tags will perform the comparisons based on the string values of the items being retrieved.
Here's another interesting discussion about the Tight Skins antipattern.
The Tight Skins AntiPattern Revisited
A common requirement, for many web applications, is to provide a different look and feel for the same screen(s), depending on who the user is. Many development teams will embed the conditional checks in the JSP code of the application to determine which piece of the screen is to be rendered for the user. However, embedding the conditional logic into every page, for each different user role, is very shortsighted solution. In applications with more than two user roles, it becomes very cumbersome to implement role-based presentation. The JSP code has tags spread all over it and becomes a nightmare to maintain. This is a Tight Skin antipattern, because customizing the look and feel of the page to a particular class of the user becomes very difficult.
The JSP code for checking the user's role becomes tightly intertwined with the JSP code rendering the HTML page. However, using the Struts and tags, we can simplify role-based presentation. Also, this makes it very easy to have an application that can support different looks and feels for the same screens.
Let's look at a simple example of using the and tags for role-based presentation in the JavaEdge application. Suppose, in the JavaEdge website, we want to provide different headers, footers, and content based on whether the visitor of the JavaEdge site is a registered member or an anonymous user. For the register member, we might want to have a different presentation interface, which provides more functionalities and features than that available to a non-registered member. We could rewrite the homePage.jsp file to perform the following logic:
 <%@ page language="java" %>
 <%@ taglib uri="/WEB-INF/struts-bean.tld" prefix="bean" %>
 <%@ taglib uri="/WEB-INF/struts-html.tld" prefix="html" %>
 <%@ taglib uri="/WEB-INF/struts-logic.tld" prefix="logic" %>
 <%@ taglib uri="/WEB-INF/struts-template.tld" prefix="template" %>
The JavaEdge application has two user roles, anonymous and member. In more sophisticated applications, where we might have several different roles, we can customize the look and feel of each screen to a specific user using the above approach. Every time we need to add a role, we modify the base template for each screen to include new plug-in points for the header, screen content, and footer JSP files specific to that role.
By using Struts templates and performing the conditional checks in the template file for each page, we partition the presentation code for each role. Each role has its own JSP files for rendering the application screens. This makes maintaining the JSP code for the individual role easier and lessens the risk that modifications made for one role break the user interface for all the other roles.
Movement Tags
These logic tags, in the Struts tag library, offer the developer the ability to redirect the user to a new URL. The two movement logic tags are:
- : Forwards the user to a specified global tag defined in the struts-config.xml file.
- : Performs a redirect to a URL specified by the developer.
Let's see how these two tags can be used. To bring up the JavaEdge application, the user needs to point the browser to http://localhost:8080/JavaEdge/homePageSetup. This forces the users to know they have to do the /homePageSetup action. An easier solution would be to allow them to go to http://localhost:8080/JavaEdge.
In a non-Struts based application, this could be accomplished by setting up a tag in the application's web.xml file. This tag allows you to define the default JSP or HTML file, which is presented when the user comes to the application and does not define a specific page. However, this is a problem for Struts applications. The allows the developer to specify only file names and not URLs or Struts actions.
However, using the movement logic tags provides you with the ability to work around this shortcoming. First, we will demonstrate a solution using a tag. We still need to set up the tag in web.xml file of the JavaEdge. We are going to set up a file, called default.jsp, for the default file to be executed.
 ...

 default.jsp
Next, we add a new tag, called default.action, to tag in the struts-config.xml file of the JavaEdge.
...
The last step is to write the default.jsp file. This file contains two lines of code:
<%@ taglib uri="/WEB-INF/struts-logic.tld" prefix="logic" %>
We can perform the same functionality with the tag. If we implement the default.jsp using a tag, we still need to setup default.jsp in the web.xml file. However, we do not need to add another tag to the located in struts-config.xml. Instead, we just need to write the default.jsp in the following manner:
<%@ taglib uri="/WEB-INF/struts-logic.tld" prefix="logic" %>
The above code will generate a URL relative to the JavaEdge application (http://localhost:8080/Javaedge/execute/HomePageSetup). We are not restricted, while using the , to redirect to a relative URL. We can also use a fully qualified URL and even redirect the user to another application. For instance, we could rewrite the default.jsp as follows:
<%@ taglib uri="/WEB-INF/struts-logic.tld" prefix="logic" %>
Using both the and the is equivalent to calling the redirect() method in the HttpSessionServletResponse class in the Java Servlet API. The difference between the two tags is the that the tag will let you forward only to a defined in the struts-config.xml file. The tag will let you redirect to any URL.
The tag has a significant amount of functionality. However, we have had a brief introduction to what the tag can do. A full listing of all the attributes and functionalities of this tag can be found at http://jakarta.apache.org/struts/doc-1.0.2/struts-logic.html#redirect.
Summary
In this chapter, we explored the basic elements of a Struts application and how to begin using Struts to build the applications. To build a Struts application we need to know:
- The basic components of a Struts application:
- ActionServlet: Is the controller in the Struts MVC implementation. It takes all user requests and tries to map them to an entry in the struts-config.xml file.
- action: Defines a single task that can be carried by the end user. Also, it defines the class that will process the user's request and the JSP page that will render the HTML the user sees.
- Action class: Contains the entire logic to process a specific user request.
- ActionForm: Is associated with an tag in the struts-config.xml file. It wraps all the form data submitted by the end user and also can perform validation on the data entered by the user.
- JSP pages: Are used to render the HTML pages that the users will see, as a result of their request to the ActionServlet.
- The configuration files necessary to build a Struts application:
- web.xml: This file contains the entire ActionServlet configuration, the mapping of user requests to the ActionServlet, and all the Struts Tag Library Definitions (TLDs).
- struts-config.xml: This file contains all the configuration information for a Struts-based application.
- ApplicationResources.properties: This file is a central location for static content for a Struts application. It allows the developer to easily change the text or internationalize an application.
- The different Struts tag libraries for building the presentation piece of the application. These tags libraries include:
We also identified some different areas where Struts can be used to refactor the web antipatterns, that might form during the design and implementation of the web-based applications. Refactoring of the following antipatterns was discussed:
- : Gives the developer a set of JSP tags to break down an application screen into pluggable components that can be easily swapped in and out.
- : Provides the developer with JSP tags for generating output from a JavaBean and creating a JavaBean from common JSP web artifacts.
- : Can be used to apply the conditional logic in the JSP page, through Collections stored in the user's JSP page context, and redirect the user to another page.
-
: These tags are not discussed in this chapter. However, they offer a significant amount of functionality and are discussed in Chapters 3 and Chapter 4.
- Hardwired Antipattern
We looked at how to chain together Struts actions, to perform the pre-condition, form processing, and post-condition logic. This segregation of the business logic into the multiple applications provides a finer control over the application of the business logic and makes it easier to redirect the user to different Struts actions and JSP pages.
- Tight Skins Antipattern
While examining this antipattern, we looked at how to use the and tags to implement role-based presentation logic.
This chapter lays the foundation for the material covered in Chapters 3 and Chapter 4. In the next chapter, we are going to cover how to implement web-based forms using the Struts form tags. We will also look at the Struts HTML tag library and how it simplifies form development. Finally, the next chapter will focus on how to use the Struts ActionForm class, to provide a common mechanism for validating user data and reporting validation errors back to the user.
Chapter 3 Form Presentation and Validation with Struts
- Hardwired Antipattern
Introduction
- The Challenges of Web Application Development
- Creating a Struts-based MVC Application
- Form Presentation and Validation with Struts
- Managing Business Logic with Struts
- Building a Data Access Tier with ObjectRelationalBridge
- Templates and Velocity
- Creating a Search Engine with Lucene
- Building the JavaEdge Application with Ant and Anthill
EAN: 2147483647
Pages: 83
