Web Services
Overview
Web services are the single most hotly hyped feature of the .NET platform, and it's no wonder—used properly, Web services can wrap legacy components, cross platform boundaries, and even Web-enable traditional rich desktop applications.
One of the most important details you should understand about Web services is that they use exactly the same Microsoft Visual Basic .NET code as any other .NET application. Therefore, you can use all the recipes from earlier chapters in a Web service to access files, connect to a database, process strings with regular expressions, and much more. The recipes in this chapter concentrate on .NET features that are unique to Web services. For example, you'll learn how to use caching with a Web service (recipes 16.2 and 16.3), how to use transactional Web methods (recipe 16.4), how to leverage Internet Information Services (IIS) authentication (recipe 16.6), and how to extend Web services with SOAP headers and a full-fledged SOAP extension (recipes 16.9 and 16.11).
| Note |
All the Web services in this chapter are held in one virtual directory named VBCookbookWebServices. To use the examples in the downloadable code, you can create the same virtual directory (following the instructions in the included readme.txt file) or you can add the Web services to your own Web application projects. Many of the Web services in this chapter can be used without a dedicated client. Instead, you can use the simple Web service test page in a Web browser. For more advanced Web services, Microsoft Windows client applications are provided. |
Avoid Hard Coding the Web Service URL
Problem
You need to use a Web service whose URL might change.
Solution
Use a dynamic URL, which will be retrieved automatically from the client application's configuration file.
Discussion
By default, when you add a Web reference in Microsoft Visual Studio .NET, the Web service URL is hard-coded in the constructor of the proxy class.
Public Sub New()
 MyBase.New()
 Me.Url = "http://localhost/WebServices/MyService.asmx"
End Sub
You can override this setting in your code by manually modifying the Url property of the proxy class after you instantiate it. However, there's another option: configure the proxy class to use a dynamic URL endpoint. You can make this change by selecting the Web reference in the Visual Studio .NET Solution Explorer and changing the URL Behavior option in the Properties window, as shown in Figure 16-1.
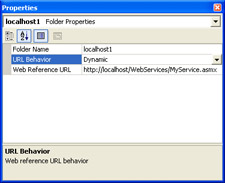
Figure 16-1: Configuring a dynamic Web service URL.
After you make this change, the Web service URL will be automatically added to the client application's configuration file. (The configuration file is named web.config for all Web applications and AppName.exe.config for all other applications, in which case the file appears in the design environment as simply App.config.) An example of the automatically generated configuration file setting is shown here:
value="http://localhost/WebServices/MyService.asmx"/>
In addition, the code in the proxy class is modified so that it attempts to read the URL from the configuration file. If it doesn't find the required value, it defaults to the URL that was used during development.
Public Sub New()
 MyBase.New()
 Dim urlSetting As String = _
 ConfigurationSettings.AppSettings("AppName.ServerName.ServiceName")

 If Not urlSetting Is Nothing Then
 Me.Url = urlSetting
 Else
 Me.Url = "http://localhost/WebServices/MyService.asmx"
 End If
End Sub
This approach allows you to modify the Web service URL after compiling and deploying the application, simply by editing the configuration file.
| Note |
You can't modify the code for the proxy class constructor directly because your changes will be lost every time you regenerate the proxy class. Instead, you must change the URL Behavior setting so that Visual Studio .NET will automatically add the dynamic URL code. |
16 2 Add Response Caching
Problem
You want to improve Web service performance by caching the return value of a Web method.
Solution
Use response caching by setting the CacheDuration property of the WebMethod attribute.
Discussion
ASP.NET Web services support response caching in much the same way as ASP.NET Web pages. When response caching is enabled, your code runs only once, and the return value of the Web method is stored for subsequent method invocations. With Web forms, caching is performed on a per-form basis. With Web services, caching is enabled and configured distinctly for each Web method.
For example, the following Web method returns the current date and time on the server. This information is cached for one minute, meaning that subsequent requests within this timeframe will receive the previously recorded date information. You can test this behavior using the Web service test page.
 _
Public Function GetDate() As String
 Return DateTime.Now.ToString()
End Function
If your Web method accepts parameters, ASP.NET will only reuse the cached method result if it receives a request with the exact same parameters. If you have a method that accepts a wide range of values, caching might be ineffective or even wasteful because a great deal of information might be stored in the cache but rarely reused. For example, a Web method that performs a mathematical calculation based on numeric input is rarely a good choice for response caching. On the other hand, a Web method that accepts an ID referencing one of about a dozen different product items probably is. As always, response caching bypasses your code, making it unsuitable if your Web method needs to perform other actions (such as logging activity) or if your Web method depends on information that's not supplied through method parameters (such as user authentication information or session data).
| Note |
One limitation of response caching with Web methods is that it only allows you to reuse data within the bounds of a single method. If you want to reuse specific data in different Web methods, data caching (described in recipe 16.3) will probably be more effective. |
16 3 Add Data Caching
Problem
You want to improve Web service performance by caching some data, but you need to reuse cached data among several methods. Or, you want to run your Web method code but still use some cached information.
Solution
Store any object in the cache using the Cache object.
Discussion
Data caching with a Web service works almost exactly the same as the Web page data caching technique described in recipe 15.11. In fact, you can store data in the cache using Web page code and retrieve it in a Web service, or vice versa. Data caching supports two types of expiration policy: absolute expiration and sliding expiration. For more information, refer to recipe 15.11.
The only difference between caching in a Web service and caching in a Web page is that in the former case, you can't retrieve the Cache as a built-in property. Instead, you need to access the cache through the shared HttpContext.Current property.
The following example shows a Web service with two Web methods. The first Web method, GetFullCustomerData, returns a DataSet with a table of customer information. This DataSet is either retrieved from the cache or generated automatically (if required) using the private GetCustomerDataSet function. The second Web method, GetCustomerNameList, also uses the customer DataSet and the GetCustomerDataSet function. However, it retrieves a subset of the available information—a list of contact names—and returns it as a string. The end result is that both Web methods can use the same cached data, reducing the burden that is placed on the database.
The full Web service code is shown here:
 _
Public Class DataCachingTest
 Inherits System.Web.Services.WebService

  _
 Public Function GetFullCustomerData() As DataSet
 ' Return the full customer table (from the cache if possible).
 Return GetCustomerDataSet()
 End Function

  _
 Public Function GetCustomerNameList() As String()
 ' Get the customer table (from the cache if possible).
 Dim Dt As DataTable = GetCustomerDataSet().Tables(0)

 ' Create an array that will hold the name of each customer.
 Dim Names() As String
 ReDim Names(Dt.Rows.Count - 1)

 ' Fill the array.
 Dim Row As DataRow
 Dim i As Integer
 For Each Row In Dt.Rows
 Names(i) = Row("ContactName").ToString()
 i += 1
 Next

 Return Names
 End Function

 Private Function GetCustomerDataSet() As DataSet
 Dim Cache As System.Web.Caching.Cache
 Cache = HttpContext.Current.Cache

 ' Check for cached item.
 If Cache("Customers") Is Nothing Then
 ' Recreate the item.
 Dim Customers As New DataSet("Customers")

 ' Create the connection. The connection string is retrieved
 ' from a setting in the web.config file.
 Dim Con As New SqlConnection( _
 ConfigurationSettings.AppSettings("DBCon"))

 ' Create the command for filling the DataSet.
 Dim CmdSelect As New SqlCommand("SELECT * FROM Customers", Con)

 Dim Adapter As New SqlDataAdapter(CmdSelect)

 ' Fill the DataSet.
 Try
 Con.Open()
 Adapter.Fill(Customers, "Customers")
 Catch Err As Exception
 ' Throw a higher-level exception to mask any sensitive
 ' error information.
 Throw New ApplicationException("Database error.")
 Finally
 Con.Close()
 End Try

 ' Store the item in the cache (for 60 seconds).
 Cache.Insert("Customers", Customers, Nothing, _
 DateTime.Now.AddSeconds(60), TimeSpan.Zero)

 ' Return the item.
 Return Customers
 Else
 ' Retrieve the item.
 Return CType(Cache("Customers"), DataSet)
 End If
 End Function

End Class
16 4 Create a Transactional Web Method
Problem
You want to execute all the actions in a Web method within the context of a single COM+ transaction so that they all either fail or succeed as a unit.
Solution
Enable an automatic transaction using the TransactionOption property of the WebMethod attribute.
Discussion
.NET Web services include support for automatic transactions that can be enabled on a per-method basis. When enabled, any data source that supports COM+ transactions (which includes most databases) is automatically enlisted in the current transaction when it's used in your code. The transaction is automatically committed when the Web method completes. The transaction is rolled back if any unhandled exception occurs or if you explicitly call the SetAbort method of the System.EnterpriseServices.ContextUtil class.
To enable transaction support for a Web method, set the TransactionOption property of the WebMethod attribute to RequiresNew. For example, the transactional Web method shown in the following code takes two actions—it deletes records in a database and then tries to read from a file. However, if the file operation fails and the exception is not handled, the entire operation will be rolled back. To use this code, you must add a reference to the System.EnterpriseServices.dll assembly and import the System.EnterpriseServices namespace.
 _
Public Sub UpdateDatabase()
 ' Create the connection.
 Dim Con As New SqlConnection(ConfigurationSettings.AppSettings("DBCon"))

 ' Create the command for filling the DataSet.
 Dim Cmd As New SqlCommand("DELETE * FROM Customers", Con)

 ' Apply the update. This will be registered as part of the transaction.
 Con.Open()
 Cmd.ExecuteNonQuery()

 ' Try to access a file.
 ' This generates an exception which is not handled.
 ' The Web method will be aborted and the changes will be rolled back.
 Dim fs As New System.IO.FileStream("does_not_exist.bin", IO.FileMode.Open)

 ' (If no errors have occurred, the database changes
 ' are committed here when the method ends).

End Sub
You can use the Component Services console to monitor this transaction. You can start the Component Services utility by selecting Component Services from the Administrative Tools section of the Control Panel. In the Component Services console, select the Distributed Transaction Coordinator for the current computer, and view the Transaction Statistics. Figure 16-2 shows how the display will look after running this code, which produces one failed transaction.
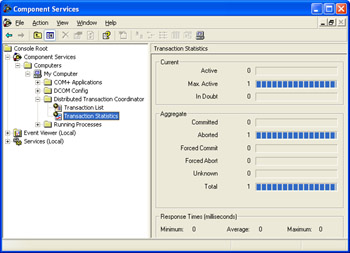
Figure 16-2: Monitoring a failed transaction.
Because of the stateless nature of the HTTP protocol, a Web service method can participate only as the root of a transaction, which means that you can't enlist more than one Web method in the same transaction. Although the TransactionOption property accepts all the standard TransactionOption values, the values don't have the expected meanings. For example, Disabled, NotSupported, and Supported all have the same effect: they disable transaction support. Similarly, Required and RequiresNew both enable transaction support and start a new transaction. I recommend that you use RequiresNew in your Web methods because its name most clearly matches the actual behavior.
| Note |
COM+ transactions work seamlessly with most data sources because they provide compatible resource managers. But always remember, if you interact with a non-transactional resource, your code won't be rolled back. Some examples of actions that aren't transactional include writing a file, placing information into session state, and accessing a hardware device (such as a printer). On the other hand, data operations with most enterprise database systems (including SQL Server and Oracle) are COM+ compatible. |
16 5 Create a One Way Web Method
Problem
You want a Web method to perform a long task, and you don't want to force the client to wait while the Web service code executes.
Solution
Create a one-way Web method by applying the SoapDocumentMethod or SoapRpcMethod attribute and setting the OneWay property to True.
Discussion
With one-way Web methods, the client sends a request message, and the server responds immediately to indicate that the method began processing. This behavior has the following consequences:
- The client doesn't need to wait while the Web method code executes.
- The Web method can't return any information to the client, either through a return value or a ByRef parameter.
- If the Web method throws an unhandled exception, it won't be propagated back to the client.
To create a one-way Web method, you need to apply a SoapDocumentMethod attribute (from the System.Web.Services.Protocols namespace) to the appropriate method and set the OneWay property to True. Here's an example:
  _
 Public Sub DoLongTask()
 ' (Start a long task that doesn't return
 ' information to the client.)
 End Sub
This example assumes that your Web service and client are using SOAP document encoding (the default). If you're using RPC encoding, use the corresponding SoapRpcMethod attribute to mark a one-way method.
| Note |
One-way methods aren't the only way to remove client delays. You can also modify the client to call any Web method asynchronously. In this case, the client will wait for the Web service to complete, but it will wait on another thread, so the client application can continue with other work. Asynchronous method calls are described in recipe 7.1. |
16 6 Set Authentication Credentials for a Web Service
Problem
You want a Web service client to submit logon credentials for IIS authentication.
Solution
Use the Credentials property of the proxy class. You can create a new NetworkCredential object or use the CredentialCache to retrieve the credentials for the current user.
Discussion
Web services, like Web pages, can be used in conjunction with IIS authentication. All you need to do is place your Web services in a virtual directory that restricts anonymous access.
Unlike Web pages, Web services have no built-in method for retrieving authentication information from the client because Web services are executed by other applications, not directly by the user. Thus, the application that's interacting with the Web service bears the responsibility for submitting any required authentication information. Furthermore, Web services must use a form of Windows authentication that maps user credentials to valid user accounts. Form-based authentication will not work.
To create a simple Web service test, enable both anonymous and Windows Integrated authentication for the virtual directory in IIS Manager. Make sure that the web.config file specifies that Windows authentication will be used and that anonymous users will be permitted.
Next create a new subdirectory. Add a web.config file that explicitly denies anonymous users, as shown here:
Unauthenticated calls to any Web services in this directory will fail. However, if the user can submit credentials that map to a valid user account, the user will be authenticated and you'll be able to retrieve the authentication information through the built-in User object.
| Note |
Your Web service can access the User object as a built-in property, as long as you derive it from the System.Web.WebServices.WebService class. If you don't, you can still access the same user information through the shared HttpContext.Current property. |
The following Web service provides a simple user authentication test. GetIISUser returns the user that was authenticated by IIS. If anonymous access is allowed, the result will be an empty string because no authentication will be performed. If anonymous access is denied, the result will be a string in the form [DomainName][UserName] or [ComputerName][UserName]. You can use the role-based security techniques described in recipe 18.2 to examine the group membership of this authenticated user.
 _
Public Class AuthenticationTest
 Inherits System.Web.Services.WebService

 ' Retrieves the authenticated IIS user.
  _
 Public Function GetIISUser() As String
 Return User.Identity.Name
 End Function

End Class
The final step is to create a client that can submit the authentication information. The credentials are submitted through the Credentials property of the Proxy class. If you are using Basic authentication, you must create a NetworkCredential object that specifies the user name and password information. If you are using Windows Integrated authentication, you can automatically use the credentials of the currently logged on user using the shared CredentialCache.DefaultCredentials property. Both the CredentialCache and NetworkCredential classes are found in the System.Net namespace.
Figure 16-3 shows a Windows client that tests both approaches to authentication and attempts an unauthenticated call.
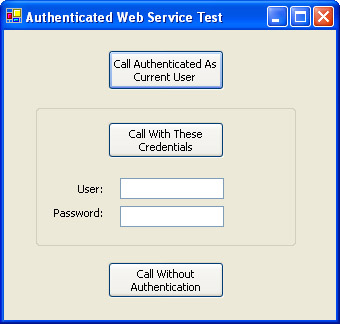
Figure 16-3: A client that tests authentication.
The full form code for the client is shown here:
Public Class AuthenticationClient
 Inherits System.Windows.Forms.Form

 ' (Designer code omitted.)

 Private Sub cmdNoAuthenticate_Click(ByVal sender As System.Object, _
 ByVal e As System.EventArgs) Handles cmdNoAuthenticate.Click
 ' Create the proxy.
 Dim Proxy As New localhost.AuthenticationTest()

 CallMethod(Proxy)
 End Sub

 Private Sub cmdAuthenticateCurrent_Click(ByVal sender As System.Object, _
 ByVal e As System.EventArgs) Handles cmdAuthenticateCurrent.Click
 ' Create the proxy.
 Dim Proxy As New localhost.AuthenticationTest()

 ' Assign the current user's credentials to the proxy class.
 ' This works for Windows Integrated authentication.
 Proxy.Credentials = System.Net.CredentialCache.DefaultCredentials

 CallMethod(Proxy)
 End Sub

 Private Sub cmdAuthenticateCustom_Click(ByVal sender As System.Object, _
 ByVal e As System.EventArgs) Handles cmdAuthenticateCustom.Click
 ' Create the proxy.
 Dim Proxy As New localhost.AuthenticationTest()

 ' Assign the credentials from the user name and password textboxes.
 ' This is required for Basic authentication.
 Proxy.Credentials = New System.Net.NetworkCredential( _
 txtUser.Text, txtPassword.Text)

 CallMethod(Proxy)
 End Sub

 Private Sub CallMethod(ByVal proxy As localhost.AuthenticationTest)
 Try
 MessageBox.Show("User: " & proxy.GetIISUser(), _
 "Authentication Succeeded")
 Catch Err As Exception
 MessageBox.Show(Err.Message, "Authentication Failed")
 End Try
 End Sub

End Class
16 7 Use Session State
Problem
You want to create a Web service that can store information in user-specific session state.
Solution
Avoid this option if possible because it leads to several complications. If it's absolutely necessary to use session state, set the EnableSession property of the WebMethod attribute to True, and initialize the CookieContainer property of the proxy class before calling the Web method.
Discussion
ASP.NET Web services can use session state to store objects in server-side memory. However, this approach has several consequences, including:
- Because session state must be tracked using a cookie with the session ID, the client must take additional steps to maintain the cookie. In addition, session state won't work over protocols other than HTTP.
- Cookies are maintained separately for each proxy class. Therefore, there's no easy way for multiple Web services to access the same session information for a client.
- Web services are usually designed as stateless classes. Creating a Web service that retains information between calls might lead to behavior the client does not expect. In addition, the lifetime of a session does not necessarily match the lifetime of the Web service proxy object.
- If you store a large amount of information in session state, server memory will become scarce and performance will suffer.
If you still decide to use session state, you must tweak both the Web service and the client code. On the Web service side, every Web method that needs access to the session state collection must set the EnableSession property of the WebMethod attribute to True. If you do not take this step, any existing session information will be preserved, but it will not be deserialized and made available to your Web method code.
The following Web service allows the remote user to store and retrieve a simple string:
 _
Public Class SessionTest
 Inherits System.Web.Services.WebService

  _
 Public Sub SetString(ByVal data As String)
 Session("Data") = data
 End Sub

  _
 Public Function GetString() As String
 Return CType(Session("Data"), String)
 End Function

End Class
On the client side, you must create an empty cookie collection before you use the proxy. Otherwise, the proxy will not be able to accept the ASP.NET session cookie and a new session will be started for each method call. The client will need to maintain this instance of the proxy class (or at least its cookie collection) as long as it needs to access the same session.
Here's the code for a sample client that sends the data from a text box to the session-enabled Web service:
Public Class SessionClient
 Inherits System.Windows.Forms.Form

 ' (Designer code omitted.)

 Private Proxy As New localhost.SessionTest()

 Private Sub Form_Load(ByVal sender As System.Object, _
 ByVal e As System.EventArgs) Handles MyBase.Load
 ' Initialize the cookie container.
 Proxy.CookieContainer = New System.Net.CookieContainer()
 End Sub

 Private Sub cmdSet_Click(ByVal sender As System.Object, _
 ByVal e As System.EventArgs) Handles cmdSet.Click
 Proxy.SetString(txtData.Text)
 txtData.Text = ""
 End Sub

 Private Sub cmdGet_Click(ByVal sender As System.Object, _
 ByVal e As System.EventArgs) Handles cmdGet.Click
 txtData.Text = Proxy.GetString()
 End Sub

End Class
16 8 Upload or Download Large Binary Data
Problem
You want to transfer an image or a file to or from a Web service.
Solution
Submit or return the data as a byte array.
Discussion
Web services support only a carefully limited set of data types, an approach that's designed to ensure optimum cross-platform compatibility. However, you can transmit virtually anything if you convert it to binary first.
The following Web service accepts a byte array and saves it directly to disk. For this code to work, the ASP.NET process must have privileges to write to the appropriate directory. You should also import the System.IO namespace.
 _
Public Class UploadData
 Inherits System.Web.Services.WebService

  _
 Public Sub UploadFile(ByVal originalName As String, _
 ByVal buffer As Byte())

 ' Canonicalize the originalName value so it just includes a filename.
 ' This strips out any path information, which a malicious user could
 ' submit to trick your application into writing in the wrong location.
 originalName = Path.GetFileName(originalName)

 ' Retrieve the save path from the configuration file.
 Dim SavePath As String
 SavePath = ConfigurationSettings.AppSettings("UploadDirectory")
 SavePath = Path.Combine(SavePath, originalName)

 ' Use CreateNew mode, so that an error will be raised if a file
 ' with the same name already exists.
 Dim fs As New FileStream(SavePath, FileMode.CreateNew)

 ' Write the file.
 fs.Write(buffer, 0, buffer.Length)
 fs.Close()

 End Sub

End Class
Here is a sample client that allows the user to select a file and submit it to the Web service:
Public Class UploadClient
 Inherits System.Windows.Forms.Form

 ' (Designer code omitted.)

 Private Sub cmdUpload_Click(ByVal sender As System.Object, _
 ByVal e As System.EventArgs) Handles cmdUpload.Click
 Me.Cursor = Cursors.WaitCursor

 ' Show a dialog that allows the user to choose a file.
 Dim dlgOpen As New OpenFileDialog()
 If dlgOpen.ShowDialog() = DialogResult.OK Then

 ' Read the file into a byte array.
 Dim fs As New FileStream(dlgOpen.FileName, FileMode.Open)
 Dim Buffer As Byte()
 ReDim Buffer(fs.Length)
 fs.Read(Buffer, 0, fs.Length)
 fs.Close()

 ' Submit the byte array to the Web service.
 Dim Proxy As New localhost.UploadData()
 Proxy.UploadFile(Path.GetFileName(dlgOpen.FileName), Buffer)
 MessageBox.Show("Upload complete.")

 End If

 Me.Cursor = Cursors.Default
 End Sub

End Class
Notice that this example doesn't take security into account. In a production-level application, you would want to authenticate the user before allowing him or her to write data to the server (using the technique shown in recipe 16.6). You might also limit the maximum accepted message size to prevent denial of service attacks that work by flooding the server with data.
You would also need to take additional steps to prevent name collision, which occurs when two files are uploaded with the same name. Name collision causes the first file to be overwritten or the second operation to fail, depending on the file access mode you use. To prevent name collision, you could create a new GUID with each Web method request and use this GUID as the file name. In this case, you would probably need to log some information in a database mapping the GUID to the original file name. Alternatively, you might want to use multiple user-specific directories and allow users to overwrite their own uploaded files.
| Note |
Depending on the size of data and the speed of the connection, it might take some time to transmit large binary arrays. While the transfer is in process, the ASP.NET thread that's serving the request will not be able to respond to any other clients. So, if you need to create a system where users can frequently upload and download large amounts of data, you might want to use another approach, such as FTP. |
16 9 Send Out of Band Data in a SOAP Header
Problem
You want to send some information to one or more Web methods without having to add it as a method parameter.
Solution
Create a custom SOAP header that encapsulates the additional information you need.
Discussion
Sometimes, you might need to submit information to a Web method that does not specifically relate to the method itself. This is most often the case when you are building your own custom authentication system or state management system, and you need to submit some type of credentials or tracking information every time you call the Web service. You can accommodate this information by inserting additional parameters into every method. However, this approach raises several problems, including:
- The client needs to track this information and remember to submit it with each request.
- The Web service method signatures are needlessly cluttered.
- If you change your custom authentication or tracking system, you must modify each and every method definition.
A better approach is to submit this data out-of-band as a SOAP header. In this case, the client needs to specify the information only once and it will be automatically added to every request message as needed.
For example, consider a Web service that uses ticket-based authentication. In this system, the user is authenticated only once and given a time-limited GUID ticket. This ticket is presented on subsequent method invocations, saving the effort of re-authenticating the user with each request. In ticket-based authentication, you might want to create a SOAP header that tracks the user's authenticated GUID ticket. The class would derive from SoapHeader in the System.Web.Services.Protocols namespace and would add a single public member variable.
Public Class TicketHeader
 Inherits SoapHeader

 Public Ticket As Guid

End Class
Now you must modify the Web service so that it includes a public TicketHeader member variable.
 _
Public Class TicketTest
 Inherits System.Web.Services.WebService

 ' Holds the authentication SOAP header.
 Public Ticket As TicketHeader

 ' (Other code omitted.)

End Class
Web methods that need to use or set TicketHeader must include the SoapHeader attribute. This attribute provides the following two pieces of information:
- It indicates which member variable will be used to receive the header. This variable is defined as a string, but it must correspond to a public Web service member variable of the appropriate type.
- It specifies the Direction, which indicates whether the Web method will receive the header from the client (SoapHeaderDirection.In), return a new header to the client (SoapHeaderDirection.Out), or need to be able to receive and modify the header (SoapHeaderDirection.InOut).
For example, the following Login Web method creates the authentication ticket if the user can be successfully authenticated. It uses SoapHeaderDirection.Out because it creates the SOAP header and returns it to the client.
 _
Public Function Login(ByVal userName As String, ByVal password As String) _
 As Boolean

 ' Typically, you would look up the user record in the database.
 ' In this case, authentication simply checks that the password is "test"
 If password = "test" Then
 ' Create the SOAP header.
 Ticket = New TicketHeader()
 Ticket.Ticket = Guid.NewGuid()

 ' Store the ticket in server memory to validate against later.
 Application(Ticket.Ticket.ToString()) = Ticket

 Return True
 Else
 Return False
 End If

End Function
| Note |
The Login method assumes the user name and password are sent in clear text. Therefore, you should use Secure Socket Layer (SSL) encryption to ensure that this data is not visible to an eavesdropping attacker. See recipe 18.6 for more information. |
The Logout method, on the other hand, uses SoapHeaderDirection.InOut, which means it automatically receives the SOAP header from the client (if it exists). In addition, any changes that are made to the SOAP header are propagated back to the client.
 _
Public Sub Logout()
 If Not (Ticket Is Nothing) Then
 ' Remove the server-side ticket information.
 Application(Ticket.Ticket.ToString()) = Nothing

 ' Remove the ticket information from the SOAP header.
 Ticket.Ticket = Nothing
 End If

End Sub
All other methods can now receive the ticket header. The following DoSomething method is one example. It returns a string that indicates whether the ticket was found and could be authenticated. Usually, you would use these criteria to decide whether to carry on with a task or throw a SecurityException.
 _
Public Function DoSomething() As String
 If IsAuthenticated() Then
 Return "Sucessful authentication"
 Else
 Return "Failed authentication"
 End If
End Function

Private Function IsAuthenticated() As Boolean
 ' Check first that the ticket exists.
 If Ticket Is Nothing Then Return False

 ' Now check if the ticket in the header corresponds to
 ' the ticket stored in server memory.
 If Application(Ticket.Ticket.ToString()) Is Nothing Then
 Return False
 Else
 Dim CachedTicket As TicketHeader
 CachedTicket = CType(Application(Ticket.Ticket.ToString()), _
 TicketHeader)

 ' (This is where you would add any expiration logic.)

 ' Verify the ticket values are the same.
 ' This is not really necessary, but it's a simple failsafe.
 If CachedTicket.Ticket.CompareTo(Ticket.Ticket) = 0 Then
 Return True
 Else
 Return False
 End If
 End If
End Function
Finally, consider the simple test code for a Windows client shown below. Notice that the client simply needs to call the Login method before using any other Web methods. The client does not need to interact with the ticket directly or even be aware that the ticket exists at all.
Dim Proxy As New localhost.TicketTest()
Dim Success As Boolean = Proxy.Login("Me", "test")
MessageBox.Show("Login result: " & Success.ToString())

' This succeeds.
Dim Result As String = Proxy.DoSomething()
MessageBox.Show("DoSomething result: " & Result)

Proxy.Logout()

' This fails, because the ticket information no longer exists.
Result = Proxy.DoSomething()
MessageBox.Show("DoSomething result: " & Result)
| Note |
The examples in this recipe show a complete demonstration of how to use a SOAP header. However, if you want to use ticket-based authentication in your own application, you'll probably want to store information about when the ticket was created on the server so that you can expire tickets after a reasonable amount of time has passed. If an expired ticket is detected, you can throw a custom exception that the client can catch. The client can then log on again with the Login method. |
16 10 Trace a SOAP Message Using the SOAP Toolkit
Problem
You want to see raw SOAP request and response messages, probably for debugging purposes.
Solution
Use the SOAP trace utility included with the Microsoft SOAP Toolkit, and forward all Web service request messages to port 8080.
Discussion
The SOAP Toolkit includes COM components that you can use to call Web services in non-.NET clients. However, even if you code exclusively in the .NET world, you'll still find that the trace utility can be quite useful.
You can download the latest version of the SOAP Toolkit from http://msdn.microsoft.com/library/default.asp?url=/downloads/list/websrv.asp. You can then run the trace utility from the Start Menu icons created by the setup application. (Look for a shortcut named Trace Utility.)
To start a trace, select File | New | Formatted Trace from the menu in the trace utility. You can then use the defaults shown in Figure 16-4, in which case the trace utility will listen on port 8080 and forward all received messages to port 80 (which IIS uses to listen for all HTTP Web requests).
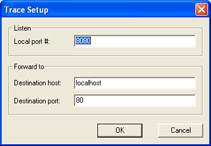
Figure 16-4: Configuring a SOAP trace.
To trace the messages sent in your application, you need to modify the client code so that SOAP requests are sent to the trace listener at port 8080. You can do so by modifying the Web service URL. For example, if your Web service is at http:// localhost/VBCookbookWebServices/Recipe16-7.asmx, request http://localhost:8080/VBCookbookWebServices/Recipe16-7.asmx instead. The following code shows how you can modify the URL of the proxy class using the System.Uri class, which allows you to insert the 8080 port into any URL.
' Retrieve the current URL for the proxy class.
Dim ProxyUri As New Uri(Proxy.Url)

' Insert the port 8080.
Proxy.Url = ProxyUri.Scheme & "://" & ProxyUri.Host & _
 ":8080" & ProxyUri.AbsolutePath
The trace listener will then forward your message to its destination (the Web service), intercept the response message, and forward it to your client. The full message trace will be displayed in the utility. Figure 16-5 shows an example using the Web service from recipe 16.7, with two messages.
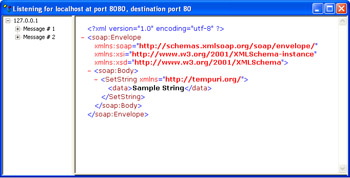
Figure 16-5: The results of a SOAP trace.
16 11 Log SOAP Messages with a SOAP Extension
Problem
You want to directly access or modify raw SOAP messages with .NET code.
Solution
Create a custom SOAP extension.
Discussion
ASP.NET allows you to access the raw SOAP messages that are transmitted to and from a Web service, but only by creating a special SOAP extension class. This class is triggered automatically as the SOAP message passes through the following four stages on the server:
- SoapMessageStage.BeforeDeserialize occurs immediately after the Web server receives the SOAP request message.
- SoapMessageStage.AfterDeserialize occurs after the raw SOAP message is translated to .NET data types but just before the Web method code runs.
- SoapMessageStage.BeforeSerialize occurs after the Web method code runs but before the return value is translated into a SOAP message.
- SoapMessageStage.AfterSerialize occurs after the return data is serialized into a SOAP response message but before it is sent to the client.
Each time the message moves into a new stage, ASP.NET calls the ProcessMessage method of any attached SOAP extensions. Your SOAP extension can respond by inspecting and logging various information about the SOAP message. If the message is in the BeforeDeserialize or AfterSerialize stage, you can retrieve the full SOAP message text. This recipe presents the complete code for a SOAP extension that logs SOAP request and response messages to the Windows event log on the server.
All SOAP extensions consist of two ingredients: a custom class that derives from System.Web.Services.Protocols.SoapExtension and a custom attribute that you apply to a Web method to indicate that your SOAP extension should be used. The custom attribute is the simpler of the two ingredients. It needs to include two properties: Priority (which is seldom used) and ExtensionType (which returns a Type object that represents your custom SoapExtension class). You can also add additional properties that will be used to supply initialization information to your SOAP extension. The following example adds an EventSource property, which stores the source string that will be used when writing event log entries:
 _
Public Class EventLogSoapExtensionAttribute
 Inherits SoapExtensionAttribute

 Private _Priority As Integer
 Private _EventSource As String

 ' The priority property allows you to configure the order that multiple
 ' SOAP extensions will execute in, if order is important.
 Public Overrides Property Priority() As Integer
 Get
 Return _Priority
 End Get
 Set(ByVal Value As Integer)
 _Priority = Value
 End Set
 End Property

 ' This is a custom piece of data used to configure event log entries.
 Public Property EventSource() As String
 Get
 Return _EventSource
 End Get
 Set(ByVal Value As String)
 _EventSource = Value
 End Set
 End Property

 ' Returns the type representing the SOAP extension class.
 ' In this case, the class is named EventLogSoapExtension.
 Public Overrides ReadOnly Property ExtensionType() As System.Type
 Get
 Return GetType(EventLogSoapExtension)
 End Get
 End Property

End Class
The EventLogSoapExtension class is much longer. Most of the code is basic boilerplate that you can copy into any SOAP extension. The custom logging logic is shown in bold text. All the lines that aren't bold are generic and will be a part of any SOAP extension you create.
Public Class EventLogSoapExtension
 Inherits SoapExtension

 ' These properties track the SOAP message as it is being
 ' serialized or deserialized.
 Private OldStream As Stream
 Private NewStream As Stream

 Public Overrides Function ChainStream(ByVal stream As Stream) As Stream
 OldStream = stream
 NewStream = New MemoryStream()
 Return NewStream
 End Function

' The source string that will be used when writing log entries.
Private EventSource As String

 Public Overloads Overrides Function GetInitializer( _
 ByVal methodInfo As LogicalMethodInfo, _
 ByVal attribute As SoapExtensionAttribute) As Object
' Retrieve the EventSource property from the associated attribute.
' Use this information as the SOAP extension initializer.
Return CType(attribute, EventLogSoapExtensionAttribute).EventSource
 End Function

 Public Overloads Overrides Function GetInitializer( _
 ByVal serviceType As Type) As Object
 ' The SOAP extension was loaded through a configuration file.
 ' Do not attempt to retrieve the initializer.
 Return ""
 End Function

 Public Overrides Sub Initialize(ByVal initializer As Object)
' Apply the initializer every time the SOAP extension is executed.
EventSource = CType(initializer, String)
If EventSource = "" Then EventSource = "SOAPExtension"
 End Sub

 ' This method is invoked as the SOAP message changes stages.
 Public Overrides Sub ProcessMessage(ByVal message As SoapMessage)
 If message.Stage = SoapMessageStage.AfterSerialize Then
' The SOAP response message has just been created.
' We can log it.
NewStream.Position = 0
Dim LogData As New MemoryStream()
CopyStream(NewStream, LogData)
LogMessage(LogData, message)

 NewStream.Position = 0
 CopyStream(NewStream, OldStream)

 ElseIf message.Stage = SoapMessageStage.BeforeDeserialize Then
 CopyStream(OldStream, NewStream)
 NewStream.Position = 0

' The SOAP request message has not yet been deserialized.
' We can log it.
Dim LogData As New MemoryStream()
CopyStream(NewStream, LogData)
LogMessage(LogData, message)

 NewStream.Position = 0
 End If

 End Sub

Private Sub LogMessage(ByVal messageContent As Stream, _
ByVal message As SoapMessage)
' Create a log message that includes data about the SOAP message,
' and the contents of the SOAP message itself.
Dim LogMessage As String
LogMessage &= "Message in: " & message.Stage.ToString() & vbNewLine
LogMessage &= "Action: " & message.Action & vbNewLine
LogMessage &= "URL: " & message.Url & vbNewLine
LogMessage &= "Time: " & DateTime.Now.ToString()

messageContent.Position = 0
Dim r As New StreamReader(messageContent)
LogMessage &= r.ReadToEnd()

' Create the EventLog source if needed.
' This action will only succeed if the ASP.NET worker process is
' running under an account that has been granted full control
' for the event log registry keys.
If Not EventLog.SourceExists(EventSource) Then
EventLog.CreateEventSource(EventSource, "Application")
End If

' Log the message.
Dim Log As New EventLog()
Log.Source = EventSource
Log.WriteEntry(LogMessage)
End Sub

 Private Sub CopyStream(ByVal fromStream As Stream, _
 ByVal toStream As Stream)
 Dim r As New StreamReader(fromStream)
 Dim w As New StreamWriter(toStream)
 w.WriteLine(r.ReadToEnd())
 w.Flush()
 End Sub

End Class
Finally you need to apply the custom EventLogSoapExtension attribute to any method that will use the SOAP extension. At the same time, you can specify the event source that should be used for logging.
 _
Public Sub DoSomething()
 ' (No code needed.)
End Function
Now when a client invokes the DoSomething method, the EventLogSoapExtension will be invoked automatically and ProcessMessage will be called four times. Two messages will be logged to the Application event log, one for the request message (as shown in Figure 16-6) and one for the response message.
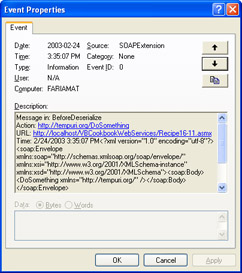
Figure 16-6: The SOAP message information in the event log.
| Note |
To use the sample SOAP extension shown in this recipe, the ASP.NET worker process have must permission to access and modify the event log keys in the registry. Specific setup steps are provided in the readme.txt file with the code download. In addition, the SOAP extension will only execute if the Web method is invoked over SOAP. Therefore, a .NET client will trigger the SOAP extension, but the browser test page will not. |
16 12 Call a Web Service from a Visual Basic 6 Client
Problem
You need to invoke a .NET Web service from a Windows client written in Visual Basic 6.
Solution
Use the SOAP Toolkit, which provides this functionality through an easy-to-use COM library.
Discussion
The SOAP Toolkit includes a COM component that you can use to call any type of Web service that provides a valid Web Services Description Language (WSDL) document. Thus, the SOAP Toolkit supports .NET Web services and Web services created on other platforms. You can download the latest version of the SOAP Toolkit from http://msdn.microsoft.com/library/default.asp?url=/downloads/list/websrv.asp. In Visual Basic 6, you can add a reference to the SOAP Toolkit by selecting Project | References from the menu and adding a check mark next to the Microsoft Soap Type Library item, as shown in Figure 16-7.
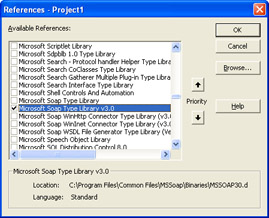
Figure 16-7: Adding a reference to the SOAP Toolkit in Visual Basic 6.
To use the SOAP Toolkit, you need to know the location of the WSDL for the service you want to use. You must also know which Web methods the service provides. The SOAP Toolkit dynamically generates a proxy at run time, and it uses late binding to access the proxy methods. Therefore, no runtime checking is performed to ensure that you enter a valid Web method name or supply the right parameters and data types. To determine the available Web methods and correct method signatures, you must read the WSDL or any documentation that is provided with the service.
The following example shows a Visual Basic 6 client that calls the Web service presented in recipe 16.2 to determine the current date and time. In this case, the WSDL document is retrieved directly from the Web server. To improve performance, it's recommended that you save a local copy of the WSDL file and use it to configure the SoapClient object.
' (This is Visual Basic 6 code.)
Private Sub Form_Load()

 ' Create the SoapClient.
 Dim SoapClient As MSSOAPLib30.SoapClient30
 Set SoapClient = New MSSOAPLib30.SoapClient30

 ' Use the Init method to generate a proxy
 Dim WSDLPath As String
 WSDLPath = "http://localhost/VBCookbookWebServices/Recipe16-2.asmx?WSDL"
 Call SoapClient.MSSoapInit(WSDLPath)

 ' Call the GetDate web method to retrieve some information.
 MsgBox("Server returned: " & SoapClient.GetDate())

End Sub
Chapter 17 Remoting and Enterprise Services
Introduction
- Strings and Regular Expressions
- Numbers, Dates, and Other Data Types
- Arrays and Collections
- Objects, Interfaces, and Patterns
- Files and Directories
- XML
- Multithreading
- Network Programming
- Reflection
- Windows Programming
- Windows Controls
- Printing and Drawing with GDI+
- Windows Services
- ADO.NET
- ASP.NET Web Applications
- Web Services
- Remoting and Enterprise Services
- Security and Cryptography
- Useful COM Interop
EAN: 2147483647
Pages: 376
