Help and Application-Embedded Support
Overview
Help: Is it the final polish on a professional application or a time-consuming chore? It all depends on the audience, but most commercial applications need a support center where users can seek assistance when they become confused or disoriented. Without this basic aid, you (or your organization's technical support department) are sure to be buried under an avalanche of support calls.
In this chapter, you learn:
- How to integrate Windows Help files into your applications. You look at launching Help manually, and using the context-sensitive HelpProvider.
- When to design your own Help, and how you can weave it into an application using an extensible database-based or XML-based framework.
- How to break down the limits of Help and design application-embedded support: user assistance that's integrated into the software it documents, instead of slapped on in a separate file as an afterthought. You explore some basic approaches like affordances and wizards (through visual inheritance), and a few advanced techniques like animated agents.
 Companion Web Site
Types of HelpStandardized Help has existed since the Windows platform was created, and even in the DOS world in little known tools like QuickHelp. Throughout the years (and versions of Windows), Help has continued to evolve, passing through several distinct stages, which are described in the next few sections. WinHelpThe WinHelp format used in Windows 3.0 still exists, and can be used in the most modern Windows application. Unfortunately, it looks irredeemably garish. Help files from different authors tended to look—and act—differently.
WinHelp 95When Windows 95 was introduced, a new standard (often referred to as WinHelp 95) took over. WinHelp 95 files are familiar to almost any computer user, and they are still used in countless programs. WinHelp 95 was a major improvement in the Help world. Whereas the original WinHelp forced developers to create their own contents page with hyperlinks, WinHelp 95 files use a separate contents file (with the extension .cnt) to define the standardized multilevel table of contents. WinHelp 95 really has two parts: the .cnt contents page (which also provides a standardized index and full-text search), and the .hlp help file that provides the actual topics. When a user double-clicks a topic, the table of contents disappears, and is replaced with the appropriate help window.
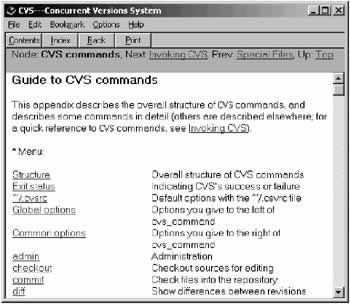
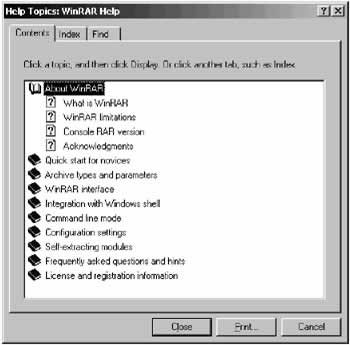
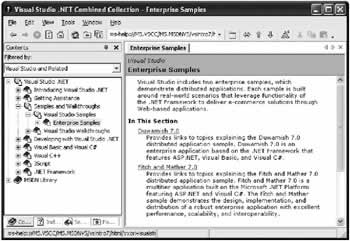
The standardized table of contents was both the most significant advance and the most obvious limitation of WinHelp 95. The obvious problem is that users often need to jump back and forth between the table of contents and the topic pages before they find the content they need. This process is tedious, and it feels complicated because there can be multiple windows scattered about the desktop. HTML HelpThe next version of WinHelp was named HTML Help, because the source files were written in HTML markup language instead of the RTF format. HTML Help debuted with Windows 98 and also shipped with Internet Explorer 4. A common source of confusion about HTML Help is the idea that it is somehow supposed to provide help over the Web or browser-integrated help. While HTML Help depends on some components that are also used in Internet Explorer, it really has little to do with the Internet. Instead, HTML Help is an improvement to WinHelp that combines the table of contents and topic views in the same window (see Figure 14-3).
The new HTML Help view makes it dramatically easier to browse through a long, multilevel table of contents without losing your place. By dividing and subdividing information into its smallest bits, Help developers are able to put fairly lengthy, complex content in a help file. With HTML Help, developers also started to use DHTML and JavaScript text directly in their Help to create collapsible headings and other neat tricks. In some cases (for example, the Visual Studio 6 documentation and the SQL Server documentation), Microsoft refers to these help files as "books online." HTML Help files always use the .chm extension. MS Help 2The next revolution to the Help world is tentatively titled MS Help 2, and it's the help engine used by Microsoft's MSDN help in Visual Studio .NET. The first Help 2 engine ships with Visual Studio .NET, but it isn't yet supported by most third-party tools, and there isn't a great deal of information about it (some basic information is available at http://helpware.net). Help 2 promises some long-awaited improvements to HTML help, like a redesigned user interface, and the ability to embed a help window in an application interface with minimum fuss. However, it also has its idiosyncrasies. For example, every Help 2 file must be registered with the Windows operating system. You can't simply copy the appropriate .HxS file to another computer.
Some Help Authoring ToolsMicrosoft provides only rudimentary tools for compiling source files to create Help systems. To have the full range of tools for designing, linking, and configuring your Help, you will probably need to turn to a third-party design tool. Creating Help is beyond the scope of this book, but there are a few starting points:
|
||||||||||||||||||
Classic Bad HelpHave you ever had this experience? You find an unusual option buried deep in an application, and it piques your curiosity. You hit F1, curious to find out what this option accomplishes. But your optimism dwindles when you read the description provided by the context-sensitive Help system: "To enable option X, click once on the option X check box. To disable option X, click the option X check box again to remove the check mark. Click OK to save your changes." Clearly something is missing here. You want to know what option X does; the Help wants to explain, in oddly explicit detail, how to use a check box. The situation is ridiculous, as the function of option X is not at all obvious, but the way to use a check box is an instinctive part of every computer user's understanding. If you don't know how to use a check box, you probably wouldn't have guessed to press the F1 key for help. This is a classic example of bad help. Some of the characteristics of bad Help include:
To understand good help, you need to recognize that most Help is designed to provide reference information. Help really shines compared to a printed book when it's able to use context sensitivity to automatically display a piece of information about a specific window or setting. This is the type of information that all users need occasionally while working with an application they mostly understand. On the other hand, Help is relatively poor at providing tutorial-based learning, which explains tasks that incorporate many different parts. In this case, it's generally easier to use a printed book. Help that tries to provide descriptive task-based learning is generally frustrating for a number of reasons-users can't see the help window at the same time they look at the program window, the help window doesn't provide enough space for the long descriptions that are needed, and most users don't want to read a large amount of information from the computer screen anyway. When creating Help, you should aim to divide it into discrete topics that describe individual windows, complete with all their details. This provides the most useful context-sensitive Help system.
|
||||||||||||||||||
Basic Help with the HelpProviderOne easy way to use Help with a .NET application is by adding the HelpProvider control. This "invisible" control shows up in the component tray (Figure 14-5).
The HelpProvider uses a basic HelpNamespace property that sets the help source. This could be a path to an ordinary .hlp file, an HTML Help .chm file, or even a URL. To bind a control to this HelpProvider, you simply need to set the extended ShowHelp property to true. In other words, when you add a HelpProvider to a form, every control acquires a special property in the designer (with a name like ShowHelp on HelpProvider). Set this to true, and the help file is automatically launched if the user presses the F1 key while this control has focus. You can also connect or disconnect help manually in code, using the HelpProvider.SetShowHelp() method. Just pass the control that you want to use as an argument.
private void HelpTest_Load(object sender, System.EventArgs e)
{
 // This turns on F1 help support for cmdAdd.
 hlp.SetShowHelp(cmdAdd, true);

 // This disables it.
 hlp.SetShowHelp(cmdAdd, false);
}
You can also set the HelpKeyword and HelpNavigator properties in conjunction to configure which topic is shown when the Help is invoked. Table 14-1 outlines all the possible options you have with the HelpNavigator enumeration. Note that while all these choices are supported by HTML Help, the support in WinHelp and WinHelp 95 is notoriously poor.
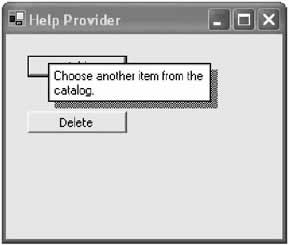
For example, the following two lines of code define a context-sensitive link that binds a control to a specific topic in an HTML Help file. // Specify a topic link. hlp.SetHelpNavigator(ctrl, HelpNavigator.Topic); // Identify the topic. hlp.SetHelpKeyword(ctrl, "Welcome.html"); Note that the topic name is "Welcome.html." In this case, the example is using a .chm file, and the original HTML Help project included the topic in a source file named Welcome.html. Once the .chm file is created, this file no longer exists separately. Instead, like all topics, it is combined into the compiled help file. However, the file name can still be used as a help keyword to select the topic. Your other option (and your only option with the older WinHelp format) is to use context integers, which are numbers that uniquely identify each topic. Alternatively, you don't need to use a Help file at all. Instead, you can display a pop-up window with a short message (formerly referred to as "What's This Help"). To do so, make sure that you do not set the HelpProvider.HelpNamespace property, which always takes precedence. Then, either set the HelpString on the HelpProvider property at design-time, or use the SetHelpString method, as shown here: hlp.SetHelpString(cmdAdd, "Choose another item from the catalog."); hlp.SetHelpString(cmdDelete, "Delete the selected item from your order."); The resulting pop-up message is shown in Figure 14-6.
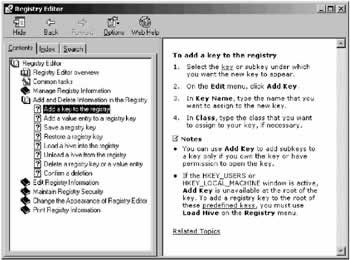
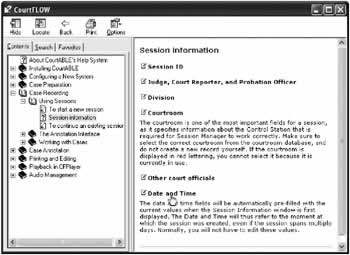
Note that when you set use the SetHelpString() or SetHelpKeyword() methods, you automatically enable help for the control. That means that you don't need to call the SetShowHelp() method, unless you want to explicitly disable help for the control. Control Based and Form Based HelpControl-by-control context-sensitivity is usually too much for an application. It's rare that a Help file is created with separate topics for every control in a window, and even if it were, most users simply press F1 as soon as they encounter a confusing setting. In other words, they don't explicitly tab to the setting they want to find out about to give it focus before invoking Help. For that reason, the control that is launching Help is quite possibly not the control the user is seeking information about. One easy way around this is to define an individual context-sensitive help topic for every form. For a settings dialog, this topic should contain a list of every option. Nicely designed Help might even use dynamic HTML to make this list collapsible (see, for example, Figure 14-7).
The only subtlety to understand with form-based Help is that when you enable Help for the form, you also enable Help for every control it contains. If the user presses F1 while the focus is on a control that is specifically configured with different Help settings, these settings take precedence. If, however, the current control has ShowHelp set to false, the request will be forwarded to the containing form, which launches its own Help. This process works analogously with all container controls, and it allows you to define Help that's as specific as you need, while still being able to fall back on a generic form-wide topic for controls that aren't specifically configured.
|
||||||||||||||||||||||||||||||||||||||||||||||||

Invoking Help ProgrammaticallyThe examples so far require the user to press the F1 key. This automated approach doesn't work as well if you want to provide your own buttons that allow the user to trigger help when needed. Sometimes, this sort of prominent reminder can reassure the user that help is nearby. To trigger help programmatically, you need to use the static ShowHelp() method of the Help class (found in the System.Windows.Forms namespace). The Help class works analogously to the HelpProvider-in fact, the HelpProvider uses the Help class behind the scenes when the user presses F1. There are several overloaded versions of the ShowHelp() method. The simplest requires a help filename (or URL) and the control that is the parent for the help dialog (this second parameter is required for low-level Windows operating system reasons). Here's an example that shows the test.hlp file: Help.ShowHelp(this, "test.hlp"); Additionally, you can use a version of the ShowHelp() method that requires a HelpNavigator, one that requires a keyword, or one that requires both a keyword and a HelpNavigator. Here's an example that could be used for context-sensitive help: Help.ShowHelp(this, "test.hlp", HelpNavigator.Topic, "about.htm"); To save yourself some work when using this technique with the HelpProvider, you would probably retrieve these values from another control. For example, you might provide a button on your form that invokes the default form help:
private void cmdHelp_Click(object sender, System.EventArgs e)
{
 Help.ShowHelp(this, hlp.HelpNamespace, hlp.GetHelpNavigator(this),
 hlp.GetHelpKeyword(this));
}
Similarly, you might use a right-click context menu for a control that provides the control's default help:
private void mnuHelp_Click(object sender, System.EventArgs e)
{
 Control ctrl = mnuLabel.SourceControl;
 Help.ShowHelp(ctrl, hlp.HelpNamespace, hlp.GetHelpNavigator(ctrl),
 hlp.GetHelpKeyword(ctrl));
}
This menu event handler is written using the SourceControl property, which means it's generic enough to be used with any control. When the menu is clicked, it retrieves the control attached to the menu, and gets its assigned Help keyword. Help Without the HelpProviderNow that you are this far, it's possible to unshackle yourself completely from the HelpProvider class. It works like this-handle the KeyDown event of every form that should display help, and check for the F1 key. If it is pressed, launch the appropriate help programmatically with the Help class. There are two tricks to making this work. The first one is setting the form's KeyPreview property to true, which makes sure it will receive all key press events, regardless of what control has focus. The second sticky point is to make sure you create an event handler for the KeyDown event, not the KeyPress event, which doesn't react to the special F1 key. The code itself is simple:
private void form1_KeyDown(object sender, System.Windows.Forms.KeyEventArgs e)
{
 if (e.KeyCode == Keys.F1)
 {
 Help.ShowHelp(this, "test.hlp");
 }
}
So now that you've seen how it can be done, why would you want to do it? There are actually a number of reasons that you might take this approach when using context-sensitive Help. You examine two of the most common in the next two sections. Using Database Based HelpHelp files, like any other external resource, change. You don't want to embed information like topic URLs all over your user interface, because they are difficult and time-consuming to update. Instead, you can use a basic form event handler that calls a method in a custom AppHelp class. It would look something like this:
private void form1_KeyDown(object sender System.Windows.Forms.KeyEventArgs e)
{
 if (e.KeyCode == Keys.F1)
 {
 Global.Help.ShowHelp(this);
 }
}
The Global class simply provides the current AppHelp instance through a static Help member:
public class Global
{
 public static AppHelp Help;
}
The AppHelp.ShowHelp() method examines the submitted form, compares it with a list of forms in a database, and thus determines the appropriate context topic, which it launches. Note that for performance reasons, this list of form-topic mappings would be read once when the application starts, and stored in a member variable. The AppHelp class is shown in the following example. The database code needed to retrieve the FormHelpMappings table has been omitted.
public class AppHelp
{
 public DataTable FormHelpMappings = null;
 public string HelpFile = "";

 public void ShowHelp(Form helpForm)
 {
 foreach (DataRow row in FormHelpMappings.Rows)
 {
 if (helpForm.Name == Row["FormName"])
 {
 // A match was found. Launch the appropriate help topic.
 Help.ShowHelp(helpForm, HelpFile, HelpNavigator.Topic,
 Row["Topic"]);
 return;
 }
 }
 }
}
Using Task Based HelpAnother reason you might take control of the help process is to get around the limitations of form-based help. Form-specific help works well in a dialog-based application, but falters when you create a document-based or workspace-based program where users perform a number of different tasks from the same window. Rather than try to write the code needed to dynamically modify help keywords, you can use the AppHelp class to track the current user's task. When Help is invoked, you can use this information to determine what topic should be shown. Here's the remodeled AppHelp class. Note that in this case, it doesn't decide what topic to show based on form name, but based on one of the preset task types. The logic that links tasks to topics is coded centrally in the AppHelp class (not in the user interface), and it could be moved into a database for even more control. An enumeration is used to ensure that the client code always sets a valid value.
public class AppHelp
{
 // These are the types of tasks that have associated help topics.
 public enum Task
 {
 CreatingReport,
 CreatingReportWithWizard,
 ManagingReportFiles,
 ImportingReport
 }

 public string HelpFile = "";
 public Task CurrentTask;

 // Show help based on the current task.
 public void ShowHelp(Form helpForm)
 {
 string topic = ""
 switch (CurrentTask)
 {
 case Task.CreatingReport:
 topic = "Reports.htm";
 break;
 case Task.CreatingReportWithWizard:
 topic = "Wizard.htm";
 break;
 case Task.ManagingReportFiles:
 topic = "Reports.htm";
 break;
 case Task.ImportingReport:
 topic = "Importing.htm";
 break;
 }

 Help.ShowHelp(helpForm, HelpFile, HelpNavigator.Topic, topic);
 }
}
Now, the code simply needs to "remember" to set the task at the appropriate times. Global.Help.CurrentTask = AppHelp.Task.CreatingReport; When help is invoked, the form doesn't need to determine what task is underway-the AppHelp class simply uses the most recent task setting.
private void form 1_KeyDown(object sender, System.Windows.Forms.KeyEventArgs e)
{
 if (e.KeyCode == Keys.F1)
 {
 Global.Help.ShowHelp(this);
 }
}
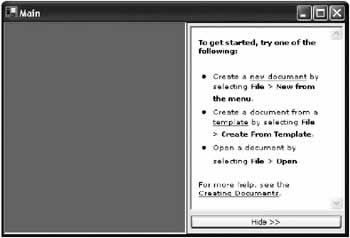
This system could be made much more complex by using a task list or tracking multiple types of context information in the AppHelp class, which is conceptually similar to how many advanced consumer applications (like office productivity software) work. Creating Your Own HelpAnother advanced option you might want to pursue is creating your own Help from scratch, rather than relying on one of the formats I've described. This technique has significant drawbacks: namely, you surrender advanced features like text searching, hierarchical table of contents, and an index. However, it also has significant advantages, the most important being that you can easily integrate Help content into your application. With the current HTML Help system, it is almost impossible to embed and control a help window in your application. MS Help 2 promises some improvements, but the required tools have not yet appeared. Creating your own Help generally follows two approaches:
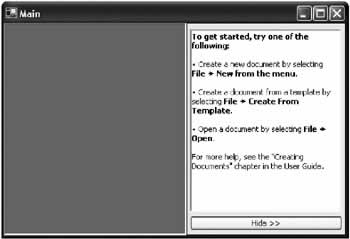
These designs allow you to provide a design like the one shown in Figure 14-8. It provides a slide-out window that can be used to give a list of steps with information for the current task. The information itself is retrieved from a database and displayed in the application.
You'll notice that this .NET example uses a RichTextBox control to display a formatted list of instructions. RichTextBox controls do not support linking, which makes them less useful for complex Help than a full HTML window. Unfortunately, the .NET Framework does not provide a dedicated HTML control. Instead, you need to import the Internet Explorer ActiveX control, which will efficiently provide the same functionality (see Figure 14-9).
This design begins to enter a new topic: application-embedded support, which examines how help can be integrated into applications. |
|||||||||||||||
Application Embedded SupportOne of the crucial shortcomings with the Help systems you have looked at is that they are all designed to provide fine-grained reference information about specific windows and controls. As I described earlier, help usually fails miserably when it tries to walk the user through a long, involved task. However, better help is possible. What's needed is a change to how help is designed and integrated in applications. Application-embedded support represents that change. Quite simply, embedded help is user assistance that is a first class member of an application. It's designed as part of the software, not added to the software after it's complete. Embedded help provides far greater user assistance, but also requires far more development work. Some examples of embedded help include:
AffordancesAffordances are the visual "clues" designed to demystify a complex application. For example, Windows uses brief descriptions to provide a little information about your computer's Internet settings, as shown in Figure 14-10.
Help and affordances represent a bit of a paradox. Nothing can clarify a confusing dialog box more than a couple of well-placed words or icons. On the other hand, users often automatically ignore descriptions, error messages, or anything else that requires reading. They either try to figure out the task on their own or, in the case of an error, repeat the task a few times and then give up. Given this problem, what is the role of Help in an application? I refuse to believe that Help is useless, as I routinely see innovative games and Web sites that have no problem guiding users through new and unusual interfaces with a few carefully integrated explanations. Unfortunately, the customary current standalone Help is designed to provide reference information. It's very poor at the task-based explanations that most beginning users require-in fact, in this case it's really little more than a limited electronic book. Integrating Help and user interface Of course, integrating help content into the user interface is not a happy solution for the programmer. To fend off the cycle of endless recompiles and tweaking, you can try to read information dynamically from a database, but this approach usually fails because the content is not guaranteed to be the appropriate length and fit in an attractive way in the space provided. Windows controls and Forms have fixed bounds, and do not automatically resize to fit their contents unless you add the code to accommodate this behavior. Generally, the most practical approach is to add a few words when needed in a dialog box, but to fall back on a secondary window embedded in the application for more extensive information. This window, which you explored in the previous section, is the perfect compromise-it doesn't force the user to leave the application, and it can easily accommodate HTML or RTF documents of various lengths and with embedded formatting. Microsoft is also beginning to standardize a variation of this approach in some of its latest releases. AgentsAgents are the animated characters that appear in applications to guide users through a task. The most infamous example of Agents is the (now defunct) Clippy character included with Microsoft Office. Most developers don't consider agents for their applications because of several factors:
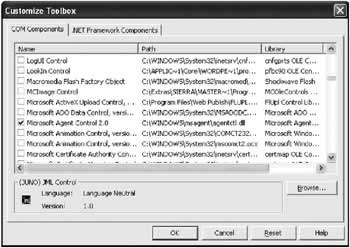
These are legitimate concerns. However, in a consumer application, an agent can also act as an appealing and distinctive feature that attracts the user's attention. Agents also perform the remarkable trick of turning tedium into fun. Quite simply, users often enjoy using programs with agents. Creating a program with agent support is not as difficult as most developers believe, because Microsoft provides some remarkable tools, and a set of four standard characters that can be freely distributed with your applications. To download the agent libraries, refer to http://msdn.microsoft.com/library/en-us/msagent/userinterface/3y2a.asp. The Microsoft Agent Control is only available as a COM component, but it can be easily consumed in a .NET program by creating a runtime callable wrapper, a task Visual Studio .NET carries out automatically when you add the reference. Figure 14-11 shows the reference you must add for the Microsoft Agent control.
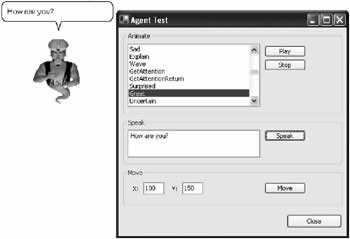
The Microsoft Agent Control allows you to use Merlin, a Genie, Peedy (a bird), or Robbie (a robot), or all of them at once. All components are complete with rotoscoped animations, can perform various actions as you direct them, can move about the screen, can think or "speak" text (either using a poor voice synthesizer that's included, or a wave file you specify). When speaking with a voice file, the characters' mouths even move to synchronize closely with the words, creating a lifelike illusion. Best of all, Microsoft quietly gives these features away for free. You can purchase other Agent characters from third-party sites online, or create them independently, although the tools provided won't help you create lifelike animations on your own. The online samples include an AgentTryout application that allows you to put an agent character through its paces, speaking and thinking the text you specify, moving about the screen, and performing various animations (see Figure 14-12).
The AgentTryout application interacts with any of the four agent characters through a special AgentController class, which encapsulates all the functionality for controlling movements, speech, and action. This class code can be reused in any application.
public class AgentController
{
 // Agent variable.
 private AgentObjects.IAgentCtlCharacterEx agentChar;

 // Name of the initialized character.
 private string characterName;

 // Balloon constants
 private const short BalloonOn = 1;
 private const short SizeToText = 2;
 private const short AutoHide = 4;
 private const short AutoPace = 8;

 public AgentController(AxAgentObjects.AxAgent agentHost,
 string character)
 {
 agentHost.Characters.Load(character, null);
 agentChar = agentHost.Characters[character];

 characterName = character;

 // You could put your own options in this menu, if desired.
 agentChar.AutoPopupMenu = false;

 // Set balloon style.
 agentChar.Balloon.Style = agentChar.Balloon.Style | BalloonOn;
 agentChar.Balloon.Style = agentChar.Balloon.Style | SizeToText;
 agentChar.Balloon.Style = agentChar.Balloon.Style | AutoHide;
 agentChar.Balloon.Style = agentChar.Balloon.Style & (!AutoPace);
 }

 public void Dispose()
 {
 if (agentChar.Visible)
 {
 agentChar.StopAll(null);
 agentChar.Hide(null);
 }
 }

 public void Show()
 {
 agentChar.Show(null);
 }

 public void Hide()
 {
 agentChar.Hide(null);
 }

 public void StopAll()
 {
 agentChar.StopAll(null);
 }

 public void Speak(string text)
 {
 agentChar.StopAll(null);
 agentChar.Speak(text, "");
 }

 public void Think(string text)
 {
 agentChar.StopAll(null);
 agentChar.Think(text);
 }

 public void Animate(string animation)
 {
 agentChar.StopAll(null);
 agentChar.Play(animation);
 }

 public void MoveTo(short x, short y)
 {
 agentChar.MoveTo(x, y, null);
 }

 public void GestureAt(short x, short y)
 {
 agentChar.GestureAt(x, y);
 }

 public Array GetAnimations()
 {
 ArrayList list = new ArrayList();
 foreach (string animation in agentChar.AnimationNames)
 {
 list.Add(animation);
 }
 return list.ToArray(typeof(string));
 }

 // Tests if the agent is visible.
 // If the agent is not visible it will be shown.
 private bool IsAgentVisible()
 {
 if (agentChar.Visible)
 {
 return true;
 }
 else
 {
 agentChar.Show(null);
 return false;
 }
 }
}
Using the AgentController class is easy. All you need to do is create an instance of the Microsoft Agent Control on your form, and then create a new instance of the AgentController class using the interop class. The AgentController wraps all the functionality you will need to use. All you need to do is call the appropriate method. For example, the AgentTryout project uses the code below to create the Agent and fill a list control with a list of supported animations:
private AgentController controller;

private void Form1_Load(object sender, System.EventArgs e)
{
 // Create the agent.
 controller = new AgentController(axAgent1, "Genie");

 // List the supported animations.
 lstAnimations.DataSource=controller.GetAnimations();

 // Show the agent.
 controller.Show();
}
The animation is played with a single line of code in response to a button click:
private void cmdPlay_Click(object sender, System.EventArgs e)
{
 controller.Animate(lstAnimations.Text);
}
Moving, thinking, and speaking (shown in the following) are similarly easy:
private void cmdSpeak_Click(object sender, System.EventArgs e)
{
 controller.Speak(txtSpeak.Text);
}
Even if you don't like the idea of animated characters, it's hard to complain about the agent control. Similar functionality from a third-party developer comes at quite a price.
|
||||||||||||||||||

The Last WordThis chapter began with the built-in .NET Framework support for Help, and then began to expand on it with integrated help and animated agents. In the process, the chapter delved into the old world of ActiveX components, demonstrating that COM is far from gone, even after the .NET revolution. Help strategies and systems vary widely depending on the intended audience and the application design. In this chapter we toured the wide and diverse world of Help programming. None of the solutions examined here can be used in every scenario. Instead, it helps to keep some basic principles in mind:
|
|||||||||||||||
Index |
|||||||||||||||
Introduction
EAN: 2147483647
Pages: 142
- Chapter II Information Search on the Internet: A Causal Model
- Chapter VII Objective and Perceived Complexity and Their Impacts on Internet Communication
- Chapter VIII Personalization Systems and Their Deployment as Web Site Interface Design Decisions
- Chapter XIII Shopping Agent Web Sites: A Comparative Shopping Environment
- Chapter XVII Internet Markets and E-Loyalty
