Tablet PC Screen Rotation and Special Buttons
 Download CD Content
Overview
In the previous chapter, we built an application that allowed us to write anywhere on the screen and then store the recognized text on the clipboard. The text was then pasted automatically or manually into another running application. In this chapter, we turn away from ink collection for a moment and look at another interesting aspect of the Tablet PC-its special buttons and rotation of the screen (see Figure 15.1).

Figure 15.1: Our application will provide functions for dealing with screen rotation and special buttons.
| Note |
The source code for the projects are located on the CD-ROM in the PROJECTS folder. You can either type them in as you go or you can copy the projects from the CD-ROM to your hard drive for editing. |
Extending VB NET with C++
VB is the most popular programming language in the world for a variety of reasons. There are many great resources for learning the language and it has become increasingly popular with each release. However, there are times when you are tackling a problem when C++ still makes the most sense. We happen to have one of those situations as we look at programmatically rotating the screen. Fortunately, it is a nearly painless process to create a DLL in C++ that we can call from VB or C#. In case you don't have any experience with C++, the DLL is only a few lines of code. If you don't want to build the DLL, you can use the one included on the CD-ROM in the Chapter 15 folder.
Begin by opening VS .NET. Choose Visual C++ Project from the list of project types and then choose Win32 Project from the available list. Similarly to VB, type the name of the DLL in the Name field. This name is important because it will be used by your VB .NET program when you call the DLL from it. Therefore, choose something like 'screenrotatedll.' We'll assume this is the name the rest of the way, but you can replace this name with anything you want. Also, remember the location of the project because we'll use the path in the VB project as well.
After you create a Win32 Project, you can choose the Application Settings tab (see Figure 15.2), and then select DLL as the type of application. Double-click on the Screenrotatedll.cpp file to open it. This is the main code for our project, and although we could create new cpp and h documents, it's easier for this simple project to use the existing cpp file. When you open it, you'll see there is a single function defined for our DLL. You can think of this function as being equivalent to the Form_Load event in VB .NET.
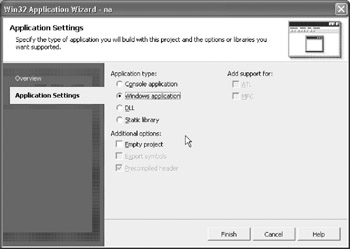
Figure 15.2: Setting our application to a DLL.
The code will look similar to the following, but will be slightly different depending on what you named your project:
// screenrotatedll.cpp : Defines the entry point for the DLL application.
//

#include "stdafx.h"
BOOL APIENTRY DllMain( HANDLE hModule,
 DWORD ul_reason_for_call,
 LPVOID lpReserved
 )
{
 return TRUE;
}
Next, we need to add the WinGDI header file to our project. Choose Add Existing Item from the Project menu and then navigate to the following folder: C:Program FilesMicrosoft SDKinclude.
Within this folder, you should find the Win32GDI.h file. Choose this file and then click Open. You will see it is available in Solution Explorer, located in the Header Files folder. Now, we need to include it in the project. Add the following code:
#include "WinGDI.h"
This include should be placed immediately beneath the existing include statement. This simply includes the WinGDI header file so that we have access to it in our project. At the end of the current code, you will see the following:
{
Return True
}
Place your cursor after the final bracket and press Enter to place it beneath all existing code. This is where we will place all of our new code, beginning with our only method, rotscreen.
Here is the complete code for the method:
int _stdcall rotscreen(int value){

DEVMODE dm;
DWORD dwTemp;
EnumDisplaySettings(NULL, ENUM_CURRENT_SETTINGS, &dm);
dwTemp = dm.dmPelsHeight;
dm.dmPelsHeight = dm.dmPelsWidth;
dm.dmPelsWidth = dwTemp;

if (value == 90) {
 dm.dmDisplayOrientation = DMDO_90;
}

if (value == 180) {
 dm.dmDisplayOrientation = DMDO_180;
}

if (value == 270) {
 dm.dmDisplayOrientation = DMDO_270;
}

dm.dmFields = DM_DISPLAYORIENTATION|DM_PELSHEIGHT|DM_PELSWIDTH;
ChangeDisplaySettings(&dm, 0);
return value;
}
The previous code uses the ChangeDisplaySettings API. We are not going to really get involved with explaining this too much. If you want to learn more about this, there is information available in the Platform SDK, which you can find at http://www.microsoft.com/msdownload/platformsdk/sdkupdate/.
If you have ever worked with some basic C++, you may be wondering about the _stdcall keyword. This is added to make sure that the function is used in the same way as VB for passing variables. The VB equivalent for what we have is as follows:
Function rotscreen() As Integer
 ...code
End Function
Before we can use the DLL in VB, we must make sure that the function we created is viewable by outside applications. To do this, we use a special type of file called a Definition File (DEF), which is actually very simple. It is nothing more than a list of function names to export so applications know what they're looking for as it queries the DLL for methods. To add a new file to the project, select Project | Add New Item | DEF file (.def). In the Name field, type the name of your project (i.e., screenrotatedll), and then click the Open button.
We now have the DEF file available in our project and it is automatically opened in the IDE. You should see a single line at the top of the code:
LIBRARY screenrotatedll
This reports the screenrotatedll name to other applications, but we still need to add the export. For our application, this is a single method called rotscreen. We can use the keyword EXPORTS:
LIBRARY screenrotatedll
EXPORTS
 rotscreen
Now, we need to compile the project. Choose Build screenrotatedll from the Build menu. You will see the build log being generated as the files are compiled and linked, and when finished, you should see something like:
------ Rebuild All started: Project: screenrotatedll, Configuration: Debug Win32 ------

Deleting intermediate files and output files for project 'screenrotatedll', configuration 'Debug|Win32'.
Compiling...
stdafx.cpp
Compiling...
screenrotatedll.cpp
Linking...
 Creating library Debug/screenrotatedll.lib and object Debug/screenrotatedll.exp

Build log was saved at "file://c:Documents and SettingsClaytonMy DocumentsTabletPCChapter 15ProjectscreenrotatedllDebugBuildLog.htm"
screenrotatedll - 0 error(s), 0 warning(s)


---------------------- Done ----------------------

 Build All: 1 succeeded, 0 failed, 0 skipped
If you receive any error messages or warnings, you need to go back through the code to make sure you didn't miss something, such as a ';'. With this small amount of code, it should be relatively easy.
Using the DLL in VB NET
If you have ever used the API in VB .NET, you are already familiar with our next step, which is to use the rotscreen function in VB. You can close the C++ project and create a new VB .NET Windows Forms application. At the top of the code (beneath the Inherits System.Windows.Forms.Form line), we need to add the following code:
Private Declare Function rotscreen Lib "C:Documents and Settings
ClaytonMy DocumentsTabletPCChapter 15Projectscreenrotatedll
Debugscreenrotatedll.dll" (ByVal value As Integer) As Integer
You can see the long path location, and you can copy your DLL to the root drive or even the System folder. Wherever you put it, you need to change the path to represent the actual location. You might wonder what the rest of this means. The following list is a breakdown of the syntax.
'Private': The function is only available here.
'Declare': This means that this is only a method header and not the entire method.
'Function': It's a function.
'Lib': This is the library name given to VB.
'screenrotatedll.dll': This is the name of the DLL file that contains the method. This is an extremely long path in our example, but you can change it to something manageable.
'(': We're going to declare some parameters that need to be passed to the method.
'ByVal': We're passing the value of the variable passed to the method and not the address of its value in memory.
'As Integer': This means we're setting the type of value being passed to an integer.
')': This is the end of the parameters.
'As Integer': This returns an integer.
That's really all we need to add to the program to provide access to the rotscreen function. Now, let's add the following two controls to the form, as shown in Table 15.1.
|
Type |
Name |
Text |
|---|---|---|
|
Label |
lblKeys |
|
|
Button |
btnRotate |
Rotate |
The next step is to set a few properties to the Form_Load event:
lblKeys.Text = ""
lblKeys.Font = New Font("Arial", 18, FontStyle.Bold)
lblKeys.TextAlign = ContentAlignment.MiddleCenter
Me.KeyPreview = True
We begin by setting the Text property of lblKeys to an empty string, and then we set its font and text alignment properties so that it is more easily seen on the form. The label will display the key as it is being pressed. The keys can be either the standard keyboard keys, or the special Tablet PC keys that are included in various locations, depending on the model of Tablet PC. These keys include things such as Tab and Escape. The final property sets the KeyPreview property of Form1 to be True. This lets the form handle the keydown event. Without this, the form would ignore the key presses.
Because we have this in mind, let's create the Form1_KeyDown event and add the following code:
lblKeys.Text = String.Concat((e.KeyCode), " ", (e.KeyValue))
This line of code displays the key being pressed and the value of the key. It uses the label we already have on the form.
The final thing we need to do with our application is to rotate the screen. We can place this code in the btnRotate_Click event. After you have created the procedure, add the following code:
Dim ok As Integer
ok = rotscreen(90)
You may have noticed that VB automatically provides us help for our rotscreen function as you type it, just like it does for any DLL. As you can see in Figure 15.3, when you type the rotscreen function name, VB informs us that it is looking for an integer to be passed and that it will return an integer. For our application, we need to pass values such as 90, 180, or 270, so that the screen can be rotated. Any other type of value being passed causes the function to return the value being passed and does nothing to the screen.
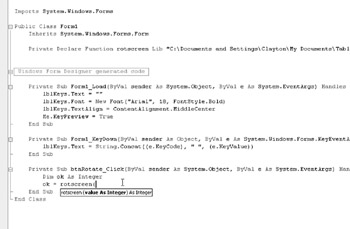
Figure 15.3: Help in the IDE is provided automatically.
You can now save this application and test the various features. Figures 15.4 and 15.5 display some of its capabilities.
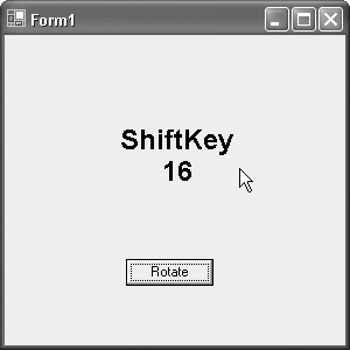
Figure 15.4: The form has detected a key being pressed.

Figure 15.5: The screen is rotated by 90 degrees.
Summary
In this chapter, we looked at how we can easily extend VB .NET with C++ DLLs and have seen that collecting ink is not the only important aspect of a Tablet PC application. The screen rotation DLL that we created can be very useful from a development standpoint, as one of the interesting features offered by the Tablet PC is screen rotation.
- The Tablet PC
- Introduction to Visual Basic .NET
- Working with VB .NET
- Basics of the .NET Framework
- Introduction to the VB .NET Language
- Object-Oriented Programming with VB .NET
- Strings, GDI+, and Error Handling in VB .NET
- Math and Random Number Functions in VB .NET
- Your First Program
- Console Application Input/Output
- Your First Windows Forms Application
- Obtaining the Tablet PC SDK
- Introduction to Ink-Enabled Applications
- Tablet PC Full Screen Utility
- Tablet PC Screen Rotation and Special Buttons
- Creating an MP3 Player
- Form Effects
- Using Gestures to Control Tablet Media Player
- Getting Started with Microsoft Agent
- Advanced Microsoft Agent
- Speech Input with SAPI
- Custom Grammars for Speech Recognition
- WMI and Hardware
- Power Management for the Tablet PC
- Virtual Joystick
- Pong Game
- Not Quite a Magic Ball
- Storing Ink in a Database
- 3D Rendering with OpenGL and DirectX 9
- Using Third-Party Engines
- Tablet Fax
EAN: 2147483647
Pages: 191
