Speech Input with SAPI
 Download CD Content
In the previous chapter, we built our second application with Microsoft Agent. The application took advantage of speech recognition technologies available as an engine for the Agent characters. In this chapter, we continue on a similar path, but this time, we use the Microsoft Speech SDK.
| Note |
The source code for the projects are located on the CD-ROM in the PROJECTS folder. You can either type them in as you go or you can copy the projects from the CD-ROM to your hard drive for editing. |
SDK Overview
When the Microsoft Research Speech Technology Group released the SAPI 5.0 SDK, it contained one big omission, a COM interface for VB programmers. By the time version 5.1 was released, they had fixed this shortcoming. It's important not to confuse the SAPI 5.1 SDK with the .NET Speech SDK. The .NET Speech SDK should only be used for Web-based applications (Web Forms), whereas the SAPI SDK was intended for Windows Forms applications.
The SAPI speech recognition engine differs greatly from the Agent offering. For starters, the engine is advanced enough to allow you to dictate directly into an application. You could dictate letters or memos without the need to make many corrections afterwards. The engine even works very well without extensive training. You can download the Speech SDK from http://www.microsoft.com/speech/download/sdk51/, and remember that we need to use the version 5.1 Speech SDK in lieu of the .NET Speech SDK because it is for Windows-based applications rather than the Web-centric .NET version.
Like Agent, the SAPI speech recognition engine is also very easy to use. We can begin the application by creating a new Windows Forms application. The next step is to add a reference to the Microsoft Speech Object Library. You can add the library using the Project menu, selecting Add Reference, clicking on the COM tab, and then choosing the library from the list.
The user interface for our application will be very simple and will consist of four buttons, a status bar, and a text box. You can use the properties listed in Table 21.1 and refer to Figure 21.1 for the arrangement of the controls.
|
Type |
Name |
Text |
|---|---|---|
|
Button |
btnSpeak |
Speak |
|
Button |
btnSpeaktoFile |
Speak To File |
|
Button |
btnRecognize |
Recognize |
|
Button |
btnStopRecognition |
Stop Recognition |
|
StatusBar |
StatusBar1 |
StatusBar1 |
|
TextBox |
txtSpeech |
TextBox1 |
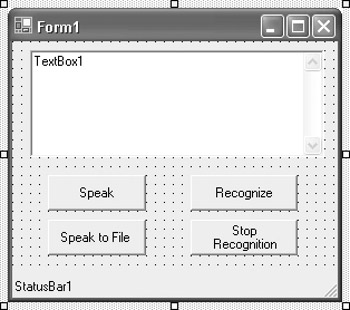
Figure 21.1: The completed GUI for our application.
| Note |
You could replace the standard text box with one of the Inkable controls if you want to make it ink- and speech-enabled. |
Writing Some Code
With the brief overview and GUI out of the way, we can write some code for our application. We begin the code with the Imports statements for SpeechLib and System.Threading:
Imports SpeechLib
Imports System.Threading
The SpeechLib was added as a reference earlier in the project and probably comes as no surprise. The System.Threading namespace is something that we have yet to touch on. In simple terms, threading is the ability to run different pieces of code (methods) at the same time. You can even think of it as multitasking within a single application. Although that sounds good, a computer can't do multiple things at the same time. Therefore, in order for threading to work, different tasks and threads have to share processing resources. It is the job of the operating system to assign the time to the different tasks. As a real-world example, take a look at Microsoft Internet Explorer. As you navigate a Web site, items are being downloaded. As busy as the application is retrieving information, you can still perform other tasks, such as move the window around, resize it, and even open another window. This is because all of the tasks are running on different threads.
We don't have much of a need in the way of threads for this application. Really, we only need to use a constant called Timeout.Infinite, which is used to specify an infinite waiting period. We use the constant in this application when we save the text-to-speech output of our application to a WAV file.
Our next step is to Dim some variables that we'll need to use throughout the application. These variables include RecoContext, Grammar, m_BrecoRunning, and m_cChars.
Dim WithEvents RecoContext As SpeechLib.SpSharedRecoContext
Dim Grammar As SpeechLib.ISpeechRecoGrammar
Dim m_bRecoRunning As Boolean
Dim m_cChars As Short
We use the Form_Load event to initialize some of the controls and variables. First, we set txtSpeech (or a replacement Ink control) to an empty string value. This effectively removes any text it currently has, so that anything we dictate into the application is visible by itself. Next, we set the state of the recognition to False. We'll actually create a Sub routine for this, but for now, you can simply type the line that calls the routing. Additionally, we set m_cChars equal to 0 and the Text property of StatusBar1 equal to an empty string.
Here is the code:
txtSpeech.Text = ""
SetState(False)
m_cChars = 0
StatusBar1.Text = ""
The next step is to create the SetState Sub routine. This Sub allows us to turn the recognition on and off quickly and effectively throughout the use of the application. We'll begin by passing a Boolean value into the Sub, because the True and False values are an easy way to set the current state of the recognition. If you pass a True value, recognition is working, whereas False obviously turns it off.
The value being passed in will be known as bNewState by the Sub. We can use bNewState directly to set the m_bRecoRunning variable. After setting the value, we can set the enabled property of btnRecognize equal to the opposite of m_bRecoRunning. Therefore, if the engine is running, the button is not enabled. Additionally, if the engine is not running, the button is enabled. The last step in the Sub is to use m_bRecoRunning to set the enabled property of btnStopRecognize. This time, however, we can use the actual value as we only want btnStopRecognize enabled when the engine is running and we certainly don't have a need to click on it when it is not running.
Here is the entire procedure:
Private Sub SetState(ByVal bNewState As Boolean)
 m_bRecoRunning = bNewState
 btnRecognize.Enabled = Not m_bRecoRunning
 btnStopRecognize.Enabled = m_bRecoRunning
End Sub
Let's now look at the events that are triggered when each of the four buttons are clicked as well as the RecoContext event, which occurs when m_bRecoRunning is enabled and some speech is recognized. We'll start with the btnRecognize_click event.
The btnRecognize_click event begins with initializing the Recognition Context object and the Grammar object. We will then use the SetStatus Sub procedure, and by passing a value of True, we set the state of the recognition to True. Lastly, we set the Text property of StatusBar1 to "SAPI ready for dictation...".
Private Sub btnRecognize_Click(ByVal sender As System.Object, ByVal e As System.EventArgs) Handles btnRecognize.Click
 If (RecoContext Is Nothing) Then
 StatusBar1.Text = "Initializing SAPI reco..."
 RecoContext = New SpeechLib.SpSharedRecoContext()
 Grammar = RecoContext.CreateGrammar(1)
 Grammar.DictationLoad()
 End If

 Grammar.DictationSetState(SpeechLib.SpeechRuleState.SGDSActive)
 SetState(True)
 StatusBar1.Text = "SAPI ready for dictation..."
End Sub
This is the first time in our application that the state of the recognition has been set to True, so it seems like an appropriate time to look at the RecoContext Recognition method. You can create this procedure by using the Class Name and Method Name drop-down lists and choosing RecoContext and Recognition, respectively.
We begin by setting the StatusBar1 Text property to "Recognizing...". This gives an update to our user that something is actually occurring in our application. If you did not update the user on the status, it might appear to them that the application was not working correctly. Most of the remaining portion of code for this procedure is used to add the recognized text to the text box. When we append the text to the text box, we add a space so that the sentences do not run together. Once finished, we set the StatusBar1 Text property to "Speech recognized successfully...SAPI enabled" so the user knows he can continue dictation if he wants.
Here is the code:
Private Sub RecoContext_Recognition(ByVal StreamNumber As Integer,
ByVal StreamPosition As Object, ByVal RecognitionType As SpeechLib.SpeechRecognitionType,
ByVal Result As SpeechLib.ISpeechRecoResult) Handles RecoContext.Recognition
 Dim strText As String
 strText = Result.PhraseInfo.GetText
 StatusBar1.Text = "Recognizing..."
 txtSpeech.SelectionStart = m_cChars
 txtSpeech.SelectedText = strText & " "
 m_cChars = m_cChars + 1 + Len(strText)
 StatusBar1.Text = "Speech recognized successfully...SAPI enabled"
End Sub
Now that we are dictating into the application, we also need a way to turn the dictation process off. This job is taken care of with btnStopRecognize. When we click the button, we want to set the grammar state to inactive, use SetState to set the recognition to False, and then update the StatusBar1 to reflect these changes.
Here is the code:
Private Sub btnStopRecognize_Click(ByVal sender As System.Object,
ByVal e As System.EventArgs) Handles btnStopRecognize.Click
 Grammar.DictationSetState(SpeechLib.SpeechRuleState.SGDSInactive)
 SetState(False)
 StatusBar1.Text = "SAPI Disabled"
End Sub
Dictation into the application is now taken care of completely, although we have a few additional features we want to add to our application. In addition to speech recognition, SAPI allows us to perform Text to Speech similarly to Microsoft Agent. We have two remaining buttons on our form, and their click events allow us to read back the text audibly, or, if we choose, we can save the content of the text box to a WAV file so that it could be played later.
Let's handle btnSpeak first because it is the less complicated of the two and covers part of what occurs in btnSpeakToFile. We begin by creating a variable called Voice and setting it to SpVoice. We can then use the Speak method of Voice to convert the text contents of the txtSpeech text box to speech. Lastly, we update StatusBar1 to "SAPI disabled...".
| Note |
At this time, we are not enabling and disabling the Speak and Speak to File buttons. If you plan to add anything to this application or distribute it to an end user, you can take care of this within the SetState Sub routine. |
Here is the code:
Private Sub btnSpeak_Click(ByVal sender As System.Object, ByVal e As System.EventArgs) Handles btnSpeak.Click
 Dim Voice As SpVoice
 Voice = New SpVoice()
 Voice.Speak(txtSpeech.Text, SpeechLib.SpeechVoiceSpeakFlags.SVSFlagsAsync)
StatusBar1.Text = "SAPI disabled..."
End Sub
Like btnSpeak, btnSpeakToFile begins with initializing the Voice variable. Next, we set the Text property of StatusBar1 to "Saving to file...". We then proceed to create a new SaveFileDialog and create a filter for saving the contents as a WAV file. Once we have a filename, we then Dim spFileMode and spFileStream so that we know how to save the file. We then use the Speak method of Voice, but instead of audibly hearing the speech, it is saved into the WAV file we create. Lastly, we close the stream and then set the StatusBar1 Text property to "SAPI disabled...".
Here is the code:
Private Sub btnSpeakToFile_Click(ByVal sender As System.Object, ByVal e As System.EventArgs) Handles btnSpeakToFile.Click
 Dim Voice As SpVoice
 Voice = New SpVoice()
 StatusBar1.Text = "Saving to file..."

 Dim sfd As SaveFileDialog = New SaveFileDialog()

 sfd.Filter = "All files (*.*)|*.*|wav files (*.wav)|*.wav"
 sfd.Title = "Save to a wave file"
 sfd.FilterIndex = 2
 sfd.RestoreDirectory = True

 If sfd.ShowDialog() = DialogResult.OK Then
 Dim SpFileMode As SpeechStreamFileMode = SpeechStreamFileMode.SSFMCreateForWrite
 Dim SpFileStream As SpFileStream = New SpFileStream()

 SpFileStream.Open(sfd.FileName, SpFileMode, False)

 Voice.AudioOutputStream = SpFileStream
 Voice.Speak(txtSpeech.Text, SpeechLib.SpeechVoiceSpeakFlags.SVSFlagsAsync)
 Voice.WaitUntilDone(Timeout.Infinite)

 SpFileStream.Close()
 End If
 StatusBar1.Text = "SAPI Disabled..."
End Sub
Testing the Application
You are now in position to test the application after you save it. When you start it, the screen should look like Figure 21.2.
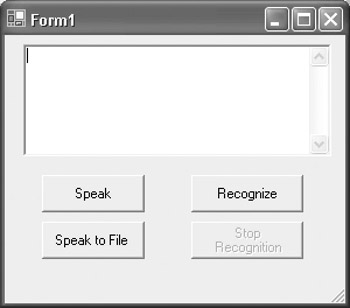
Figure 21.2: Your application should be similar on startup.
You can now try the various buttons to see how each of them performs. When you test the Speak to File button, you can test the resulting WAV file by double-clicking it. The application that has been set to open WAV files (by default, this is Media Player) opens and plays the file similarly to Figure 21.3.
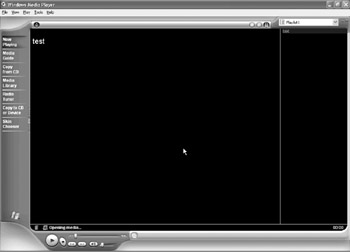
Figure 21.3: The file being played back in Media Player.
Summary
In this chapter, we built the first of two programs based on the SAPI 5.1 Speech SDK. We used the built-in grammar as we tested the speech recognition capabilities. Although it is certainly very good, there are certain types of applications that can benefit from more precise recognition. This brings us to Chapter 22, Custom Grammars for Speech Recognition, in which we build an application that performs basic arithmetic. The numbers and operations are all completed by speech recognition using a custom grammar.
- The Tablet PC
- Introduction to Visual Basic .NET
- Working with VB .NET
- Basics of the .NET Framework
- Introduction to the VB .NET Language
- Object-Oriented Programming with VB .NET
- Strings, GDI+, and Error Handling in VB .NET
- Math and Random Number Functions in VB .NET
- Your First Program
- Console Application Input/Output
- Your First Windows Forms Application
- Obtaining the Tablet PC SDK
- Introduction to Ink-Enabled Applications
- Tablet PC Full Screen Utility
- Tablet PC Screen Rotation and Special Buttons
- Creating an MP3 Player
- Form Effects
- Using Gestures to Control Tablet Media Player
- Getting Started with Microsoft Agent
- Advanced Microsoft Agent
- Speech Input with SAPI
- Custom Grammars for Speech Recognition
- WMI and Hardware
- Power Management for the Tablet PC
- Virtual Joystick
- Pong Game
- Not Quite a Magic Ball
- Storing Ink in a Database
- 3D Rendering with OpenGL and DirectX 9
- Using Third-Party Engines
- Tablet Fax
EAN: 2147483647
Pages: 191
