Using Third-Party Engines
 Download CD Content
In this chapter, we look at several of the third-party engines that are available to us for the development of applications capable of 3D rendering. This list is not all-inclusive, but does give you an idea of what is available. There are also many additional third-party development tools, such as Darkbasic, Director, Jamagic, and the 3D Game Studio to name a few. We only concern ourselves with the development tools that are COM-based or can be called from within a VB .NET application.
| Note |
The source code for the projects are located on the CD-ROM in the PROJECTS folder. You can either type them in as you go or you can copy the projects from the CD-ROM to your hard drive for editing. |
DLinX
The first of the 3D engines we look at is called 3DLinX (www.3dlinx.com). This is one of the most interesting of the offerings because it includes 3D models that are called Living Models™. They are aware of each other and interact with one another, obeying the laws of physics with very little programming. 3DLinX is a COM-based engine and a native .NET version is currently under development.
Truevision3D
Truevision3D (www.truevision3dsdk.com) probably produces the best rendering of any of the engines that we are looking at. It is supported in VB .NET, C#, VB5, VB6, and Delphi. The engine is based on DirectX 8.1 and includes the ability to render terrains or you can use BSPs for inside environments. It also offers the most support for graphics with popular formats such as 3DS, X, MDL, MD2, and MD3. The only real negative to this engine is that it seems to have a problem with the digitizer of some of the Tablet PCs it has been tested on. This makes it a problem in using it for Tablet PC development and is the only reason that it was not the engine of choice.
Revolution3D
If there is such a thing as engine 'rivalries,' then this is definitely the rival of Truevision3D. Revolution3D (www.revolution.de) is based on DirectX 9 and supports the same development environments as Truevision. It also offers support for many graphics formats, including Milkshape 3D, which makes it a popular choice for those on a budget. The future of this engine is very promising and it remains to be seen if either of the rival engines will ever outdistance themselves from one another.
D State
3D State (www.3dstate.com) is the 3D engine formerly known as Morfit. It is a DLL file that includes over 200 graphics functions that you can call from VB (or many other languages). It supports the Quake MD2 format for animated 3D models and includes a variety of lighting effects and a relatively fast rendering engine. It's another good engine worth a look.
Wildtangent
WildTangent's Web Driver (www.wildtangent.com) platform allows games to be played online and is built on DirectX. One of the big advantages of WildTangent is the GameChannel™ delivery method, which allows games to be downloaded in the background with idle bandwidth. This delivery method is unparalleled and can be a good way for developers to get their software out to the masses. The 3D engine is probably not as feature-rich as some of the others, but it is more than adequate for what would normally constitute a Tablet PC game.
DX
6DX (www.aztica.com) is the engine that we are going to use to develop a sample in this chapter. It is a general-purpose engine that can have a multitude of uses and is very easy to use for development. Before moving forward, it is probably a good idea to download the SDK, which you will find at the Web site and follow its installation instructions carefully.
We begin the development project by looking at creating a new Windows Forms application. Next, we need to add the control to our project. Right-click on the Toolbox, and from its context menu, you can choose Customize. Make sure the COM tab is selected in the Customize Toolbox window and try to locate the CA6DX control. If you see it listed, you can select it and click OK. Otherwise, you should browse to the directory where you saved/registered the control and choose the 6DX_atl.dll file from there. Either way, it is now visible in the Toolbox.
You can now add it to the form just like any other control. You can draw a box in the form to fill most of the center portion of the form (see Figure 30.1) and change its Name property to "C6DX".
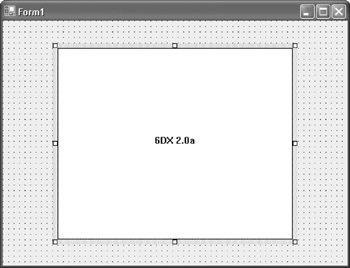
Figure 30.1: The control has been drawn on the form.
We are now going to add six Label controls to the form. They are arranged as in Figure 30.2 and have the following properties set as shown in Table 30.1 (the TextAlign property should be set to Middle Center for all of them):
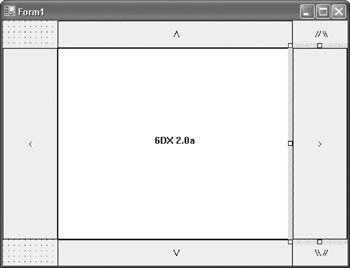
Figure 30.2: The GUI is now complete.
|
Name |
Text |
|---|---|
|
lblUp |
/ |
|
lblDown |
/ |
|
lblLeft |
< |
|
lblRight |
> |
|
lblCamUp |
// \ |
|
lblCamDown |
\ // |
The final item we need to add to the form is a Timer control, and set the Interval property to 100. The next step is to open the Code Editor, and add the following variables for our project:
Dim map As My6dx_atl.CA6DXMAP
Dim Act As My6dx_atl.CA6DXACTOR
Dim Mdl As My6dx_atl.CA6DXMODEL
Dim MdlInst As My6dx_atl.CA6DXMD3INSTANCE
Dim cam As New My6dx_atl.CA6DXCAMERA()
Dim Mover As New My6dx_atl.CA6DXCOLLIDER()
Dim MoveUp As Boolean
Dim MoveDown As Boolean
Dim RotateLeft As Boolean
Dim RotateRight As Boolean
Now, in the Form_Load event, we'll initialize the 6DX control, load a map and an actor, assign the camera, and then make the map visible. Here is the code:
Private Sub Form1_Load(ByVal sender As Object, ByVal e As System.EventArgs) Handles MyBase.Load
 ChDir("c:6dxsimple_runtime")
 Me.Text = "Tablet 3D Rendering"

 C6DX.Initialize(Handle.ToInt32, 1, "demo", "demo", "demo")

 map = C6DX.World.CreateMapInstance("doortest.map")
 Act = New My6dx_atl.CA6DXACTOR()
 Act.Create(True)
 Act.Visible = True

 Mdl = New My6dx_atl.CA6DXMODEL()
 Mdl.Create("md3peasant.md3")
 MdlInst = Act.Attach(Mdl, "")
 Mover.AssignCamera(cam)
 map.Visible = True
End Sub
The previous code assumes that you installed the code to the C:6DX directory. You need to change this hard-coded location if you installed it elsewhere.
We are now going to set up the Timer_Elapsed procedure, which contains the code for movement, updating the frame, rendering the frame, and showing the frame. The rendering, updating, and movement are all methods of the 6DX control, so they are easy to implement. For the movement, we use a series of If...Then statements to test for two conditions: key presses on a keyboard or mouse position over the Label controls that are visible outside of the control on the form. We test the Boolean values for MoveUp, MoveDown, MoveLeft, and MoveRight. We use two methods for movement so that a user with only their Tablet PC could explore just as easily as a user with a keyboard.
Here is the code:
 Private Sub Timer1_Elapsed(ByVal sender As System.Object, ByVal e As System.Timers.ElapsedEventArgs) Handles Timer1.Elapsed
 Static forward, fturn, ftime As Single

 ftime = C6DX.Time
 forward = 0
 fturn = 0

 If C6DX.IsKeyPressed(Keys.Up) Then forward = 128
 If C6DX.IsKeyPressed(Keys.Down) Then forward = -128
 If C6DX.IsKeyPressed(Keys.Left) Then fturn = -128
 If C6DX.IsKeyPressed(Keys.Right) Then fturn = 128

 If MoveUp Then forward = 128
 If MoveDown Then forward = -128
 If RotateLeft Then fturn = -128
 If RotateRight Then fturn = 128

 If C6DX.IsKeyPressed(Keys.Escape) Then
 Timer1.Enabled = False
 End If

 Mover.CalcCharacterMovement(forward, 0, fturn, ftime)
 Mover.DoCollision()

 C6DX.UpdateFrame(C6DX.Time)
 C6DX.RenderFrame()
 C6DX.ShowFrame()
 End Sub
We know that the Boolean values are tested and used for movement. We assign their values by using the MouseEnter and MouseLeave events for the various labels. Inside the events, we also change the foreground colors for the labels so that the user can tell when their mouse is positioned over the various movement options.
Here is the code for all of the MouseEnter and MouseLeave events:
Private Sub lblUp_MouseEnter(ByVal sender As Object, ByVal e As System.EventArgs) Handles lblUp.MouseEnter
 lblUp.ForeColor = Color.Red
 MoveUp = True
End Sub

Private Sub lblUp_MouseLeave(ByVal sender As Object, ByVal e As System.EventArgs) Handles lblUp.MouseLeave
 lblUp.ForeColor = Color.Black
 MoveUp = False
End Sub

Private Sub lblDown_MouseEnter(ByVal sender As Object, ByVal e As System.EventArgs) Handles lblDown.MouseEnter
 lblDown.ForeColor = Color.Red
 MoveDown = True
End Sub

Private Sub lblDown_MouseLeave(ByVal sender As Object, ByVal e As System.EventArgs) Handles lblDown.MouseLeave
 lblDown.ForeColor = Color.Black
 MoveDown = False
End Sub

Private Sub lblLeft_MouseEnter(ByVal sender As Object, ByVal e As System.EventArgs) Handles lblLeft.MouseEnter
 lblLeft.ForeColor = Color.Red
 RotateLeft = True
End Sub

Private Sub lblLeft_MouseLeave(ByVal sender As Object, ByVal e As System.EventArgs) Handles lblLeft.MouseLeave
 lblLeft.ForeColor = Color.Black
 RotateLeft = False
End Sub

Private Sub lblRight_MouseEnter(ByVal sender As Object, ByVal e As System.EventArgs) Handles lblRight.MouseEnter
 lblRight.ForeColor = Color.Red
 RotateRight = True
End Sub

Private Sub lblRight_MouseLeave(ByVal sender As Object, ByVal e As System.EventArgs) Handles lblRight.MouseLeave
 lblRight.ForeColor = Color.Black
 RotateRight = False
End Sub
There are still two Label controls that we haven't dealt with. We use the Click events for both labels. Inside of the events, we set the pitch of the camera up five degrees or down five degrees depending on which label is clicked.
Here is the code:
Private Sub lblCamUp_Click(ByVal sender As Object, ByVal e As System.EventArgs) Handles lblCamUp.Click
 Dim x As My6dx_atl.dxx_angle
 x = cam.Orientation
 x.pitch = cam.Orientation.pitch - 5
 cam.Orientation = x
End Sub

Private Sub lblCamDown_Click(ByVal sender As Object, ByVal e As System.EventArgs) Handles lblCamDown.Click
 Dim x As My6dx_atl.dxx_angle
 x = cam.Orientation
 x.pitch = cam.Orientation.pitch + 5
 cam.Orientation = x
End Sub
The application is now finished and can be saved. You can also test it to see if the rendering works correctly and that the movement works as well.
Summary
In this chapter, we built an application that loads a precompiled map and allows us to move around it. We used a third-party engine called 6DX, which has a demo version available for download. In the final chapter of the book, we build a faxing and e-mailing program.
- The Tablet PC
- Introduction to Visual Basic .NET
- Working with VB .NET
- Basics of the .NET Framework
- Introduction to the VB .NET Language
- Object-Oriented Programming with VB .NET
- Strings, GDI+, and Error Handling in VB .NET
- Math and Random Number Functions in VB .NET
- Your First Program
- Console Application Input/Output
- Your First Windows Forms Application
- Obtaining the Tablet PC SDK
- Introduction to Ink-Enabled Applications
- Tablet PC Full Screen Utility
- Tablet PC Screen Rotation and Special Buttons
- Creating an MP3 Player
- Form Effects
- Using Gestures to Control Tablet Media Player
- Getting Started with Microsoft Agent
- Advanced Microsoft Agent
- Speech Input with SAPI
- Custom Grammars for Speech Recognition
- WMI and Hardware
- Power Management for the Tablet PC
- Virtual Joystick
- Pong Game
- Not Quite a Magic Ball
- Storing Ink in a Database
- 3D Rendering with OpenGL and DirectX 9
- Using Third-Party Engines
- Tablet Fax
EAN: 2147483647
Pages: 191
- Enterprise Application Integration: New Solutions for a Solved Problem or a Challenging Research Field?
- Distributed Data Warehouse for Geo-spatial Services
- Data Mining for Business Process Reengineering
- A Hybrid Clustering Technique to Improve Patient Data Quality
- Development of Interactive Web Sites to Enhance Police/Community Relations
