Pong Game
 Download CD Content
Overview
In this chapter, we continue in the general direction we started with in our last application by developing our first game. The game is a simple game of Pong (see Figure 26.1) using very basic drawing techniques and simple Artificial Intelligence (AI).

Figure 26.1: The game we'll create is Pong.
| Note |
The source code for the projects are located on the CD-ROM in the PROJECTS folder. You can either type them in as you go or you can copy the projects from the CD-ROM to your hard drive for editing. |
Game Overview
All game projects, be it for the Tablet PC or a standard desktop PC, have a few concepts and are constructed in a similar manner. These are a few steps that are consistent among game projects:
- Initialization: Initializes the key objects, such as starting locations of players, number of lives, score, direction, and so forth
- Game Loop: Controls movement, score, and collisions for every frame of a game
- Exit: Exits the game, stores high scores, asks if user wants to play again, and so on
Let's start a new Windows Forms application in VB and add the following variables to the project:
Dim ball As Single
Dim x, y, dx, dy As Single
Dim xpaddle1, ypaddle1, dxpaddle1, dypaddle1 As Single
Dim xpaddle2, ypaddle2, dxpaddle2, dypaddle2, paddleWidth, paddleHeight As Single
Dim blnGameOn As Boolean
Dim t As New Threading.Thread(AddressOf game)
Dim g As Graphics
Dim Computer As Integer
Dim Player As Integer
Dim MoveDown As Boolean
Dim MoveUp As Boolean
Game Loop
All of the action for our game takes place in a loop, but before we look through the procedure that will house the loop, let's take a minute to get the rest of the application out of the way.
The first step is to use the Form1_Activated event to start the threading for our game loop. Threads are a powerful abstraction for allowing parallelized operations. For example, graphical updates can happen while a different thread is performing computations. Conceptually, threads are pretty simple to understand, but they can get very complicated to manage from a programming standpoint. In this example, we'll have a very simple implementation:
Private Sub Form1_Activated(ByVal sender As Object, ByVal e As System.EventArgs) Handles MyBase.Activated
 t.Start()
End Sub
The Form_Load event comes after the Form_Activated event. We use the Form_Load event to set the Text property to show the scores for the game (at this time 0 for the computer and the player), and we set the variables Player and Computer to 0.
Here is the procedure:
Private Sub Form1_Load(ByVal sender As System.Object, ByVal e As System.EventArgs) Handles MyBase.Load
 Me.Text = "Computer = " & "0" & " Player = " & "0"
 Player = 0
 Computer = 0
End Sub
We will now implement a simple movement method similar to the virtual joystick we created in the previous chapter. We can test the pen's position and move the paddle depending on its position. Here is the code:
Private Sub Form1_MouseMove(ByVal sender As Object, ByVal e As System.Windows.Forms.MouseEventArgs) Handles MyBase.MouseMove
 If e.Y > (Me.Height / 2) + 50 Then
 MoveDown = True
 MoveUp = False
 Exit Sub
 ElseIf e.Y < (Me.Height / 2) - 50 Then
 MoveUp = True
 MoveDown = False
 Exit Sub
 Else
 MoveUp = False
 End If
End Sub
The final event we deal with before moving on to the loop thread is to set up what occurs when the form is closing. We set the Boolean variable blnGameOn equal to False so that the loop will end.
Here is the code:
Private Sub Form1_Closing(ByVal sender As Object, ByVal e As System.ComponentModel.CancelEventArgs) Handles MyBase.Closing
 blnGameOn = False
End Sub
The remaining text in this chapter is used to go through the various parts of the game loop. It is the job of this loop to draw every frame of the game, creating the illusion of movement by repositioning each object after each frame is drawn.
The first part of the game procedure sets the size of the ball, the position of the ball, and the size and position of the computer controlled paddle (paddle1) and the player controlled paddle (paddle2).
Here is the code:
Private Sub game()
 Randomize()
 ball = 10 'Size
 x = Rnd() * (Me.Width - ball)
 y = Rnd() * (Me.Height - 30 - ball)
 dx = 1
 dy = 1

 paddleWidth = 15
 paddleHeight = 60
 xpaddle1 = 10
 xpaddle2 = Me.Width - paddleWidth - 20
 ypaddle1 = Me.Height / 2 - paddleHeight / 2
 ypaddle2 = Me.Height / 2 - paddleHeight / 2
 dxpaddle1 = 0
 dxpaddle2 = 0
 dypaddle1 = 1
 dypaddle2 = -1

 g = Me.CreateGraphics

 blnGameOn = True
The game loop is a While loop, which continues executing as long as blnGameOn is equal to True. The loop consists of a series of steps, as follows:
- Calculate the new position of objects.
- Draw the object at the calculated location.
- Provide the user with time to see the frame.
- Delete the frame.
- Return to Step 1.
The objects in our game, a ball and two paddles, are moved according to four variables:
x: Controls horizontal position of the ball
y: Controls the vertical position of the ball
dx: Controls the direction and magnitude of movement of the object along the horizontal axis
dy: Controls the direction and magnitude of movement of the object along the vertical axis
To move the objects, we use the x, y, dx, and dy values of the objects with the following calculations:
x = x + dx
y = y + dy
After we calculate the new coordinate values, then we draw the object at this new location. There are a few additional things we need to check as we move the ball and paddles. That is, we need to calculate when there is a collision between the ball and either paddle, or the ball and the upper and lower bounds of the form, which results in reversing the direction of the ball. The last collision we need to watch is the collision between the ball and either end. This adds a point to the appropriate player and positions the items where they began. To reverse the direction of the object along its dx and dy, we just multiply these values by -1. Therefore if dy = 1 and the ball is moving downwards, then we can use dy = dy * -1 to change dy's value to -1, which in turn, makes the object move up.
There are many different algorithms involved in determining when two objects collide on a computer screen; we will look at one of the simpler, albeit inaccurate, ones. We calculate the distance between the centers of two objects on the screen. If it is less than the sum of the radius of the two objects, then the objects are going to collide.
If you remember back to the steps for our game loop, we have covered the first step. Now, it's time to draw the objects. For the ball, it's as simple as using the following:
g.DrawEllipse(New Pen(Color.Orange), x, y, ball, ball
Similarly, we can draw the paddles:
g.DrawRectangle(New Pen(Color.White), xpaddle1, ypaddle1, paddleWidth, paddleHeight)
g.DrawRectangle(New Pen(Color.Yellow), xpaddle2, ypaddle2, paddleWidth, paddleHeight)
We now pause the application so the user can see how it appears on screen. We use the thread's Sleep method to delay the application. Next, we clear the graphics and then update the Text property of the form to reflect any new changes to the score.
Here is the complete procedure:
 While (blnGameOn)
 x = x + dx
 y = y + dy
 If ((x + ball) >= Me.Width) Then
 dx = dx * -1
 Computer = Computer + 1
 x = Rnd() * (Me.Width - ball)
 y = Rnd() * (Me.Height - 30 - ball)
 dx = 1
 dy = 1
 End If

 If (x <= 0) Then
 dx = dx * -1
 Player = Player + 1
 x = Rnd() * (Me.Width - ball)
 y = Rnd() * (Me.Height - 30 - ball)
 dx = 1
 dy = 1
 End If

 If ((y + ball) >= (Me.Height - 30) Or y <= 0) Then
 dy = dy * -1
 End If

 g.DrawEllipse(New Pen(Color.Orange), x, y, ball, ball)

 xpaddle1 = xpaddle1 + dxpaddle1
 xpaddle2 = xpaddle2 + dxpaddle2
 ypaddle1 = ypaddle1 + dypaddle1
 ypaddle2 = ypaddle2 + dypaddle2

 If (ypaddle1 <= y Or (ypaddle1 + paddleHeight) >= (Me.Height - 30)) Then
 dypaddle1 = 1
 End If

 If (ypaddle1 >= y Or (ypaddle1 + paddleHeight) >= (Me.Height - 30)) Then
 dypaddle1 = -1
 End If

 If ypaddle2 >= Me.Height - 35 - paddleHeight Then
 ypaddle2 = Me.Height - 35 - paddleHeight
 ElseIf ypaddle2 <= 0 Then
 ypaddle2 = 0
 End If

 If MoveDown Then
 dypaddle2 = 1
 ElseIf MoveUp Then
 dypaddle2 = -1
 Else
 dypaddle2 = 0
 End If


 g.DrawRectangle(New Pen(Color.White), xpaddle1, ypaddle1, paddleWidth, paddleHeight)
 g.DrawRectangle(New Pen(Color.Yellow), xpaddle2, ypaddle2, paddleWidth, paddleHeight)

 If Math.Abs((x + ball / 2) - (xpaddle1 + paddleWidth / 2)) <
(ball / 2 + paddleWidth / 2) And Math.Abs((y + ball / 2) - (ypaddle1 +
paddleHeight / 2)) < (ball / 2 + paddleHeight / 2) Then
 dx = dx * -1
 x = xpaddle1 + paddleWidth + 1
 ElseIf Math.Abs((x + ball / 2) - (xpaddle2 + paddleWidth / 2)) <
(ball / 2 + paddleWidth / 2) And Math.Abs((y + ball / 2) - (ypaddle2 +
paddleHeight / 2)) < (ball / 2 + paddleHeight / 2) Then
 dx = dx * -1
 x = xpaddle2 - paddleWidth - ball - 1
 End If

 t.Sleep(10)

 g.Clear(Color.Black)

 Me.Text = "Computer = " & Computer.ToString & " Player = " & Player.ToString

 End While

End Sub
You can now test the application, which should look like Figure 26.2 when it is executed.
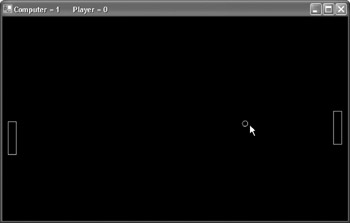
Figure 26.2: The application is being executed.
Summary
In this chapter, we built our first game for the Tablet PC. Although simple, it is a good introduction to some of the techniques you'll use with many of the games you can create. This game also used a technique similar to the virtual joystick for the movement of the player-controlled paddle. In Chapter 27, Not Quite a Magic Ball, we build another entertainment application that simulates a magic ball.
- The Tablet PC
- Introduction to Visual Basic .NET
- Working with VB .NET
- Basics of the .NET Framework
- Introduction to the VB .NET Language
- Object-Oriented Programming with VB .NET
- Strings, GDI+, and Error Handling in VB .NET
- Math and Random Number Functions in VB .NET
- Your First Program
- Console Application Input/Output
- Your First Windows Forms Application
- Obtaining the Tablet PC SDK
- Introduction to Ink-Enabled Applications
- Tablet PC Full Screen Utility
- Tablet PC Screen Rotation and Special Buttons
- Creating an MP3 Player
- Form Effects
- Using Gestures to Control Tablet Media Player
- Getting Started with Microsoft Agent
- Advanced Microsoft Agent
- Speech Input with SAPI
- Custom Grammars for Speech Recognition
- WMI and Hardware
- Power Management for the Tablet PC
- Virtual Joystick
- Pong Game
- Not Quite a Magic Ball
- Storing Ink in a Database
- 3D Rendering with OpenGL and DirectX 9
- Using Third-Party Engines
- Tablet Fax
EAN: 2147483647
Pages: 191
