Storing Ink in a Database
 Download CD Content
In the previous chapter, we continued our work on entertainment-related software. In this chapter, we take a break from this and return back to digital ink, and specifically, how to store ink in a database. This is a very important objective because database applications can now store such ink as a signature, making many applications that were once impossible a reality.
| Note |
The source code for the projects are located on the CD-ROM in the PROJECTS folder. You can either type them in as you go or you can copy the projects from the CD-ROM to your hard drive for editing. |
Database Overview
If you are familiar with data access in previous versions of VB, then you are probably already familiar with ActiveX Data Objects (ADO) or the Data Control. In VB .NET, the Data Control is no longer available, and ADO.NET has replaced ADO.
Creating the Form
The first step is to create the database using Microsoft Access. If you don't have Access, you can use the database included on the CD-ROM in the Chapter 28 Project folder. If you have Access, and want to create the database, you need to name it Worksig.mdb and include the fields shown in Table 28.1 in a table called Main:
|
Field |
DataType |
|---|---|
|
Id |
AutoNumber |
|
Customer |
Text |
|
Date |
Date/Time |
|
Ink |
Memo |
|
Description |
Memo |
|
Parts |
Memo |
Open VB .NET, create a new Windows Forms application, and click the Data tab in the ToolBox window. Drag an OleDbDataAdapter object onto the form, which causes the Data Adapter Configuration Wizard to appear. Click Next on the Wizard's initial frame (see Figure 28.1).
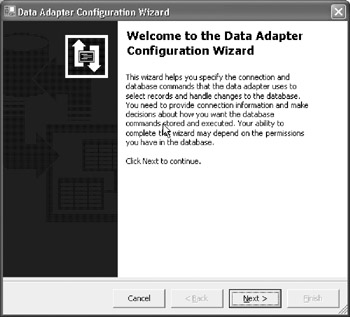
Figure 28.1: The Data Adapter Configuration Wizard.
In the next window, you choose your data connection. As we don't currently have one, click the New Connection button, which brings you to a Data Link Properties window.
Click the Provider tab and choose Microsoft Jet 4.0 OLE DB Provider, and then click the Next button. At this time, you should be on the Connection tab. In the Dataset name text box, you can browse your system to find the Worksig.mdb database. The other options are fine as is.
Click on the Test Connection button and be sure you get 'Test Connection Succeeded.' If you have problems, go back through the steps until you find the error. After you are successful with the test connect, click OK on the Data Link Properties window.
Click the Next button on the Data Adapter Configuration Wizard's window. The next window is the Choose a Query Type window. Select 'Use SQL Statements' from the window and then click Next. On the Generate SQL Statements window, click the Query Builder button. Add the Main table and then close the Tables window. Click on all the fields and then click OK. View the SQL statements that were generated for us. Click Next and see that the Select statement and table mappings are OK, and commands are generated. Click the Finish button to end the wizard.
You should now find yourself back in the VB application window. You can rename the OleDbDataAdpapter object to odaSample. Right-click on odaSample, and from the context menu, choose Generate Dataset. Leave the default settings in the Generate Dataset dialog box, but change the name from DataSet1 to pdsSample, and click OK. You now have a persistent file or data set (this is the reason we gave the file a prefix of 'pds') called pdsSample.xsd, which is now visible in the Properties window. This file contains an XML schema that describes your data set and allows you to treat your dynamic data set as a file at design time. It's amazingly simple and effective.
You also have a new object visible below the form with the other data objects called pdsSample1. You can also change its name to dsSample, which stands for data set Sample. Making the names easier to remember also makes it much easier when binding controls or when you reference a project that is several months old.
Binding Controls
We now have access to the database, but we still need a way to add and retrieve information from it. We construct our GUI out of standard controls and then bind the controls to the appropriate fields. Add four TextBox controls to the form called txtCustomer, txtWork, txtParts, and txtSignature. Figure 28.2 shows the fields and the general layout of the form. The txtWork and txtParts controls are much larger than the other two and need to have their Multiline properties set to True. You can clear the Text properties for all of them. Click on the txtCustomer text box, and in the Properties window, drill down on its DataBindings property. Next, choose Text, and click the drop-down list arrow. Drill down through the dsSample node, then on the Main node, and choose Customer from the list by double-clicking it. The same operation can be performed for the remaining TextBox controls, making sure to bind them to the appropriate field in the database.
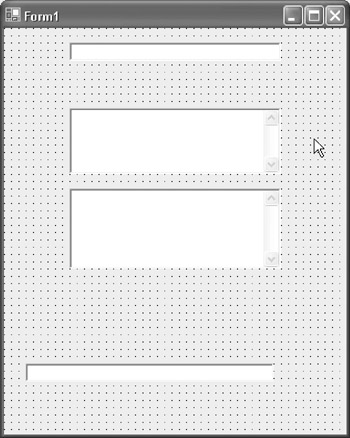
Figure 28.2: The basic layout of the form with four TextBox controls added.
It's easy to tell that the TextBox controls have all been bound to a field as you will see a small gold-colored cylinder representing the data-binding icon next to their Text properties in the Properties window.
The next control to add is a DatePick control. You can place it beneath txtCustomer and above txtWork. This control is also bound to a field, this time the Date field. The process is identical to the TextBox controls, so you can do this now.
The DatePick control is the final control that we bind to a field in the database, although we do need to add the controls shown in Table 28.2 at this time:
|
Type |
Name |
Text |
|---|---|---|
|
GroupBox |
gbSignature |
Signature |
|
Button |
btnPrevious |
Previous |
|
Button |
btnSave |
Save |
|
Button |
btnAddNew |
Add New |
|
Button |
btnNext |
Next |
|
Label |
lblNumber |
0 |
|
Button |
btnClear |
X |
You can view their placement in Figure 28.3, which also displays additional Label controls that are used only for the end users' benefit. That is, they do not play any programmatic role in the example. You should also add the labels using the figure as an example.
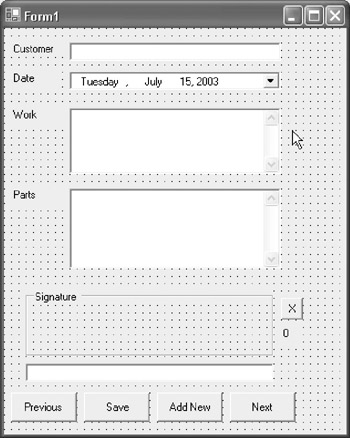
Figure 28.3: The final GUI.
You may have noticed that we have bound the txtSignature control to a field in the database but have not bound the gbSignature GroupBox, which is the area in which ink is displayed and written. This is because it's much easier to save the string data representation of the ink and then render it as needed. We look at this in more detail when we get to the step later in the chapter.
There is only one line of code to write to fill the data controls with the sample data from the database. Open the Code Editor, and using the Form_Load event, add the following two lines of code, one of which simply sets the form's text:
odaSample.Fill(DsSample, "main")
Me.Text = "Work Order Database"
You can now save the application, run it, and the first record (if any) from the data set should be visible. However, we cannot navigate the database or really do much of anything with the data at this time. Let's begin to add the navigation code.
Navigating the Database
The code to navigate the database is as simple as the lines of code we have written. We begin with btnNext. In the btnNext_Click event, we add the code for navigating the database. If we were not attempting to deal with rendering the ink, this would require only a single line of code:
Me.BindingContext(DsSample, "main").Position += 1
However, this is obviously not the case. We begin the procedure by refreshing gbSignature. Next, we check the lblNumber.Text property to see if it is less than the total available records in the database -1 (we are looking at the previous record so that we know if we have reached 0). If it is, we then move the position in the database up a record and assign lblNumber to the current position in the database. If it is not less than the last record, we can assume that we have reached the end of the data set and display a message box that says 'End of Data.' The final step is to test the contents of the txtSignature text box. If it is an empty string, we can ignore ink for the current record. Otherwise, we need to render the ink.
Here is the code:
Private Sub btnNext_Click(ByVal sender As System.Object, ByVal e As System.EventArgs) Handles btnNext.Click
 gbSignature.Refresh()
 If lblNumber.Text < Me.BindingContext(DsSample, "main").Count - 1 Then
 Me.BindingContext(DsSample, "main").Position += 1
 lblNumber.Text = Me.BindingContext(DsSample, "main").Position
 Else
 MsgBox("End of Data", MsgBoxStyle.OKOnly, "Ink Work Order")
 End If
 If txtSignature.Text <> "" Then RenderInk()
End Sub
Rendering the ink is the most interesting aspect of this particular application, but before we look at it in further detail, we need to add a reference to the Ink SDK and the following Imports statements to the application:
Imports Microsoft.Ink
Imports System
Imports System.Drawing
Imports System.Windows.Forms
It's also a good time to add the global variables, which include the following:
Public myInk() As Byte
Public myInkString As String
Dim WithEvents myInk2 As InkCollector
Dim thePenInputPanel As New PenInputPanel()
You probably can remember back to the earlier chapters where we have already dealt with the PenInputPanel and the InkCollector. We are not going to spend much time on either of these. The InkCollector_Load procedure is listed next:
Private Sub InkCollection_Load(ByVal sender As System.Object, ByVal e As System.EventArgs) Handles MyBase.Load
 myInk2 = New InkCollector(gbSignature.Handle)
 myInk2.Handle = gbSignature.Handle
 myInk2.Enabled = True
End Sub
After all of that, we can finally get back to the RenderInk procedure. It simply takes the text from txtSignature, stores it in myInkString, and then creates the ink from the Base64String we store in the database.
Here is the code:
Private Sub RenderInk()
 Dim ink As New Microsoft.Ink.Ink()
 Dim r As New Microsoft.Ink.Renderer()
 Dim g As Graphics
 myInkString = txtSignature.Text
 g = gbSignature.CreateGraphics()
 ink.Load(Convert.FromBase64String(myInkString))
 r.Draw(g, ink.Strokes)
End Sub
Now that we have the RenderInk Sub procedure finished, we can go back and add the ink rendering to the Form_Load event. Without this, if the first database record has ink, it is not visible on the screen.
Here is the now complete code:
Private Sub Form1_Load(ByVal sender As System.Object, ByVal e As System.EventArgs) Handles MyBase.Load
 odaSample.Fill(DsSample, "main")
 Me.Text = "Work Order Database"
 lblNumber.Text = Me.BindingContext(DsSample, "main").Position
 If txtSignature.Text <> "" Then RenderInk()
End Sub
The remaining code for the application is similar to what we have already done. The following procedures assign the Pen Input Panel to all of the text boxes:
Private Sub btnClear_Click(ByVal sender As System.Object, ByVal e As System.EventArgs) Handles btnClear.Click
 gbSignature.Refresh()
 txtSignature.Text = ""
End Sub

Private Sub txtCustomer_Enter(ByVal sender As Object, ByVal e As System.EventArgs) Handles txtCustomer.Enter
 thePenInputPanel.AttachedEditControl = txtCustomer
End Sub

Private Sub txtWork_Enter(ByVal sender As Object, ByVal e As System.EventArgs) Handles txtWork.Enter
 thePenInputPanel.AttachedEditControl = txtWork
End Sub

Private Sub txtParts_Enter(ByVal sender As Object, ByVal e As System.EventArgs) Handles txtParts.Enter
 thePenInputPanel.AttachedEditControl = txtParts
End Sub
The only remaining code to write is for btnSave, btnAddNew, and btnPrevious. btnPrevious works similarly to btnNext, so we don't really need to spend time on it. btnSave is the most interesting of the procedures. It begins by converting the ink to a base64 string and storing the string in myInkString. It then deletes the strokes from myInk2 and checks the value of myInkString to make sure that it does not equal 'AAA='. If it does not equal 'AAA=', then we save the string value so that we can later retrieve it and display it as Ink. The last of the procedures is btnAddNew, and with a few lines of code, it should be self-explanatory at this time. Here is the code for each of the procedures:
Private Sub btnSave_Click(ByVal sender As System.Object, ByVal e As System.EventArgs) Handles btnSave.Click
 myInk = myInk2.Ink.Save(Microsoft.Ink.PersistenceFormat.InkSerializedFormat)
 myInkString = System.Convert.ToBase64String(myInk)
 myInk2.Ink.DeleteStrokes()
 If myInkString.ToString <> "AAA=" Then
 txtSignature.Text = myInkString.ToString
 End If

 Me.BindingContext(DsSample, "Main").EndCurrentEdit()
 odaSample.Update(DsSample, "main")

 MsgBox("Database Updated Successfully", MsgBoxStyle.OKOnly, "Save Record")
End Sub

Private Sub btnAddNew_Click(ByVal sender As System.Object, ByVal e As System.EventArgs) Handles btnAddNew.Click
 Me.BindingContext(DsSample, "Main").EndCurrentEdit()
 Me.BindingContext(DsSample, "Main").AddNew()
 lblNumber.Text = Me.BindingContext(DsSample, "main").Position
 txtSignature.Text = ""
 gbSignature.Refresh()
End Sub

Private Sub btnPrevious_Click(ByVal sender As System.Object, ByVal e As System.EventArgs) Handles btnPrevious.Click
 gbSignature.Refresh()
 If lblNumber.Text > 0 Then
 Me.BindingContext(DsSample, "main").Position -= 1
 lblNumber.Text = Me.BindingContext(DsSample, "main").Position
 Else
 MsgBox("Start of Data", MsgBoxStyle.OKOnly, "Ink Work Order")
 RenderInk()
 End If
 If txtSignature.Text <> "" Then RenderInk()
End Sub
You can now test the application, making sure to check out the navigation and ink rendering. Figure 28.4 displays the application with rendering working.
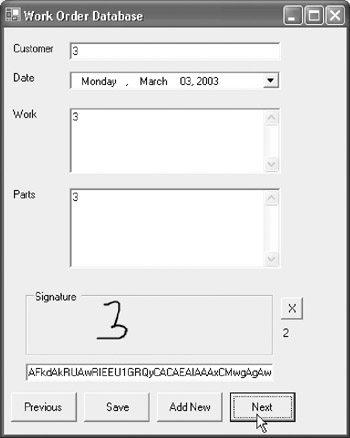
Figure 28.4: The ink is being rendered.
Summary
In this chapter, we built an application that stored ink in a database-something that is useful for a variety of applications. Rather than storing the ink directly, the ink is stored with a text representation and then rendered in a GroupBox. In Chapter 29, 3D Rendering with OpenGL and DirectX 9, we look at 3D rendering on the Tablet PC.
- The Tablet PC
- Introduction to Visual Basic .NET
- Working with VB .NET
- Basics of the .NET Framework
- Introduction to the VB .NET Language
- Object-Oriented Programming with VB .NET
- Strings, GDI+, and Error Handling in VB .NET
- Math and Random Number Functions in VB .NET
- Your First Program
- Console Application Input/Output
- Your First Windows Forms Application
- Obtaining the Tablet PC SDK
- Introduction to Ink-Enabled Applications
- Tablet PC Full Screen Utility
- Tablet PC Screen Rotation and Special Buttons
- Creating an MP3 Player
- Form Effects
- Using Gestures to Control Tablet Media Player
- Getting Started with Microsoft Agent
- Advanced Microsoft Agent
- Speech Input with SAPI
- Custom Grammars for Speech Recognition
- WMI and Hardware
- Power Management for the Tablet PC
- Virtual Joystick
- Pong Game
- Not Quite a Magic Ball
- Storing Ink in a Database
- 3D Rendering with OpenGL and DirectX 9
- Using Third-Party Engines
- Tablet Fax
EAN: 2147483647
Pages: 191
