Form Effects
 Download CD Content
By itself, Visual Basic provides the necessary basic ingredients for Graphical User Interface (GUI) design. Unfortunately, although you can change the color and shapes of items such as forms and controls, you're severely limited to the variations you can design. In this chapter, you'll create an application that doesn't really have a great deal of functionality, but instead focuses on designing a unique interface using the new GDI+ features of VB .NET that we initially looked at in Chapter 6, Object-Oriented Programming with VB .NET. As you already know, a Tablet PC runs what is essentially Windows XP. With that in mind, it's important to have an understanding of the new GDI+ if you want to take advantage of the many features a Tablet PC has to offer. In fact, in Chapter 26, Pong Game, we'll look at game development with a Tablet PC, a market that thus far is pretty limited.
| Note |
The source code for the projects are located on the CD-ROM in the PROJECTS folder. You can either type them in as you go or you can copy the projects from the CD-ROM to your hard drive for editing. |
The VB NET Way
Before looking at the VB .NET approach, it's worth rehashing (or mentioning for the first time if you skipped over the section) the VB6 method. To begin, we had to use several relatively obscure API calls as VB6 is fairly limited in built-in graphics features. On the other hand, .NET offers the GDI+ namespace that contains basically everything we need for this project.
We begin this project by opening the project from the previous chapter. We will use the same code for all of the playing and so on, but we are going to change the way the form looks. We begin by adding the following line:
Imports System.Drawing.Drawing2D
We'll also add a new variable of type Point beneath the variables from the previous chapter (the others are listed for your convenience):
Dim strFileName As String
Dim strFileNameTemp As String
Dim blnPlaying As Boolean
Dim Temp As Integer
Dim command As String
Private mouse_offset As Point
In the Form_Load event, we need to add a little new code. First, we'll change the opacity of the form to a value of .75 so that you can see through it. This is one of the more powerful new features offered to us. By changing the opacity property, we can produce in a single line what would be difficult in earlier versions of VB.
Here is the line of code:
Me.Opacity = 0.75
We'll now create regions and points for drawing the shape of the form. We'll set a series of points to draw the shape, change the BackColor property of cmdOpen and cmdClose to navy blue, and we'll also set cmdOpen.Text equal to an empty string.
Here is the entire Form_Load procedure:
Private Sub Form1_Load(ByVal sender As System.Object, ByVal e As System.EventArgs) Handles MyBase.Load
 lblCaption.Text = " - No Media"
 Me.Opacity = 0.75 ' New Code

 Dim windowRegion As Region
 Dim regionPoints(5) As Point
 Dim regionTypes(5) As Byte
 regionPoints(0) = New Point(0, 0)
 regionPoints(1) = New Point(Me.Width, 0)
 regionPoints(2) = New Point(Me.Width - 50, Me.Height)
 regionPoints(3) = New Point(50, Me.Height)
 regionPoints(4) = New Point(0, 0)

 Dim Cnt As Long
 For Cnt = 0 To 5
 regionTypes(Cnt) = PathPointType.Line
 Next Cnt
 Dim regionPath As New GraphicsPath(regionPoints, regionTypes)
 Me.Region = New Region(regionPath)

 cmdOpen.Text = "" ' Remove existing text
 cmdOpen.BackColor = Color.Navy
 cmdClose.BackColor = Color.Navy

End Sub
The next step is to create the Form1_Paint event. You already know how to create the event using the drop-down lists. We're going to use the Paint event to draw a gradient background from red to yellow in the form.
Here is the code:
Private Sub Form1_Paint(ByVal sender As Object, ByVal e As System.Windows.Forms.PaintEventArgs) Handles MyBase.Paint
 Dim r As Rectangle = New Rectangle(0, 0, Me.Width, Me.Height)
 Dim g As Graphics = e.Graphics
 Dim lb As LinearGradientBrush = New LinearGradientBrush(r, Color.Red, Color.Yellow,
LinearGradientMode.BackwardDiagonal)
 g.FillRectangle(lb, r)
End Sub
We now need to remove the border from the form by changing the FormBorderStyle property of the form to None in the Properties window. This removes the border and the Close button that is at the upper right of most Windows applications and looks like an 'x'. We will add a new button to the form, give it a Text property of 'x' and then place it on the form. You'll see an example of this in Figure 17.1.
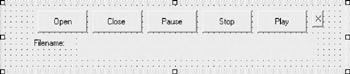
Figure 17.1: A new button added to the form.
Now that we have the button, we need to add the Click event for it and instruct the application to close when it is clicked:
Private Sub cmdExit_Click(ByVal sender As System.Object, ByVal e As System.EventArgs) Handles cmdExit.Click
 Me.Close()
End Sub
Because we removed the border, we will not have a built-in way to move the form by clicking and dragging it. Instead, we'll use the MouseDown and MouseMove events of the form to do this for us:
Private Sub Form1_MouseDown(ByVal sender As Object, ByVal e As System.Windows.Forms.MouseEventArgs) Handles MyBase.MouseDown
 mouse_offset = New Point(-e.X, -e.Y)
End Sub

Private Sub Form1_MouseMove(ByVal sender As Object, ByVal e As System.Windows.Forms.MouseEventArgs) Handles MyBase.MouseMove
 If e.Button = MouseButtons.Left Then
 Dim mousePos As Point = Control.MousePosition
 mousePos.Offset(mouse_offset.X, mouse_offset.Y)
 Location = mousePos
 End If
End Sub
We now have a form that looks much different than a standard VB form, but we're not finished. We're going to utilize the cmdOpen_Paint event and the cmdClose_Paint event to change the way those two buttons work. If we were really interested in completing the application, we would follow the same procedure for the remaining buttons, but for this example, the two buttons work just fine.
Begin by creating both events. Next, we need to instantiate a new instance of the GraphicsPath class in the cmdOpen_Paint event:
Dim myGraphicsPath As New System.Drawing.Drawing2D.GraphicsPath()
Next, we need to specify a string that we'll draw. In this case, use 'Open' and specify the font family to be 'Arial' and the font style to be 'Bold':
Dim stringText As String = "Open"
Dim family As FontFamily = New FontFamily("Arial")
Dim fontStyle As FontStyle = fontStyle.Bold
Our next step is to specify the size of an imaginary square, which will be used to house the string we are going to draw and a point at which the text will start. We'll use a size of 20:
Dim emSize As Integer = 20
Dim origin As PointF = New PointF(0, 0)
The last steps are to create a StringFormat object, which specifies the text formatting information, such as line spacing and alignment. We also need to use the AddString method to create the string, and lastly, we need to set the control's Region property to the instance of the GraphicsPath class we created earlier:
Dim format As StringFormat = StringFormat.GenericDefault

 myGraphicsPath.AddString(stringText, family, fontStyle, emSize, origin, format)

 cmdOpen.Region = New Region(myGraphicsPath)
Final Code Listing
Here is the complete listing for both the cmdOpen_Paint event and cmdClose_Paint event:
 Private Sub cmdOpen_Paint(ByVal sender As Object, ByVal e As System.Windows.Forms.PaintEventArgs) Handles cmdOpen.Paint
 Dim myGraphicsPath As New System.Drawing.Drawing2D.GraphicsPath()

 Dim stringText As String = "Open"
 Dim family As FontFamily = New FontFamily("Arial")
 Dim fontStyle As FontStyle = fontStyle.Bold
 Dim emSize As Integer = 20

 Dim origin As PointF = New PointF(0, 0)

 Dim format As StringFormat = StringFormat.GenericDefault

 myGraphicsPath.AddString(stringText, family, fontStyle, emSize, origin, format)

 cmdOpen.Region = New Region(myGraphicsPath)

 End Sub


 Private Sub cmdClose_Paint(ByVal sender As Object, ByVal e As System.Windows.Forms.PaintEventArgs) Handles cmdClose.Paint

 Dim myGraphicsPath As New System.Drawing.Drawing2D.GraphicsPath()

 Dim stringText As String = "Close"

 Dim family As FontFamily = New FontFamily("Arial")

 Dim fontStyle As FontStyle = fontStyle.Bold

 Dim emSize As Integer = 20

 Dim origin As PointF = New PointF(0, 0)

 Dim format As StringFormat = StringFormat.GenericDefault

 myGraphicsPath.AddString(stringText, family, fontStyle, emSize, origin, format)

 cmdClose.Region = New Region(myGraphicsPath)
 End Sub
End Class
Testing the Application
We don't really need to test the application because the basics of file playback were tested in the previous chapter. We only need to run it to see if it is now drawn appropriately. We can also test the ability of the program to be moved with the mouse to make sure you can drag it around the screen. You can see an example of the form in Figure 17.2.
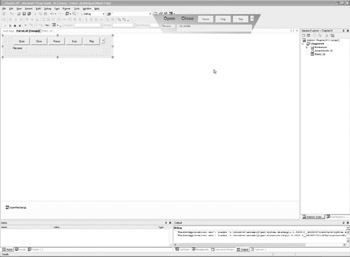
Figure 17.2: The final application.
Summary
In this chapter, we built a custom interface for our MP3 player using GDI+. We use GDI+ functions in several chapters in the book, so you can refer back to this information if needed. In Chapter 18, Using Gestures to Control Tablet Media Player, we look at using gestures in a similar type of application.
- The Tablet PC
- Introduction to Visual Basic .NET
- Working with VB .NET
- Basics of the .NET Framework
- Introduction to the VB .NET Language
- Object-Oriented Programming with VB .NET
- Strings, GDI+, and Error Handling in VB .NET
- Math and Random Number Functions in VB .NET
- Your First Program
- Console Application Input/Output
- Your First Windows Forms Application
- Obtaining the Tablet PC SDK
- Introduction to Ink-Enabled Applications
- Tablet PC Full Screen Utility
- Tablet PC Screen Rotation and Special Buttons
- Creating an MP3 Player
- Form Effects
- Using Gestures to Control Tablet Media Player
- Getting Started with Microsoft Agent
- Advanced Microsoft Agent
- Speech Input with SAPI
- Custom Grammars for Speech Recognition
- WMI and Hardware
- Power Management for the Tablet PC
- Virtual Joystick
- Pong Game
- Not Quite a Magic Ball
- Storing Ink in a Database
- 3D Rendering with OpenGL and DirectX 9
- Using Third-Party Engines
- Tablet Fax
EAN: 2147483647
Pages: 191
