Dynamic User Interface
Overview
One of the most common questions in any Windows programming language is how to programmatically add a control to a form at runtime. The answer depends on the programming framework, and ranges from simple to complex, especially if the programmer needs to add a licensed ActiveX control or handle the events of the newly created control.
.NET erases the distinction between design-time and runtime control programming. In .NET programming, every control is created through code. When you add a control to a form and configure its properties using the design editor, Visual Studio .NET generates the appropriate code and adds it to a collapsed region of your Form class. By studying this region of your code, you can quickly learn how to create and add any control you need at runtime.
Of course, creating a dynamic user interface is about much more than defining a control class at runtime. It's also a philosophy that breaks free of the shackles of visual design tools and allows you to generate interfaces based on database records, user preferences, or localization needs. This chapter examines some innovative techniques you can use to dynamically generate a user interface. It starts with the mandatory button generators, and moves to drawing tools, document applications, and the question of localization. It even considers how you can create a custom form layout engine.
 Companion Web Site
Creating Controls at RuntimeCreating a control at runtime involves a few simple steps:
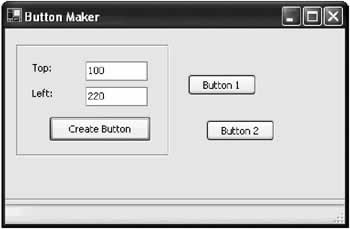
To demonstrate this process, consider the sample button generator program shown in Figure 11-1. This program creates a button at the specified position every time the user clicks the Create button. An event handler is attached to every new button's Click event, ensuring that .NET can capture user clicks (and display a brief user message at the bottom of the window).
public class ButtonMaker : System.Windows.Forms.Form
{
 // (Windows designer code omitted.)

 private int buttonCount = 0;

 private void cmdCreate_Click(object sender, System.EventArgs e)
 {
 buttonCount++;

 // Create the button. Button newButton = new Button();
 newButton.Text = "Button " + buttonCount.ToString();
 newButton.Left = int.Parse(txtLeft.Text);
 newButton.Top = int.Parse(txtTop.Text);

 // Attach the event handler.
 newButton.Click += new EventHandler(ButtonHandler);

 this.Controls.Add(newButton);
 }

 private void ButtonHandler(object sender, System.EventArgs e)
 {
 status.Text = " You clicked ... ";
 status.Text += ((Button)sender).Text;
 }

}
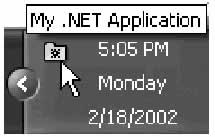
A System Tray ApplicationSometimes the only reason you create a control at runtime is for cleaner, more logical code. One example is found with "invisible" controls that don't really appear on a form. These include the standard dialog controls (for changing colors, choosing fonts, and viewing a print preview) that we saw in Chapter 5. You could add these controls to a form at design time, but why bother? Code that creates it dynamically is more readable. On the other hand, if the control is a part of the form (for example, the PrintPreviewControl instead of a PrintPreviewDialog) it makes sense to create and configure it when you are designing the form. One common example of creating runtime controls for convenience occurs with system tray applications. Often, a system tray application is designed to run quietly in the background, waiting for user interaction or a specific operating system event. This application might even be configured to start every time the computer is logged on. Applications such as this should start minimized in the system tray. You don't want to force the user to interact with any unnecessary windows when the application first loads. If you build this program by adding a NotifyIcon control on a design-time form, your program will need to load the corresponding form before the icon system tray will appear. If you create the icon in a startup routine at runtime, however, no such limitation applies. The next example demonstrates exactly such an application. When it first loads, it creates a system tray icon (see Figure 11-2), attaches two menu items to it, and begins monitoring the file system for changes (using the System.IO.FileSystemWatcher class). No windows are displayed.
Here's the essential code for the dynamic system tray icon:
public class App
{
 // Define the system tray icon control.
 private NotifyIcon appIcon = new NotifyIcon();

 // Define the menu.
 private ContextMenu sysTrayMenu = new ContextMenu();
 private MenuItem displayFiles = new MenuItem("Display New Files");
 private MenuItem exitApp = new MenuItem("Exit");

 // Define the file system watcher and a list to store filenames.
 private FileSystemWatcher watch = new FileSystemWatcher();
 private ArrayList newFiles = new ArrayList();

 public void Start()
 {
 // Configure the system tray icon.
 Icon ico = new Icon("icon.ico");
 appIcon.Icon = ico;
 appIcon.Text = "My .NET Application";

 // Place the menu items in the menu.
 sysTrayMenu.MenuItems.Add(displayFiles);
 sysTrayMenu.MenuItems.Add(exitApp);
 appIcon.ContextMenu = sysTrayMenu;

 // Show the system tray icon.
 appIcon.Visible = true;

 // Hook up the file watcher.
 watch.Path = "c:\";
 watch.IncludeSubdirectories = true;
 watch.EnableRaisingEvents = true;

 // Attach event handlers.
 watch.Created += new FileSystemEventHandler(FileCreated);
 displayFiles.Click += new EventHandler(DisplayFiles);
 exitApp.Click += new EventHandler(ExitApp);
 }

 // The static startup method.
 public static void Main()
 {
 App app = new App();
 app.Start();

 // Because no forms are being displayed, you need this

 // statement to stop the application from automatically ending.
 Application.Run();
 }
}
This presents the basic application class framework. In order to log newly created files, you need to handle the FileSystemWatch.Created event, and simply add the name of the new file to the ArrayList.
private void FileCreated(object sender, System.IO.FileSystemEventArgs e)
{
 newFiles.Add(e.Name);
}
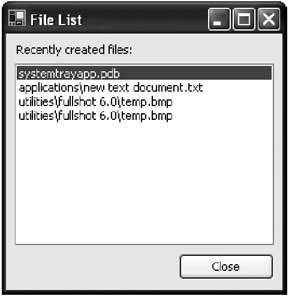
To enable the system tray icon menu, you also need to add two more event handlers. The menu only provides two options: exit the application or display another window that lists the name of changed files (shown in Figure 11-3).
private void ExitApp(object sender, System.EventArgs e)
{
 Application.Exit();
}

private void DisplayFiles(object sender, System.EventArgs e)
{
 FileList frmFileList = new FileList();
 frmFileList.FillList(newFiles);
 frmFileList.Show();
}
Finally, the following code is used in the FileList form to display the ArrayList information. Figure 11-3 shows how the list of changed files might look.
public class FileList : System.Windows.Forms.Form
{
 // (Designer code omitted.)

 private void cmdClose_Click(object sender, System.EventArgs e)
 {
 this.Close();
 }

 public void FillList(ArrayList list)
 {
 lstFiles.DataSource = list;
 }
}
Of course, though this is a useful example, it's not the only approach to freeing the NotifyIcon from the confines of a form. You could also create the App class as a component by inheriting from System.ComponentModel.Component. You'll also need to add some additional code to your class, as shown in this template:
public class Component1 : System.ComponentModel.Component
{
 private System.ComponentModel.Container components = null;

 public Component1(System.ComponentModel.IContainer container)
 {
 container.Add(this);
 InitializeComponent();
 }

 public Component1()
 {
 InitializeComponent();
 }

 private void InitializeComponent()
 {
 components = new System.ComponentModel.Container();
 }
}
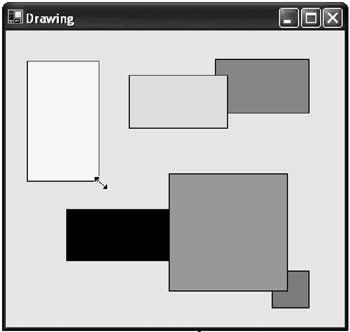
This code allows the component to support the disposable pattern and host design-time controls. It looks essentially the same as the automatically generated form code. (In other words, the special form code isn't just form code-it's code that any component requires to support design-time control hosting). If you don't want to type this code yourself, you can coax Visual Studio .NET into creating it by right-clicking the Solution Explorer and selecting Add → New Component. Every component has the ability to host design-time controls-just drag and drop the control onto the design time view of the class, and Visual Studio .NET will create the code in the special hidden designer region. Using this approach, you could configure the NotifyIcon and the menu items at design time, without needing to tie them to a form. This is the approach used in Chapter 8 to create a design-time picture box that can store an icon file for the HelpIconProvider control. Using Controls in a Drawing ProgramDrawing programs exist in two basic flavors. Painting programs, like Microsoft Paint, allow users to create a bitmap with static content. Once the user draws a shape or types some text onto the drawing area, it can't be modified or rearranged. In more sophisticated vector-based drawing programs (everything from Adobe Illustrator to Microsoft Visio), the drawing is actually a collection of objects. The user can click and change any object at any time or remove it entirely. It is relatively easy to create a bitmap drawing program once you learn the appropriate functions for drawing on a form with GDI+. A vector-based drawing or diagramming program, however, is not so easy, because you need to keep track of every object and its location individually. When the user clicks on the drawing surface, you may need some fairly intricate logic to find out which object the user is trying to select, and handle the overlapping painting. One shortcut to making a drawing program is allowing the user to create drawings out of dynamically generated controls. The next example does exactly that, and demonstrates some fundamentals about handling events and context menus with custom controls. The basic application (shown in Figure 11-4) allows the user to create squares of any color, and then resize them or move them around the form to any location. The squares are based on label controls with borders, although you could easily add support for additional controls with only a few more lines of code. This drawing program, with a few minor changes, could become an entity-diagramming tool for creating class models. It could also become more like a traditional paint program-which is the direction I develop the paint program in through Chapter 13.
The application begins with an empty canvas. To create a square, the user right-clicks the form drawing area, and chooses Create New Square from the context menu. The square then appears (with a default size) at the current mouse location. The code that creates the square is shown in the following:
private void mnuNewSquare_Click(object sender, System.EventArgs e)
{
 // Create and configure the "square".
 Label newLabel = new Label();
 newLabel.Size = new Size(40, 40);
 newLabel.BorderStyle = BorderStyle.FixedSingle;

 // To determine where to place the label, you need to convert the
 // current screen-based mouse coordinates into relative form coordinates.
 newLabel.Location = this.PointToClient(Control.MousePosition);

 // Attach a context menu to the label.
 newLabel.ContextMenu = mnuLabel;

 // Connect the label to all its event handlers.
 newLabel.MouseDown += new MouseEventHandler(lbl_MouseDown);
 newLabel.MouseMove += new MouseEventHandler(lbl_MouseMove);
 newLabel.MouseUp += new MouseEventHandler(lbl_MouseUp);

 // Add the label to the form.
 this.Controls.Add(newLabel);
}
There are three things the user can do with a square once it is created:
All these actions happen in response to the MouseDown event. At this point, the code retrieves a reference that points to the control that fired the event, and then examines whether the right-mouse button was clicked (in which case the menu is shown). If the left mouse button has been clicked, the form switches into resize or drag mode (using one of two Boolean form-level variables), depending on the location of the cursor. Resizing can only be performed from the bottom-right corner.
// Keep track of when fake drag or resize mode is enabled.
private bool isDragging = false;
private bool isResizing = false;

// Store the location where the user clicked the control.
private int clickOffsetX, clickOffsetY;

private void lbl_MouseDown(object sender,
System.Windows.Forms.MouseEventArgs e)
{
 // Retrieve a reference to the active label.
 Control currentCtrl;
 currentCtrl = (Control)sender;

 if (e.Button == MouseButtons.Right)
 {
 // Show the context menu.
 currentCtrl.ContextMenu.Show(currentCtrl, new Point(e.X, e.Y));
 }
 else if (e.Button == MouseButtons.Left)
 {
 clickOffsetX = e.X;
 clickOffsetY = e.Y;

 if ((e.X + 5) > currentCtrl.Width && (e.Y + 5) > currentCtrl.Height)
 {
 // The mouse pointer is in the bottom right corner,
 // so resizing mode is appropriate.
 isResizing = true;
 }
 else
 {
 // The mouse is somewhere else, so dragging mode is
 // appropriate.
 isDragging = true;
 }
 }

}
The MouseMove event changes the position or size of the square if it is in drag or resize mode. It also changes the cursor to the resize icon to alert the user when the mouse pointer is in the bottom right corner.
private void lbl_MouseMove(object sender, System.Windows.Forms.MouseEventArgs e)
{
 // Retrieve a reference to the active label.
 Control currentCtrl;
 currentCtrl = (Control)sender;

 if (isDragging)
 {
 // Move the control.
 currentCtrl.Left += e.X - clickOffsetX;
 currentCtrl.Top += e.Y - clickOffsetY;
 }
 else if (isResizing)
 {
 // Resize the control.
 currentCtrl.Width = e.X;
 currentCtrl.Height = e.Y;
 }
 else
 {
 // Change the pointer if the mouse is in the bottom corner.
 if ((e.X + 5) > currentCtrl.Width && (e.Y + 5) > currentCtrl.Height)
 {
 currentCtrl.Cursor = Cursors.SizeNWSE;
 }
 else
 {
 currentCtrl.Cursor = Cursors.Arrow;
 }
 }
}
Figure 11-5 shows the process of resizing a square.
The MouseUp event ends the dragging or resizing operation.
private void lbl_MouseUp(object sender, System.Windows.Forms.MouseEventArgs e)
{
 isDragging = false;
 isResizing = false;
}
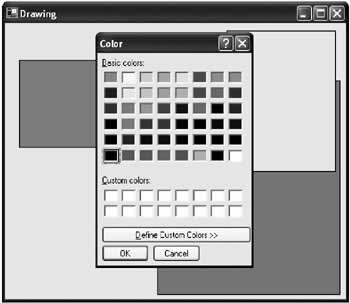
Finally, the context menu provides a single option which, when clicked, allows the user to change the square's fill color using a common color dialog box. Note that the code retrieves the active control through the SourceControl property of the ContextMenu control.
private void mnuColorChange_Click(object sender, System.EventArgs e)
{
 // Show color dialog.
 ColorDialog dlgColor = new ColorDialog();
 dlgColor.ShowDialog();

 // Change label background.
 mnuLabel.SourceControl.BackColor = dlgColor.Color;
}
Figure 11-6 shows how a square's background color can be modified using this color dialog.
As written, this simple example could easily grow into a more sophisticated drawing framework. For example, you could add context-menu items that allow the user to set text in the label (and change its font), or configure other properties. You could also change the form's context menu, and add additional options for other controls. You could even use methods like Control.BringToFront and Control.SendToBack to allow squares to be layered in various ways, according to the user's selections. Currently, all the event handlers assume they are dealing with generic control events, and thus work with buttons, text boxes, picture boxes, and just about any other control.
|
|||||||||||||||||||||

Dynamic ContentWhen discussing dynamic interfaces, it's useful to draw a distinction between those that generate controls dynamically (like the examples you've just seen), and those that configure their controls dynamically. Dynamic content can appear in just about any situation, but it's most common in these cases:
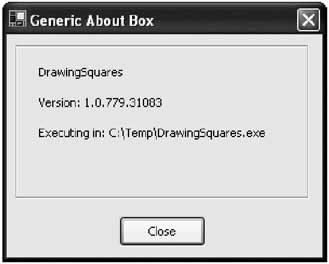
One simple example of dynamic content is the average About box (shown in Figure 11-7). It rarely makes sense to hard-code information like a program's version directly into the user interface of a window, because it cannot be guaranteed to remain correct (and it can be extremely tedious to synchronize if you use autoincrementing version numbers). Instead, this information should be retrieved dynamically: lblProductName.Text = Application.ProductName; lblProductVersion.Text = "Version: " + Application.ProductVersion.ToString(); lblPath.Text = "Executing in: " + Application.ExecutablePath;
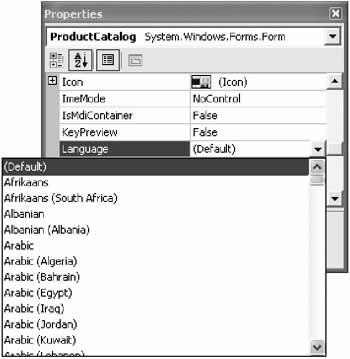
LocalizationThe .NET platform provides considerable support for localizing Windows Forms through resource files. Using resource files, you ensure that elements that may change in different product versions (for example text labels that need to be translated into different languages) are embedded in a separate satellite assembly. You can create different localized versions of your application simply by creating a new satellite assembly. The basic process for creating a localizable form is simple:
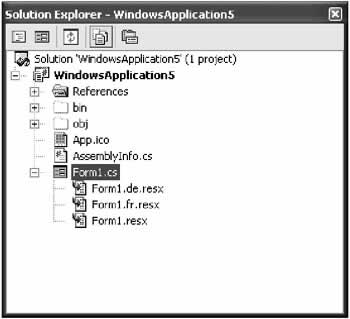
To get a handle on exactly what is going on, select Show All Files from the Projects menu. For every localizable form, you see multiple .resx files with different language identifiers. In fact, there will be one for each language you've configured in the design environment. Figure 11-9 shows an example with two additional languages: German (de) and French (fr).
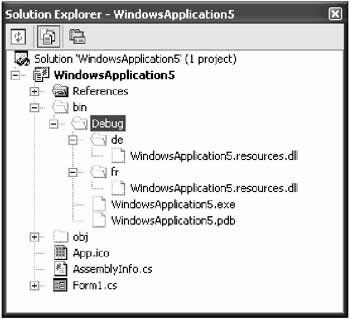
When you compile this project, Visual Studio .NET creates a separate directory using the language identifier, and uses it to store the satellite assembly with the localization settings (see Figure 11-10).
The greatest part about this is that you won't have to delete or move files around for different versions. Because of the way probing works with .NET assemblies, you can count on the CLR to automatically inspect the right directory based on the computer's regional settings and load the correct localized text! Or, you can fall back on a code statement like the one that follows to change the program's culture for testing purposes:
Thread.CurrentThread.CurrentUICulture = new CultureInfo("fr-FR");
The .NET SDK also ships with a utility called Winres.exe, which is extremely useful for localization. It allows another user to edit the information in an .resx resource file using a scaled down form editor. This is useful because it allows translators and other non-programming professionals to create the locale-specific resource files without allowing them the chance to see sensitive code or inadvertently alter it. Finally, you should be aware that you can also read and write directly to resource files using the classes in the System.Resources namespace. This is useful if you have localizable strings that can't be configured at design time, like error messages that appear in dialog boxes. This task is beyond the scope of the present discussion.
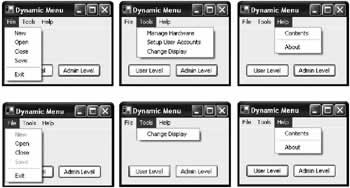
A Dynamic Menu ExampleHere's an example that demonstrates a simple use of dynamic content. It uses a database table that maps user levels to control access permissions. Depending on the user type, some options may be disabled or hidden entirely. The database uses three tables (see Figure 11-11). Controls lists the names of available controls in the user interface, Levels lists the supported user levels, and Controls_Levels specifies what controls are allowed for a given user level (using a special State field that indicates 0 for normal, 1 for hidden, and 2 for disabled). All controls are enabled by default, so the only records that need to be added to Controls_Levels are those that specifically hide or disable controls. In a full-blown application, there would probably also be a Users table that indicates what level each user has.
In this example, the database is configured with the information for two user levels: User and Admin. The different menu structures these users will see are shown in Figure 11-12.
By pulling all the user permission logic out of the user interface and placing it in the database, it becomes very easy to write a small amount of generic code that automatically configures the user interface for the user who is currently logged on: DataTable dtPermissions; // Get permissions for an Admin-level user. dtPermissions = DBPermissions.GetPermissions(DBPermissions.Level.Admin); // Update the menu with these permissions. SearchMenu(this.Menu, dtPermissions); The DBPermissions class uses a static GetPermissions() function that returns a table with all the security information for the specified user level. To remove the chance of errors, it also uses an enumeration that defines the different levels of user access in the database. This is a technique you saw in Chapter 9, where a database class encapsulates all the important information about a database.
public class DBPermissions
{
 public enum State
 {
 Normal = 0,
 Disabled = 1,
 Hidden = 2
 }

 public enum Level
 {
 Admin,
 User
 }

 private static SqlConnection con = new SqlConnection("Data Source=localhost;"
 + "Integrated Security=SSPI;Initial Catalog=Apress;");

 public static DataTable GetPermissions(Level userLevel)
 {
 con.Open();

 // Permissions isn't actually a table in our data source.
 // Instead, it's a view that combines the important information
 // from all three tables using a Join query.
 string selectPermissions = "SELECT * FROM Permissions ";

 switch (userLevel)
 {
 case Level.Admin:
 selectPermissions += "WHERE LevelName = 'Admin"';
 break;
 case Level.User:
 selectPermissions += "WHERE LevelName = 'User"';
 break;
 }

 SqlCommand cmd = new SqlCommand(selectPermissions, con);
 SqlDataAdapter adapter = new SqlDataAdapter(cmd);
 DataSet ds = new DataSet();
 adapter.Fill(ds, "Permissions");

 con.Close();

 return ds.Tables["Permissions"];
 }
}
Finally, the form's SearchMenu() function recursively tunnels through the menu, hiding or disabling controls as indicated in the permissions table.
private void SearchMenu(Menu menu, DataTable dtPermissions)
{
 DataRow[] rowMatch;

 foreach (MenuItem mnuItem in menu.MenuItems)
 {
 // See if this menu item has a corresponding row.
 rowMatch = dtPermissions.Select("ControlName = "' + mnuItem.Text + ""');

 // If it does, configure the menu item state accordingly.
 if (rowMatch.GetLength(0) > 0)
 {
 // Retrieve the state for this menu item.
 string stateString;
 DBPermissions.State state;
 stateString = rowMatch[0]["State"].ToString()
 state = (DBPermissions.State)int.Parse(stateString);

 switch (state)
 {
 case DBPermissions.State.Hidden:
 mnuItem.Visible = false;
 break;
 case DBPermissions.State.Disabled:
 mnuItem.Enabled = false;
 break;
 }
 }
 else
 {
 mnuItem.Visible = true;
 mnuItem.Enabled = true;
 }

 // Search recursively through any submenus.
 if (mnuItem.MenuItems.Count > 0)
 {
 SearchMenu(mnuItem, dtPermissions);
 }
 }
}
Best of all, if the permissions need to change or another access level needs to be added, only the database needs to be modified. An application created in this way is easy to maintain without painful recompiles and redeployment. Our example dynamically configures menus, but there are other approaches. For example, you could disable controls in a form (at which point you would probably want to add a FormName field to the Controls table). Chapter 14 demonstrates a similar technique with dynamic help content. You could also use a similar model to create localizable content for your menus. Instead of mapping controls to user levels with a State field, you would use a Text field that would be applied to the control's Text property.
|
|||||||||||||||||||||

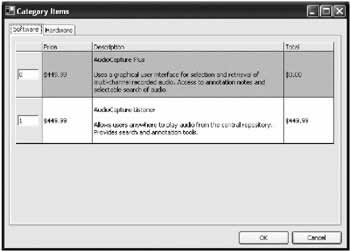
Data Driven ProgrammingAn extreme example of dynamic content is found in applications that generate their entire interface using the information in a database record. This approach isn't suited for all types of programs, but it can be a lifesaver in certain data-driven applications, saving you hours of recompiling, and providing other non-programmers with the tools they need to modify and configure your program. Occasionally, a programmer develops a system that allows every aspect of a form to be defined in a database record or XML document. This type of approach is rarely useful because it requires too much code. However, specialized applications might use a scaled down version of these techniques, like a survey-generation tool that allows you to define a collection of forms that represent the questions of a survey. The most common example of all is a pricing application, where the program must match the product catalog as closely as possible. This is the type of application considered in the next section. A Data Driven Pricing ApplicationThe next example demonstrates that, contrary to what three-tier design dictates, tight coupling between the user interface and a data source is acceptable sometimes-in fact, it may be the best approach. Consider the case where you have a product catalog that changes frequently. The scope of the changes aren't limited to price; new items and categories are regularly added or removed, and different customers enjoy completely different pricing schemes and discount structures. If you write this application ordinarily, you end up creating a great deal of custom code that needs to be tweaked and changed endlessly as the product catalog changes. Sooner or later, these frequent modifications will introduce unexpected errors or make the program difficult to change or extend (for example, if you decide you need to create a new Web-based version). A more successful way to model this problem is to create a program that constructs its interface according to information in a database. So, when adding a product to an order, the user is presented with a list of categories from a list control, with the description for each also read from the database. When the user chooses items from a category, the whole interface is built out of a grid control (in this case, Microsoft's MSFlexGrid ActiveX control that ships with Visual Studio 6), and text boxes are added dynamically for quantity (see Figure 11-13).
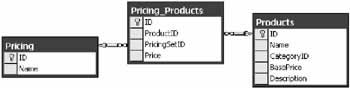
The pricing information is also read from a database. However, the pricing is not product-specific. Instead, every product has a basic price (as listed in the Products table). Additionally, a Pricing table lists different pricing schemes, and gives each one a descriptive name. The Pricing_Products table maps these two tables together, assigning each product multiple prices-one for each pricing system. The database structure is diagrammed in Figure 11-14.
This application would typically ship with a special admin tool that is little more than a glorified database editor. It would allow the sales department to modify the list of products, change prices, and add new pricing schemes. This system is great for salespeople who love to invent new price structures for every customer.
|
||||||||||||||||||
Control Layout EnginesAs you've seen, the .NET forms architecture provides support for laying out controls using coordinates in a grid. This approach, combined with the built-in support for docking and anchoring, gives developers a rich layout environment. However, there are times when grid layout is not necessarily the best approach. For example, you may need a container control that automatically lays out child controls according to different rules, perhaps adjusting them to accommodate the width of the largest control or shrinking them to fit the size of the container, to name just two possibilities. You could create a custom user control to encapsulate this type of functionality, but that wouldn't let you use the same layout logic in different containers (for example, forms, group boxes, and tabs). To provide a more generic, reusable system, you need to create a layout manager. A layout manager is a class that dictates the layout of child controls in a container. Ideally, a layout manager can be reused with any type of child control and applied to any type of container.
Generally, a layout manager connects itself to the action by listening for layout events from the container control. It then iterates through all the items in the Controls collection, and arranges them accordingly. Depending on the layout manager, this may mean ignoring the Location property and even the Size property of each control. It could also involve inspecting other extended properties, as I discuss at the end of this section. The SingleLineFlow Layout ManagerA good example of a simple layout provider is shown with the following SingleLineFlow example. It lays out one control per line, from top to bottom, and gives each control the width of the container. It's ideal for a property page display (as with a TabPage container control).
public class SingleLineFlow
{
 private Control container;
 private int margin;

 public SingleLineFlow(Control parent, int margin)
 {
 this.container = parent;
 this.margin = margin;

 // Attach the event handler.
 container.Layout += new LayoutEventHandler(UpdateLayout);

 // Refresh the layout.
 UpdateLayout(this, null);
 }

 public int Margin
 {
 get
 {
 return margin;
 }
 set
 {
 margin = value;}
 }
 }

 // This is public so it can be triggered manually if needed.
 public void UpdateLayout(object sender,
 System.Windows.Forms.LayoutEventArgs e)
 {
 int y = 0;
 foreach (Control ctrl in container.Controls)
 {
 y += Margin;
 ctrl.Left = Margin;
 ctrl.Top = y;
 ctrl.Width = container.Width;
 ctrl.Height = Margin;
 }
 }
}
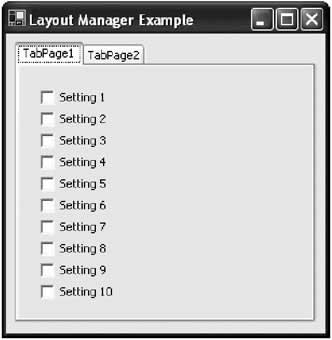
The bulk of the work is performed in the UpdateLayout() method, which adjusts the position of the controls in the container. The client doesn't need to call this method manually. Instead, once the layout manager is connected to the correct container, it fires automatically as controls are added or removed. The UpdateLayout() method arranges controls with a fixed height and uses the width of the container. Many more alternatives are possible-for example, you could record the width of the largest contained control, and resize all the other controls and the container itself to match. The following form code shows how easy it is to use the layout provider. It adds several check box controls to a TabPage container when a form is loaded. Because a layout provider is being used, the client doesn't need to worry about details like the position or size of the child controls-they are organized automatically.
private void form1_Load(object sender, System.EventArgs e)
{
 // Create and attach the layout manager.
 SingleLineFlow layoutManager = new SingleLineFlow(tabPage1, 20);

 // Add 10 sample checkboxes.
 CheckBox chkbox;

 for (int i = 1; i < 11; i++)
 {
 chkbox = new CheckBox();
 chkbox.Text = "Setting " + i.ToString();
 tabPage1.Controls.Add(chkbox);
 }
}
Without the layout manager, all the check boxes would just be layered on top of each other with the default size and the coordinates (0, 0). Figure 11-15 shows the result with the SingleLineFlow layout manager.
You can use the same technique with controls that you add at design time. However, in this case the layout logic isn't performed until the layout manager class is created. That means that the controls won't be organized in the IDE view at design-time. Instead, they will be reorganized when the program begins and you attach the layout manager. You could extend this example layout manager so that it creates a tabular layout, or so that it provides a multicolumn single line flow layout. The only limits are time and imagination. Control Layout Engines As Extender ProvidersIn the previous example, the control layout engine treats all controls equally. However, what happens if you need a more customizable layout that allows individual control settings to affect it? For example, the default layout provided by Windows Forms gives every control a Size and a Location property that is used to determine where the control is placed in the container. Is it possible for you to add other layout properties (for example, a Justification or Column property) to standard controls? The answer is yes-if you develop your layout manager using extender providers. The basic strategy is as follows:
These techniques aren't a conceptual leap, but they do require some lengthy trial-and-error coding, and they are a specialty item that won't be of interest to all application programmers. Microsoft provides an interesting article about how custom layout can be developed with extender providers on their MSDN Web site (look for it at http://msdn.microsoft.com/library/en-us/dndotnet/html/custlaywinforms.asp). Their approach may be more effort than it's worth for most programmers (which may explain the article's low reader ranking), but it could also form the nucleus for an advanced localization system for a specialized product. |
||||||||||||||||||
The Last WordThis chapter considered dynamic user interfaces. But rather than limit the discussion to questions about how to create controls at runtime and hook up their events (which, as you've seen, is relatively trivial once you know how to do it), the chapter examined some more radical approaches. These techniques allow you to dynamically build a vector-based drawing application, or a program that generates its own interfaces using information from a database. It's remarkable what you can accomplish if you surrender the design-time comfort of the Visual Studio .NET IDE. Many of these applications have specific niches, and the techniques discussed here aren't suitable for all applications. On the other hand, if you need to create a data-driven tool like the product catalogue application in this chapter, you need to use a dynamic interface—without it you'll be trapped in an endless cycle of user interface tweaking and recompiling as the underlying data changes. Perhaps best of all, dynamic user interfaces give developers a chance to write innovative code—and that is always fun. |
|||||||||||||||
GDI+ Basics |
|||||||||||||||
Introduction
EAN: 2147483647
Pages: 142
