MDI Interfaces and Workspaces
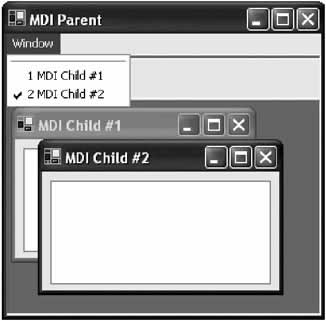
Multiple document interface (MDI) represents one of the most common user interface designs on the Windows platform. MDI interfaces provide a single application window that contains multiple child windows (and optionally other windows like toolbars and floating palettes). MDI windows turn up in some form or another in most complex applications, and Visual Studio .NET is no exception.
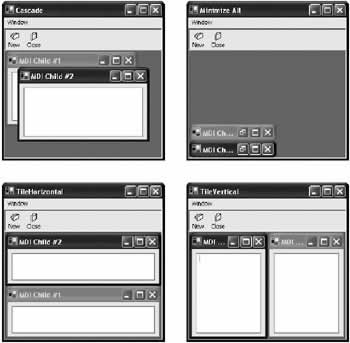
In this chapter, you learn how to create an MDI application in .NET, and how it's dramatically easier to use and more flexible than in previous programming toolkits. You also learn basic window management and synchronization with the document-view architecture. Finally, toward the end of the chapter, you explore one of the trickiest aspects of MDI interfaces with dockable windows.
The Story of MDI
MDI windows have been the de facto standard for user interfaces for the past several years, although their dominance is fading. Newer Windows applications sometimes use multiple independent SDI (single-document interface) windows instead. For example, Internet Explorer is an SDI application-if you want to open several pages at once, the pages appear in several windows, each of which is shown on the taskbar. Microsoft Word has also become an SDI application, although it was one of the earliest MDI examples in the Windows world. Most other word processors and document applications use MDI interfaces, and Visual Studio .NET is irredeemably MDI. Though it provides a unique user interface with tabbed and grouped windows, the basic principle-hosting several different windows in one large container-remains unchanged.
The debate between SDI and MDI is sometimes heated. There is no clear standard, although Microsoft officially states that SDI is easier to use and preferred. The best design depends on the purpose of your application and the user it is designed to serve. If you are dealing with advanced users who need to manage several views simultaneously, an MDI interface is usually better than scattering multiple windows across the taskbar. On the other hand, if you are creating a simple editor for a novice user, it's probably clearer to follow a simpler SDI design like that used in Microsoft Paint of WordPad.
Types of MDI Applications
There are essentially two types of MDI applications:
- Document applications. These applications use a single application window to contain multiple identical document windows. In a word processing program, this might provide a simple way for a user to work with several files at once.
- Workspace applications. These applications provide several different windows (which correspond to different features) that can all be displayed simultaneously. For example, you might create a project management program that allows you to simultaneously browse through a list of users, enter new projects, and report software bugs. This could be modeled in an Explorer-style SDI interface application, but the user would only be able to perform one task at a time.
 Companion Web Site
Document View ArchitectureMany developers will recognize document-view architecture as a staple of MFC design. In .NET, the emphasis is less critical because custom form classes can be equipped with most of the intelligence they need (as you saw in our refresh example), and don't require an additional separation between the document and the view. Tasks that typically required views, like scrolling, are dealt with effortlessly with the built-in smarts of most .NET controls. On the other hand, there are several scenarios that are particularly well suited to a dedicated document-view architecture:
When discussing MDI interfaces, a document is the actual underlying data. For example, with Microsoft Word the document is the memo, report, or resume the user is composing. The view is a window onto the document. For example, the view in Microsoft Word might just include the page that is currently being edited (which can be scrolled to different pages). A typical document-view application uses the following ingredients:
Why would a document require more than one view? It's easy to think of a view as a window onto a different part of a document, but a view can also correspond to a representation of the document. For example, you could have an editing view where changes are made and a print preview that shows the final layout. Both views represent the same data in different ways and must be synchronized. However, they can't be cleanly dealt with in a single class. Similarly, you might have a document object that corresponds to a large amount of information from a database. You could simultaneously view this as a grid of records and as a diagram with two different views. Yet another example is an HTML file, which can be viewed as straight text or marked-up content. A Document View Ordering ProgramOur next example presents a fairly sophisticated model that supports real-time previews using the document-view architecture. It includes the following ingredients:
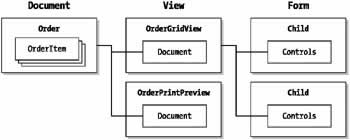
Figure 10-7 shows the relationship of some of the classes in this example.
Document class The heart of this application is the document class called Order, which represents a collection of items in a sales order. Because this is a fairly long piece of code, it helps to attack it piecemeal. The first ingredient is the Product class, which represents an item in the catalog.
public class Product
{
 public string Name;
 public string Description;
 public decimal Price;

 public Product(string name, string description, decimal price)
 {
 this.Name = name;
 this.Description = description;
 this.Price = price;
 }
}
In an order, each product is identified solely by product ID. Here's the OrderItem class, which represents a line item in an order:
public class OrderItem
{
 public int ID;

 public OrderItem(int ID)
 {
 this.ID = ID;
 }
}
Finally, there is the Order class, which contains a collection of OrderItem objects. The Order class is created as a custom collection by deriving from the CollectionBase class. This trick provides an added benefit to all clients, ensuring that they can easily iterate through the order items using foreach syntax. It also prevents deficient code from trying to add any objects other than OrderItem instances. Here's the basic framework for the Order class:
public class Order : CollectionBase
{
 public event EventHandler DocumentChanged;

 private string lastFilename = "[New Order]";

 public string LastFileName
 {
 get
 {
 return lastFilename;
 }
 set
 {
 lastFilename = value;
 }
 }

 public void Add(OrderItem item)
 {
 this.List.Add(item);
 OnDocumentChanged(new EventArgs());
 }

 public void Remove(int index)
 {
 // Check to see if there is an item at the supplied index.
 if (index > (this.Count - 1) || index < 0)
 {
 throw new System.IndexOutOfRangeException();
 }
 else
 {
 this.List.RemoveAt(index);
 }
 OnDocumentChanged(new EventArgs());
 }

 public OrderItem Item(int index)
 {
 return (OrderItem)this.List[index];
 }

 protected void OnDocumentChanged(System.EventArgs e)
 {
 // Note that this currently occurs as items are added or removed,
 // but not when they are edited. To overcome this would require adding
 // an additional OrderItem change event.

 // Raise the DocumentChanged event.
 if (DocumentChanged != null)
 {
 DocumentChanged(this, e);
 }
 }
}
The OnDocumentChanged() method is a critically important ingredient. This is the key that allows other views to update themselves when the list of items in the order is changed (either by adding a new item or removing an existing one). The Order class also includes two additional document-specific methods: Save and Open, which transfer the data to and from a file:
public void Open(string filename)
{
 FileStream fs = new FileStream(filename, FileMode.Open);
 StreamReader r = new StreamReader(fs);

 do
 {
 this.Add(new OrderItem(int.Parse(r.ReadLine())));
 } while (r.Peek() != -1);

 r.Close();
 fs.Close();

 // By placing this last we ensure that the file will not be updated
 // if a load error occurs.
 this.LastFileName = filename;
}

public void Save(string filename)
{
 FileStream fs = new FileStream(filename, FileMode.Create);
 StreamWriter w = new StreamWriter(fs);

 foreach (OrderItem item in this.List)
 {
 w.WriteLine(item.ID);
 }

 w.Close();
 fs.Close();

 // Note: a real pricing program would probably store the price in the file
 // (required for orders) but update it to correspond with the current
 // price for the item when the file is opened.

 // By placing this last we ensure that the file will not be updated
 // if a save error occurs.
 this.LastFileName = filename;
}
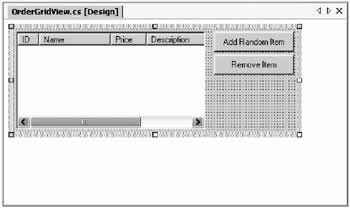
All in all, the Order class is really built out of three parts: It contains data (the collection of OrderItem objects), it provides the functionality for saving and opening files, and it provides the DocumentChanged event that will prompt the appropriate views to update themselves when any changes are detected. OrderGridView class The OrderGridView presents a ListView that displays all the order items and provides support for adding and removing items. The view is created as a user control, which allows it to hold various combined controls and be tailored at design-time. The ListView is anchored so that it grows as the dimensions of the user control expand (see Figure 10-8).
public class OrderGridView : System.Windows.Forms.UserControl
{
 // (Designer code omitted.)

 public Order Document;

 public OrderGridView(Order document)
 {
 // This is required to make sure the controls that were added at
 // design-time are actually rendered.
 InitializeComponent();

 // Store a reference to the document, attach the event handler,
 // and refresh the display.
 this.Document = document;
 this.Document.DocumentChanged += new EventHandler(RefreshList);
 RefreshList(this, null);
 }

 private void RefreshList(object sender, System.EventArgs e)
 {
 // Update the ListView control with the new document contents.
 if (list != null)
 {
 // For best performance, disable refreshes while updating the list.
 list.SuspendLayout();

 list.Items.Clear();

 // Step through the list of items in the document.
 Product itemProduct;
 ListViewItem itemDisplay;
 foreach (OrderItem item in this.Document)
 {
 itemDisplay = list.Items.Add(item.ID.ToString());
 itemProduct = PriceList.GetItem(item.ID);
 itemDisplay.SubItems.Add(itemProduct.Name);
 itemDisplay.SubItems.Add(itemProduct.Price.ToString());
 itemDisplay.SubItems.Add(itemProduct.Description);
 }

 list.ResumeLayout();
 }
 }

 // Triggered when the Add button is clicked.
 private void cmdAdd_Click(object sender, System.EventArgs e)
 {
 // Add a random item.
 Random randomItem = new Random();
 Document.Add(new OrderItem(randomItem.Next(1, 4)));
 }

 // Triggered when the Remove button is clicked.
 private void cmdRemove_Click(object sender, System.EventArgs e)
 {
 // Remove the current item.
 // The ListView is configured for single-selection only.
 Document.Remove(list.SelectedIndices[0]);
 }
}
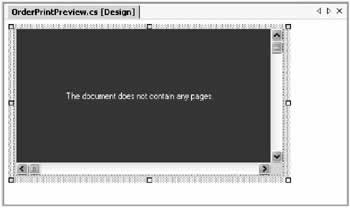
Our simple example doesn't provide an additional product catalog-instead, a random order item is added every time the Add button is clicked. It also doesn't include any code for editing items. None of these details would change the overall model being used. You should also notice that the RefreshList() method handles the DocumentChanged event, ensuring that the list is rebuilt if any change is made by any view (or even through code). OrderPrintPreview class The OrderPrintPreview class is also a user control, but it only contains a single instance of the PrintPreview control. Once again, this example has been left intentionally crude. You could easily add other controls for zooming, moving from page to page, and otherwise configuring the print preview. Similarly, the printed output is very basic, and doesn't include details like an attractive title or letter-head. Figure 10-9 shows the OrderPrintPreview view in action.
The OrderPrintPreview class follows a similar design to the OrderGridView. A reference to the document is set in the constructor, and the RefreshList() method handles the DocumentChanged event. The only difference is that the RefreshList() needs to initiate printing using a PrintDocument instance. The PrintDocument.PrintPage event handler writes the output to the preview window.
public class OrderPrintPreview : System.Windows.Forms.UserControl
{
 // (Designer code omitted.)

 public Order Document;
 private PrintDocument printDoc = new PrintDocument();

 public OrderPrintPreview(Order document)
 {
 // This is required to make sure the controls that were added at
 // design-time are actually rendered.
 InitializeComponent();

 // Store a reference to the document, attach the document event handlers,
 // and refresh the display.
 this.Document = document;
 this.Document.DocumentChanged += new EventHandler(RefreshList);
 this.printDoc.PrintPage += new PrintPageEventHandler(PrintDoc);

 RefreshList(this, null);
 }

 private void RefreshList(object sender, System.EventArgs e)
 {
 // Setting this property starts the preview,
 // even if the PrintDoc document is already assigned.
 Preview.Document = printDoc;
 }

 // Tracks placement while printing.
 private int itemNumber;

 // The print font.
 private Font printFont = new Font("Tahoma", 14, FontStyle.Bold);

 private void PrintDoc(object sender,
 System.Drawing.Printing.PrintPageEventArgs e)
 {

 // Tracks the line position on the page.
 int y = 70;

 // Step through the items and write them to the page.
 OrderItem item;
 Product itemProduct;

 for (itemNumber == itemNumber; itemNumber < Document.Count; itemNumber++)
 {
 item = Document.Item(itemNumber);
 e.Graphics.DrawString(item.ID.ToString(), printFont,
 Brushes.Black, 70, y);
 itemProduct = PriceList.GetItem(item.ID);
 e.Graphics.DrawString(itemProduct.Name, printFont,
 Brushes.Black, 120, y);
 e.Graphics.DrawString(itemProduct.Price.ToString(), printFont,
 Brushes.Black, 350, y);

 // Check if more pages are required.
 if ((y + 30) > e.MarginBounds.Height &&
 itemNumber < (Document.Count - 1))
 {
 e.HasMorePages = true;
 return;
 }

 // Move to the next line.
 y += 20;
 }

 // Printing is finished.
 e.HasMorePages = false;
 itemNumber = 0;
 }
}
Child form class So far, everything is designed according to the document-view ideal. Most of the data manipulation logic is concentrated in the Order class, while most of the presentation logic is encapsulated in the view classes. All that's left for the child form is to create the appropriate view and display it. This is implemented by adding an additional constructor to the form class that accepts an Order document object.
public class Child : System.Windows.Forms.Form
{
 // (Designer code omitted.)

 public enum ViewType
 {
 ItemGrid,
 PrintPreview
 }

 public Order Document;

 public Child(Order doc, ViewType viewType)
 {
 // This is required to make sure the controls that were added at
 // design-time are actually rendered.
 InitializeComponent();

 // Configure the title.
 this.Text = doc.LastFileName;
 this.Document = doc;

 // Create a reference for the view.
 // This reference can accommodate any type of control.
 Control view = null;

 // Instantiate the appropriate view.
 switch (viewType)
 {
 case ViewType.ItemGrid:
 view = new OrderGridView(doc);
 break;
 case ViewType.PrintPreview:
 view = new OrderPrintPreview(doc);
 break;
 }

 // Add the view to the form.
 view.Dock = DockStyle.Fill;
 this.Controls.Add(view);
 }
}
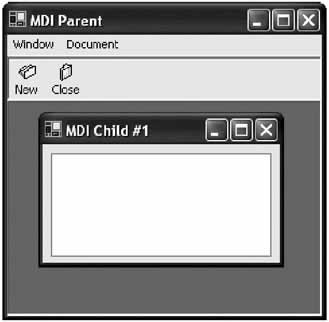
One advantage to this design is that you could easily create a child window that hosts a combination of views (for example, grid views for two different orders, or a grid view and print preview for the same document). This could even provide the flexibility to change the interface to an SDI style. The Parent form class The MDI parent provides a toolbar with basic options, and the typical event handling logic that allows users to open, close, and save documents. This code follows true "switchboard" style, and relies heavily on the other classes to actually perform the work.
public class Parent : System.Windows.Forms.Form
{
 //(Designer code omitted.)

 private string lastDir = "C:\Temp";

 private void toolBar1_ButtonClick(object sender,
 System.Windows.Forms.ToolBarButtonClickEventArgs e)
 {
 if (e.Button == cmdOpen)
 {
 OpenFileDialog dlgOpen = new OpenFileDialog();
 dlgOpen.InitialDirectory = lastDir;
 dlgOpen.Filter = "Order Files (*.ord)|*.ord";

 // Show the open dialog.
 if (dlgOpen.ShowDialog() == DialogResult.OK)
 {
 Order doc = new Order();
 try
 {
 doc.Open(dlgOpen.FileName);
 }
 catch (Exception err)
 {
 // All exceptions bubble up to this level.
 MessageBox.Show(err.ToString());
 return;
 }

 // Create the child form for the selected file.
 Child frmChild = new Child(doc, Child.ViewType.ItemGrid);
 frmChild.MdiParent = this;
 frmChild.Show();
 }
 }
 else if (e.Button == cmdNew)
 {
 // Create a new order.
 Order doc = new Order();
 Child frmChild = new Child(doc, Child.ViewType.ItemGrid);
 frmChild.MdiParent = this;
 frmChild.Show();
 }
 else if (e.Button == cmdSave)
 {
 // Save the current order.
 if (this.ActiveMdiChild != null)
 {
 SaveFileDialog dlgSave = new SaveFileDialog();
 Order doc = ((Child)this.ActiveMdiChild).Document;
 dlgSave.FileName = doc.LastFileName;
 dlgSave.Filter = "Order Files (*.ord)|*.ord";

 if (dlgSave.ShowDialog() == DialogResult.OK)
 {
 try
 {
 doc.Save(dlgSave.FileName);
 this.ActiveMdiChild.Text = dlgSave.FileName;
 }
 catch (Exception err)
 {
 // All exceptions bubble up to this level.
 MessageBox.Show(err.ToString());
 return;
 }
 }
 }
 }
 else if (e.Button == cmdClose)
 {
 if (this.ActiveMdiChild != null)
 {
 this.ActiveMdiChild.Close();
 }
 }
 else if (e.Button == cmdPreview)
 {
 // Launch a print preview child for the active order.
 if (this.ActiveMdiChild != null)
 {
 Order doc = ((Child)this.ActiveMdiChild).Document;

 Child frmChild = new Child(doc, Child.ViewType.PrintPreview);
 frmChild.MdiParent = this;
 frmChild.Show();
 }
 }
 }
}
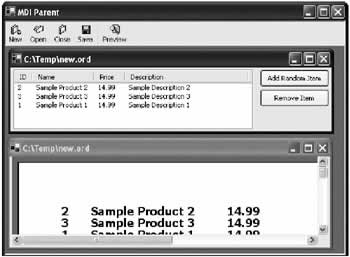
One interesting detail is the event handling code for the preview button. It determines whether there is a current document, and if there is, it opens a preview window with the same underlying document object. Figure 10-10 shows the finished application with its synchronized views. You can peruse the full code in the DocumentView project included with the samples for this chapter.
|
||||||||||||||||||
Floating Windows and DockingEveryone expects an MDI interface to sport dockable windows and toolbars-floating controls that can be latched into place or left hovering above your application. Unfortunately, designing this type of interface is surprisingly awkward. Windows (and previous application frameworks) do not provide native support for most of these features. Instead, the developer has to resort to some creative coding to implement a solution. As a side effect, docked and floating windows never look exactly the same in any two Windows applications-even if those two applications are both written by Microsoft programmers. Every solution has drawbacks and advantages. Floating ToolbarsBy default, when you create a toolbar it is automatically docked to the top of the form. However, it doesn't need to be-as with any .NET control, you can set the Dock property to modify this behavior. To create a toolbar that can float, you need to add some additional logic to the mouse events that detect if the toolbar is clicked and "pulled" downward or rightward. In the next example, the toolbar is disconnected after 20 pixels of a movement in either direction. Then other event-handling logic comes into play, which allows the control to be dragged around the surface of the MDI container. Here's the code that needs to be added to the Form class to support this design. It's similar to the dragging code developed in Chapter 4, as it combines MouseDown, MouseMove, and MouseUp event handlers to manage the process of moving the floating control.
private bool draggingToolbar;
private Point draggedFrom;

private void toolBar1_MouseDown(object sender,
 System.Windows.Forms.MouseEventArgs e)
{
 draggingToolbar = true;
 draggedFrom = new Point(e.X, e.Y);
 toolBar1.Capture = true;
}

private void toolBar1_MouseMove(object sender,
 System.Windows.Forms.MouseEventArgs e)
{
 if (draggingToolbar)
 {
 if (toolBar1.Dock == DockStyle.Top)
 {
 // Check if the dragging has reached the threshold.
 if (draggedFrom.X < (e.X - 20) || draggedFrom.Y < (e.Y - 20))
 {
 draggingToolbar = false;

 // Disconnect the toolbar.
 toolBar1.Dock = DockStyle.None;
 toolBar1.Location = new Point(10, 10);
 toolBar1.Size = new Size(200, 100);
 toolBar1.BorderStyle = BorderStyle.FixedSingle;
 }
 }
 else if (toolBar1.Dock == DockStyle.None)
 {
 toolBar1.Left = e.X + toolBar1.Left - draggedFrom.X;
 toolBar1.Top = e.Y + toolBar1.Top - draggedFrom.Y;
 }
 }
}

private void toolBar1_MouseUp(object sender,
 System.Windows.Forms.MouseEventArgs e)
{
 draggingToolbar = false;
 toolBar1.Capture = false;
}
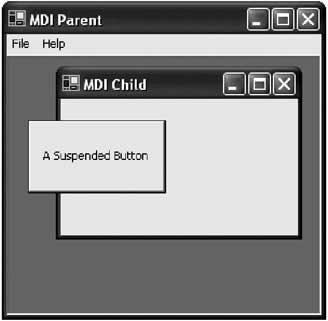
Figure 10-11 shows the toolbar in its "floating" state.
A key technique in this example is the use of the Control.Capture property. By setting this property to true, the code ensures that mouse events will be received, even if the mouse moves off the control. This allows the user to drag the toolbar from its docked position by clicking at the bottom of the control and dragging down off the surface of the toolbar. This step wasn't required for our simple dragging examples in Chapter 4, because the control was never fixed. Instead, it always moved to keep under the mouse pointer. There's still one aspect missing from the draggable toolbar: it doesn't automatically reattach itself. To accomplish this, you simply need to add some code in the MouseMove event that checks how close the toolbar is to top of the form. If it is within a given threshold, the toolbar should return to its fixed position. Here's the rewritten mouse move code that allows automatic docking to the top or left sides.
private void toolBar1_MouseMove(object sender,
 System.Windows.Forms.MouseEventArgs e)
{
 if (draggingToolbar)
 {
 if (toolBar1.Dock == DockStyle.Top)
 {
 // (Code for undocking omitted.)
 }
 else if (toolBar1.Dock == DockStyle.None)
 {
 toolBar1.Left = e.X + toolBar1.Left - draggedFrom.X;
 toolBar1.Top = e.Y + toolBar1.Top - draggedFrom.Y;

 if (toolBar1.Top < 5)
 {
 draggingToolbar = false;

 // Re-dock the control.
 toolBar1.Dock = DockStyle.Top;
 toolBar1.BorderStyle = BorderStyle.None;
 }
 else if (toolBar1.Left < 5)
 {
 draggingToolbar = false;

 // Re-dock the control.
 toolBar1.Dock = DockStyle.Left;
 toolBar1.BorderStyle = BorderStyle.None;
 }
 }
 }
}
These techniques are simple building blocks that can lead to a fairly sophisticated interface. You can experiment with the FloatingToolbar project, which is included with the samples for this chapter. Unusual controls The preceding example also paves the way to creating your own "coolbar" type of control that provides other .NET controls (like drop-down list controls) in a dockable toolbar. All you need to do is create a custom user control that contains a Panel control and the controls you want to use. You can then use that control with exactly the same docking code used for the toolbar example. Remember, in .NET any type of control can be dragged over the surface of an MDI container.
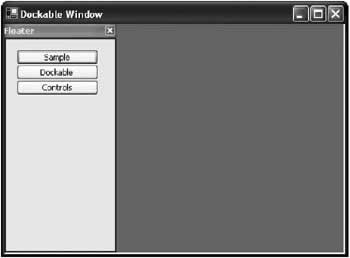
Dockable WindowsDockable windows use a similar concept to floating toolbars, but require a little more finesse. The problem is that window movement is handled automatically by Windows, and can't be easily altered in your code. A typical approach to create a dockable window is to create a toolbox-border window, and then check its position in the Form.LocationChanged or Form.Move event handler. If you find that it is within certain range from one of the form sides, you could then manually move it to so that it sits flush against the border. Unfortunately, several problems arise with this approach. It's possible to react after the position of a window has changed, but it's not possible to prevent attempted changes (and thus "fix" a window into place). Generally, a docked window should only move if the user clicks and drags it beyond a specified threshold. However, if the user has configured the system settings to show window contents while dragging, there could be a significant amount of flicker as the window battles between the user's movement and the code's attempt to resist. It's for this reason that the Visual Studio .NET dockable windows (and those in earlier Visual Studio versions) never show their contents while dragging. All you see is a grey transparent outline, regardless of your system settings. Dockable windows with owner-drawn controls One of the ways that you can create fake dockable windows is to create your own owner-drawn control that attempts to look as much like a window as possible. This fake window can use the technique you applied with the floating toolbar, which allows you to drag it across the surface of an MDI container and automatically latch it onto a side. Best of all, you have complete control over when the window does and doesn't move. Unfortunately, you will have to take some effort to ensure that your control mimics a real window closely enough, and takes into account the current system colors and font. This painful approach is used in many modern Windows applications, although this chapter won't attempt it. Dockable windows with timers One of the key problems you'll face while trying to create dockable windows is the fact that forms don't fire MouseUp events when the user finishes dragging them (instead, mouse events are reserved for actions in the client area). Typically, you would use a MouseUp event handler to dock the control. You can code around this limitation with a little desperate ingenuity, by manually polling the state of the mouse when a dock is potentially about to take place. That's the technique used in your next example, which provides two forms: MDIMain and Floater, the dockable window. When the program first starts, MDIMain creates an instance of the Floater window and displays it. Note that the Floater is not a child window but an owned form. That means it can be moved anywhere on the screen, but will always appear above the MDIMain form. This is simply a design decision-the Floater window could also be created as a child window.
private void MDIMain_Load(object sender, System.EventArgs e)
{
 Floater frmFloat = new Floater();
 frmFloat.Owner = this;
 frmFloat.Show();
}
Some of the most interesting code takes place in the Move event handler for the floating window. Here, the current position of the form is examined:
private Point dockTestAt;

private void Floater_Move(object sender, System.EventArgs e)
{
 // Determine the current location in parent form coordinates.
 Point mouseAt = this.Owner.PointToClient(this.Location);

 // Determine if the floater is close enough to dock.
 if (mouseAt.X < 5 && mouseAt.X > -5)
 {
 if ((Control.MouseButtons & MouseButtons.Left) == MouseButtons.Left)
 {
 dockTestAt = mouseAt;

 // Show the dock focus rectangle.
 ((MDIMain)this.Owner).DrawDockRectangle = true;
 // Reset the timer to poll for the MouseUp event.
 tmrDock.Enabled = false;
 tmrDock.Enabled = true;
 }
 }
}
If the floating window is within a predefined threshold of the left border of the owner form, the floating window instructs the owner to draw a dock cue: a grey rectangle in the spot where the dock will be performed. This is performed by setting the custom MDIMain.DrawDockRectangle property.
public bool DrawDockRectangle
{
 get
 {
 return pnlDock.Visible;
 }
 set
 {
 pnlDock.Visible = value;
 }
}
All this property does is hide or show a Panel control. The panel provides its own logic to draw a hatched border outline, as shown in Figure 10-12.
private void pnlDock_Paint(object sender,
 System.Windows.Forms.PaintEventArgs e)
{
 HatchBrush dockCueBrush = new HatchBrush(HatchStyle.LightDownwardDiagonal,
 Color.White, Color.Gray);
 Pen dockCuePen = new Pen(dockCueBrush, 10);
 e.Graphics.DrawRectangle(dockCuePen,
 new Rectangle(0, 0, pnlDock.Width, pnlDock.Height));
}
This isn't the only action that's taken when the floating window is in a valid dock position. The floating window also begins polling to check if the mouse button is released by enabling a timer.
// This code is triggered with every timer tick.
private void tmrDock_Tick(object sender, System.EventArgs e)
{
 if (dockTestAt.X == this.Owner.PointToClient(this.Location).X
 && dockTestAt.Y == this.Owner.PointToClient(this.Location).Y)
 {
 if (Control.MouseButtons == MouseButtons.None)
 {
 // Dock in place.
 tmrDock.Enabled = false;
 ((MDIMain)this.Owner).AddToDock(this);
 }
 }
 else
 {
 // Mouse has moved. Disable this dock attempt.
 tmrDock.Enabled = false;
 ((MDIMain)this.Owner).DrawDockRectangle = false;
 }
}
If the form is moved, the polling is disabled, and the dock cue is hidden. If the mouse button is released while the form is still in the same place, docking is initiated using the MDIMain.AddToDock() method.
public void AddToDock(Form frm)
{
 // Allow the form to be contained in a container control.
 frm.TopLevel = false;
 pnlDock.Controls.Add(frm);

 // Don't let the form be dragged off.
 frm.WindowState = FormWindowState.Maximized;
}
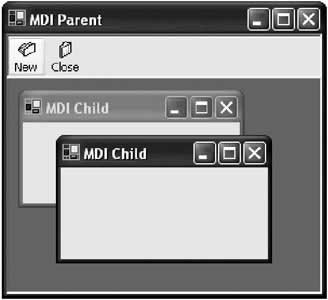
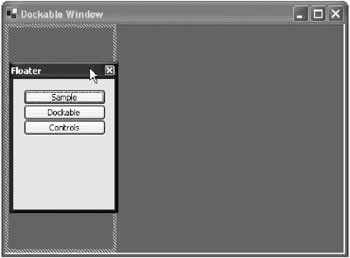
This is one of the most unusual pieces of code in this example. It works by adding the form to the Controls collection of another container, and maximizing it so that it can't be moved. This seemingly bizarre approach is possible as long as you disable the TopLevel property of the form. The docked window is shown in Figure 10-13.
One benefit of this approach is that it is fairly easy to create a system with multiple dockable windows, just by adding a separate Panel for each form into one fixed Panel control. You can set the Dock property for each form-containing panel to Top or Fill, ensuring that they automatically adjust their sizes to accommodate one another. You could even add splitter bars so the user could alter the relative size of each panel, as demonstrated in Chapter 5. However, this simple example is a long way away from the docking intelligence of Visual Studio. To perfect this system requires a lot of mundane code and tweaking. For example, in Visual Studio .NET forms aren't pulled out of a docked position based on the amount they are dragged, but also the speed at which the user drags them. Thus, a quick jerk will dislodge a docked form, while a slow pull will leave it in place. Try it out on your own-you'll find a lot of thought has been put into this behavior. Unfortunately, docked windows are a nonstandardized area of Windows programming, and one where the .NET framework still comes up short. |
||||||||||||||||||

The Last WordThis chapter explored MDI programming and design. The chapter began with an introduction to .NET's effortless MDI features, and showed how to use menu merging, simple synchronization, and MDI layout styles. It continued in more detail with a sophisticated example of document-view architecture, which provides the freedom to create multiple synchronized views hosted in separate windows or the same window. Finally, the chapter ended by delving into one of MDI design's hottest topics with an introduction to coding your own dockable windows. |
|||||||||||||||
Dynamic User Interface |
|||||||||||||||
Introduction
EAN: 2147483647
Pages: 142
- Challenging the Unpredictable: Changeable Order Management Systems
- ERP System Acquisition: A Process Model and Results From an Austrian Survey
- Enterprise Application Integration: New Solutions for a Solved Problem or a Challenging Research Field?
- Distributed Data Warehouse for Geo-spatial Services
- Data Mining for Business Process Reengineering
