Implementation of Online Photo Shop
|
All required interfaces and modules for this iteration have been defined, and we can now begin the implementation of our online shop. |
11.4.1 Creating a New Web Application
|
For the Web application of Online Photo Shop, we create a new project. The developer workstation can also serve as a Web server for the Online Photo Shop project. All that is required is a local installation of Microsoft Internet Information Server (IIS). To run the Web server on a different machine, for localhost you must substitute the server's machine name or IP address throughout the remainder of this chapter. |
After setting up IIS, start Microsoft Visual Studio.NET and choose New Project. Create a new C# ASP.NET Web application and set the location to http://localhost/OnlinePhotoShop. A new project will be created by the application wizard.
Next, we delete the unneeded default form Webform1.aspx from the project. Then we configure the version control for the source files. For this, open the Visual Studio Options via the Tools menu and use Visual Source Safe settings under the Source Control folder for the General and the SCC Provider settings (see Figure 11.5).
Figure 11.5. Source Control Settings for Visual Studio.NET
Next, we configure source control for the virtual directory that has been created. Open the Internet Services Manager console, which can be found in Control Panel under Administrative Tools. In Internet Services Manager, choose the virtual directory of OnlinePhotoShop in Default Web Site, and open the Properties window (see Figure 11.6). Click on the Server Extensions tab, and choose Visual Source Safe in the Version Control field. Now close and reopen the project on the developer machine to make sure that source control has been set up correctly.
Figure 11.6. Internet Services Manager
11.4.2 Parsing the XML Product Catalog
Let's first add the product catalog sample file products.xml from Listing 11.1 to the OnlinePhotoShop project. Just add a new XML file to the solution and fill it with the products shown in Listing 11.1.
Reading the Product List
Next, we define a new class for the ProductParser utility. This class provides the application with a set of helper methods that parse the XML product catalog for various products and options. Add a member variable mFilename of type string to the class, and set it within the constructor as shown in Listing 11.2. This member stores the file name of the product catalog throughout the lifetime of this class.
Listing 11.2 ProductParser.cs: The ProductParser Class Declaration
using System;
using System.Collections; // Hashtable, SortedList
using System.Xml; // XmlTextParser

namespace OnlinePhotoShop
{
 ///
/// Utility class providing helper methods to parse an XML /// product catalog file. ///
/// F:order_products /// F:products_options public class ProductParser { ///
/// Private member that stores the path of the XML product /// catalog file. ///
private string mFilename; ///
/// Constructor. ///
///Path of XML product catalog /// file. public ProductParser(string filename) { mFilename = filename; } } }
Now we add a method to parse the file for a list of all products. But before adding this method to the class, we must choose or define a return type. Because the list of products will be used as a data source for drop-down lists or similar controls, it is desirable to store each product identifier together with its description in a list. The .NET Framework provides the collections Hashtable and SortedList, in which all entries consist of a Key field and a Value field. The Hashtable class provides faster access to the elements, whereas SortedList, as the name implies, sorts the items in alphabetical order. We can use both classes to group product code and product name in each entry and return such a collection after all products have been parsed. Because we would like to bind the returned list directly to Web page controls, we use the SortedList class for the product and option list and use the Hashtable class for querying details on the products and options.
The .NET Framework class XmlTextReader provides a fast implementation of parsing XML documents. To find all products in the file, we must read all nodes and check the elements for the product tag. If a product tag has been found, the attribute's ID and name are added to the returned list. To avoid parsing additional tags within the same product, we call ReadInnerXml()and the parser advances to the next product tag. Listing 11.3 shows the implementation for a product list query.
Listing 11.3 ProductParser.cs: The ProductList() Method
///
/// Queries all products from a product catalog. ///
/// SortedList where product identifiers are stored in /// the Key field, and product names in the Value field. public SortedList ProductList() { SortedList table = new SortedList(); XmlTextReader parser = new XmlTextReader(mFilename); // read all nodes while(parser.Read()) { if (parser.NodeType == XmlNodeType.Element) { if (parser.Name == "product") { // found a product tag, add new item to list table.Add(parser.GetAttribute("id"), parser.GetAttribute("name")); // read the "inside" of the product tag // to advance to next product parser.ReadInnerXml(); } } } return table; }
Checking Progress through Informal Testing
To monitor our progress with the implementation and check whether the newly added parser method works, we add the Web form Browse.aspx to the project. From the Toolbox, drag and drop a DropDownList Web form control to the design view, and set the property (ID) to Product. The control must be initialized in the Page_Load method. To add code to this method, you must open the code behind file. Right-click on Browse.aspx in Solution Explorer, and select View Code to open Browse.aspx.cs. Locate the Page_Load method, and add the code to get the product list using the ProductParser class and associate it with the Product control.
Listing 11.4 shows how to associate the product list from the product parser with a DropDownList control. DataValueField selects which properties from the list entries represent the values that are set via the control and eventually transmitted back to the server. In our implementation we use the product identifiers stored in Key for this field. On the other hand, TextValueField defines the property of the list item that is displayed on the screen. We associate Value with this field, which contains the product name.
Listing 11.4 Browse.aspx.cs: The PageLoad() Method
private void Page_Load(object sender, System.EventArgs e)
{
 // Put user code to initialize the page here
 if (!Page.IsPostBack)
 {
 // Initialize the product parser
 ProductParser catalog = new
 ProductParser(Server.MapPath("products.xml"));

 // Get the product list and set it in the Product control
 SortedList products = catalog.ProductList();
 Product.DataValueField = "Key";
 Product.DataTextField = "Value";
 Product.DataSource = products;
 Product.DataBind();
 Product.SelectedIndex = 0;
 }
}
To better understand this, let's start the application and look at the HTML client code generated by IIS for the product list. Running the application requires setting the initial Web page via the project properties. Open the properties via the Project menu, and choose Configuration Properties, Debugging, where you enter Browse.aspx in the Start Page setting. Now the application can be started with the F5 function key.
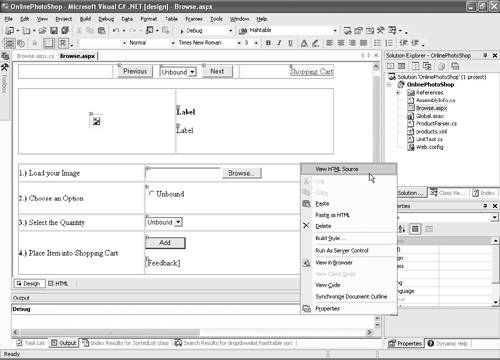
You will see a Web page with a drop-down list showing Prints and Cups. Let's take a look at the HTML code by selecting the menu View Source in Internet Explorer. Near the end of the code you will find the HTML tags for select and option, which represent the drop-down list.
[View full width]
TOP: 24px">PrintsCups
You can see that the id attribute of the product tag in the XML file has been placed in the value field of the option tags, but it is not visible to the user. The value field, however, contains the name attribute and is displayed on the screen. This example shows that we differentiate between the identifiers and the text displayed to the user.
Finding Product Options
We now extend the ProductParser class by an additional method to parse for each product's option list. The code in Listing 11.5 shows how to generate a list of options for a given product. As with the list of products, each node must be checked for the product key. If the product's identifier does not match the one passed as an argument to this method, all the inner content of this tag is skipped. We also skip all option tags of any product that does not match the passed argument. Therefore, any encountered option tag must belong to the wanted product and can be added to the table that is returned to the caller. For any encountered option tag the attributes id, name, and price are read and merged into the value field.
Listing 11.5 ProductParser.cs: The OptionList() Method
///
/// Queries all options of a given product from a product /// catalog. ///
///Product identifier whose available /// options will be returned. /// SortedList of product options. Each entry's Key /// field refers to the option identifier, and the Value field /// refers to the option name plus price. public SortedList OptionList(string product) { SortedList table = new SortedList(); XmlTextReader parser = new XmlTextReader(mFilename); // read all nodes while(parser.Read()) { if (parser.NodeType == XmlNodeType.Element) { switch(parser.Name) { case "product": if (parser.GetAttribute("id") != product) { // different product, // "eat" up all its content parser.ReadInnerXml(); } break; case "option": { // option found, add to list double price = Convert.ToDouble(parser.GetAttribute("price")); table.Add(parser.GetAttribute("id"), parser.GetAttribute("name") + " - " + price.ToString("C")); } break; } } } return table; }
Extracting the Product Details
Next, we add a method to parse for all information stored in the XML product catalog for a single product. In our product catalog example in Listing 11.1, each product has only two subtags (summary and image), but it would be better to implement the method in a more generic way so that we can add new tags to the product catalog as needed. To address this issue, all encountered tags within a product tag (except for the option fields) are added to a Hashtable object, which is then returned by this method. The tag names are used as keys to identify the values. Listing 11.6 shows the implementation of the ProductDetails() method.
Listing 11.6 ProductParser.cs: The ProductDetails() Method
///
/// Queries all properties of a given product from a product /// catalog excluding the product options. To query the product /// options, use OptionList(). ///
///Product identifier whose properties /// will be returned. /// Hashtable of properties. The keys in the hash table /// refer to the tag names, and the values refer to the text stored /// within the tag. The returned hash table also contains the /// product name attribute. public Hashtable ProductDetails(string product) { XmlTextReader parser = new XmlTextReader(mFilename); Hashtable table = new Hashtable(); string field = ""; // read all nodes while(parser.Read()) { switch (parser.NodeType) { case XmlNodeType.Element: { switch(parser.Name) { case "product": { // if not the wanted product read the inner xml // otherwise add product name to table if (parser.GetAttribute("id") != product) parser.ReadInnerXml(); else table["name"] = parser.GetAttribute("name"); }break; case "option": { // not interested in option tag parser.ReadInnerXml(); break; } default: { // store name of current tag field = parser.Name; break; } } } break; case XmlNodeType.Text: { // store the content using the tag name // as key in the hash table table[field] = parser.ReadString(); } break; } } return table; }
We need a similar implementation for a given product option, a task we leave to you.
Adding Unit Tests
|
At this point the implementation of the ProductParser class is complete, and some informal "testing" has been done. It is a good practice to add the unit tests before continuing with the implementation of the next class. This practice actually reduces integration time in most cases because malfunctions are discovered early on. From our experience the greatest dangers come from not doing unit testing early, instead trying things on-the-fly during application development. The latter approach gives the developer the wrong impression that things are working correctly although there are hidden bugs. These problems usually impact many more people in their later work and cause increased cost as well as significant schedule delays. |
We have been involved in many large projects and have seen many software malfunctions even in simple utility classes implemented by senior software engineers. In one project, an insufficiently tested and late-tested utility class to read configuration values from a text file led to several weeks' delay in the release schedule of a large project involving several dozen people. The class had been implemented by the technical leader of the project, and therefore no one suspected it of having any errors. But very late during the system tests, many problems occurred when the team incorporated this class with other components and tested various application configurations. A project must minimize the risk of such situations.
As we did with the photo editor, we continue using the NUnit framework for our unit testing by following these steps:
- Add a new class UnitTest: This class will encapsulate all unit test methods for the Online Photo Shop application.
- Add a reference to nunit.framework.dll: Add a reference to OnlinePhotoShop project in Solution Explorer.
- Use the NUnit.Framework namespace: Add a state to use NUnit.Framework to the UnitTest.cs file. For simplicity, we also add the namespaces needed for the test code at this point: System.IO,System.Runtime.Serialization.Formatters.Binary, System.Collections, System.Xml, and System.Configuration.
- Set the [TestFixture] attribute: The [TestFixture] attribute must be set for the UnitTest class in the file UnitTest.cs.
To validate the correctness of the implementation, we need to know about the data in the XML product catalog. One way is to manually create a product catalog only for testing containing some known values. Another way is to programmatically create a synthetic product catalog file in which each element or attribute has a unique value. The latter choice has the advantage that later it would be easy to add stress or performance tests that could test against thousands of products and product options. Even though there is no such requirement for Online Photo Shop, we use the approach of a generated product catalog over the manually created one.
Listing 11.7 shows an XML product catalog file defining two products. In this file every element or attribute value is composed of the element's or attribute's name plus a sequence number for each product and option. A test can now very easily validate the content of the file by comparing element values against their names.
Listing 11.7 Generated Product Catalog Example
 product_summary1
 product_image1option_summary11option_summary12


 product_summary2
 product_image2option_summary21option_summary22
In Listing 11.8 the method CreateProductCatalog shows how this synthetic product catalog file can be created programmatically.
Again, the importance of unit testing can be underlined by an error in the XmlTextReader class of .NET Framework 1.1 when you use the ReadInnerXML method to parse XML text files that do not use any indentation. A minimal level of unit testing should always be done even for classes provided by external frameworks or toolkits, including the .NET Framework itself. In a fairly short time, Microsoft has developed one of the largest class libraries ever built, and it would be a miracle if the problem that we found here were the last one.
Listing 11.8 UnitTest.cs: The CreateProductCatalog() Method
///
/// Creates a temporary XML product catalog with a given set of products and options. ///
///Number of product entries in the catalog. ///Number of options for each product. /// File path of the generated XML product catalog. string CreateProductCatalog(int products, int options) { // Get path for a temporary file string file = System.IO.Path.GetTempFileName(); // create a temp XML file XmlTextWriter writer = new XmlTextWriter(File.CreateText(file)); // Bug in .NET Framework, ReadInnerXML works only indented writer.Formatting = System.Xml.Formatting.Indented; writer.WriteStartDocument(); writer.WriteStartElement("doc"); writer.WriteStartElement("products"); for (int p = 1; p <= products; p++) { writer.WriteStartElement("product"); writer.WriteAttributeString( "id", "product_id" + p.ToString()); writer.WriteAttributeString( "name", "product_name" + p.ToString()); writer.WriteElementString( "summary", "product_summary" + p.ToString()); writer.WriteElementString( "image", "product_image" + p.ToString()); for (int o = 1; o <= options; o++) { writer.WriteStartElement("option"); writer.WriteAttributeString( "id", "option_id" + p.ToString() + o.ToString()); writer.WriteAttributeString( "name", "option_name" + p.ToString() + o.ToString()); writer.WriteAttributeString( "price", p.ToString() + "." + o.ToString()); writer.WriteElementString("summary", "option_summary" + p.ToString() + o.ToString()); writer.WriteElementString("weight", "0." + p.ToString() + o.ToString()); writer.WriteEndElement(); // option } writer.WriteEndElement(); // product } writer.WriteEndElement(); // products writer.WriteEndElement(); // doc writer.WriteEndDocument(); writer.Close(); return file; }
Writing a test to validate the ProductList and OptionList methods of the ProductParser class is now very simple. Listing 11.9 shows a method that tests both lists. First, we create a temporary product catalog with 10 products, each product having five options. Then each item in the product list is checked for correctness. The product name must simply match the identifier used for the lookup. To validate the functionality of the OptionList method, we pick one product and retrieve its options. The validation of the option list is similar to that of the product list.
Listing 11.9 UnitTest.cs: The ProductParserListsTest() Method
///
/// Test the ProductList and OptionList methods of ProductParser. ///
/// F:order_products /// F:products_options [Test] public void ProductParserListsTest() { string tmpFile = this.CreateProductCatalog(10, 5); ProductParser parser = new ProductParser(tmpFile); // check product list SortedList p = parser.ProductList(); Assertion.AssertEquals(p.Count, 10); for (int i = 0; i < p.Count; i++) { Assertion.AssertEquals( p["product_id" + (i + 1).ToString()], "product_name" + (i + 1).ToString()); } // check one option list, pick one from the center SortedList o = parser.OptionList("product_id3"); Assertion.AssertEquals(o.Count, 5); for (int i = 0; i < o.Count; i++) { Assertion.AssertEquals( o["option_id3" + (i + 1).ToString()], "option_name3" + (i + 1).ToString() + " - " + (3 + (i + 1) / 10.0f).ToString("C")); } File.Delete(tmpFile); }
When running the test using the NUnit GUI, we are surprised by a failed test. Looking closer, we can see that an error occurs when a file is deleted (see Figure 11.7).
Figure 11.7. Failed Unit Test
Let's assume that the access rights to the temporary file allow its deletion; perhaps the cause of this error is that the file is still in use. Although the .NET runtime frees all unreferenced objects after garbage collection kicks in, the time when objects will be destroyed is not determined. Because we do not close the file handle before any of the parsing methods returns to the caller, the XmlTextParser object goes out of scope with an open file handle. So only after the garbage collection picks up and destroys this object can the file finally be closed. Because the parsing methods are used very frequently in the Online Photo Shop application, this would lead to increasing consumption of file handles in a system. To avoid problems that can be caused by this, we add parser.Close() before returning from the parsing methods ProductList, OptionList, ProductDetails, and OptionDetails. Compiling the assembly and rerunning the test now results in a passed test.
Next, we add the method ProductParseDetails to test the ProductDetails and OptionDetails methods. As with the preceding test, the implementation is straightforward. We create a temporary product catalog and validate some parsed elements against the synthetic data stored in the catalog. Listing 11.10 shows the test code.
Listing 11.10 UnitTest.cs: The ProductParserDetailsTest() Method
///
/// Test the ProductDetails and OptionDetails methods of ProductParser. ///
/// F:order_products /// F:products_options [Test] public void ProductParserDetailsTest() { string tmpFile = this.CreateProductCatalog(20, 3); ProductParser parser = new ProductParser(tmpFile); // check product details of the 20th entry Hashtable p = parser.ProductDetails("product_id20"); Assertion.AssertEquals((string) p["name"], "product_name20"); Assertion.AssertEquals( (string) p["summary"], "product_summary20"); Assertion.AssertEquals( (string) p["image"], "product_image20"); // check some option details (3rd product, 2nd option) Hashtable o = parser.OptionDetails( "product_id3", "option_id32"); Assertion.AssertEquals((string) o["name"], "option_name32"); Assertion.AssertEquals( (string) o["summary"], "option_summary32"); Assertion.AssertEquals( (string) o["price"], (3.2f).ToString()); File.Delete(tmpFile); }
11.4.3 The Online Shop Portal
|
Having implemented a product catalog parser, we can now extend the Browse.aspx Web form to allow cycling through all products and displaying the available options for each product. We start by defining the basic layout of the page according to Figure 11.2. Open the Browse.aspx design window, and switch from GridLayout to FlowLayout in the Documents Properties field. Then add three borderless tables (header, product, and order section) to format the sections using multiple columns. Figure 11.8 shows the table layout for Browse.aspx. |
Figure 11.8. Table Layout for Browse.aspx
After adding the tables, place the previously added Product drop-down list in the center column of the header section. Changing the product selection invalidates all the information currently displayed, so we set this control's AutoPostBack property to True. In this way, a change in the product selection will trigger an automatic response to the Web server.
Before adding new code to the page, let's complete the design of the form by adding all controls:
- Header: Drag and drop two Button controls next to the Product drop-down list. Set the ID and Text properties for the left button to Previous, and for the right button to Next. Then add a Hyperlink control to the right column, and change the Text property to Shopping Cart and the NavigateUrl to Cart.aspx, which will be implemented later in this chapter.
- Product: Add two Label controls to the product description column of the product section. Set the label ID properties to ProductHeading and ProductSummary. Also add an Image control to the product image column, and change its ID property to ProductImage.
- Order: Add a File Browser control for the image to the form. Drag and drop a File field from the HTML section in the Toolbox into the browse column. Right-click on the control and select Run As Server Control. Then change the id property of this control to Image. Now place a RadioButtonList into the option column, and set the ID to Option. The quantity column is filled with a DropDownList control, whose ID property is set to Quantity. To finish the order section, place a Button control in the submit column. Change the ID property of the button to AddButton, and the Text property to Add. Also add another label for user feedback below the button. Set the ID to Feedback, and clear the Text property so that nothing is displayed by default.
Figure 11.9 shows the completed design of the Browse.aspx form.
Figure 11.9. Browse.aspx Design
Because we want to upload binary data, we also need to manually check the HTML code generated by the form designed in Visual Studio. You can switch to the HTML view using the context menu of the design window. First, we make sure that the
tag spans the entire page (from
to ). This is most likely not the case, and you must manually move the form closing tag right before the tag. Next, add the encType attribute to the form tag, and set its value to "multipart/form-data". This allows transmission of binary files (in our case, images) to the server (see Listing 11.11).
Listing 11.11 Browse.aspx: Modifying the
Tag
[View full width]
<%@ Page language="c#" Codebehind="Browse.aspx.cs" AutoEventWireup="false"Inherits="OnlinePhotoShop.Browse" %>
Browse
. . . }
The design of the form is complete, and it's time to add the logic behind it. Open the code for the form by right-clicking on Browse.aspx in Solution Explorer and selecting View Code. We first implement the utility method shown in Listing 11.12 for the Browse form class, which updates all controls depending on the currently selected product.
Listing 11.12 Browse.aspx.cs: The UpdateProduct() Method
[View full width]
///
/// Updates the ProductHeading, ProductSummary, ProductImage, and Option controls depending on the currently selected product in the Product control. /// private void UpdateProduct() { ProductParser catalog = new ProductParser(Server.MapPath("products.xml")); // set the available options for this product Option.DataValueField = "Value"; Option.DataTextField = "Text"; Option.DataSource = catalog.OptionList(Product.SelectedValue); Option.DataBind(); Option.SelectedIndex = 0; // get the product details System.Collections.Hashtable details = catalog.ProductDetails(Product.SelectedValue); // update controls in product section if (details["name"] != null) ProductHeading.Text = (string) details["name"]; if (details["summary"] != null) ProductSummary.Text = (string) details["summary"]; if (details["image"] != null) ProductImage.ImageUrl = (string) details["image"]; }
The UpdateProduct method uses the helper class ProductParser (implemented earlier in this chapter) to retrieve the product options and details from the XML catalog. This method must be invoked from the Page_Load method to properly initialize all controls. Also, the Quantity control must be associated with a data source containing numbers. This list is also generated in the Page_Load method. Listing 11.13 shows the updated code.
Listing 11.13 Browse.aspx.cs: Updated Page_Load() Method
private void Page_Load(object sender, System.EventArgs e)
{
 // Put user code to initialize the page here
 if (!Page.IsPostBack)
 {
 // Initialize the product parser
 ProductParser catalog = new
 ProductParser(Server.MapPath("products.xml"));

 // Get the product list and set it in the Product control
 Hashtable products = catalog.ProductList();
 Product.DataValueField = "Key";
 Product.DataTextField = "Value";
 Product.DataSource = products;
 Product.DataBind();
 Product.SelectedIndex = 0;

 // Fill Quantity with a list of numbers
 ArrayList numbers = new ArrayList();
 for (int i = 1; i <= 20; i++)
 {
 numbers.Add(i.ToString());
 }
 Quantity.DataSource = numbers;
 Quantity.DataBind();
 Quantity.SelectedIndex = 0;

 // Update all other controls
 this.UpdateProduct();
 }
}
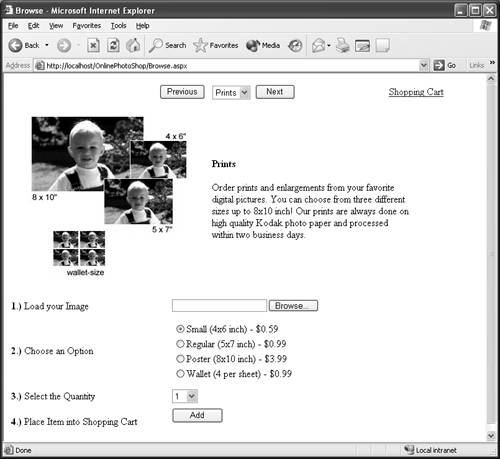
Now that we have properly initialized the form, it is time to give it a first try in the Web browser. To launch the form from Visual Studio, you must set it as the start page of the project. Select Debugging in the Configuration Properties section of the project properties, and set the Start Page field to Browse.aspx. Now the form can be launched in Internet Explorer from Visual Studio by selecting Debug and Start or by pressing F5. The default product should be cups, giving two options to choose from.
If you are wondering about the error icon in the image, this is caused by the missing image file that has been specified in the XML product catalog. To solve this problem, create an img folder under the OnlinePhotoShop project, and copy two images for the cups and prints product categories there.
Although the page looks nearly complete, we have not yet implemented the navigation logic. To do so, go back to the design view and double-click on the Product drop-down list control. Visual Studio generates a message handler for the event of a changed selection in the drop-down list. All you need to do is to call the UpdateProduct method to update the option list and product description fields.
Next, double-click on the buttons in the header section. This will create event handlers for the event of those buttons being pressed or clicked. Fill the handlers with code that increments or decrements the selected index of the Product control. There, we also need to consider the boundary conditions of being at the start or end of the product list. After the implementation of the event handlers shown in Listing 11.14, we can navigate through the product catalog using the drop-down list as well as the Next and Previous buttons.
Listing 11.14 Browse.aspx.cs: Event Handlers
[View full width]
///
/// Called when a new product is selected in the Product control. Updates the product description and optionlist by calling UpdateProduct(). /// ///Sending object. ///Event arguments. private void Product_SelectedIndexChanged(object sender, System.EventArgs e) { this.UpdateProduct(); } /// /// Called when the Next button is pressed. Selects the next product in the list and updates the product description and optionlist by calling UpdateProduct(). /// ///Sending object. ///Event arguments. private void Next_Click(object sender, System.EventArgs e) { if ((Product.SelectedIndex + 1) < Product.Items.Count) { Product.SelectedIndex++; } else { Product.SelectedIndex = 0; } this.UpdateProduct(); } /// /// Called when the Previous button is pressed. Selects the previous product in the list and updates the product description and optionlist by calling UpdateProduct(). /// ///Sending object. ///Event arguments. private void Previous_Click(object sender, System.EventArgs e) { if (Product.SelectedIndex > 0) { Product.SelectedIndex; } else { Product.SelectedIndex = Product.Items.Count - 1; } this.UpdateProduct(); }
This completes the implementation of the requirement keys F:products_browse and F:product_options. The keys left to implement in this iteration are F:product_shopping_cart and F:product_customize. Figure 11.10 shows the form rendered by Internet Explorer.
Figure 11.10. Rendered Browse.apsx
11.4.4 The Shopping Cart
To start the implementation of the shopping cart functionality, we design a class that describes a single order item. This class is very simple and mainly provides data encapsulation by using get accessors. The properties to be implemented are as follows:
- Product: Product identifier of the item
- Option: Identifier of the option selected for this item
- Quantity: Quantity of items ordered
- ClientPath: Path for image file on the client computer
- ServerPath: Path of the uploaded image
Add a new class ShoppingItem to the project, and add members and get accessors for those properties.
Serialization for the ASP.NET State Server
Because of the architectural requirement C:online_shop_stateservice (see Chapter 4), this class must be serializable to allow the usage of the ASP Session State service. To make a class serializable, it must be inherited from ISerializable and must implement the serialization function as well as a deserialization constructor (see Listing 11.15). Furthermore, the class must have the Serializable attribute set, and the permission flags for GetObjectData must allow the SerializationFormatter.
To switch the application to use the session state service from ASP.NET, we must change the Web.config file. Locate the sessionState tag in the configuration section, and change the value of the mode attribute from InProc to StateServer. To run the application now, we must first start the service called "ASP.NET State Service". You do so by running the following command:
net start "ASP.NET State Service"
Listing 11.15 ShoppingItem.cs: Serialization
[View full width]
using System;
using System.Runtime.Serialization;
using System.Security.Permissions;

namespace OnlinePhotoShop
{
///
/// Class that contains all information to describe one item in the shopping cart ( product id, option id, quantity, and image locations). /// [Serializable()] public class ShoppingItem : ISerializable { #region ISerializable Members /// /// The serialization function. /// ///The object to be populated with serialization information.param> ///The destination context of the serialization. [SecurityPermissionAttribute(SecurityAction.Demand,SerializationFormatter=true)] public void GetObjectData(SerializationInfo info, StreamingContext context) { info.AddValue("Product", mProduct); info.AddValue("Option", mOption); info.AddValue("Quantity", mQuantity); info.AddValue("ClientPath", mClientPath); info.AddValue("ServerPath", mServerPath); } /// /// The deserialization constructor. /// ///The object populated with serialization information. ///The source context of the serialization. public ShoppingItem(SerializationInfo info, StreamingContext context) { mProduct = (string) info.GetValue("Product", typeof(string)); mOption = (string) info.GetValue("Option", typeof(string)); mQuantity = (int) info.GetValue("Quantity", typeof(int)); mClientPath = (string) info.GetValue("ClientPath", typeof(string)); mServerPath = (string) info.GetValue("ServerPath", typeof(string)); } #endregion ...
The ShoppingCart Class
The next step is to implement the ShoppingCart class. This is a collection class to which elements of type ShoppingItem can be added. To uniquely identify items placed in the shopping cart, we inherit the class from Hashtable. An integer value is used as a key that will be incremented for each newly added item. Add a new class ShoppingCart inherited from Hashtable to the project, and define the following two members:
- mNextKey (int): A private enumerator for unique numbers. This enumerator is incremented every time a new item is added to the list.
- mID (string): A private storage for a unique identifier string (SessionID). This string is used to generate server-side file names for uploaded images.
In the constructor of this class, you must initialize the two members. Instead of putting in new logic to generate unique identifiers for each shopping cart object, we make this a required parameter for the constructor. In this way, the Web form instantiating the object can pass the SessionID of the current HTTP request, which is ensured to be unique by design.
As with the ShoppingItem class, the ShoppingCart class must be inherited from ISerializable. Add this parent class and the Serializable attribute to the class definition. Then implement the serialization function and deserialization constructor to serialize the two added member variables. Both methods must call the base class so that the items stored in the collection are also serialized. Listing 11.16 shows the implementation of the ShoppingCart class to this point.
Listing 11.16 ShoppingCart.cs
[View full width]
using System;
using System.Collections;
using System.Runtime.Serialization;
using System.Security.Permissions;
using System.Configuration;

namespace OnlinePhotoShop
{
///
/// Class that stores a number of shopping items associated with a unique key. This class and the items stored in it are serializable and allow the class to be stored within a Session object even when using ASP Session State service. /// [Serializable()] public class ShoppingCart : Hashtable, ISerializable { /// /// Private enumerator for unique numbers. This enumerator is incremented every time a new item is added to the list. /// private int mNextKey; /// /// Private storage for unique identifier string (SessionID). This string is used to generate server-side file names for uploaded images. /// private string mID; #region ISerializable Members /// /// The serialization function. /// ///The object to be populated with serialization information.param> ///The destination context of the serialization. [SecurityPermissionAttribute(SecurityAction.Demand,SerializationFormatter=true)] override public void GetObjectData(SerializationInfo info, StreamingContext context) { base.GetObjectData(info, context); info.AddValue("NextKey", mNextKey); info.AddValue("ID", mID); } /// /// The deserialization constructor. /// ///The object populated with serialization information. ///The source context of the serialization. public ShoppingCart(SerializationInfo info, StreamingContext context) : base(info, context) { mNextKey = (int) info.GetValue("NextKey", typeof(int)); mID = (string) info.GetValue("ID", typeof(string)); } #endregion /// /// Constructor. /// ///SessionID of current HTTP request. public ShoppingCart(string id) { mNextKey = 0; mID = id; } } }
Now we implement AddItem, a method to add new items to the shopping cart. This method takes a number of input parameters posted by the Web form. It then generates a unique file name from the mID and mKey members to store the image file on the server. After the image is saved, a new ShoppingItem is stored in the hash table. The code for this method is shown in Listing 11.17.
Listing 11.17 ShoppingCart.cs: The AddItem() Method
[View full width]
///
/// /// Adds a new item to the shopping cart. /// ///Product identifier. ///Selected product options. ///Image file to customize the item with. ///Quantity of the ordered item. public void AddItem(string product, string option, System.Web.HttpPostedFile image, int quantity) { if (image != null) { // pick a new key int key = mNextKey++; // save the image to the upload directory string extension = image.FileName.Substring(image.FileName.LastIndexOf(".")); string store = ConfigurationSettings.AppSettings["ImageStore"]; string path = store + "\" + mID + "_" + key.ToString() + extension; image.SaveAs(path); // add the item to the order list this[key] = new ShoppingItem( product, option, quantity, image.FileName, path); } }
Configuring the Web Application
The ShoppingCart class needs a storage directory for the uploaded images. Instead of hard-coding the path into the code, we read it from the application configuration settings. To add this setting to the OnlinePhotoShop configuration file, open the Web.config file of the project and add the following section following the system.web section:
The value attribute of the ImageStore key must be set to the image storage location on the server. A network path also can be specified if the images are stored on a dedicated file server. Just make sure that a correct path is entered that specifies an existing directory.
Shopping Cart Unit Tests
Now it is time to add new unit tests for ShoppingItem and ShoppingCart. Both classes are serializable to allow the usage of ASP.NET's session state service. To test the serialization of any class, we add a SerializationTest method to the UnitTest class that serializes a given class in a binary file and then deserializes a class from the same file. This class is then returned to the caller.
|
The other two methods (ShoppingItemTest and ShoppingCartTest) in Listing 11.18 are the test methods for the ShoppingItem and ShoppingCart classes. There, an instance of the class is created with known properties. Then another instance of the class is created using the SerializationTest method, and we validate that all properties of both instances match. |
Listing 11.18 UnitTest.cs: The ShoppingItem and ShoppingCart Unit Tests
[View full width]
///
/// Helper function that serializes an object into a stream and returns /// the deserialized object from the same stream. /// ///Object for serialization. /// Deserialized object. Object SerializationTest(Object obj) { // Opens a file and serializes the object into it // in binary format string tmpFile = System.IO.Path.GetTempFileName(); Stream stream = File.Open(tmpFile, FileMode.Create); BinaryFormatter bformatter = new BinaryFormatter(); bformatter.Serialize(stream, obj); stream.Close(); //Opens file and deserializes the object from it stream = File.Open(tmpFile, FileMode.Open); bformatter = new BinaryFormatter(); Object deserialized = bformatter.Deserialize(stream); stream.Close(); return deserialized; } /// /// Tests the ShoppingItem class. /// /// F:product_shopping_cart [Test] public void ShoppingItemTest() { // test constructor ShoppingItem item = new ShoppingItem("product", "option", 123, "clientPath", "serverPath"); Assertion.AssertEquals(item.Product, "product"); Assertion.AssertEquals(item.Option, "option"); Assertion.AssertEquals(item.Quantity, 123); Assertion.AssertEquals(item.ClientPath, "clientPath"); Assertion.AssertEquals(item.ServerPath, "serverPath"); // test (de)serialization ShoppingItem item2 = (ShoppingItem) this.SerializationTest(item); Assertion.AssertEquals(item2.Product, "product"); Assertion.AssertEquals(item2.Option, "option"); Assertion.AssertEquals(item2.Quantity, 123); Assertion.AssertEquals(item2.ClientPath, "clientPath"); Assertion.AssertEquals(item2.ServerPath, "serverPath"); } /// /// Tests the ShoppingCart class. /// /// F:product_shopping_cart [Test] public void ShoppingCartTest() { // test constructor ShoppingItem item = new ShoppingItem("product", "option", 123, "clientPath", "serverPath"); ShoppingCart cart = new ShoppingCart("id"); // AddItem requires an HttpPostedFile // if null, nothing should happen cart.AddItem("product", "option", null, 123); Assertion.AssertEquals(cart.Count, 0); // Add two keys to test serialization cart.Add("key1", new ShoppingItem("product1", "option1", 1, "clientPath1", "serverPath1")); cart.Add("key2", new ShoppingItem("product2", "option2", 2, "clientPath2", "serverPath2")); ShoppingCart cart2 = (ShoppingCart) this.SerializationTest(cart); Assertion.AssertEquals(cart2.Count, 2); // Check one property (already tested in ShoppingItemTest) Assertion.AssertEquals(((ShoppingItem)cart2["key1"]).Product, "product1"); Assertion.AssertEquals(((ShoppingItem)cart2["key2"]).Product, "product2"); }
Integration of the Shopping Cart into the Product Browser
|
After adding the unit test, we integrate the shopping cart into the Web form Browse.aspx. By double-clicking on the Add button in the design view, we add to the Browse class a new event handler for pressing this button. Within this handler the shopping cart needs to be retrieved from the current session, and if no shopping cart is yet stored a new one must be created. Then a new item will be added to that cart, and the feedback label updated. Listing 11.19 shows the code for the event handler. |
Listing 11.19 Browse.aspx.cs: The Add Button Event Handler
[View full width]
///
/// Called when Add button is pressed. Adds a new item of the currently selected product, option, and quantity to the shopping cart. /// ///Sending object. ///Event arguments. private void AddButton_Click(object sender, System.EventArgs e) { // Report error if no image is selected if (Image.PostedFile.ContentLength == 0) { Feedback.Text = "Before adding an item to the shopping cart you must select an image."; Feedback.ForeColor = System.Drawing.Color.Red; } else { try { // retrieve shopping cart information from session object ShoppingCart cart = (ShoppingCart) Session["ShoppingCart"]; if (cart == null) { // no cart in this session yet, create one cart = new ShoppingCart(Session.SessionID); Session["ShoppingCart"] = cart; } // add the order cart.AddItem( Product.SelectedValue, Option.SelectedValue, Image.PostedFile, Quantity.SelectedIndex + 1); Feedback.Text = Quantity.SelectedValue + " item(s) added to your shopping cart."; Feedback.ForeColor = System.Drawing.Color.Black; } catch { Feedback.Text = "The item could not be added to the shopping cart. Please try again another time."; Feedback.ForeColor = System.Drawing.Color.Red; } } }
Now, when the page is launched in the Web server, navigating through the product catalog should work as well as adding an item from it to the shopping cart. Each time a product is added, the feedback label is updated with the selected quantity of this item. What is left to do is to create a new form to display all the items in the shopping cart.
Shopping Cart Web Page
Add a new Web form, Cart.aspx, to the project. As with Browser.aspx, switch to FlowLayout and design the form according to Figure 11.3 using tables. Add two Hyperlinks controls to the header that navigate back to Browse.aspx or to the Checkout.aspx form, which is implemented in the next iteration. For the table of shopping cart items, add only the header and the footer of the empty table. The items will be generated using the shopping cart object stored in the current session. The only control that needs to be added to this table is a label next to the Total column displaying the total cost of the order. Add a Label control and set the ID property to Total.
To complete the page design, switch to the HTML view and place a Repeater control between the header and the footer of the shopping cart table, as shown in Listing 11.20.
Listing 11.20 Cart.aspx: The Repeater Control
 '
 border="0" width="100">


 <%# DataBinder.Eval(Container.DataItem, "Product") %>


 <%# DataBinder.Eval(Container.DataItem, "Option") %>


 <%# DataBinder.Eval(Container.DataItem, "Quantity") %>

 Remove


 <%# DataBinder.Eval(Container.DataItem, "Price") %>
Using the tags in the style <%# DataBinder.Eval(Container.DataItem, "Property") %> you can insert property values from the bound data source into the table. The class ShoppingItemView provides those properties needed to display the shopping cart.
Immediately following the quantity value we add a LinkButton control that allows the customer to remove an item from the cart. Because this button is inserted for each row in the table, an argument must be specified to identify the item. Therefore, ShoppingItemView must also provide the hash table key of the item.
Figure 11.11 shows the completed design of the Cart.aspx form.
Figure 11.11. Cart.aspx: Design
Next, we implement the ShoppingItemView class needed to generate the table. This class has properties named after the table columns: Image, Product, Option, Quantity, and Price. It must also provide an accessor to the hash table key that is used in the shopping cart. Using this key, we can easily remove an item from the cart if the customer wants to do this. Furthermore, we add an accessor to the unformatted price of the item so that the total for the entire shopping cart can be calculated easily. Because the constructor of the class will format a given item for display, we need to pass the product catalog file so that description and attributes can be queried from there via the ProductParser utility class. Also, we pass the hash table key because the key is not known to instances of ShoppingItem itself. Listing 11.21 shows the code for the ShoppingItemView class.
Listing 11.21 ShoppingItemView.cs
///
/// Formatted version of ShoppingItem for displaying it in the shopping cart table. /// /// F:product_shopping_cart public class ShoppingItemView { /// /// Private member to store the hash table key of the item. /// int mKey; /// /// Private member to store the product name. /// string mProduct; /// /// Private member to store the option name. /// string mOption; /// /// Private member to store the quantity of the ordered item. /// int mQuantity; /// /// Private member to store the image path. /// string mImage; /// /// Private member to store the price of the ordered items. /// double mPrice; /// /// Constructor. /// ///Path of the product catalog file. ///Shopping cart hash table key of the item. ///Shopping item that will be formatted for output. public ShoppingItemView(string file, int key, ShoppingItem item) { mKey = key; mImage = item.ClientPath; mQuantity = item.Quantity; // get the product name ProductParser parser = new ProductParser(file); mProduct = (string) parser.ProductDetails(item.Product)["name"]; // get the option name and item price System.Collections.Hashtable details = parser.OptionDetails(item.Product, item.Option); mOption = (string) details["name"]; double price = System.Convert.ToDouble((string) details["price"]); mPrice = (price * item.Quantity); } /// /// Key in shopping cart hash table. /// public string Key { get { return mKey.ToString(); } } /// /// Product name. /// public string Product { get { return mProduct; } } /// /// Option name. /// public string Option { get { return mOption; } } /// /// Quantity. /// public int Quantity { get { return mQuantity; } } /// /// Path of image file. /// public string Image { get { return mImage; } } /// /// Formatted price for this item. /// public string Price { get { return mPrice.ToString("C"); } } /// /// Unformatted price for this item. /// public double Subtotal { get { return mPrice; } } }
|
Before completing the integration into a Web form, we add another small unit test for the ShoppingItemView class. Using the synthetic product catalog, again it is easy to validate whether the ShoppingItemView class has replaced a product and option identifier with the correct product and option name. Listing 11.22 shows the code for the ShoppingItemView unit test. |
Listing 11.22 UnitTest.cs: The ShoppingItemViewTest() Method
[View full width]
///
/// Tests the ShoppingItemView class. /// /// F:product_shopping_cart [Test] public void ShoppingItemViewTest() { string tmpFile = this.CreateProductCatalog(2, 2); // create a shopping item to format for viewing ShoppingItem item = new ShoppingItem("product_id1", "option_id12", 10, "clientPath", "serverPath"); // create the formatted view class ShoppingItemView view = new ShoppingItemView(tmpFile, 555, item); Assertion.AssertEquals(view.Key, "555"); Assertion.AssertEquals(view.Product, "product_name1"); Assertion.AssertEquals(view.Option, "option_name12"); Assertion.AssertEquals(view.Quantity, 10); Assertion.AssertEquals(view.Subtotal, 12); // 1.20 * 10 Assertion.AssertEquals(view.Price, 12.ToString("C")); Assertion.AssertEquals(view.Image, "clientPath"); File.Delete(tmpFile); }
|
The final task in this iteration is to add the initialization and the button event handler code of the Repeater control to the code behind Cart.aspx. The data binding for the Repeater control needs to be updated on page initialization as well as after an item has been removed. Therefore, we add a new method, UpdateCart, that generates a formatted list of shopping cart items and updates the total amount of the order. Listing 11.23 shows the implementation of this method. |
Listing 11.23 Cart.aspx.cs: The UpdateCart() Method
///
/// Generates a list of formatted shopping cart items and binds /// them to the repeater control. /// public void UpdateCart() { // retrieve shopping cart information from session object ShoppingCart cart = (ShoppingCart) Session["ShoppingCart"]; if (cart == null) { cart = new ShoppingCart(Session.SessionID); Session["ShoppingCart"] = cart; } // copy shopping cart items into a formatted list ArrayList list = new ArrayList(); IDictionaryEnumerator i = cart.GetEnumerator(); double total = 0; while(i.MoveNext()) { ShoppingItemView item = new ShoppingItemView( Server.MapPath("products.xml"), (int) i.Key, (ShoppingItem) i.Value); list.Add(item); total += item.Subtotal; } // bind the formatted list to the table Table.DataSource = list; Table.DataBind(); // update total cost label Total.Text = total.ToString("C"); }
To properly initialize the table, the UpdateCart method must be invoked within the Page_Load method of this class if the page is not being posted back.
Because we defined the header and footer of the shopping cart table outside the Repeater control, it is not visible in the design view. Therefore, we must manually add a command handler for the Remove button placed inside the Repeater control. Do this by opening the region Web Form Designer-generated code and adding the following line to the InitializeComponent method:
[View full width]
this.Table.ItemCommand += new System.Web.UI.WebControls.RepeaterCommandEventHandler(this. Table_ItemCommand);
Next, the message handler method needs to be added to the class. Listing 11.24 shows the code that gets the hash table key from the command argument and deletes the item along with the image file associated with it.
Listing 11.24 Cart.aspx.cs: The Button Event Handler
[View full width]
///
/// Command handler for buttons pressed within the table (remove). /// ///Source object. ///Event argument. private void Table_ItemCommand(object source, System.Web.UI.WebControls. RepeaterCommandEventArgs e) { // remove from cart string cmd = (string) e.CommandArgument; int key = System.Convert.ToInt32(cmd); ShoppingCart cart = (ShoppingCart) Session["ShoppingCart"]; if (cart != null) { System.IO.File.Delete( ((ShoppingItem) cart[key]).ServerPath); cart.Remove(key); this.UpdateCart(); } }
Introducing .NET
- Introducing .NET
- The Need for .NET
- The .NET Framework
- The C# Language
- Debugging and the IDE
- References for Further Reading
Introducing Software Engineering
- Introducing Software Engineering
- Introducing Software Engineering Practices
- Choosing a Software Development Model
- Commonly Used Software Development Models
- Conclusion
- References for Further Reading
A .NET Prototype
- Getting Started
- Evaluating .NET for Windows Client Applications
- Our First .NET Application
- Prototyping
- Implementing the SmartNotes Application
- Visual Studio.NET: Platform of Choice
- References for Further Reading
Project Planning
- Project Planning
- The Project Vision and Business Case
- The Initial Use Case Model
- Project Requirements
- Initial Project Planning
- Initial Risk Analysis
- Initial Requirements Analysis and Design
- Conclusion
- References for Further Reading
The Photo Editor Application
- The Photo Editor Application
- The Refined Project Vision and Business Case
- Refined Requirements for Online Photo Shop
- Analysis of the Photo Editor Requirements
- Design of the Photo Editor Application
- The Detailed Project Schedule
- Implementation of the Photo Editor Application
- Unit Tests
- Conclusion
- References for Further Reading
GDI+ Graphics Extensions
- GDI+ Graphics Extensions
- Requirements for the GDI+ Extensions
- Analysis of the GDI+ Extensions Requirements
- Design of the GDI+ Extensions
- Project Management Issues
- GDI+ Programming
- Drawing GDI+ Primitives
- Unit Tests
- Conclusion
- References for Further Reading
Advanced GDI+ Operations
- Advanced GDI+ Operations
- Advanced GDI+ Extensions
- Analysis of the Advanced GDI+ Extensions Requirements
- Design of the Advanced GDI+ Extensions
- Project Management Issues
- Using Pens and Brushes in GDI+
- Implementation of Regions, Pens, and Brushes
- Unit Tests
- Conclusion
Dynamic Loading of Components
- Dynamic Loading of Components
- Requirements for Image Postprocessing Components
- Analysis of the Image Postprocessing Requirements
- Design of the Image-Processing Components Using Late Binding
- Project Management Issues
- Implementing Dynamically Loadable Image Postprocessing Plugins
- Unit Tests
- Conclusion
- References for Further Reading
Accessing System Resources
- Accessing System Resources
- Refining Requirements for 3D Text Display
- Three-Dimensional Rendering Technologies
- Analyzing User Interface Needs
- Using OpenGL.NET
- Adding 3D Text to the Photo Editor Application
- Conclusion: Dont Reinvent the Wheel
- References for Further Reading
Performance Optimization, Multithreading, and Profiling
- Performance Optimization, Multithreading, and Profiling
- Requirements for Performance Optimization
- Analysis of the Editor Optimization Requirement
- Design of the Optimizations
- Project Management Issues
- Multithreading and Optimization Implementation
- Unit Tests
- Conclusion
- References for Further Reading
Building the Web Application with ASP.NET
- Building the Web Application with ASP.NET
- Online Store Requirements
- Analyzing Interfaces and Activities
- Breakdown of the Code Modules
- Implementation of Online Photo Shop
- Conclusion
Security and Database Access
- Security and Database Access
- Secure Checkout
- Integrating Externally Supplied Software
- E-mail, Password, Credit Card: Creating a Customer Profile
- Secure Web Applications
- Database Access with ADO.NET
- Putting It All Together
- No Longer under Construction
- References for Further Reading
Product Release
EAN: 2147483647
Pages: 123
