Integration Test
|
Creating and executing integration tests is the main focus during a project's transition phase. Whereas the unit test should cover the entire implemented functionality on the class level, we use integration tests to test the interactions between classes. Classes can be seen as the building blocks of an application. Now the application as a whole will be tested. |
13.2.1 Test Automation
Unit tests are performed throughout project development to ensure that code changes do not break already implemented functionality. In contrast, integration tests are usually executed during the transition phase only. The initial need for test automation is therefore not as urgent as it is for the unit tests. However, most software projects are intended to run over time, producing service packs, updates, and new versions with extended functionality. Therefore, it's a good idea to keep test automation in mind for the integration tests.
Automating integration tests is far more difficult than automating unit tests because all tests require some sort of user interaction. It would go beyond the scope of this book to try to implement automated integration tests. For more information, see the references section for links to available products that address test automation involving user interfaces.
13.2.2 Creating a Test Book
Tests that cannot be programmed because they require user interaction are usually defined in a document called a test book. To describe the test cases it's a good practice to use a tabular format. The header should contain a test identifier as well as the requirement keys that are being tested. The main table for each test consists of four columns:
- Step Number: A sequence number that helps the tester to execute the tests in the correct order. This number also helps us to identify the location where a problem has been found.
- Description: A detailed description of the current test step (for example, "Enter value 123 into field xxx").
- Expected: A detailed description of the expected test result or output. For an imaging application, this can be a reference image.
- Result: Column where the tester can check whether a test step has been executed successfully and has led to the expected result or output.
In Chapter 4 we discussed the advantages of a structured text document (XML, TeX) over a formatted document (Microsoft Word), and it was decided to capture the project's requirements in an XML document. To improve readability on screen and in the printed document, we developed a separate XSL formatting file. A similar argument can be made when you're creating test books. Here, too, a structured document allows for better tracing and automation.
Listing 13.1 shows the template that we use for the XML test book. One test book can describe multiple test fixtures, each consisting of multiple test cases that combine a number of test steps. Each test case must be identified by a unique name and can contain a summary field as well as several requirement keys. Test steps have only two fields: the test description and a field for the expected result.
Listing 13.1 TestBookTemplate.xml: Test Book Document Example
 Test case 1 summary
 Requirement key

 Description for first test step.
 Expected result after first test step.
If the template in Listing 13.1 looks confusing, you might wonder whether it wouldn't be much easier to create the test books using text processing software such as MS Word. Indeed, for very small projects this might be an easier solution, especially if the team has no expertise in XML and XSL. However, in past projects we have observed that many document review findings relate to formatting errors, and significant effort is spent on correcting them in every version. This effort should be minimized or even eliminated and instead be spent on improving test cases.
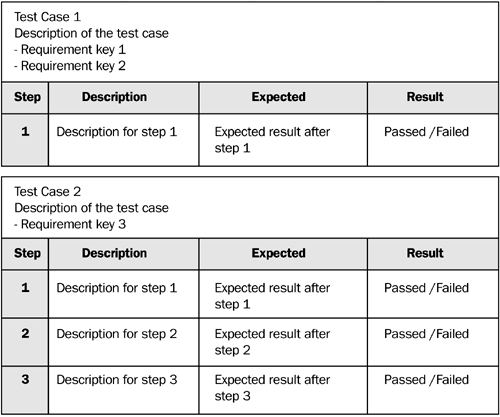
As we did for the requirement specification, we will develop a formatting file that is used for displaying the book on screen or printing it. As shown in Figure 13.4, it's good to use a spreadsheet-like layout. From our experience this layout is best suited for executing the tests.
Figure 13.4. Test Book Layout
Enforcing a simple step-by-step template on all test cases might seem a bit restrictive at first, but keep in mind that the tests are usually executed by people who have not been involved in the development of the software. Also, it is highly desirable to have the descriptions so clear and simple that there is no room for interpretation. Ideally, any person who does not have any background knowledge of the project should be able to execute the tests and evaluate the results. We therefore recommend keeping the test procedures as simple as possible.
Generating the XSL formatting file for the test books is similar to generating the requirement specification formatting file. However, it is not realistic to try to remove all formatting capabilities from the test books. Picture the description for filling in all inputs in a dialog without using any lists, line breaks, and so on. Also, the expected output column for the photo editor tests might contain images and screenshots. It is therefore necessary to allow users to use formatting styles such as bulleted lists or to add images to both the description and the expected field in the XML document. Those formatting instructions can be inserted as HTML tags and can be copied directly to the output while applying the XSL file using the command. Listing 13.2 shows the XSL formatting file for the test book template created earlier.
Listing 13.2 TestBook.xsl: Test Book Formatting File
|
|
||||||||
| Step | Description | Expected | Result | |||||
| Passed Failed | ||||||||
Instead of just putting a text line in each row of the Result column, we add HTML radio button controls. We implement functioning radio buttons by also setting the attributes for the name field based on the test case and the step number. This means that in each row the tester can switch the result between passed and failed before printing the test book. Of course this does not make very much sense, but this functionality is the foundation for recording and publishing the results of automated tests.
The test book can be made available via the project's intranet site, and the test results can be recorded and published as the tester executes them. This is of great use in large projects consisting of many components that may be developed at multiple sites. Because the requirements are included in the tests, the keys can be traced to the implementation and from there to the author of the code for immediate notification. As you can see, there are many possibilities for automation if structured text files are used for capturing requirements and tests and if XML headers are added to the code. However, for small projects like the photo editor and Online Photo Shop, the effort of implementing this kind of automation is not justified.
Now let's switch to the content of the test book. As defined by the go/no-go criteria for this phase, all requirement keys must be covered by an integration test. It is therefore a good idea to create a list of all requirement keys from the requirement specification document, grouping them into logical units. Theoretically it would be best to have a single test case for each requirement key. In this way, if one test case fails the functionality addressed by this particular requirement, the key can easily be localized. However, testing of most functionality requires a number of setup steps, and it makes sense to group certain requirements into one test case if they share common prerequisites. In this way, we reduce the execution time of the test book.
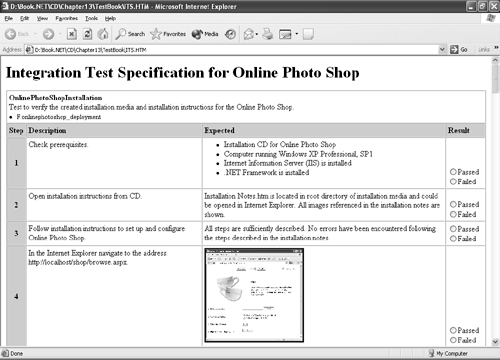
Figure 13.5 shows the description of the test cases for Online Photo Shop rendered in Internet Explorer. HTML formatting tags have been used to enhance the readability of the test steps and expected results. Also, reference images are linked within the document using hyperlink and image elements:
<a href="testimg/shoppingcart.bmp" target="_new"></a>
Figure 13.5. ITS.XML: Integration Test Specification for Online Photo Shop
Do It YourselfYou have been assigned the task of creating the integration test specification for the photo editor. Reference images can be used to define the expected output. |
Introducing .NET
- Introducing .NET
- The Need for .NET
- The .NET Framework
- The C# Language
- Debugging and the IDE
- References for Further Reading
Introducing Software Engineering
- Introducing Software Engineering
- Introducing Software Engineering Practices
- Choosing a Software Development Model
- Commonly Used Software Development Models
- Conclusion
- References for Further Reading
A .NET Prototype
- Getting Started
- Evaluating .NET for Windows Client Applications
- Our First .NET Application
- Prototyping
- Implementing the SmartNotes Application
- Visual Studio.NET: Platform of Choice
- References for Further Reading
Project Planning
- Project Planning
- The Project Vision and Business Case
- The Initial Use Case Model
- Project Requirements
- Initial Project Planning
- Initial Risk Analysis
- Initial Requirements Analysis and Design
- Conclusion
- References for Further Reading
The Photo Editor Application
- The Photo Editor Application
- The Refined Project Vision and Business Case
- Refined Requirements for Online Photo Shop
- Analysis of the Photo Editor Requirements
- Design of the Photo Editor Application
- The Detailed Project Schedule
- Implementation of the Photo Editor Application
- Unit Tests
- Conclusion
- References for Further Reading
GDI+ Graphics Extensions
- GDI+ Graphics Extensions
- Requirements for the GDI+ Extensions
- Analysis of the GDI+ Extensions Requirements
- Design of the GDI+ Extensions
- Project Management Issues
- GDI+ Programming
- Drawing GDI+ Primitives
- Unit Tests
- Conclusion
- References for Further Reading
Advanced GDI+ Operations
- Advanced GDI+ Operations
- Advanced GDI+ Extensions
- Analysis of the Advanced GDI+ Extensions Requirements
- Design of the Advanced GDI+ Extensions
- Project Management Issues
- Using Pens and Brushes in GDI+
- Implementation of Regions, Pens, and Brushes
- Unit Tests
- Conclusion
Dynamic Loading of Components
- Dynamic Loading of Components
- Requirements for Image Postprocessing Components
- Analysis of the Image Postprocessing Requirements
- Design of the Image-Processing Components Using Late Binding
- Project Management Issues
- Implementing Dynamically Loadable Image Postprocessing Plugins
- Unit Tests
- Conclusion
- References for Further Reading
Accessing System Resources
- Accessing System Resources
- Refining Requirements for 3D Text Display
- Three-Dimensional Rendering Technologies
- Analyzing User Interface Needs
- Using OpenGL.NET
- Adding 3D Text to the Photo Editor Application
- Conclusion: Dont Reinvent the Wheel
- References for Further Reading
Performance Optimization, Multithreading, and Profiling
- Performance Optimization, Multithreading, and Profiling
- Requirements for Performance Optimization
- Analysis of the Editor Optimization Requirement
- Design of the Optimizations
- Project Management Issues
- Multithreading and Optimization Implementation
- Unit Tests
- Conclusion
- References for Further Reading
Building the Web Application with ASP.NET
- Building the Web Application with ASP.NET
- Online Store Requirements
- Analyzing Interfaces and Activities
- Breakdown of the Code Modules
- Implementation of Online Photo Shop
- Conclusion
Security and Database Access
- Security and Database Access
- Secure Checkout
- Integrating Externally Supplied Software
- E-mail, Password, Credit Card: Creating a Customer Profile
- Secure Web Applications
- Database Access with ADO.NET
- Putting It All Together
- No Longer under Construction
- References for Further Reading
Product Release
EAN: 2147483647
Pages: 123
